1. 서론
This manual provides essential information for the safe and efficient operation of your Intermec PD42 Series Commercial Printer. The PD42 is a dependable and versatile direct thermal printer designed for medium-duty applications in manufacturing, transportation, and warehousing environments. It features a robust all-metal chassis, proven printing mechanics, and powerful electronics to ensure reliable performance. The integrated monochrome graphical display allows for direct setup and configuration, enhancing user control and reducing reliance on host commands.
2. 안전 정보
Please read and understand all safety instructions before operating the printer. Failure to follow these instructions may result in injury or damage to the equipment.
- 프린터는 항상 접지된 전원 콘센트에 연결하세요.
- Do not operate the printer with a damaged power cord or plug.
- Avoid placing the printer in areas with excessive dust, humidity, or extreme temperatures.
- 프린터를 직접 수리하려고 하지 마십시오. 모든 수리는 자격을 갖춘 전문가에게 맡기십시오.
- 작동 중에는 움직이는 부분에 손이나 헐렁한 옷을 가까이 두지 마십시오.
3. 패키지 내용
패키지에 모든 구성품이 들어 있는지 확인하십시오. 누락되거나 손상된 구성품이 있는 경우 즉시 공급업체에 연락하십시오.
- Intermec PD42 Series Commercial Printer
- Power Cord (Euro and US compatible)
- 빠른 시작 가이드(포함된 경우)
- Documentation CD (if included)
4. 신체적 이상view
Familiarize yourself with the external components and connection ports of the Intermec PD42 printer.

그림 4.1: 앞면과 측면 View of the Intermec PD42 Printer. This image displays the printer's front panel with its graphical display and control buttons, along with a label partially ejected from the print mechanism. The robust casing and compact design are visible.
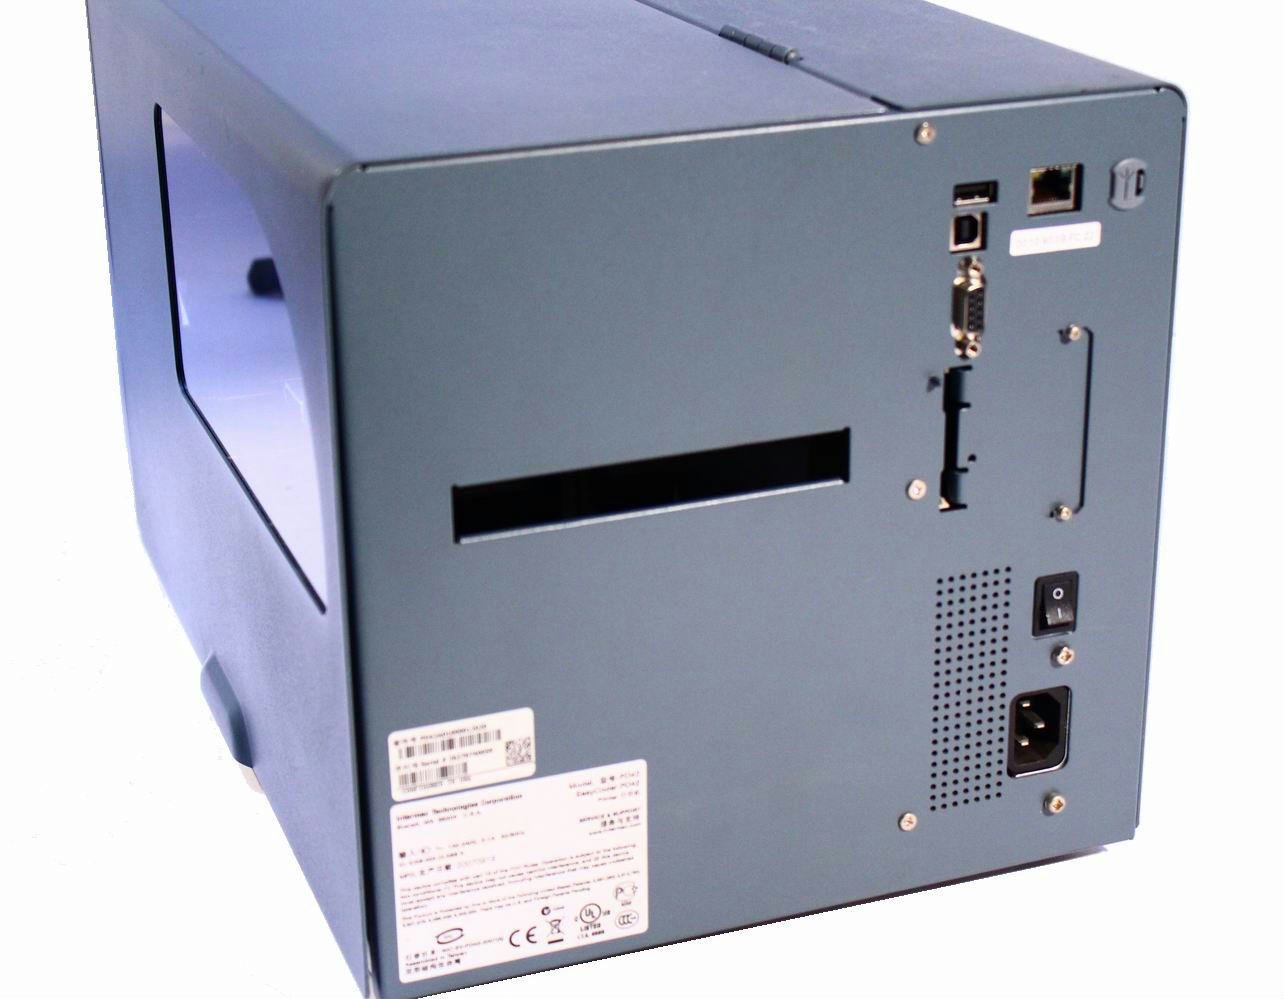
그림 4.2: 후면 View of the Intermec PD42 Printer. This image highlights the various connectivity options available on the back of the printer, including USB, Serial, and Ethernet ports. The power input and main power switch are also visible.

그림 4.3: 내부 View of the Intermec PD42 Printer. With the top cover open, this image reveals the internal mechanisms for loading labels and ribbon. Key components such as the printhead assembly, media guides, and ribbon spindles are visible, illustrating the media path.
5. 설정
5.1 포장 풀기 및 배치
- 프린터의 포장을 조심스럽게 꺼냅니다.
- 프린터를 통풍이 잘 되는 안정적이고 평평한 표면에 놓으세요.
- Ensure sufficient space around the printer for media loading and maintenance.
5.2 전원 연결
- Connect the power cord to the power input on the rear of the printer (refer to Figure 4.2).
- 전원 코드의 다른 쪽 끝을 접지된 전기 콘센트에 꽂습니다.
5.3 데이터 케이블 연결
The PD42 offers multiple connectivity options:
- USB: Connect a USB cable from the printer's USB port to your computer.
- 연속물: Connect a serial cable from the printer's serial port to your computer or host system.
- 이더넷: Connect an Ethernet cable from the printer's Ethernet port to your network.
5.4 미디어 장착 (라벨 및 리본)
The PD42 supports industry-standard 200-mm (8-inch) label rolls and 450-m (18,000-inch) ribbon rolls.
- Open the printer's top cover (refer to Figure 4.3).
- Follow the internal diagrams or specific instructions for your media type to correctly load the label roll onto the media spindle.
- Thread the labels through the media guides and under the printhead assembly.
- If using thermal transfer printing, load the ribbon onto the ribbon supply spindle and thread it according to the internal guides.
- 상단 덮개를 단단히 닫습니다.
6. 사용 설명서
6.1 전원 켜기/끄기
- 전원을 켜려면: Flip the main power switch on the rear of the printer to the 'On' position. The graphical display will illuminate.
- 전원을 끄려면: Flip the main power switch to the 'Off' position.
6.2 Using the Graphical Display
The monochrome graphical display and control buttons on the front panel allow you to configure printer settings directly. Navigate through menus using the arrow buttons and confirm selections with the 'Enter' button. Refer to the on-screen prompts for specific options.
6.3 드라이버 및 소프트웨어 설치
Before printing from a computer, install the appropriate printer drivers. These are typically available on the manufacturer's website or an included CD. Follow the on-screen instructions during installation.
6.4 Printing a Test Label
After setup, it is recommended to print a test label to verify proper operation and media loading. This option is usually available through the printer's front panel menu or via the printer driver software.
7. 유지관리
정기적인 유지보수는 최적의 성능을 보장하고 프린터의 수명을 연장시켜 줍니다.
7.1 프린트 헤드 청소
The printhead should be cleaned regularly, especially if print quality degrades. Use a lint-free cloth or a printhead cleaning pen with isopropyl alcohol. Ensure the printer is powered off and cooled down before cleaning.
7.2 Cleaning Rollers and Media Path
Dust and adhesive residue can accumulate on rollers and within the media path. Use a lint-free cloth dampened with isopropyl alcohol to clean these components. Always power off the printer before cleaning.
7.3 Replacing Media
When the label roll or ribbon runs out, follow the steps in Section 5.4 to load new media.
8. 문제 해결
이 섹션에서는 PD42 프린터 사용 중 발생할 수 있는 일반적인 문제에 대해 설명합니다.
- 프린터 전원이 켜지지 않음: Check power cord connections and ensure the power outlet is functional.
- 출력 없음: Verify that the printer is online, connected correctly to the host, and that media is loaded properly. Check for error messages on the graphical display.
- 인쇄 품질 불량: Clean the printhead. Ensure the correct media and ribbon (if applicable) are used and properly loaded. Adjust print darkness settings via the display or driver.
- 연결 문제: Check all cable connections. Verify network settings for Ethernet connections. Reinstall printer drivers if necessary.
- 표시되는 오류 메시지: Consult the printer's graphical display for specific error codes or messages, then refer to the full product documentation or manufacturer's support web자세한 솔루션은 사이트에서 확인하세요.
9. 사양
| 특징 | 사양 |
|---|---|
| 모델명 | PD42BJ1000002021 |
| 인쇄 기술 | 직접 열 |
| 프린터 출력 | 단색화 |
| 해결 | 203dpi |
| 인쇄 속도 | 최대 150mm/s(6ips) |
| 연결 기술 | USB, 직렬, 이더넷 |
| 특징 | Graphical Display, Ethernet |
| 품목 무게 | 28.7 파운드 |
| 제품 치수 | 25 x 15 x 15 인치 |
| 컨트롤러 유형 | 푸시 버튼 |
| 인쇄 매체 | 라벨 |
10. 보증 및 지원
For warranty information and technical support, please refer to the documentation provided with your printer or visit the official Intermec (now Honeywell) web사이트. 보증 청구를 위해 구매 증빙 자료로 구매 영수증을 보관하세요.
온라인 리소스: For the latest drivers, firmware updates, and detailed troubleshooting guides, visit the manufacturer's support portal.


