1. 서론
The SPL 2Control is a compact and user-friendly stereo monitor controller designed to provide comprehensive control over your digital audio workstation's (DAW) monitoring functions. It ensures high-quality audio reproduction through both studio monitors and headphones, allowing you to hear every detail of your mix. Key features include a precise speaker volume potentiometer, active circuitry for sound integrity, and a unique Crossfeed control for accurate headphone monitoring that simulates a stereo speaker image.
2. 안전 지침
- 기기를 작동하기 전에 이 지침을 꼼꼼히 읽으십시오.
- 이 설명서를 향후 참고용으로 보관하세요.
- 화재나 감전을 방지하기 위해 장치를 비나 습기에 노출시키지 마십시오.
- 적절한 환기를 확보하세요. 환기구를 막지 마세요.
- 제조사가 지정한 부속품/액세서리만 사용하세요.
- 번개가 칠 때나 장기간 사용하지 않을 때는 전원 코드를 뽑아 두세요.
- 모든 서비스는 자격을 갖춘 서비스 담당자에게 의뢰하세요.
- 라디에이터, 난방 장치, 스토브 또는 기타 장치(예: 열원) 근처에 장치를 두지 마십시오. amp열을 생성하는 발전기.
3. 패키지 내용
포장을 풀 때 다음 품목이 포함되어 있는지 확인하세요.
- 1 x SPL 2Control Module
- 1 X 전원 코드
- 이 사용 설명서
4. 제품 오버view
4.1 전면 패널 컨트롤 및 표시기
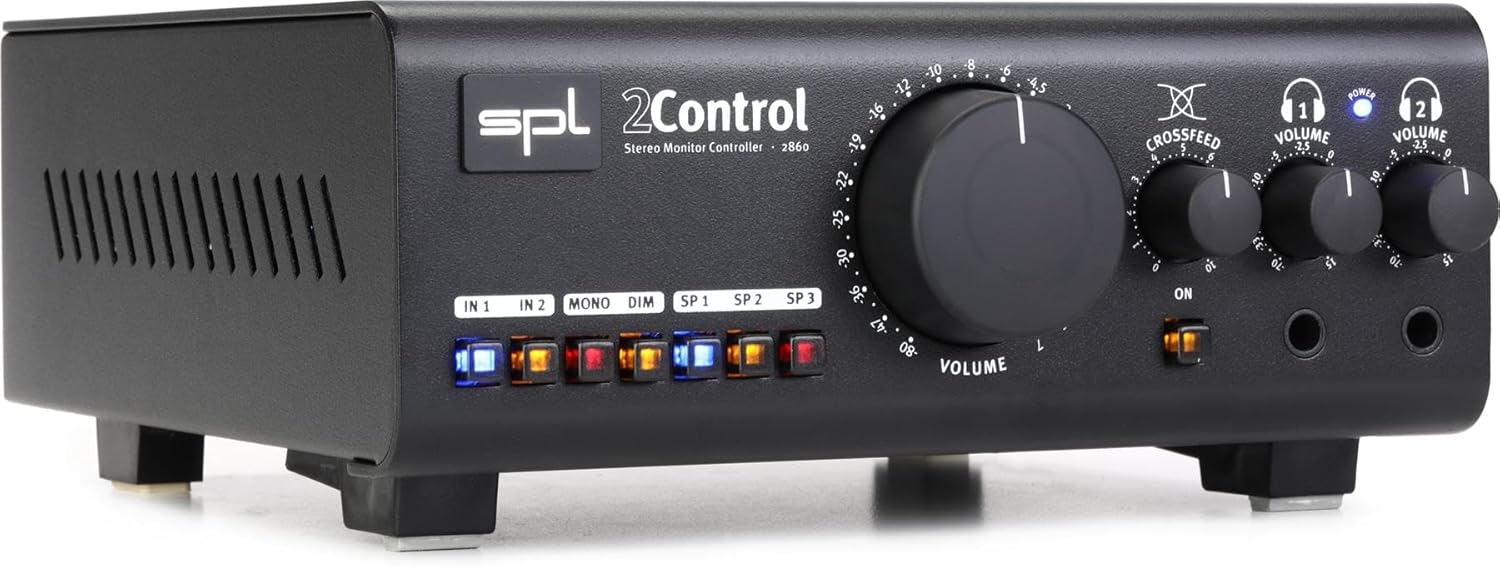
그림 1: Front Panel of the SPL 2Control Stereo Monitor Controller.
This image displays the front panel of the SPL 2Control. From left to right, it features input selection buttons (IN 1, IN 2), function buttons (MONO, DIM), speaker output selection buttons (SP 1, SP 2, SP 3), a large central master VOLUME knob, a CROSSFEED knob, and two individual headphone VOLUME knobs with corresponding headphone output jacks. A power indicator LED is visible above the headphone controls.
- IN 1 / IN 2 Buttons: Selects the active stereo input source.
- 모노 버튼: Sums the stereo signal to mono for compatibility checking.
- 희미한 버튼: Reduces the output volume by a fixed amount (e.g., -20dB) for temporary level reduction.
- SP 1 / SP 2 / SP 3 Buttons: Selects the active stereo speaker output pair.
- 볼륨 노브: Master volume control for selected speaker outputs.
- CROSSFEED Knob: Adjusts the stereo panorama for headphone monitoring to simulate a speaker listening environment.
- HEADPHONE VOLUME 1 / 2 Knobs: Independent volume controls for the two headphone outputs.
- HEADPHONE 1 / 2 Jacks: 1/4-inch stereo headphone outputs.
- 전원 LED : 기기의 전원이 켜져 있음을 나타냅니다.
4.2 Rear Panel Connections (Inferred)
The rear panel typically houses the audio input and output connections, as well as the power input. Based on common audio equipment and product specifications, you can expect:
- 아날로그 입력 : Balanced XLR or TRS inputs for connecting your audio interface or mixer.
- 스피커 출력: Multiple sets of balanced XLR or TRS outputs for connecting up to three pairs of studio monitors.
- 전원 입력: Connector for the included power cord.
5. 설정
- 놓기: Position the SPL 2Control on a stable, flat surface, ensuring adequate ventilation around the unit.
- 전원 연결: Connect the provided power cord to the power input on the rear panel of the 2Control and then to a suitable AC power outlet.
- 입력 연결: Connect the stereo outputs of your audio interface, mixer, or other audio source to the IN 1 and/or IN 2 inputs on the rear panel using balanced XLR or TRS cables.
- 스피커 연결: Connect your studio monitors to the SP 1, SP 2, and/or SP 3 outputs on the rear panel using balanced XLR or TRS cables. Ensure correct left and right channel connections.
- 헤드폰 연결: Plug your headphones into the HEADPHONE 1 and/or HEADPHONE 2 jacks on the front panel.
- 초기 전원 켜기: Ensure all volume controls are set to their minimum positions before powering on the unit. Then, connect the power cord to the wall outlet. The POWER LED on the front panel will illuminate.
6. 사용 설명서
- 입력 선택: 다음 중 하나를 누르세요: IN 1 or IN 2 button to select your desired audio source. The active button will illuminate.
- Selecting Speaker Outputs: 를 누르세요 SP 1, SP 2, 또는 SP 3 button to route the audio to the corresponding pair of studio monitors. Only one speaker output can be active at a time.
- 전체 볼륨 조절하기: Slowly turn the large 용량 knob clockwise to increase the listening level for the selected speaker outputs. Turn counter-clockwise to decrease.
- Mono Summing: 를 누르세요 단핵증 button to sum the stereo signal to mono. This is useful for checking phase compatibility and mix balance. Press again to return to stereo.
- Dim 함수: 를 누르세요 어둑한 button to temporarily reduce the output volume. This is useful for quick conversations or when you need to lower the volume without losing your main volume setting. Press again to restore the original volume.
- 헤드폰 모니터링:
- Plug your headphones into the desired headphone jack (HEADPHONE 1 or 2).
- 개인을 조정하세요 HEADPHONE VOLUME 1 or 2 knob to set the listening level for your headphones.
- 사용하세요 크로스피드 knob to adjust the stereo image for headphone listening. Turning it clockwise increases the crossfeed, simulating a more natural speaker-like stereo field by blending the left and right channels slightly.
7. 유지관리
- 청소: 부드럽고 마른 천을 사용하여 기기 외부를 닦으세요. 액체 세척제나 용제는 사용하지 마세요.
- 통풍: Ensure that the ventilation slots are kept clear of dust and debris to prevent overheating.
- 저장: 장기간 보관할 경우 전원을 끄고 서늘하고 건조한 곳에 보관하세요.
8. 문제 해결
| 문제 | 가능한 원인 | 해결책 |
|---|---|---|
| 스피커에서 소리가 나지 않습니다. |
|
|
| 헤드폰에서 소리가 나지 않습니다. |
|
|
| 왜곡된 오디오. |
|
|
9. 사양
| 특징 | 세부 사항 |
|---|---|
| 모델명 | 2 Control (also known as 2860) |
| 상표 | 영어: |
| 스피커 유형 | 감시 장치 |
| 추천 용도 | Control, Volume for Monitors |
| 호환 장치 | Monitors, Speakers |
| 서라운드 사운드 채널 구성 | 2.0 |
| 색상 | 검은색 |
| 포함된 구성 요소 | 1 x SPL Control Module |
| 제품 크기(D x W x H) | 8.66인치 x 8.46인치 x 3.15인치 |
| 품목 무게 | 7.06파운드(약 3.2kg) |
| 전원 | 코드식 전기 |
| 연결 기술 | TRS, XLR |
| 오디오 출력 모드 | 스테레오 재생 |
| 장착 유형 | 탁상 마운트 |
| 제조업체 | Sound Performance Lab |
10. 보증 및 지원
The SPL 2Control Monitor Controller comes with a limited warranty. For specific warranty terms, duration, and conditions, please refer to the documentation provided with your purchase or visit the official SPL website. For technical support, service, or inquiries, please contact the manufacturer, Sound Performance Lab, or your authorized dealer.
제조업체: Sound Performance Lab


