
1. 서론
Thank you for choosing the FORGING MOUNT Single Monitor Arm. This manual provides detailed instructions for the safe and efficient installation, operation, and maintenance of your monitor arm. Please read this manual thoroughly before installation and keep it for future reference.
2. 안전 정보
Always follow basic safety precautions when installing and using this product to reduce the risk of injury or damage. Ensure your desk surface is strong enough to support the combined weight of the monitor arm and your monitor. Do not exceed the maximum weight capacity.
- 조립하기 전에 모든 구성 요소가 있고 손상되지 않았는지 확인하세요.
- 나사를 너무 세게 조이지 마세요. 손상될 수 있습니다.
- 설치하는 동안 어린이와 애완동물이 접근하지 못하도록 하세요.
- If you have any doubts about installation, consult a qualified professional.
3. 패키지 내용
아래 나열된 모든 부품이 패키지에 포함되어 있는지 확인하세요. 부품이 누락되었거나 손상된 경우 고객 지원팀에 문의하세요.

그림 3.1: 패키지에 포함된 모든 구성품.
- 상완부(x1)
- 하완부(x1)
- 베이스 (x1)
- VESA 플레이트 (x1)
- C-Clamp (x1)
- Soft Pads (x3)
- Various Screws (D6, M6x12, M5x30, M5x12, M4x30, M4x12, D5, M6x10)
- Allen Wrenches (4/5 wrench) (x1)
4. 사양
| 특징 | 사양 |
|---|---|
| 모델 번호 | FM4578 |
| 화면 크기 호환성 | 13-32 인치 |
| 중량 용량 | 1-10kg(2.2-22파운드) |
| VESA 호환성 | 75x75mm, 100x100mm |
| 장착 유형 | Tabletop (C-Clamp 또는 그로밋) |
| 기울기 각도 | 위로 90도, 아래로 45도 |
| 회전 각도 | 180° |
| 회전 각도 | 360° |
| 재료 | 강철 |
| 최대 확장 | 57.1cm |
| 최대 높이 | 44.5cm |

Figure 4.1: Monitor size and weight compatibility.
5. 설정 및 설치
모니터 암은 C-cl 두 가지 설치 방식을 제공합니다.amp and Grommet mount. Choose the method suitable for your desk.
5.1. 설치 방법을 선택하세요
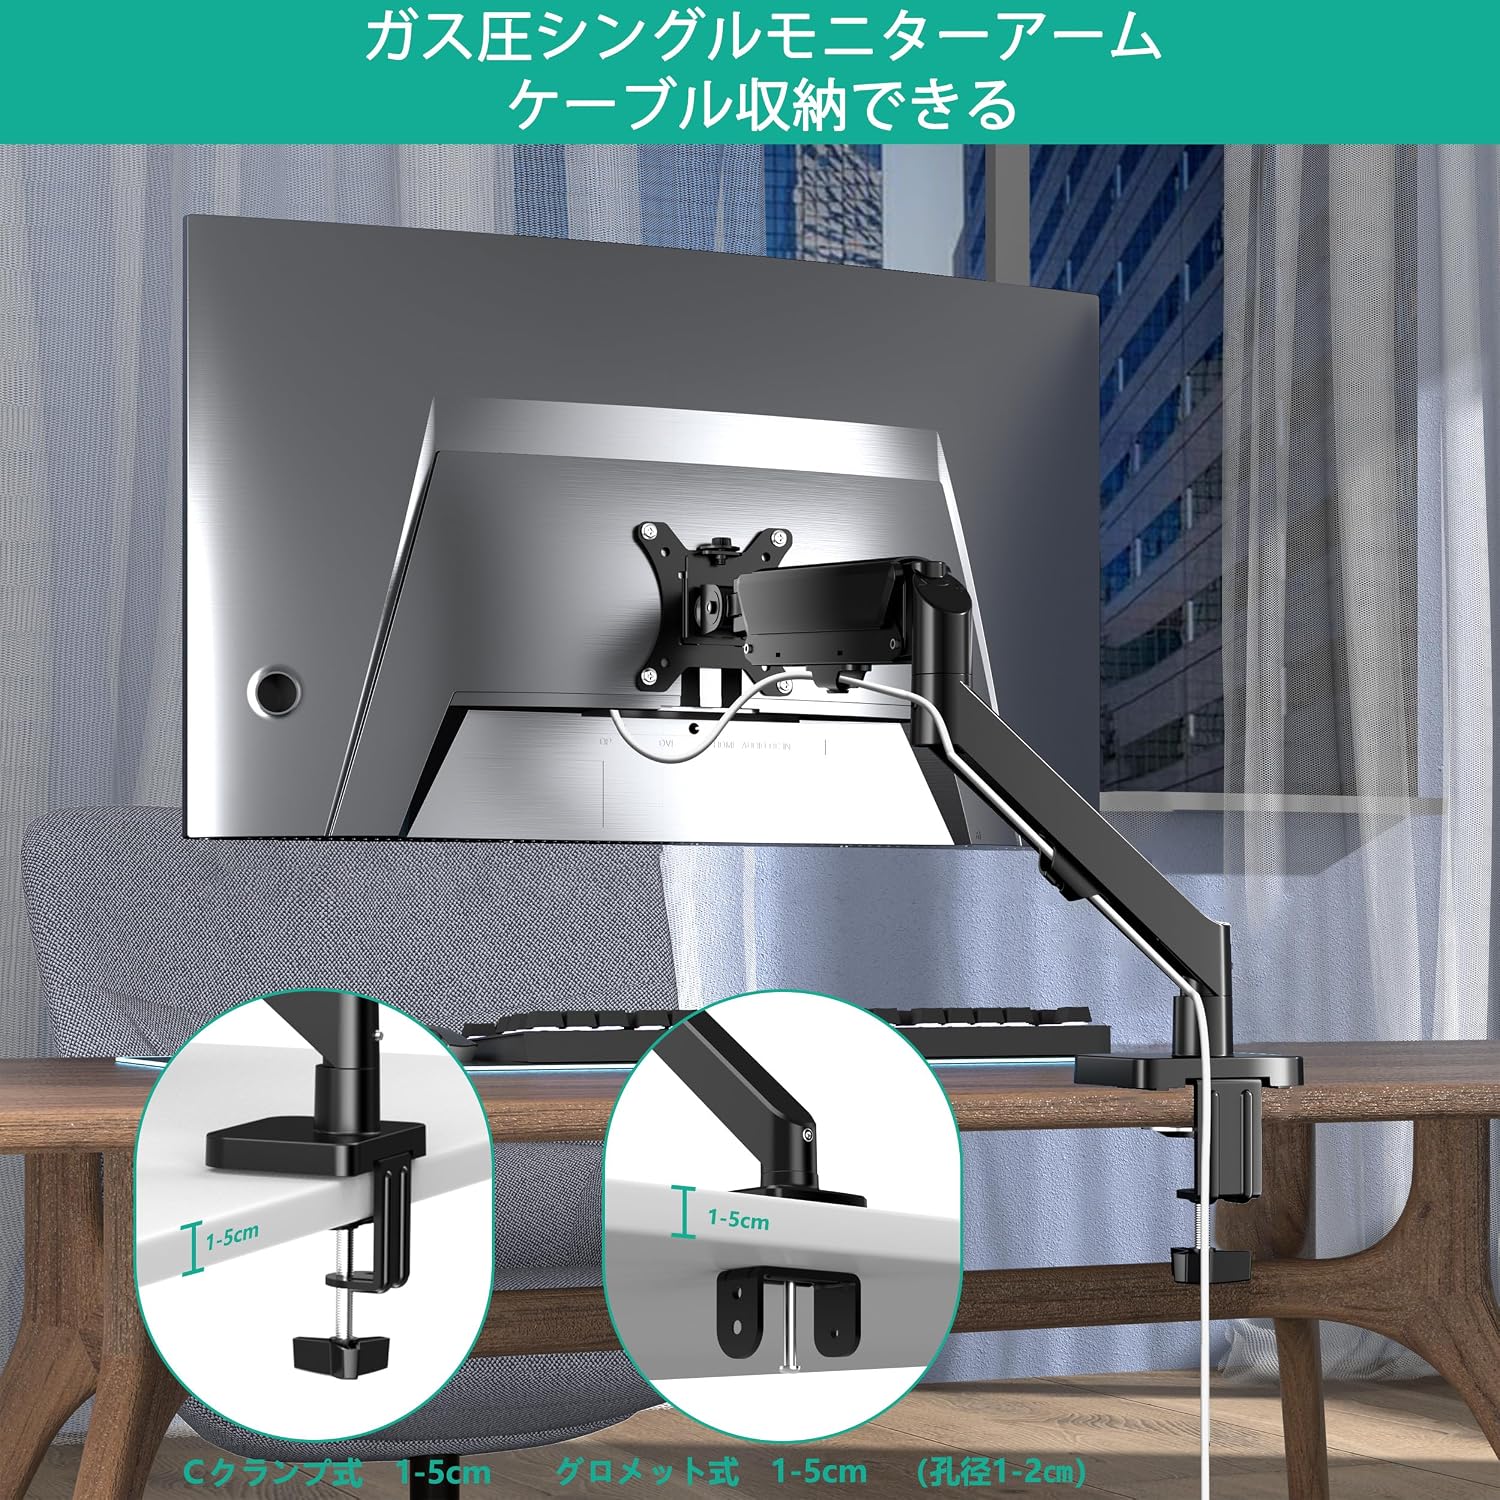
그림 5.1: C-Clamp 및 그로밋 장착 옵션.
5.2. C-Clamp 설치
- C-cl을 부착하세요amp to the base of the monitor arm.
- C-cl을 위치시키세요amp on the edge of your desk. Ensure the desk thickness is between 1-5 cm.
- cl을 조여주세요amp screw until the base is securely fastened to the desk. Do not overtighten.
5.3. 그로밋 설치
- If your desk has a grommet hole (1-2 cm diameter), insert the grommet base through the hole. Ensure the desk thickness is between 1-5 cm.
- Secure the base from underneath the desk using the provided plate and nut.
5.4. 모니터 연결
- Attach the VESA plate to the back of your monitor using the appropriate screws (M4x12, M5x12, M6x12, M6x10). Ensure the screws are tightened securely.
- Slide the VESA plate with the attached monitor onto the arm's mounting head.
- Secure the monitor to the arm by tightening the safety screw on the VESA plate.

Figure 5.2: Attaching the VESA plate and monitor.
6. 작동 지침 및 조정
The gas spring system allows for smooth and effortless adjustments to your monitor's position.
6.1. 가스 스프링 장력 조절
The gas spring tension needs to be adjusted according to your monitor's weight for optimal performance.
- Ensure the monitor is attached to the arm.
- Position the arm horizontally.
- Use the provided Allen key to adjust the gas pressure screw located on the arm.
- Turn clockwise (-) to decrease tension for lighter monitors.
- Turn counter-clockwise (+) to increase tension for heavier monitors.
- Adjust until the monitor stays in place when moved and can be repositioned with minimal effort.

그림 6.1: 가스 스프링 장력 조절.
6.2. Monitor Position Adjustment
The arm allows for extensive movement to achieve your desired viewing angle and distance.
- 높이 조정: 모니터를 위아래로 살살 밀거나 당겨주세요.
- 경사: Adjust the monitor screen vertically from 90° upwards to 45° downwards.
- 받침: Rotate the monitor horizontally up to 180°.
- 회전: 모니터를 360° 회전하여 가로 또는 세로 방향으로 사용할 수 있습니다.
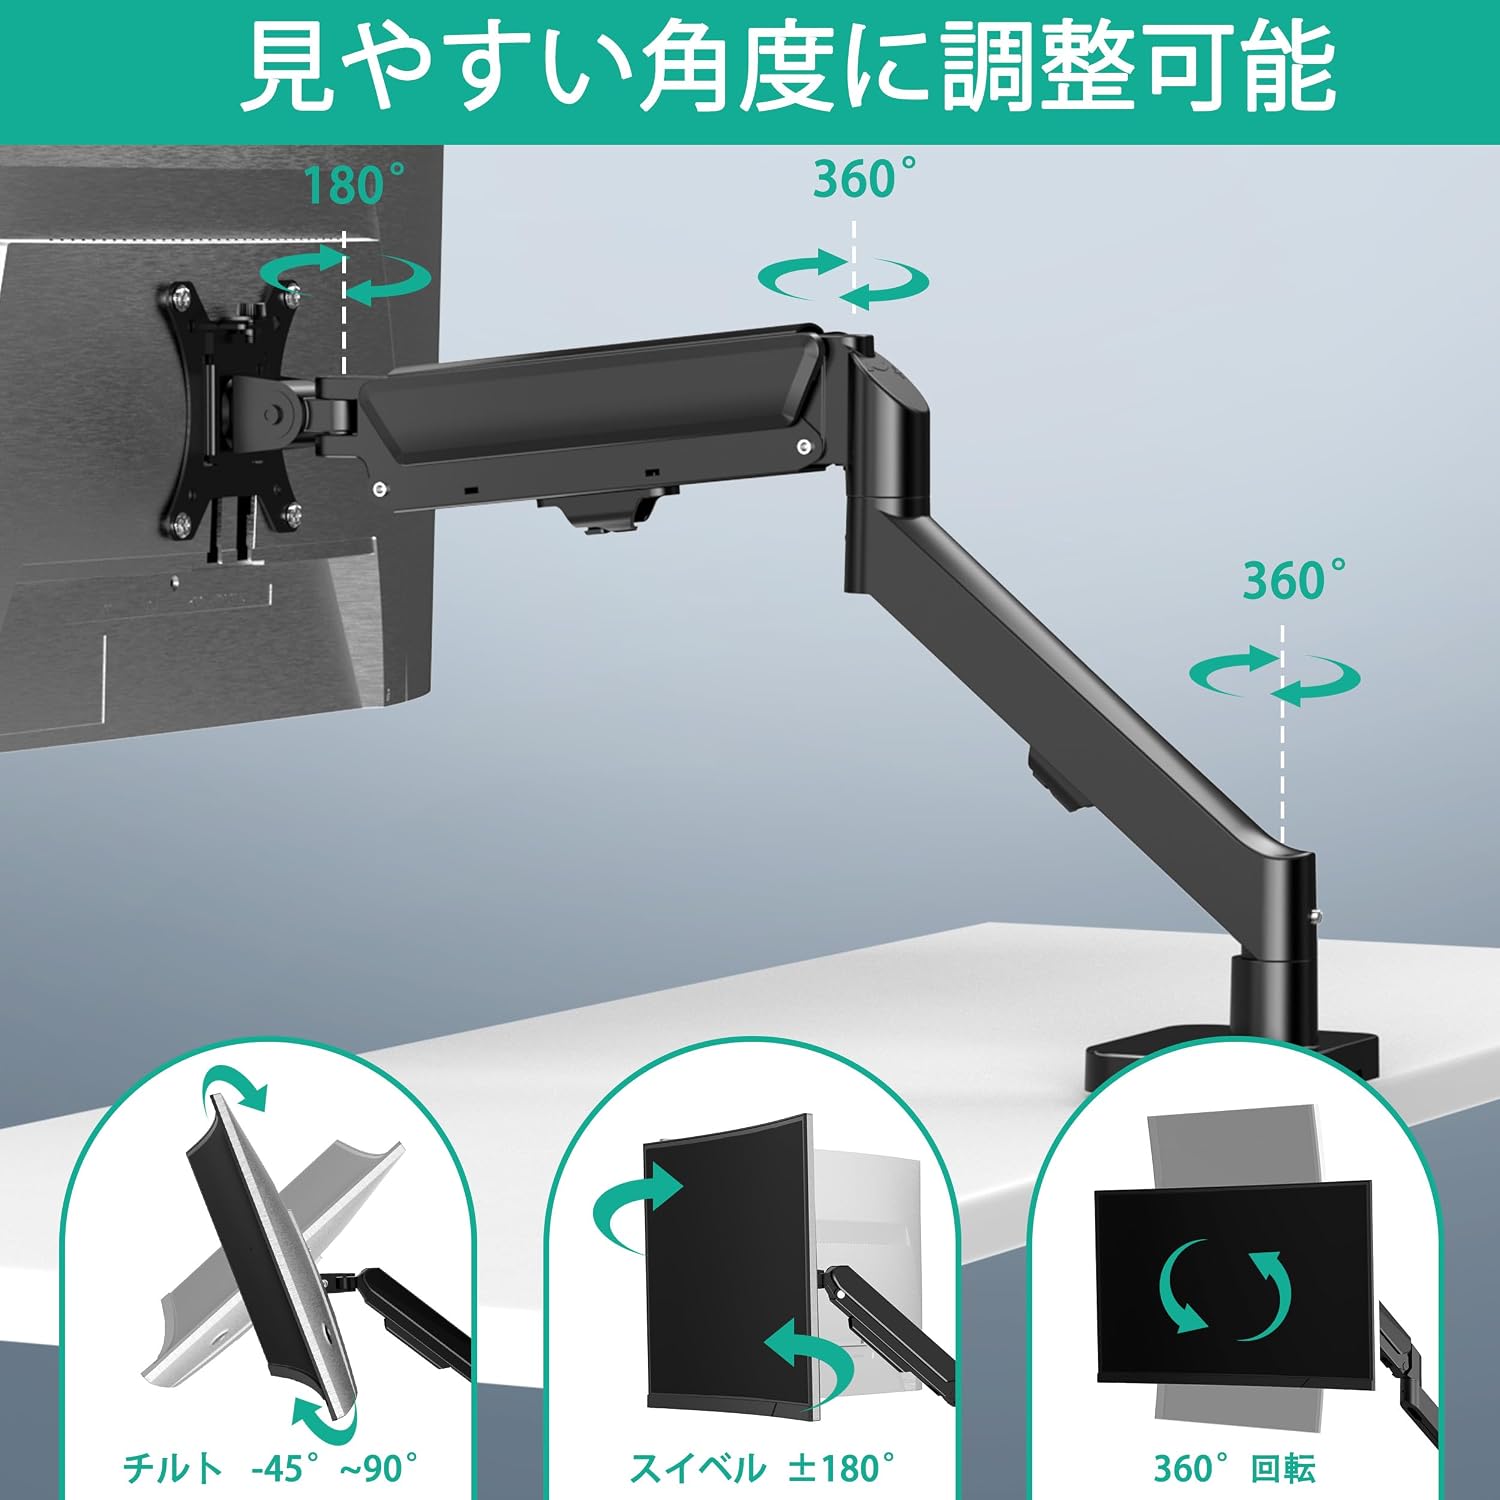
그림 6.2: 다각도 조절 기능.

Figure 6.3: Maximum height and extension range.
7. 케이블 관리
The monitor arm features integrated cable management to keep your workspace tidy.
- Route your monitor cables (power, HDMI, etc.) along the underside of the arm.
- Use the integrated cable clips or covers to secure the cables within the arm structure.
- 케이블에 충분한 여유를 두어 장력 없이 완전한 동작 범위를 확보하십시오.

그림 7.1: 케이블 정리 시스템.
8. 유지관리
Regular maintenance ensures the longevity and smooth operation of your monitor arm.
- 모든 나사와 연결부가 안전한지 주기적으로 점검하세요.
- Clean the arm with a soft, damp 옷감. 연마성 세제를 피하십시오.
- Do not lubricate the gas spring mechanism unless specifically instructed by the manufacturer.
9. 문제 해결
If you encounter issues with your monitor arm, refer to the following common problems and solutions:
| 문제 | 가능한 원인 | 해결책 |
|---|---|---|
| 모니터가 처지거나 제자리에 고정되지 않습니다. | 가스 스프링 장력이 모니터 무게에 비해 너무 낮습니다. | Increase gas spring tension using the Allen key (turn counter-clockwise). |
| 모니터가 떠오르거나 누르기가 어렵습니다. | 가스 스프링 장력이 모니터 무게에 비해 너무 높습니다. | Decrease gas spring tension using the Allen key (turn clockwise). |
| Arm feels unstable or wobbly. | 데스크 CLamp/grommet mount is not tight enough. | C-cl을 확인하십시오amp or grommet mount is securely tightened to the desk. Check all arm connections. |
| Monitor cannot be tilted or rotated. | Adjustment screws are too tight. | Loosen the tilt or rotation adjustment screws slightly. |
10. 보증 및 지원
This FORGING MOUNT monitor arm comes with a 1년 제조사 보증 구매일로부터. 이 보증은 정상적인 사용 하에서 재료 및 제조상의 결함을 포함합니다.
보증은 다음 사항을 포함하지 않습니다:
- 부적절한 설치 또는 사용으로 인한 손상.
- Damage caused by exceeding the weight capacity.
- 정상적인 마모 및 파손.
- 무단 개조 또는 수리.
For warranty claims or technical support, please contact FORGING MOUNT customer service through your retailer or the official website. Please have your purchase receipt and model number (FM4578) ready.


