1. 서론
The YINMIK YK-5 is a versatile 5-in-1 digital water quality tester designed for accurate measurement of pH, Total Dissolved Solids (TDS), Electrical Conductivity (EC), Salinity, and Temperature. This multi-parameter meter is suitable for a wide range of applications including pools, spas, aquariums, hydroponics, saltwater systems, drinking water, hot tubs, home brewing, and fish tanks.
This manual provides detailed instructions for the proper setup, operation, calibration, and maintenance of your YINMIK YK-5 tester to ensure optimal performance and longevity.
2. 안전 정보
- 기기를 어린이의 손이 닿지 않는 곳에 보관하세요.
- 장치를 분해하거나 개조하지 마세요.
- 장치를 극한의 온도나 직사광선에 장기간 노출시키지 마십시오.
- Ensure the battery compartment is sealed properly to prevent water ingress.
- Handle calibration solutions with care and follow their specific safety instructions.
- Always rinse the electrode with distilled or deionized water before and after each use.
3. 제품 오버view
The YINMIK YK-5 tester features a clear digital display and intuitive button controls for easy operation. It is designed for handheld use and includes a protective cap for the electrode.

Figure 1: YINMIK YK-5 tester shown with included pH and conductivity calibration solutions.
3.1. 구성 요소
- 전극: Sensor for measuring water parameters.
- LCD 디스플레이: Shows measurement readings and units.
- 켜기/끄기 버튼: 장치의 전원을 켜거나 끕니다.
- 홀드/온도 버튼: Freezes the current reading or switches between Celsius and Fahrenheit.
- 모드/캘리브레이션 버튼: Switches between measurement modes (pH, EC, TDS, Salinity) and initiates calibration.
- 배터리 칸: Located at the top, for battery installation.
- 보호 캡: 사용하지 않을 때는 전극을 덮어줍니다.
4. 설정
4.1. 배터리 설치
- 계량기 상단에 있는 배터리함 덮개를 돌려서 엽니다.
- Insert the required batteries (typically button cells, refer to packaging for type) according to the polarity markings.
- Securely screw the battery compartment cap back on to ensure a watertight seal.
4.2. 초기 준비
- 전극에서 보호 캡을 제거합니다.
- 증류수 또는 탈 이온수로 전극을 헹굽니다.
- Gently blot dry with a clean tissue. Do not rub.

Figure 2: YINMIK YK-5 tester with its protective cap removed, showing the electrode.
5. 교정
Calibration is essential for accurate readings. It is recommended to calibrate the meter at least once a month, or more frequently depending on usage and measurement accuracy requirements.

Figure 3: pH 4.00, pH 7.00, and 12.88 mS/cm conductivity calibration solutions are included for precise calibration.
5.1. pH 교정
- 미터를 켜려면 버튼을 누르십시오. 켜짐/꺼짐 단추.
- 를 누르세요 모드/CAL button repeatedly until the meter is in pH measurement mode.
- Prepare pH 7.00 and pH 4.00 (or pH 10.01 if needed) calibration solutions.
- Rinse the electrode with distilled water and immerse it into the pH 7.00 calibration solution. Stir gently and wait for the reading to stabilize.
- 를 누르고 계세요 모드/CAL button for approximately 3 seconds until "CAL" appears on the display. The meter will automatically recognize the solution and calibrate. Once calibrated, the display will show "END" and return to measurement mode.
- 증류수로 전극을 헹굽니다.
- Immerse the electrode into the pH 4.00 calibration solution. Stir gently and wait for the reading to stabilize.
- 를 누르고 계세요 모드/CAL button for approximately 3 seconds. The meter will automatically calibrate. Once calibrated, the display will show "END" and return to measurement mode.
- Repeat for pH 10.01 solution if necessary.
- Rinse the electrode with distilled water after calibration.

Figure 4: Calibration ensures accurate and consistent results for all parameters. Always calibrate pH 7.00 first.
5.2. EC/TDS/Salinity Calibration
- 미터를 켭니다.
- 를 누르세요 모드/CAL button repeatedly to switch to EC, TDS, or Salinity mode. Calibration for one of these modes will automatically calibrate the others.
- Prepare the 12.88 mS/cm (12880 µS/cm) conductivity calibration solution.
- Rinse the electrode with distilled water and immerse it into the 12.88 mS/cm calibration solution. Stir gently and wait for the reading to stabilize.
- 를 누르고 계세요 모드/CAL button for approximately 3 seconds until "CAL" appears. The meter will automatically recognize the solution and calibrate. Once calibrated, the display will show "END" and return to measurement mode.
- Rinse the electrode with distilled water after calibration.
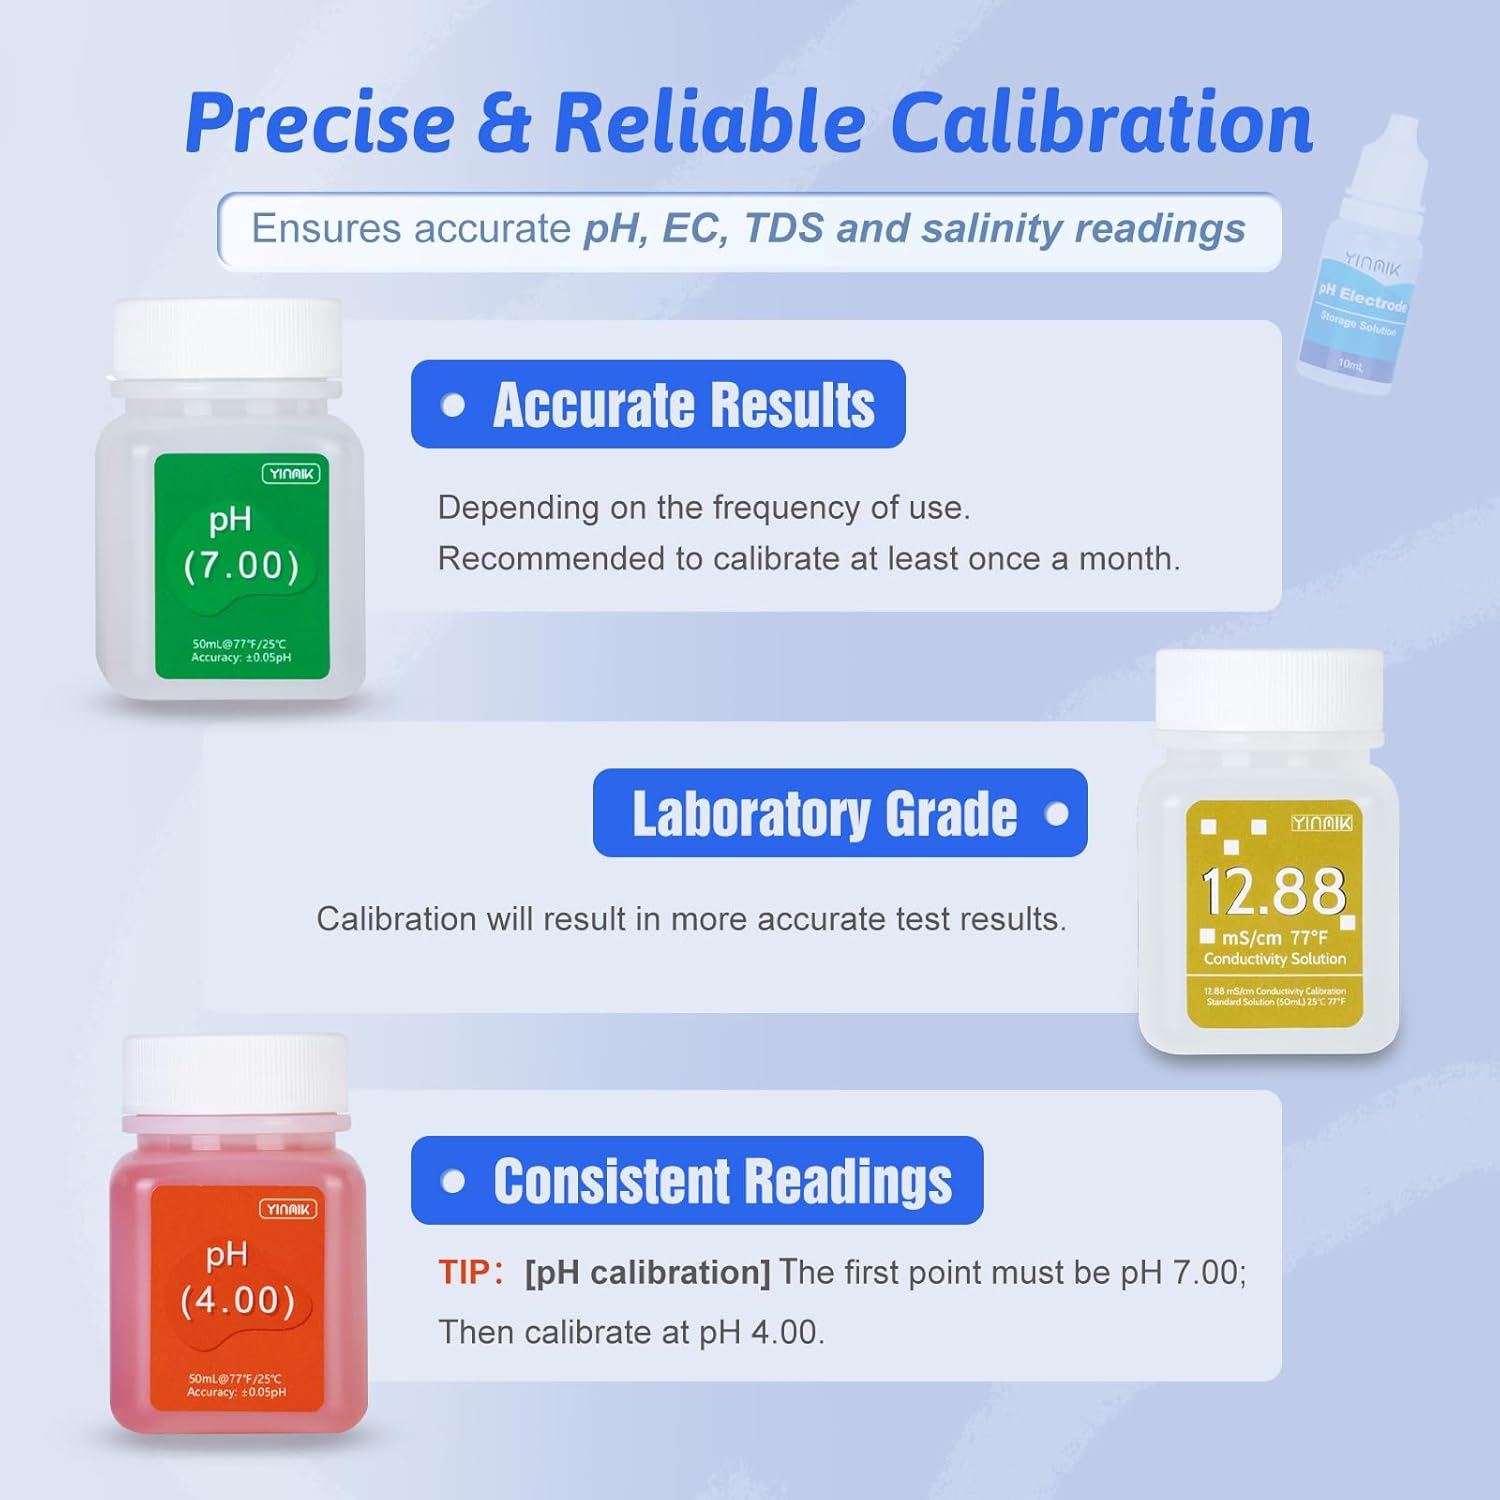
Figure 5: The calibration process is designed to be simple and user-friendly, requiring no mixing of solutions.
6. 사용 설명서
6.1. 측정하기
- 미터를 켜려면 버튼을 누르십시오. 켜짐/꺼짐 단추.
- 를 누르세요 모드/CAL button to select the desired measurement mode (pH, EC, TDS, or Salinity).
- Rinse the electrode with distilled water and immerse it into the samp용액을 침지선까지 채운 후 살살 저어주세요.
- Wait for the reading to stabilize on the display. The temperature will also be displayed.
- 측정값을 고정하려면 버튼을 누르세요. 유지/온도 버튼을 누르세요. 다시 누르면 버튼이 놓입니다.
- 측정 후 전극을 증류수로 헹구고 보호 캡을 다시 씌우십시오.
6.2. 온도 단위 변경
While the meter is on, press and hold the 유지/온도 button for approximately 3 seconds to switch between Celsius (°C) and Fahrenheit (°F).
6.3. 응용 예amp레

Figure 6: The YK-5 tester can be used to check pH and salinity levels in saltwater pools to maintain optimal water quality (pH: 7.2-7.8pH; Salt: 2700-3200ppm).

Figure 7: The YK-5 is ideal for monitoring water parameters in saltwater pools, marine aquariums, and reef tanks.
7. 유지관리
7.1. 전극 청소
Regular cleaning of the electrode is crucial for accurate and stable readings. If the electrode appears dirty or readings become erratic, clean it as follows:
- Rinse the electrode thoroughly with distilled or deionized water.
- If stubborn contaminants are present, gently brush the electrode with a soft brush or soak it in a mild cleaning solution (e.g., a dilute detergent solution) for a few minutes.
- Rinse again with distilled water and recalibrate the meter before next use.
7.2. 전극 보관
When not in use, always replace the protective cap. For long-term storage, ensure the electrode is kept moist. It is recommended to store the electrode in a pH electrode storage solution or a small amount of pH 7.00 buffer solution. Never store the electrode dry or in distilled water, as this can damage the sensor.
7.3. 배터리 교체
If the display becomes dim or the meter fails to power on, replace the batteries. Refer to section 4.1 for battery installation instructions. Ensure proper polarity and a secure seal after replacement.
8. 문제 해결
| 문제 | 가능한 원인 | 해결책 |
|---|---|---|
| 부정확한 판독 | Uncalibrated meter, dirty electrode, expired calibration solutions. | Calibrate the meter (Section 5). Clean the electrode (Section 7.1). Use fresh calibration solutions. |
| 미터가 켜지지 않습니다 | 배터리 방전, 배터리 설치 오류. | Replace batteries (Section 7.3). Check battery polarity. |
| 느리거나 불안정한 판독값 | Dirty electrode, air bubbles on electrode, electrode dry. | Clean electrode (Section 7.1). Gently tap the meter to dislodge bubbles. Ensure electrode is properly hydrated (Section 7.2). |
| "Err" or "--- " on display | Measurement out of range, sensor malfunction. | s를 확인하세요ample is within the meter's measurement range. If problem persists after cleaning and calibration, contact support. |
9. 사양
- 측정 범위:
- pH: 0.00 - 14.00
- TDS: 0 - 9990 ppm (parts per million)
- EC: 0 - 9990 µS/cm (microsiemens per centimeter)
- Salinity: 0.00 - 25.00% (0-9990ppm for pool salt, 0.00-200.0ppt for seawater)
- Temperature: 0.1 - 60.0 °C / 32.0 - 140.0 °F
- 정확성:
- pH: ±0.05 pH
- TDS/EC/Salinity: ±2% F.S.
- 온도: ±0.5 °C
- 해결:
- pH: 0.01 pH
- TDS: 1ppm
- EC: 1 µS/cm
- Salinity: 0.01% / 0.1 ppt
- 온도: 0.1 °C / 0.1 °F
- 자동 온도 보상(ATC): 0~60°C
- 전원 공급 장치: (Refer to device for specific battery type, typically button cells)
- 작동 온도: 0 - 60 °C (32 - 140 °F)
10. 보증 및 지원
For warranty information or technical support, please refer to the product packaging or contact YINMIK customer service directly. Keep your purchase receipt as proof of purchase.