
1. 서론
This manual provides comprehensive instructions for the installation, operation, and maintenance of the Generic M8400T IS7XM V1.0 LGA 1155 DDR3 Desktop Motherboard. Designed for optimal performance and reliability, this motherboard is compatible with a wide range of processors and components, making it suitable for various computing needs. Please read this manual thoroughly before proceeding with installation or operation to ensure proper setup and to prevent damage to the components.
2. 안전 정보
컴퓨터 구성 요소를 다룰 때는 항상 다음 안전 예방 조치를 준수하세요.
- 정전기 방전(ESD) 방지: Always wear an anti-static wrist strap or frequently touch a grounded metal object (like the computer case) before handling the motherboard or other components. ESD can severely damage electronic parts.
- 전원 차단: 구성품을 설치하거나 제거하기 전에 전원 공급 장치가 벽면 콘센트에서 분리되어 있는지 확인하십시오.
- 적절한 환기: Ensure your computer case has adequate airflow to prevent overheating.
- 조심스럽게 다루십시오: 메인보드를 잡을 때는 민감한 부품이나 회로에 손이 닿지 않도록 가장자리를 잡으십시오.
- 전문가의 도움: 설치 단계에 대해 확실하지 않은 경우 자격을 갖춘 기술자에게 문의하세요.
3. 제품 오버view
The Generic M8400T IS7XM V1.0 motherboard is designed for desktop computing, offering a stable and efficient platform. Key features include:
- High-performance design for optimal and efficient computing.
- Durable and reliable construction using high-quality materials.
- Easy installation and broad compatibility with various processors and components.
- LGA 1155 CPU socket support.
- DDR3 RAM technology support.
3.1 마더보드 레이아웃
Below is an image illustrating the main components and layout of the motherboard.
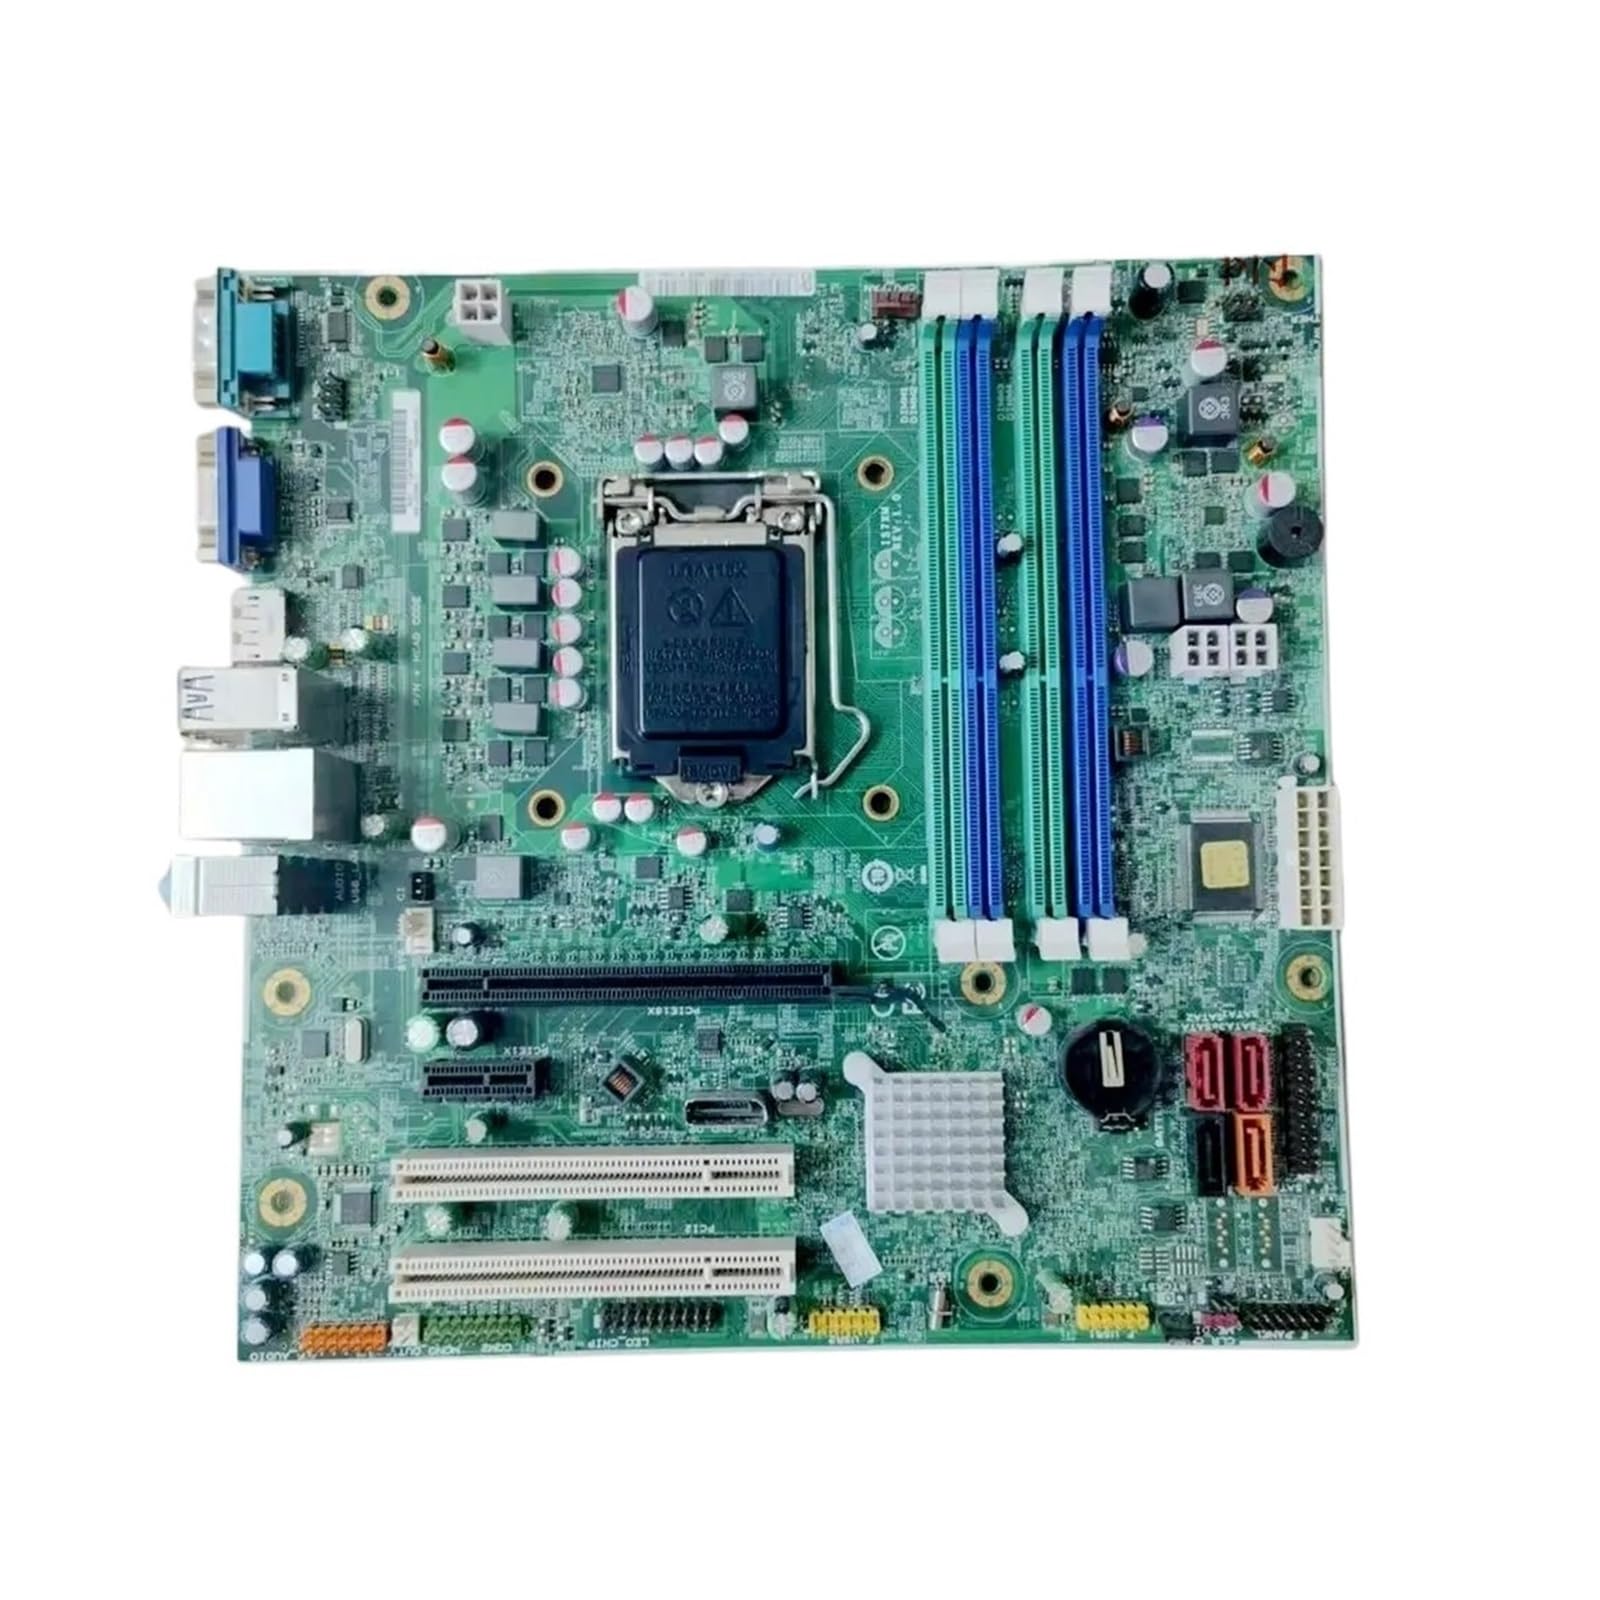
그림 1: 위에view of the Generic M8400T IS7XM V1.0 Motherboard. This image displays the full motherboard, highlighting the central LGA 1155 CPU socket, two blue and green DDR3 RAM slots, various expansion slots (PCIe x16, PCIe x1), SATA ports, and I/O connectors such as USB, Ethernet, and audio ports on the left edge.
주요 구성 요소는 다음과 같습니다.
- CPU 소켓(LGA 1155): Located centrally, this is where the processor is installed.
- DDR3 DIMM 슬롯: Two slots (blue and green) for installing DDR3 memory modules.
- PCIe 확장 슬롯: Includes a PCIe x16 slot for graphics cards and PCIe x1 slots for other expansion cards.
- SATA 포트: 하드 드라이브 및 SSD와 같은 저장 장치용 커넥터.
- I/O 패널: Rear connectors for peripherals such as USB devices, display outputs (VGA), Ethernet, and audio.
- 전원 커넥터 : Main ATX power connector and CPU power connector.
4. 설정 및 설치
마더보드와 구성 요소를 설치하려면 다음 단계를 주의 깊게 따르세요.
4.1 설치 전 체크리스트
- Ensure you have all necessary components: CPU, RAM, CPU cooler, power supply, storage devices, and a compatible computer case.
- Prepare your workspace: a clean, well-lit, and static-free environment.
- Gather tools: Phillips head screwdriver, anti-static wrist strap.
4.2 마더 보드 설치
- 컴퓨터 케이스의 뒤쪽 개구부에 I/O 실드를 설치합니다.
- Carefully align the motherboard with the standoffs inside the case.
- Secure the motherboard with screws, ensuring it is firmly seated and not touching any metal parts of the case directly.
4.3 CPU 설치(LGA 1155)
- CPU 소켓 레버를 열고 금속 로드 플레이트를 들어 올리세요.
- Carefully place the CPU into the socket, aligning the golden triangle on the CPU with the triangle on the socket. Do not force it.
- 적재판을 내리고 레버를 제자리로 밀어 넣어 고정하십시오.
- Apply thermal paste to the CPU (if not pre-applied on the cooler) and install the CPU cooler according to its manufacturer's instructions.
4.4 RAM 설치 (DDR3)
- DDR3 DIMM 슬롯의 양쪽 끝에 있는 클립을 엽니다.
- RAM 모듈의 홈과 DIMM 슬롯의 홈을 맞춰주세요.
- 클립이 제자리에 고정될 때까지 RAM 모듈의 양쪽 끝을 단단히 누릅니다.
4.5 주변 장치 및 전원 연결
- 파워서플라이의 24핀 ATX 전원 커넥터와 4핀 또는 8핀 CPU 전원 커넥터를 마더보드에 연결하십시오.
- 저장 장치의 SATA 데이터 케이블을 마더보드의 SATA 포트에 연결하십시오.
- Install your graphics card into the PCIe x16 slot and secure it. Connect any necessary PCIe power cables from the power supply to the graphics card.
- Connect front panel headers (power button, reset button, USB ports, audio jacks) to their respective pins on the motherboard. Refer to your case manual for specific pin assignments.
5. 사용 설명서
5.1 첫 번째 부팅
- 모든 구성 요소와 전원을 연결한 후 모니터, 키보드, 마우스를 연결합니다.
- Turn on the power supply and then press the power button on your computer case.
- 시스템이 켜지고 BIOS/UEFI 시작 화면이 표시됩니다.
5.2 BIOS/UEFI 액세스
BIOS/UEFI 설정 유틸리티에 들어가려면 지정된 키(일반적으로)를 누르십시오. 델, F2, 또는 F10) repeatedly during the initial boot sequence. The exact key may vary; check the on-screen prompts during startup.
5.3 드라이버 설치
After installing your operating system, install the necessary drivers for the motherboard's chipset, audio, network, and any other integrated components. These drivers are typically provided on a support CD/DVD or can be downloaded from the manufacturer's web대지.
6. 유지관리
- 먼지 청소: 컴퓨터 케이스 내부, 특히 팬과 방열판의 먼지를 압축 공기를 사용하여 정기적으로 청소하십시오. 청소하기 전에 시스템 전원을 끄고 전원 케이블을 뽑으십시오.
- BIOS/UEFI 업데이트: 정기적으로 제조업체를 확인하십시오 webBIOS/UEFI 업데이트 사이트입니다. 업데이트를 통해 안정성, 호환성 및 성능을 향상시킬 수 있습니다. 메인보드 손상을 방지하기 위해 업데이트 지침을 주의 깊게 따르십시오.
- 케이블 관리 : 공기 흐름을 개선하고 간섭을 방지하기 위해 내부 케이블이 깔끔하게 배선되어 있는지 확인하세요.
7. 문제 해결
문제가 발생하면 다음의 일반적인 문제 해결 단계를 참조하세요.
- 전원 없음:
- Check if the power supply is properly connected to the wall outlet and the motherboard (24-pin ATX and CPU power).
- 전원 스위치가 "켜짐" 위치에 있는지 확인하십시오.
- 전면 패널 전원 버튼이 마더보드에 제대로 연결되어 있는지 확인하십시오.
- 디스플레이 없음:
- Ensure the monitor is connected to the correct display output (either integrated graphics or dedicated graphics card).
- 그래픽 카드와 RAM 모듈을 다시 장착하세요.
- 램 스틱 하나만 꽂고 부팅해 보세요.
- 시스템 불안정/충돌:
- CPU와 GPU 온도를 확인하세요.
- Verify RAM is properly seated and functioning.
- 모든 드라이버가 최신 상태인지 확인하세요.
- 메모리 진단 도구를 실행합니다.
- 구성 요소가 감지되지 않았습니다.
- Check power and data cable connections for the component.
- Ensure the component is properly seated in its slot.
- BIOS/UEFI를 최신 버전으로 업데이트하세요.
8. 사양
The following table lists the technical specifications for the Generic M8400T IS7XM V1.0 Motherboard:
| 특징 | 사양 |
|---|---|
| 상표 | 일반적인 |
| 모델명 | QLAEWRHEE |
| CPU 소켓 | BGA 1023 (Note: Product description mentions LGA 1155, please verify compatibility with your CPU) |
| RAM 기술 | DDR3 |
| 메모리 클럭 속도 | 1GHz |
| 최대 RAM 크기 | 1 GB (Note: This value seems unusually low for a DDR3 motherboard, please verify with seller or manufacturer) |
| 사용 가능한 메모리 슬롯 | 1 (Note: Image shows 2 slots, please verify with seller or manufacturer) |
| CPU 모델 | 알파 |
| 플랫폼 | 3DO |
| 제조업체 부품 번호 | QLAEWRHEE |
| 원산지 | 중국 |
사양에 대한 참고 사항: Some specifications provided (e.g., CPU Socket, Max RAM Size, Available Memory Slots, Platform) appear inconsistent with typical LGA 1155 DDR3 motherboards or the product image. Users are advised to verify these details with the seller or manufacturer before purchase or installation to ensure compatibility with their intended components. The product description mentions LGA 1155 and DDR3, which is generally associated with higher RAM capacities and multiple slots. The "BGA 1023" socket and "1 GB" max RAM are typically for embedded or older systems.
9. 보증 및 지원
보증 정보 및 기술 지원에 대한 문의는 구매 시 제공된 설명서를 참조하시거나 판매자에게 직접 문의해 주세요. 보증 청구를 위해 구매 증빙 자료를 보관해 주세요.