소개
This manual provides detailed instructions for the setup, operation, maintenance, and troubleshooting of your Pisichen 24-inch Touchscreen Monitor with Built-in Webcam (Model 238TS-CMR). This monitor features a 2K QHD (2560x1440) resolution display with a 100Hz refresh rate, 10-point multi-touch functionality, and an integrated pop-up webcam, designed to enhance your productivity and interactive experience.
안전 정보
- 모니터가 떨어지는 사고를 방지하기 위해 항상 안정적이고 평평한 표면에 놓으십시오.
- 모니터를 비, 습기 또는 극한의 온도에 노출시키지 마세요.
- 과열을 방지하려면 환기구를 막지 마십시오.
- 모니터와 함께 제공된 전원 어댑터만 사용하세요.
- 청소하기 전이나 모니터를 장기간 사용하지 않을 경우에는 전원 케이블을 콘센트에서 분리하십시오.
- 모니터를 직접 분해하거나 수리하지 마십시오. 모든 정비는 자격을 갖춘 기술자에게 맡기십시오.
패키지 내용
패키지에 모든 품목이 들어 있는지 확인하세요.
- Pisichen 24-inch Touchscreen Monitor (Model 238TS-CMR)
- 모니터 스탠드 (받침대 및 암)
- 전원 어댑터 및 케이블
- HDMI 케이블
- USB-C to USB-C 케이블
- USB-A to USB-B Cable (for touch functionality with non-USB-C devices)
- 사용 설명서 (본 문서)
설정
1. 스탠드 조립
- 모니터를 포장에서 조심스럽게 꺼내어 흠집이 생기지 않도록 부드럽고 깨끗한 표면에 화면이 아래로 향하게 놓으십시오.
- Attach the stand arm to the back of the monitor using the provided screws.
- Connect the stand base to the stand arm and secure it with the designated screw.
- Once assembled, carefully lift the monitor and place it upright on your desk.

Figure 1: Monitor stand assembly and adjustment capabilities.
2. 기기에 연결하기
The monitor supports multiple connection types. Choose the appropriate cable for your device.
- 전원 연결: Connect the power adapter to the monitor's DC power port and then plug it into a power outlet.
- USB-C Connection (Recommended for full functionality): If your device has a USB-C port that supports DisplayPort Alternate Mode, connect the monitor using the provided USB-C to USB-C cable. This single cable can transmit video, audio, and touch signals, and may also provide power delivery to your laptop.
- HDMI or DisplayPort Connection: Connect an HDMI or DisplayPort cable from your device to the corresponding port on the monitor for video and audio. For touch functionality, you must also connect the USB-A to USB-B cable from your device's USB port to the monitor's USB-B upstream port.
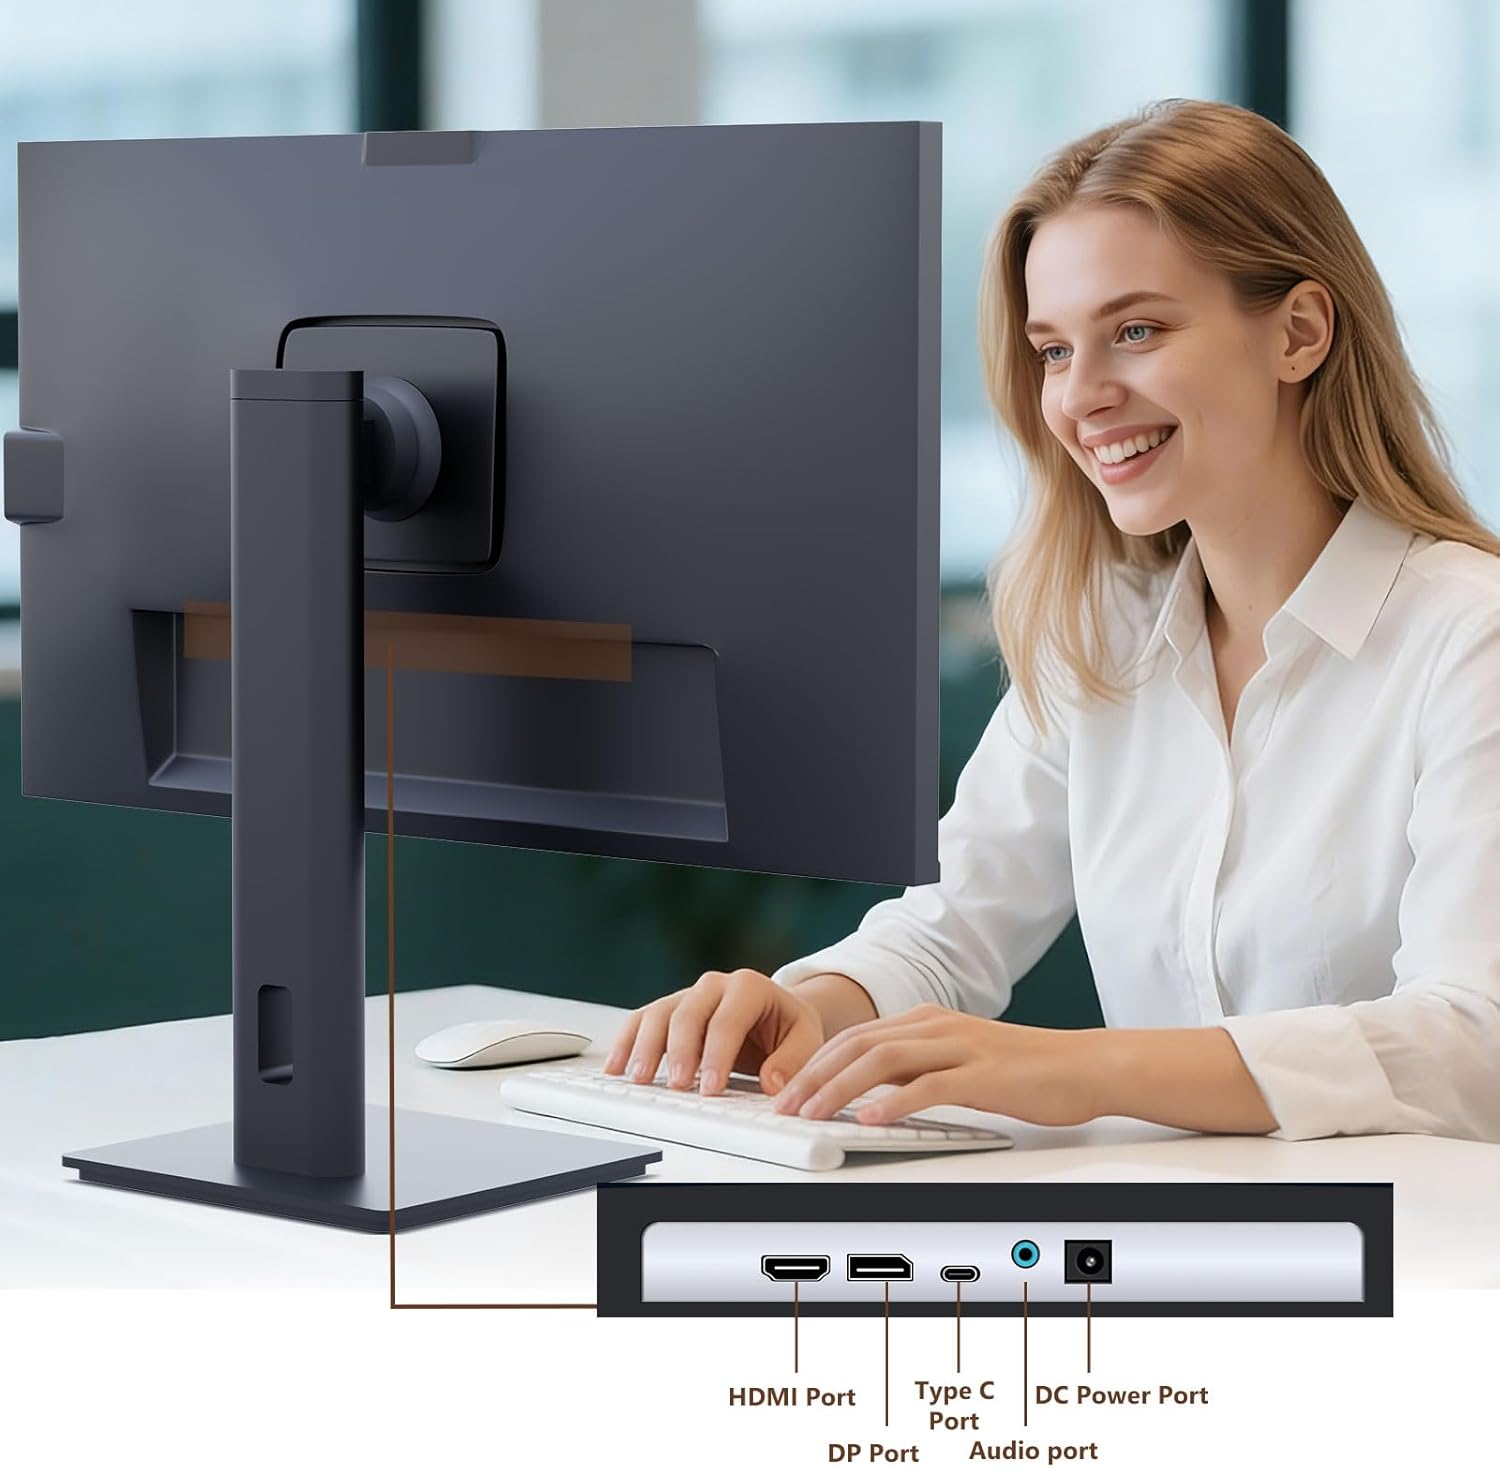
Figure 2: Available ports on the Pisichen monitor.

Figure 3: USB-C one-cable connection for simplified setup.

Figure 4: Connection options for desktop and laptop devices.
3. 초기 전원 켜기
Press the power button located on the monitor to turn it on. The monitor will automatically detect the active input source. If multiple sources are connected, you may need to select the correct input via the On-Screen Display (OSD) menu.
작동 지침
1. 터치스크린 기능
The monitor supports 10-point multi-touch. Ensure the USB-C cable is connected (for full functionality) or the USB-A to USB-B cable is connected in addition to your video cable for touch input to work. Touch gestures are similar to those used on tablets or smartphones.
- 수도꼭지: Single touch for selection or activation.
- 견인: Touch and hold, then move your finger to move items.
- 핀치/스프레드: 확대/축소하려면 두 손가락을 사용하세요.
- 강타: 손가락으로 화면을 움직여 스크롤하거나 탐색하세요.

Figure 5: Demonstrating intuitive touch interaction.

Figure 6: Collaborative use of the multi-touch display.
2. Built-in Web캠 사용법
The monitor features a pop-up webcam for privacy and convenience. To use the webcam, gently press the top center of the monitor frame where the webcam is located. It will pop up. To retract it, gently press it down until it clicks into place.
Ensure your operating system and video conferencing software recognize the webcam. No additional drivers are typically required for basic functionality.

Figure 7: The monitor with its built-in pop-up web화상 회의 중에 카메라를 사용하고 있습니다.

Figure 8: High-definition video calls using the integrated web캠.
3. 화면 디스플레이(OSD) 메뉴
The OSD menu allows you to adjust various monitor settings. Use the buttons on the back or bottom of the monitor to navigate and select options.
- 밝기/대비: 디스플레이의 밝기와 대비 수준을 조정합니다.
- 색상 설정: 색온도, 감마 및 기타 색상 관련 매개변수를 수정합니다.
- 입력 소스: Manually select between HDMI, DisplayPort, or USB-C inputs.
- 오디오: 내장 스피커 또는 연결된 헤드폰의 볼륨을 조절하세요.
- 사진 모드: 사전 설정된 디스플레이 모드(예: 표준, 게임, 영화)를 선택하십시오.
- HDR: Enable or disable High Dynamic Range settings for improved dark detail optimization.

Figure 9: HDR feature for enhanced visual detail.
4. 인체공학적 조정
모니터 스탠드는 다양한 조정을 통해 사용자의 자세를 최적화할 수 있습니다. view편안함:
- 높이 조정: 모니터를 위아래로 살살 밀거나 당겨주세요.
- 경사: Tilt the screen forward or backward to find the ideal angle.
- 받침: 모니터를 받침대를 기준으로 좌우로 회전합니다.
- 피벗: 세로 모드를 위해 화면을 90도 회전하세요 view주고받음.
Figure 10: Ergonomic adjustments for optimal view주고받음.
유지
- 화면 청소: 부드럽고 보풀이 없는 천으로 화면을 부드럽게 닦으세요. 잘 지워지지 않는 얼룩의 경우,amp천에 물이나 비연마성 화면 세척제를 살짝 묻혀 닦아주세요. 화면에 직접 분사하지 마세요.
- 본체 청소: 부드럽고 마른 천을 사용하여 모니터의 c를 닦으십시오.asing. 강한 세제나 연마성 세척제 사용을 피하십시오.
- 저장: 장기간 모니터를 보관할 경우 모든 케이블을 분리하고 시원하고 건조한 곳에 보관하세요. 원래 포장 상태로 보관하는 것이 좋습니다.
문제 해결
전원이 없습니다
- 전원 케이블이 모니터와 전원 콘센트에 단단히 연결되어 있는지 확인하세요.
- 다른 장치를 연결해 전원 콘센트가 작동하는지 확인하세요.
- Check if the power adapter is correctly connected to the monitor.
신호 없음 / 빈 화면
- Confirm the video cable (HDMI, DP, or USB-C) is securely connected to both the monitor and your device.
- 모니터의 OSD 메뉴에서 올바른 입력 소스가 선택되었는지 확인하세요.
- 모니터가 감지되고 활성화되어 있는지 확인하려면 컴퓨터의 디스플레이 설정을 확인하세요.
- 가능하다면 다른 비디오 케이블이나 포트를 사용해 보세요.
터치 기능이 작동하지 않습니다
- If using HDMI or DisplayPort, ensure the USB-A to USB-B cable is connected from your device to the monitor.
- If using USB-C, ensure your device's USB-C port supports DisplayPort Alternate Mode and touch data transmission.
- Check your operating system's touch settings.
- Note that some devices, such as game consoles (PS3/4/5, Xbox, Steam Deck, Fire TV Cube) and certain Apple products (iPhone, iPad, Switch), do not support touch functionality with this monitor.

Figure 11: Touch compatibility chart for various devices.
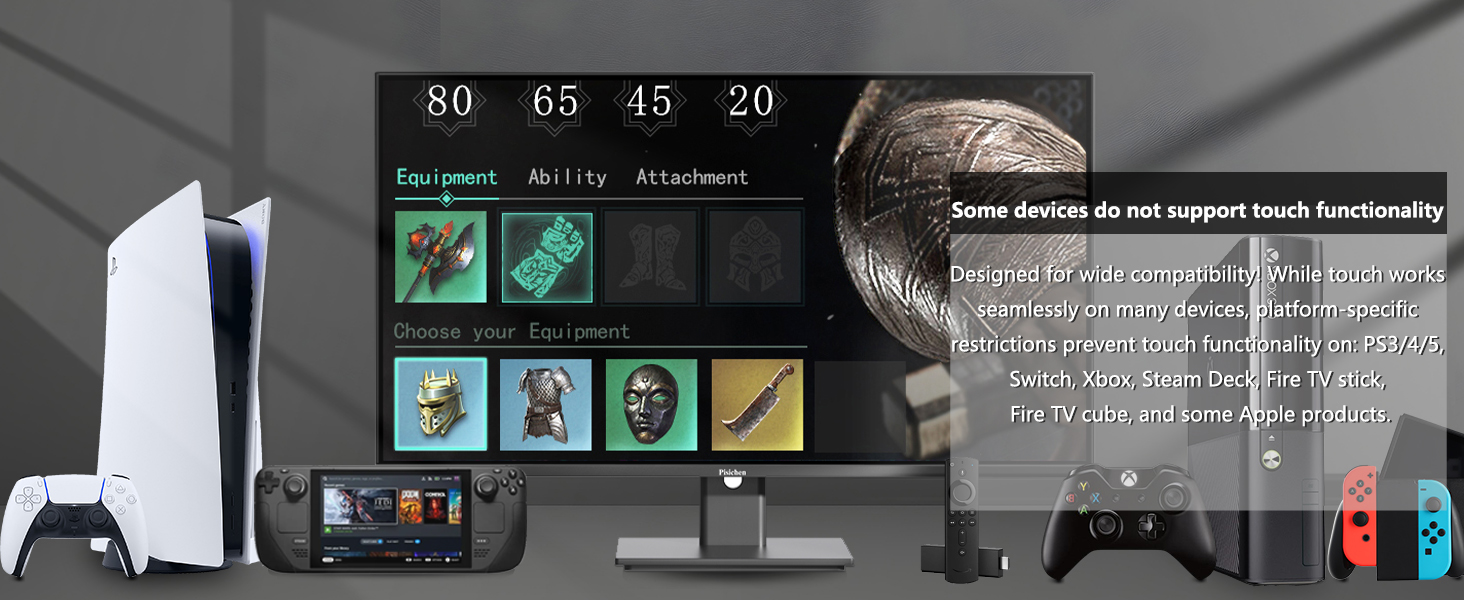
Figure 12: Devices that do not support touch functionality.
Web카메라가 감지되지 않았습니다
- 확인하십시오 webcam is fully popped up.
- Verify that the USB connection (either USB-C or USB-A to USB-B) is properly established.
- Check your operating system's privacy settings to ensure camera access is granted to applications.
- 컴퓨터를 다시 시작하세요.
명세서
| 특징 | 설명 |
|---|---|
| 모델 번호 | 238TS-CMR |
| 화면 크기 | 23.8 인치 |
| 해결 | 2560 x 1440(QHD 와이드 1440p) |
| 새로 고침 빈도 | 100Hz |
| 명도 | 400 칸델라(nits) |
| 대비율 | 3000시 1분 |
| 터치 기술 | 10포인트 멀티터치 |
| Web캠 | Built-in Pop-up Camera |
| 연결성 | HDMI, DisplayPort (DP), USB Type-C, USB-B (upstream), Audio Out, DC Power |
| 종횡비 | 16시 9분 |
| 화면 표면 | 광택있는 |
| 제품 치수 | 1.97 x 21.26 x 12.6 인치 |
| 품목 무게 | 11.53파운드 |
| 제조업체 | Shenzhen Konowa Electronics Co., LTD |
보증 및 지원
Your Pisichen monitor is covered by a limited warranty. Please refer to the warranty card included in your package for specific terms and conditions, including the warranty period and coverage details.
For technical support, troubleshooting assistance, or warranty claims, please contact Pisichen customer service. Contact information can typically be found on the manufacturer's web사이트나 보증 카드에 적혀 있습니다.
When contacting support, please have your monitor's model number (238TS-CMR) and purchase information readily available.