1. 중요한 안전 정보
Please read and understand all safety instructions before attempting installation or maintenance. Failure to follow these instructions may result in personal injury or property damage.
- 전원 분리: Always disconnect the washing machine from its power source before performing any service or maintenance.
- 보호 장비를 착용하세요: Wear appropriate personal protective equipment, such as gloves and eye protection, to prevent injury.
- 전문가의 도움: If you are unsure about any step or procedure, consult a qualified appliance repair technician.
- 날카로운 모서리: Be aware of potentially sharp edges on internal components.
- 적절한 도구: Use only the correct tools for each step to avoid damage to parts or injury.
2. 제품 오버view
This Washer Basket Drive Hub Kit is designed as a durable replacement for worn or damaged original parts in compatible Whirlpool washing machines. It is constructed from high-quality materials to ensure reliable performance.
2.1 키트 내용
키트에는 다음 구성 요소가 포함되어 있습니다.
- 1x Metal Basket Drive Hub
- 장착 너트 1개
- 6x 장착 나사
- 2x 케이블 타이
이미지: 폭발 view of the Washer Basket Drive Hub Kit, showing the individual components included in the package.
2.2 주요 특징
- Upgraded All-Metal Design: Manufactured from premium ADC12 aluminum and zinc alloy for enhanced durability and stability.
- Prevents Common Failures: Engineered to resist cracking, stripping, or breaking, providing stronger basket support than original plastic parts.
- Resolves Washer Issues: Effectively fixes problems such as the agitator not spinning, the washer not spinning or agitating, excessive noise during spin cycles, water leaks, and unbalanced drum movement.
- DIY 친화적: Designed for straightforward installation, allowing for quick and easy home repairs.
- 신뢰할 수 있는 성능: Contributes to stable operation, smooth spinning, and quieter washing cycles, extending the lifespan of your appliance.
2.3 호환 모델
This Washer Basket Drive Hub Kit is compatible with a wide range of Whirlpool washing machine models, including but not limited to:
- 7MWTW4925EW0, 7MWTW4925EW1
- 7MWTW5500XW0, 7MWTW5500XW1, 7MWTW5500XW2
- 7MWTW5521BW0, 7MWTW5521BW1
- 7MWTW5550YW0, 7MWTW5550YW1, 7MWTW5550YW2
- 7MWTW5560YW0
- 7MWTW5622BW0, 7MWTW5622BW1
- 7MWTW5700YW0, 7MWTW5700YW1, 7MWTW5700YW2
- 7MWTW5722BC0
- 8TWTW4955JW0, 8TWTW4955JW1
- 8TWTW6000JW0, 8TWTW6000JW1
- WTW4655JW0, WTW4655JW1, WTW4655JW2
- WTW4850HW0, WTW4850HW1, WTW4850HW2, WTW4850HW3
- WTW4855HW0, WTW4855HW1, WTW4855HW2, WTW4855HW3
- WTW4900AW0
3. 설정 및 설치
Follow these steps carefully to replace the washer basket drive hub. Ensure the washer is disconnected from power before starting.
3.1 필요한 도구
- Socket Wrench (appropriate size for hub nut)
- Screwdriver (Phillips or flathead, depending on agitator/wash plate)
- 플라이어(선택 사항, 잘 빠지지 않는 부품용)
- 작업용 장갑
3.2 설치 단계
- 전원 분리: Unplug the washing machine from the electrical outlet. Turn off the water supply to the washer.
- Access the Basket: Open the washer lid. Depending on your model, you may need to remove the agitator or the wash plate to access the hub. This usually involves removing a cap and a bolt/screw.
- Remove Old Hub Nut: Locate the large nut securing the basket drive hub. Use a socket wrench to loosen and remove this nut.
- Remove Old Hub: Carefully lift the old basket drive hub out of the washer tub. It may require some wiggling or gentle prying if it's stuck.
- 깨끗한 구역: Clean any debris or residue from the shaft and the area where the new hub will sit.
- Install New Hub: Place the new metal basket drive hub onto the shaft, ensuring it seats properly and aligns with the splines.
- Secure New Nut: Thread the new mounting nut onto the shaft and tighten it securely with the socket wrench. Do not overtighten.
- 재조립: Reinstall the agitator or wash plate, securing it with its original bolt/screw and cap.
- 다시 연결 : Reconnect the washer to the power outlet and turn on the water supply.
- 시험: Run a short wash cycle to ensure proper operation and check for any leaks or unusual noises.

Image: Visual guide demonstrating the key steps for replacing the washer basket drive hub.
4. 사용 설명서
Once the Washer Basket Drive Hub Kit is correctly installed, your washing machine should resume normal operation. The new hub facilitates the proper rotation of the wash basket during agitation and spin cycles.
- Ensure the washer tub spins freely by hand before running a cycle.
- Listen for any unusual grinding or knocking sounds during the first few cycles.
- Verify that the agitator or wash plate moves correctly during the wash phase and the basket spins during the spin phase.
5. 유지관리
The Washer Basket Drive Hub Kit is designed for long-lasting performance. Regular maintenance of your washing machine can help extend the life of all its components, including the new hub.
- 정기 청소: Periodically clean the washer tub and agitator/wash plate to prevent buildup that could affect performance.
- 느슨한 부품 확인: Occasionally inspect the agitator/wash plate and the hub area for any signs of loosening or wear.
- 과부하를 피하세요: Do not overload your washing machine, as this can put excessive strain on the drive system and other components.
6. 문제 해결
If you encounter issues after installing the new basket drive hub, refer to the table below for common problems and potential solutions.
| 문제 | 가능한 원인 | 해결책 |
|---|---|---|
| Washer won't spin or agitate | Hub not seated correctly; old transmission issue; motor coupling issue. | Ensure the new hub is fully seated and the nut is tightened. Check other washer components if the issue persists. |
| Loud noise or vibration during cycle | Hub nut loose; unbalanced load; foreign object in tub. | Verify the hub nut is securely tightened. Redistribute laundry. Inspect tub for obstructions. |
| Water leaks during spin cycle | Damage during installation; other washer component failure. | Carefully inspect the area around the hub for any visible damage or misaligned parts. Check drain hoses. |
| Agitator not moving | Hub not engaging agitator splines; agitator bolt loose. | Ensure the agitator is properly seated on the hub and its securing bolt is tight. |
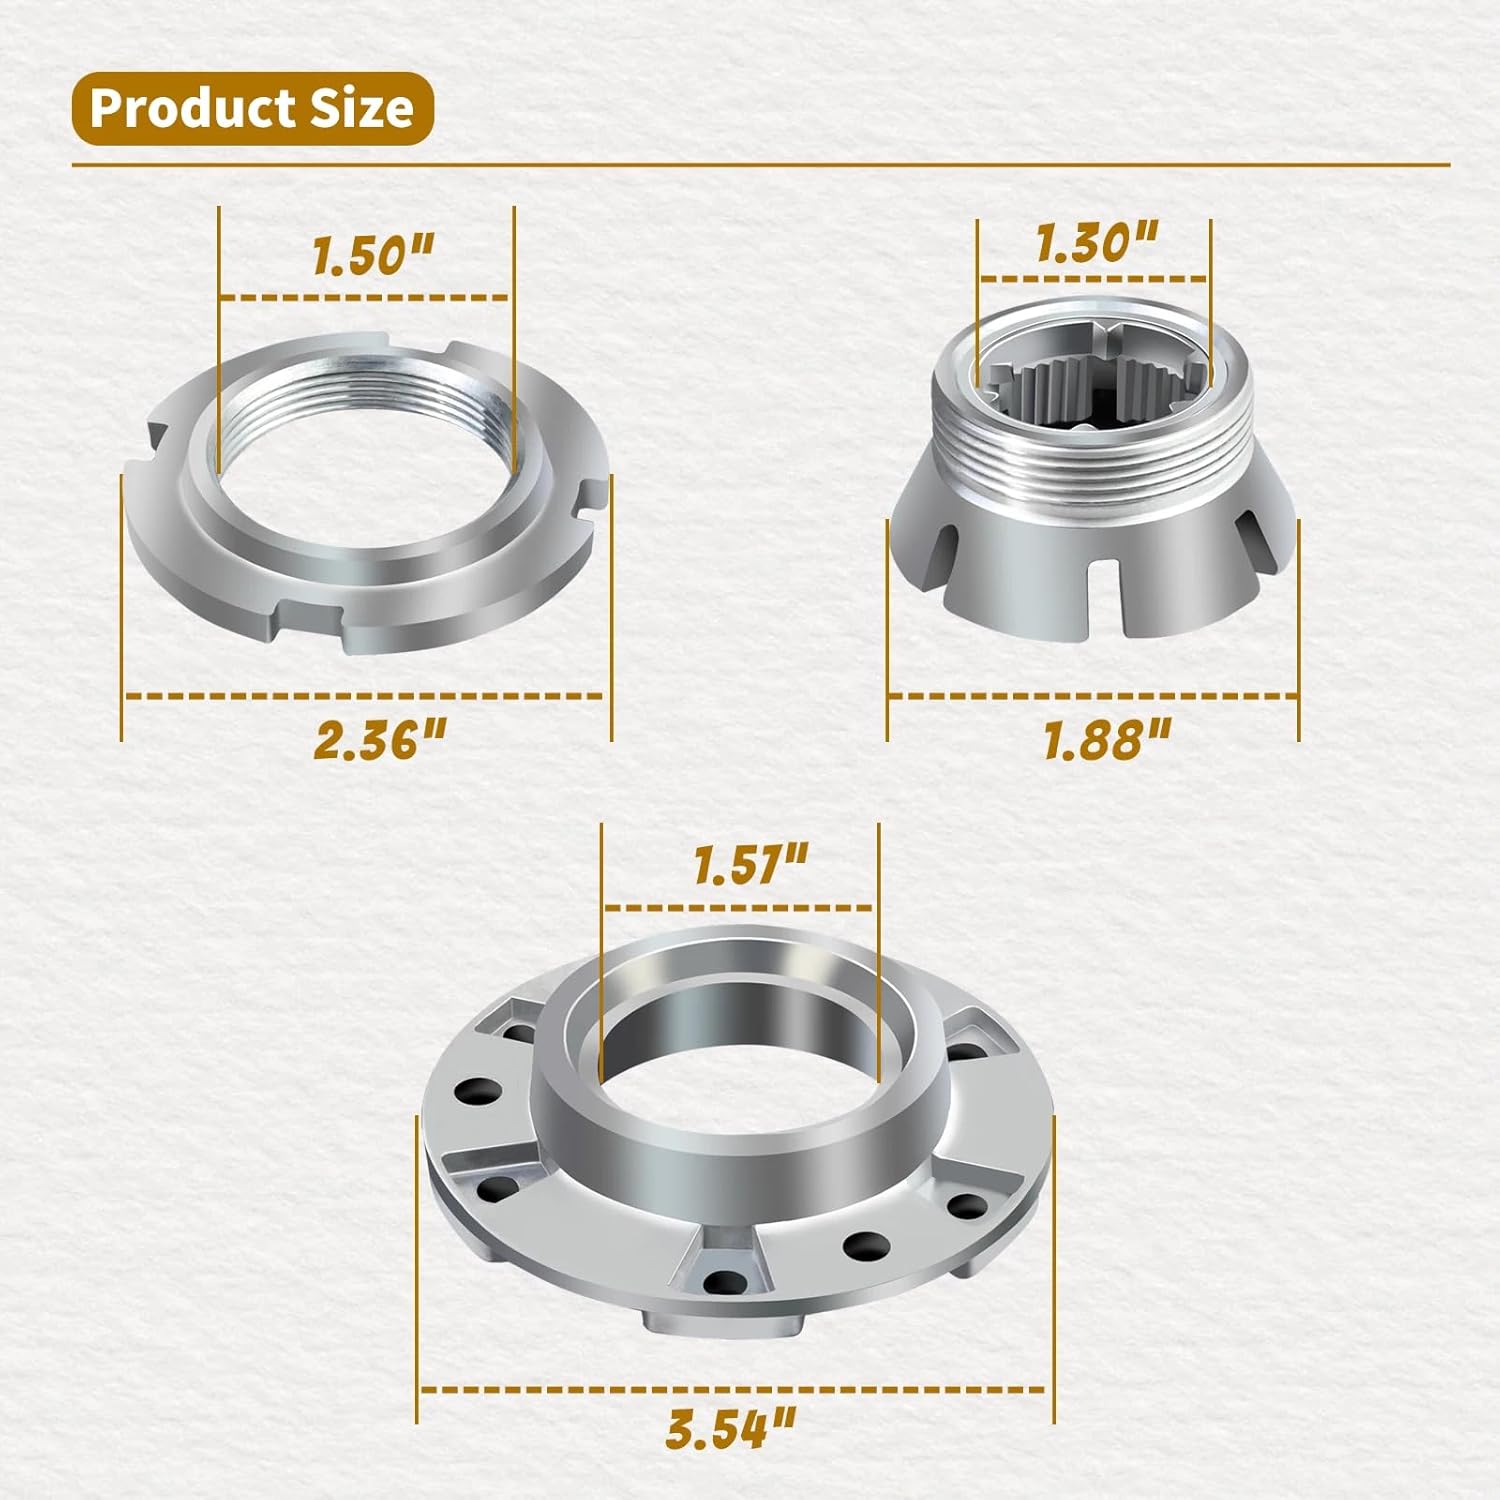
7. 사양
Key specifications for the Washer Basket Drive Hub Kit:
- 재료: ADC12 Aluminum and Zinc Alloy
- 부품 번호: W10324651#HL138
- 제품 대략적인 무게: 1 파운드
- 제품 포장 시 대략적인 크기: 4 x 4 x 4 인치

Image: Detailed dimensions of the Washer Basket Drive Hub Kit components.
8. 보증 및 지원
For any questions regarding installation, troubleshooting, or product defects, please contact the seller or manufacturer directly through your purchase platform. Keep your purchase receipt for warranty claims, if applicable.


