1. 서론
This manual provides detailed instructions for the installation, operation, and maintenance of your JOMISE A80 Pro 4K+4K Dash Cam. Please read this manual thoroughly before using the device to ensure proper functionality and safety. The JOMISE A80 Pro is designed to record high-quality video footage from both the front and rear of your vehicle, offering enhanced security and evidence in various driving conditions.
2. 제품 오버view
2.1 패키지 내용
아래 나열된 모든 품목이 패키지에 들어 있는지 확인하세요.
- A80 Pro driving recorder (main unit)
- 64GB Micro Memory Card (pre-installed)
- 11.48ft Power Cable + Car Charger
- 4K Rear Camera Unit
- 18.04ft Rear Camera Connection Cable
- GPS-enabled Bracket
- 정전기 스티커
- 설치 도구
- 사용 설명서 (본 문서)

그림 2.1: 패키지 내용물
2.2 주요 특징
- 듀얼 4K 녹화: Front 2560×1440P and Rear 2560×1440P for high-resolution video capture.
- STARVIS 2 Night Vision: Enhanced low-light imaging for clear recordings in dark conditions.
- Ethernet Rear Camera Processing: Dedicated processor for the rear camera ensures stable 4K performance for both channels.
- WiFi 6 Connectivity: High-speed wireless transfer for quick video downloads to your smartphone.
- 3.12-inch IPS Touch Panel: Responsive touchscreen for intuitive navigation and control.
- GPS 기능: Built-in positioning system for route logging and speed data.
- 24시간 주차 모드: Continuous monitoring with collision-triggered lock (requires hardwire kit, sold separately).
- G-센서: 충격을 자동으로 감지하고 발을 잠급니다.tag덮어쓰기를 방지합니다.
- 루프 녹음: 가장 오래된 파일을 덮어씁니다tag메모리 카드가 가득 차면 자동으로 녹화가 중단되어 연속 녹화가 보장됩니다.
- 광각 렌즈: Front 180° field of view, Rear 160° wide view.
- WDR / HDR Imaging: 다양한 조명 조건에서 이미지 품질을 향상시킵니다.
- Support for up to 1TB Micro Memory Card: Allows for extensive storage of video footage.
3. 설정 및 설치
The JOMISE A80 Pro is designed for straightforward installation. Follow these steps for optimal placement and connection.
3.1 전방 대시캠 장착
- Clean the windshield area where the dash cam will be mounted, typically behind the rearview mirror, to ensure a strong adhesive bond.
- Attach an electrostatic sticker to the cleaned area. This helps in easy removal and repositioning without leaving residue.
- Mount the GPS-enabled bracket onto the electrostatic sticker.
- Slide the main A80 Pro unit onto the bracket until it clicks into place. Ensure the lens has a clear view 앞으로의 길에 대하여.
- Connect the power cable to the dash cam and route it along the windshield edge, down the A-pillar, and to the car's cigarette lighter socket or a hardwire kit (for parking mode). Use the provided installation tool to tuck the cable neatly.

Figure 3.1: Front Dash Cam Installation
3.2 후방 카메라 설치
- 차량 뒷유리에 후방 카메라를 설치할 적절한 위치를 정하고, 시야가 가려지지 않도록 하십시오. view. The rear camera has a 360° adjustable module for flexible positioning.
- 뒷유리에서 선택한 부분을 닦으세요.
- Attach an electrostatic sticker and then mount the rear camera using its adhesive.
- Connect the 18.04ft connection cable to the rear camera.
- Route the rear camera cable from the rear windshield, along the headliner and side pillars, to the main front dash cam unit. Use the installation tool to conceal the cable.
- Plug the rear camera cable into the designated port on the main A80 Pro unit.
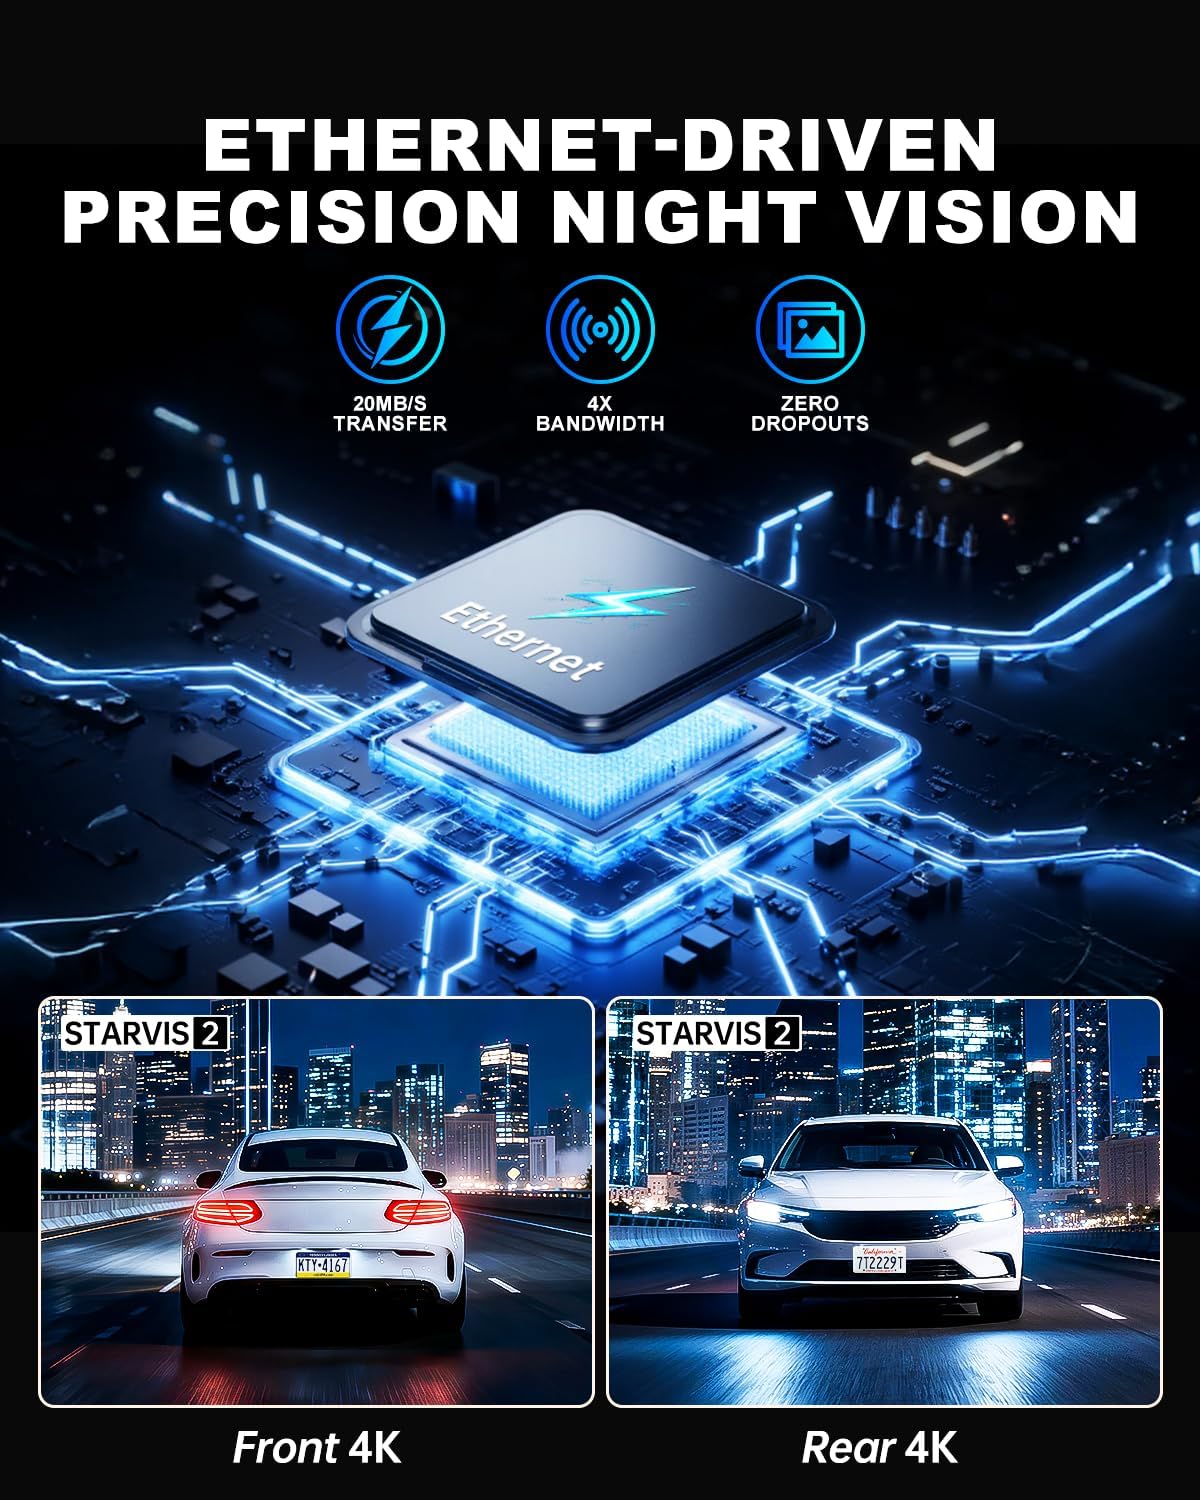
Figure 3.2: Rear Camera Installation
3.3 전원 연결
Plug the car charger into your vehicle's cigarette lighter socket. The dash cam will power on automatically when the vehicle starts and begin recording. For 24-hour parking monitoring, a hardwire kit (sold separately) is required to provide continuous power.
4. 사용 설명서
The JOMISE A80 Pro features a responsive touchscreen and physical buttons for easy operation.
4.1 전원 켜기/끄기
- 오토매틱: The dash cam powers on and starts recording automatically when connected to power and the vehicle ignition is turned on. It powers off automatically when the ignition is turned off.
- 수동 : (전원 버튼이 있는 경우) 길게 눌러 기기를 수동으로 켜거나 끌 수 있습니다.
4.2 기본 녹음
- Upon powering on, the dash cam will automatically begin loop recording.
- 비디오 푸tage is saved in TS stream format, and photos are saved as JPG.
- The 64GB micro memory card included supports continuous loop recording. The device supports up to 1TB cards.
- Audio capture is enabled by default. This can be toggled in the settings menu.
4.3 터치스크린 인터페이스
The 3.12-inch IPS touch panel allows for intuitive control. Navigate through menus, adjust settings, and review 푸tage with quick touch responses (approx. 0.2 seconds).

Figure 4.1: Touchscreen Menu Navigation
5. 고급 기능
5.1 24시간 주차 모드
For continuous monitoring when your vehicle is parked, the 24-hour parking mode utilizes the built-in G-Sensor. If an impact is detected while parked, the dash cam will automatically record and lock the footage. This feature requires a hardwire kit (not included) to provide constant power to the device.

그림 5.1: 24시간 주차 모니터링
5.2 WiFi 6 Connectivity
The integrated WiFi 6 module provides high-speed and stable connectivity for transferring video files to your smartphone. This allows for quick previewing and downloading of 4K video clips, typically within 6 seconds for a 1-minute video. Use the dedicated mobile application to access this feature.

Figure 5.2: WiFi 6 Data Transfer
5.3 GPS 기능
The built-in GPS system records your vehicle's location and speed data, which can be viewed during video playback on a computer or via the mobile application. This provides valuable context for recorded events.

Figure 5.3: GPS Route Tracking
5.4 Night Vision with STARVIS 2
The JOMISE A80 Pro utilizes STARVIS 2 technology for both front and rear cameras, providing superior low-light performance. This ensures clear and detailed video capture in challenging lighting conditions such as dark roads, tunnels, and nighttime driving, with reduced noise and improved exposure.

Figure 5.4: STARVIS 2 Night Vision Performance
5.5 Ethernet Rear Camera Processing
Unlike traditional AHD systems, the A80 Pro uses an Ethernet-based system for the rear camera. This allows a dedicated processor in the rear camera to handle its footage independently, freeing up the main processor for the front camera. This design improves overall 4K image performance and stability for both front and rear recordings.
6. 유지관리
- 청소: Use a soft, dry cloth to clean the camera lenses and the display screen. Avoid abrasive cleaners or solvents.
- 메모리 카드: Regularly format the micro memory card (at least once a month) within the dash cam's settings to ensure optimal performance and prevent data corruption. Back up important footag서식을 적용하기 전에 e를 입력하세요.
- 펌웨어 업데이트: Check the official JOMISE web펌웨어 업데이트는 정기적으로 사이트를 방문하세요. 대시캠 펌웨어를 최신 상태로 유지하면 성능을 향상시키고 새로운 기능을 추가할 수 있습니다.
7. 문제 해결
| 문제 | 가능한 원인 | 해결책 |
|---|---|---|
| 대시캠 전원이 켜지지 않습니다. | No power supply; faulty power cable; loose connection. | Check car charger connection. Ensure vehicle ignition is on. Try a different power source if available. |
| 녹음이 중지되거나 정지됩니다. | Memory card error; full memory card; incompatible memory card. | Format the memory card. Replace with a high-speed (Class 10 or U3) micro SD card if necessary. Ensure card capacity is within supported range (up to 1TB). |
| 비디오 품질이 좋지 않습니다. | 렌즈가 더럽습니다. 렌즈에 보호 필름이 여전히 붙어 있습니다. 해상도 설정이 잘못되었습니다. | Clean the lenses. Remove any protective film. Check video resolution settings in the menu. |
| 후방 카메라가 감지되지 않았습니다. | Loose cable connection; faulty rear camera cable. | 후방 카메라 케이블이 후방 카메라와 본체에 단단히 연결되어 있는지 확인하세요. |
| WiFi 연결 문제. | 비밀번호가 잘못되었습니다. 기기와의 거리가 너무 멀습니다. 앱에 문제가 있습니다. | Verify WiFi password. Ensure your phone is close to the dash cam. Restart the dash cam and your phone's WiFi. Reinstall the mobile application if necessary. |
8. 사양
| 특징 | 세부 사항 |
|---|---|
| 모델 | A80 프로 |
| Video Performance (Front) | 2560 × 1440P |
| Video Performance (Rear) | 2560 × 1440P |
| Front Lens Field of View | 180° |
| Rear Lens Field of View | 160° |
| Front Lens Aperture | F1.8 |
| Rear Lens Aperture | F1.8 |
| Rear Camera Link | Digital-powered data channel (Ethernet-based) |
| 비디오 형식 | TS 스트림 |
| 사진 형식 | 사진 |
| 표시하다 | 3.12-inch IPS touch panel |
| 제어 시스템 | Touch + physical keys |
| 연결성 | High-speed wireless transfer module (WiFi 6) |
| 위치 시스템 | Built-in GPS with route logging |
| 메모리 카드 지원 | Up to 1TB micro memory card (64GB included) |
| 전원 입력 | 타입-C 5V/3A |
| 작동 온도 | -4°F ~ 158°F(-20°C ~ 70°C) |
| 보관 온도 | -40°F ~ 176°F(-40°C ~ 80°C) |
| 제품 치수 | 3.74 x 1.97 x 1.77 인치 |
| 품목 무게 | 1.59파운드 |
| 프레임 속도 | 30프레임 |
9. 보증 및 지원
JOMISE provides an extended 18-month warranty for the A80 Pro Dash Cam. For technical assistance, troubleshooting, or warranty claims, please contact JOMISE customer support.
- 보증 기간: 18개월
- 이메일: jomise-us@jomise-cam.com
- 핸드폰: +1 866 788 8775

그림 9.1: 보증 및 지원 정보
10. 제품 비디오 끝view
Video 10.1: JOMISE A80 Pro Dash Cam Features and Operation. This video provides a visual overview of the dash cam's components, installation process, and key functionalities, including day and night recording examples and GPS tracking.