소개
This manual provides comprehensive instructions for the installation, operation, maintenance, and troubleshooting of the ASUS Prime H810M-E-CSM Intel H810 mATX Commercial CSM Motherboard. This motherboard is engineered for Intel Core Ultra (Series 2) processors, offering robust performance and essential features for commercial and AI PC applications.
안전 정보
설치 및 작동 중에는 항상 다음 안전 예방 조치를 준수하세요.
- 구성 요소를 만지기 전에 벽면 콘센트에서 전원 코드를 분리하세요.
- 정전기 방전(ESD)으로 인한 부품 손상을 방지하려면 정전기 방지 손목 스트랩을 착용하세요.
- 민감한 부분을 만지지 않으려면 구성품의 가장자리를 잡으세요.
- 과열을 방지하려면 PC 케이스 내부의 적절한 환기를 확보하세요.
- 추가적인 안전 지침은 각 구성 요소의 설명서를 참조하십시오.
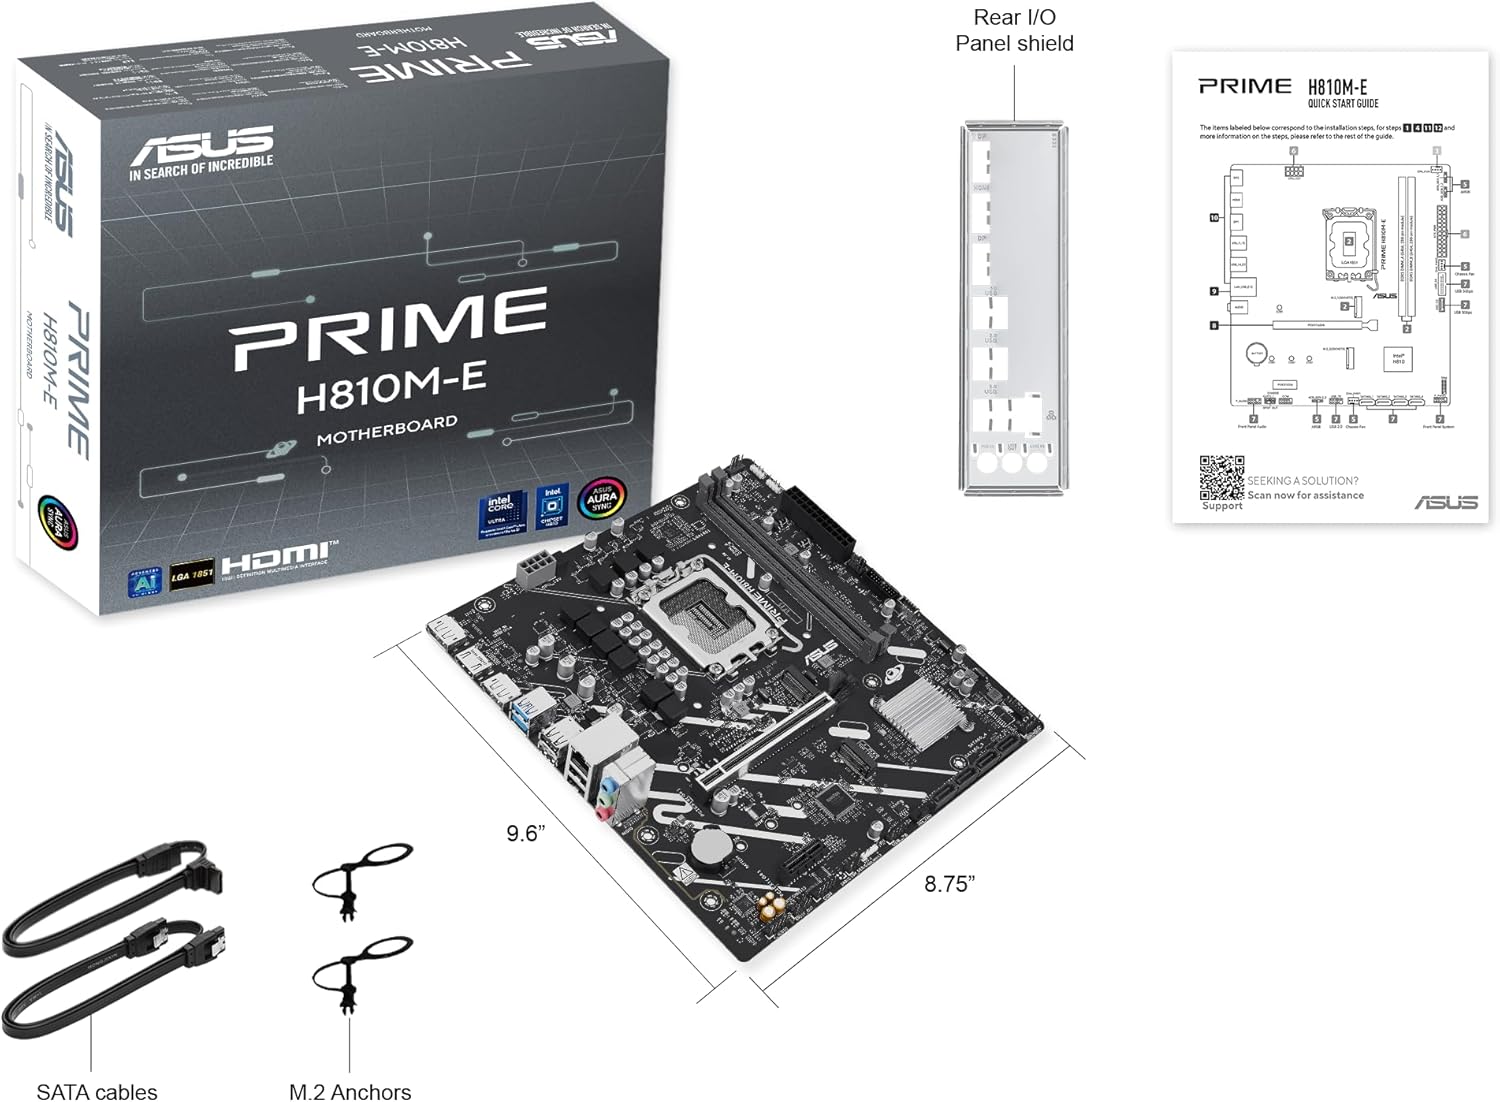
패키지 내용
마더보드 패키지에 모든 품목이 들어 있는지 확인하세요.
- ASUS Prime H810M-E-CSM Motherboard
- SATA 6Gb/s Data Cables (2x)
- M.2 SSD Anchors (2x)
- Rear I/O Shield
- 사용 설명서 / 빠른 시작 가이드
마더 보드 레이아웃
메인보드의 주요 구성 요소와 커넥터를 숙지하십시오.


설정
1. CPU 설치
This motherboard supports Intel Core Ultra (Series 2) processors with an LGA 1851 socket.
- CPU 소켓 레버를 열고 보호 캡을 제거하십시오.
- Carefully align the CPU with the socket, ensuring the notches on the CPU match the keys on the socket.
- 무리한 힘을 가하지 말고 CPU를 소켓에 조심스럽게 끼워 넣으십시오.
- 소켓 레버를 닫아 CPU를 고정합니다.
- 제조업체의 지침에 따라 CPU 쿨러를 설치하세요.
2. 메모리(RAM) 설치
The motherboard features two DDR5 DIMM slots, supporting up to 128GB of RAM.
- DIMM 슬롯의 양쪽 끝에 있는 클립을 엽니다.
- 메모리 모듈을 슬롯에 맞춰서 모듈의 홈이 슬롯의 키와 일치하는지 확인합니다.
- 클립이 제자리에 고정될 때까지 메모리 모듈의 양쪽 끝을 단단히 누릅니다.
3. 스토리지 설치
The motherboard supports M.2 SSDs and SATA drives.
M.2 SSD 설치:
- 마더보드에서 M.2 슬롯을 찾으세요.
- M.2 SSD를 30도 각도로 슬롯에 삽입합니다.
- Gently push down the SSD and secure it with the provided M.2 anchor or screw.

SATA 드라이브 설치:
- SATA 데이터 케이블의 한쪽 끝을 마더보드의 SATA 포트에 연결합니다.
- SATA 데이터 케이블의 다른 쪽 끝을 저장 장치(HDD/SSD)에 연결하십시오.
- Connect a SATA power cable from your power supply unit (PSU) to the storage drive.
4. PCIe 카드 설치
Install graphics cards or other expansion cards into the PCIe 4.0 slots.
- PCIe 슬롯 끝부분에 있는 고정 클립을 엽니다.
- Align the expansion card with the slot and press down firmly until it is seated and the clip snaps shut.
- 카드를 나사로 PC 케이스에 고정하세요.

5. 전원 연결
전원 공급 장치(PSU) 케이블을 마더보드에 연결하십시오.
- 24핀 ATX 전원 커넥터: 파워서플라이의 24핀 메인 전원 케이블을 마더보드의 해당 커넥터에 연결하십시오.
- 8-pin CPU Power Connector (EATX12V): Connect the 8-pin CPU power cable from your PSU to the connector located near the CPU socket.
6. 전면 패널 연결
Connect your PC case's front panel cables (power button, reset button, USB ports, audio jacks, LED indicators) to the corresponding headers on the motherboard. Refer to the motherboard diagram for exact locations.
운영
최초 부팅 및 BIOS/UEFI 설정
시스템 조립 후 모니터, 키보드, 마우스를 연결하고 시스템 전원을 켜십시오.
- 를 누르세요 삭제 BIOS/UEFI 설정 유틸리티를 시작하려면 시작 시 키를 누릅니다.
- 부팅 순서, 시스템 시간 및 기타 필수 설정을 구성합니다.
- 변경 사항을 저장하고 BIOS를 종료합니다.

Driver and Operating System Installation
Install your preferred operating system (e.g., Windows 10/11) from a bootable USB drive or DVD. After OS installation, install the latest drivers for the motherboard chipset, LAN, audio, and any other integrated components from the ASUS support web최적의 성능과 안정성을 보장하기 위한 사이트입니다.
유지
청소
먼지가 쌓이면 과열 및 부품 고장을 유발할 수 있으므로 정기적으로 PC를 청소하십시오. 압축 공기를 사용하여 방열판, 팬 및 기타 부품의 먼지를 제거하십시오. 청소하기 전에 시스템 전원을 끄고 전원 케이블을 뽑으십시오.
BIOS 업데이트
정기적으로 ASUS 지원을 확인하세요 website for BIOS updates. BIOS updates can improve system stability, compatibility, and performance. Follow the instructions provided by ASUS carefully when performing a BIOS update to avoid system damage.
문제 해결
이 섹션에서는 일반적으로 발생할 수 있는 문제에 대해 설명합니다.
- No Display / No Post:
- 모든 전원 케이블(24핀 ATX, 8핀 CPU)이 단단히 연결되어 있는지 확인하십시오.
- RAM 모듈을 다시 장착하십시오. RAM 스틱 하나만 장착하고 부팅을 시도해 보십시오.
- Verify the CPU is correctly seated and the CPU cooler is properly installed.
- Check that the graphics card is fully seated in its PCIe slot and has adequate power.
- If using integrated graphics, ensure your monitor is connected to the motherboard's video output (HDMI).
- 시스템 불안정/충돌:
- 모든 드라이버가 최신 상태인지 확인하세요.
- 모니터링 소프트웨어를 사용하여 CPU 및 GPU 온도를 확인하십시오.
- 메모리 진단 도구를 실행하여 RAM에 오류가 있는지 확인하십시오.
- PSU 전력을 확인하세요tage는 모든 구성 요소에 충분합니다.
- 주변 장치가 감지되지 않음:
- 주변 장치를 다른 포트에 연결해보세요.
- 주변기기 드라이버를 설치하거나 업데이트하십시오.
- BIOS 설정을 확인하여 포트가 활성화되어 있는지 확인하세요.
명세서
| 특징 | 사양 |
|---|---|
| 상표 | 아수스 |
| 모델명 | PRIME H810M-E-CSM |
| CPU 소켓 | LGA 1851 |
| 호환 프로세서 | 인텔 코어 울트라 프로세서(2세대) |
| 칩셋 유형 | 인텔 H810 |
| RAM 메모리 기술 | DDR5 |
| 사용 가능한 메모리 슬롯 | 2 |
| Ram Memory Maximum Size | 128GB (XNUMX기가바이트) |
| 그래픽 카드 인터페이스 | PCI 익스프레스 4.0 |
| Total PCIe Ports | 2 |
| 총 SATA 포트 수 | 4 |
| Total M.2 Slots | 1 |
| 총 USB 포트 | 11 (various types) |
| HDMI 포트 총 개수 | 1 |
| 이더넷 포트 수 | 1 (1Gb LAN) |
| 주 전원 커넥터 유형 | 24핀 |
| 플랫폼 | 윈도우 10, 윈도우 11 |
| 품목 치수 L x W x H | 9.6인치 길이 x 8.7인치 너비 x 1.5인치 높이 |
| 품목 무게 | 1.1 파운드 |
보증 정보
The ASUS Prime H810M-E-CSM Motherboard comes with a 3년 제조사 보증. For detailed terms and conditions, please refer to the warranty card included in your package or visit the official ASUS support web대지.
지원하다
추가 지원, 기술 지원, 드라이버 다운로드 또는 BIOS 업데이트가 필요하시면 ASUS 공식 지원 페이지를 방문하십시오. web대지:
You can also find additional resources and FAQs on the ASUS product page for the Prime H810M-E-CSM.