
소개
Thank you for choosing the Digitus DA-70919 USB-C 8K 12-Port Docking Station. This device is designed to expand the connectivity of your USB-C enabled laptop or computer, providing a comprehensive solution for video output, data transfer, network access, and power delivery. Please read this manual carefully to ensure proper installation and operation.
제품 끝view
The Digitus DA-70919 docking station offers 12 essential ports to enhance your workspace. It supports high-resolution video output, fast data transfer, and efficient power delivery to your host device.

그림 1: Detailed diagram of the Digitus DA-70919 docking station ports and their functions. This diagram labels each of the 12 ports on the docking station, including Audio Jack, USB-A, USB-C, USB-C PD, DisplayPort, HDMI, RJ45 Gigabit Ethernet, and SD/MicroSD card slots, along with anti-theft protection.

그림 2: 앞쪽 view of the Digitus DA-70919 docking station showing all accessible ports. A clear view of the docking station's front panel, displaying the various input and output ports including USB-A, USB-C, HDMI, DisplayPort, Ethernet, and card readers.
주요 특징:
- 비디오 출력: 2x HDMI, 1x DisplayPort (DP) supporting up to 8K/30Hz for single display, or multi-display configurations.
- USB 데이터 포트: 2x USB-A 3.2 Gen 2 (10Gbps), 1x USB-A 3.2 Gen 1 (5Gbps), 1x USB-C 3.2 Gen 2 (10Gbps).
- 전력 공급(PD): USB-C PD 3.0 port for charging your host laptop (up to 85W output).
- 회로망: Gigabit Ethernet (RJ45) for stable wired internet connection.
- 카드 리더기: SD and MicroSD card slots with 104 MBps transfer speed.
- 오디오: 헤드폰이나 스피커 연결을 위한 3.5mm 오디오 잭.
설치 지침
Follow these steps to set up your Digitus DA-70919 docking station:
- Check Host USB-C Port Compatibility: Ensure your laptop's USB-C port supports DisplayPort Alternate Mode (DP Alt Mode) for video output and Power Delivery for charging. Without DP Alt Mode, video output will not function.

그림 3: Guide to USB-C port compatibility for DisplayPort Alternate Mode. This graphic explains which types of USB-C ports on your laptop support the full functionality of the docking station, specifically highlighting the requirement for DisplayPort Alternate Mode (DP Alt Mode) for video output.
- 호스트 장치에 연결: Connect the integrated USB-C cable from the docking station to the USB-C port on your laptop.
- 전원 어댑터 연결(선택 사항이지만 권장): If you wish to charge your laptop via the docking station or power high-demand peripherals, connect a USB-C Power Delivery adapter (not included, up to 100W recommended) to the USB-C PD input port on the docking station.
- 외부 디스플레이 연결: 적절한 케이블을 사용하여 모니터를 도킹 스테이션의 HDMI 및/또는 DisplayPort 출력에 연결하십시오.
- 주변기기 연결: Plug in your USB devices (keyboard, mouse, external drives), Ethernet cable, SD/MicroSD cards, and audio devices to the corresponding ports on the docking station.
- 드라이버 설치: In most cases, the docking station is plug-and-play and does not require additional drivers. If prompted, allow your operating system to install any necessary drivers automatically.
작동 지침
디스플레이 모드
도킹 스테이션은 다양한 디스플레이 구성을 지원합니다.
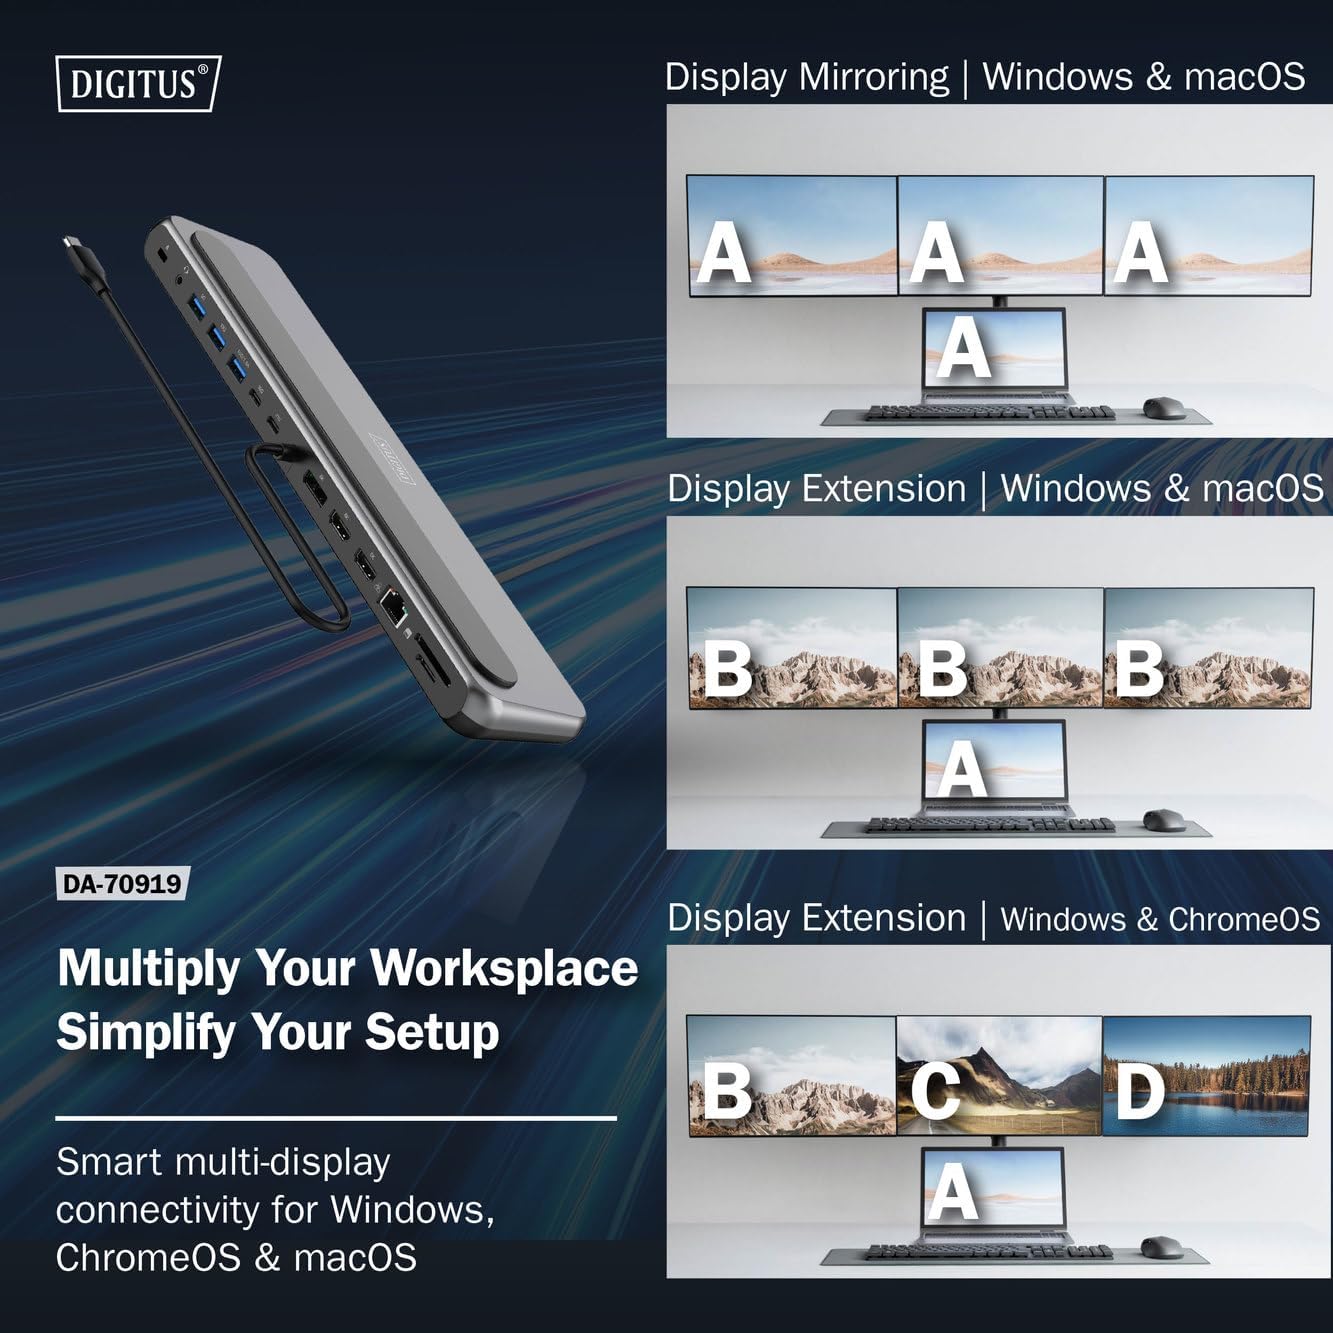
그림 4: Diagram showing display mirroring and extension modes for Windows, macOS, and ChromeOS. This image illustrates the various display configurations supported by the docking station, including mirroring your screen or extending it across multiple external monitors on Windows, macOS, and ChromeOS.
- 미러 모드: Duplicates your laptop's display onto the external monitors.
- Extend Mode (Windows/ChromeOS): Extends your desktop across multiple external monitors, allowing for a multi-tasking environment. Supports dual monitors (2x 4K/60Hz) and triple monitors (1x 4K/60Hz + 2x 4K/30Hz) in MST (Multi Stream Transport) mode.
- Extend Mode (macOS): macOS typically supports extended desktop to one external monitor, with other external monitors mirroring each other.
To configure display settings, access your operating system's display settings (e.g., Windows Display Settings, macOS System Preferences > Displays).
데이터 전송
Utilize the USB-A and USB-C data ports for connecting external storage devices, keyboards, mice, and other USB peripherals. The USB 3.2 Gen 2 ports offer speeds up to 10Gbps, while the USB 3.2 Gen 1 port offers speeds up to 5Gbps.
전력 공급
When a compatible USB-C PD power adapter is connected to the docking station's PD input port, the docking station can deliver up to 85W of power to charge your connected laptop. This allows you to power your laptop and peripherals through a single USB-C connection.
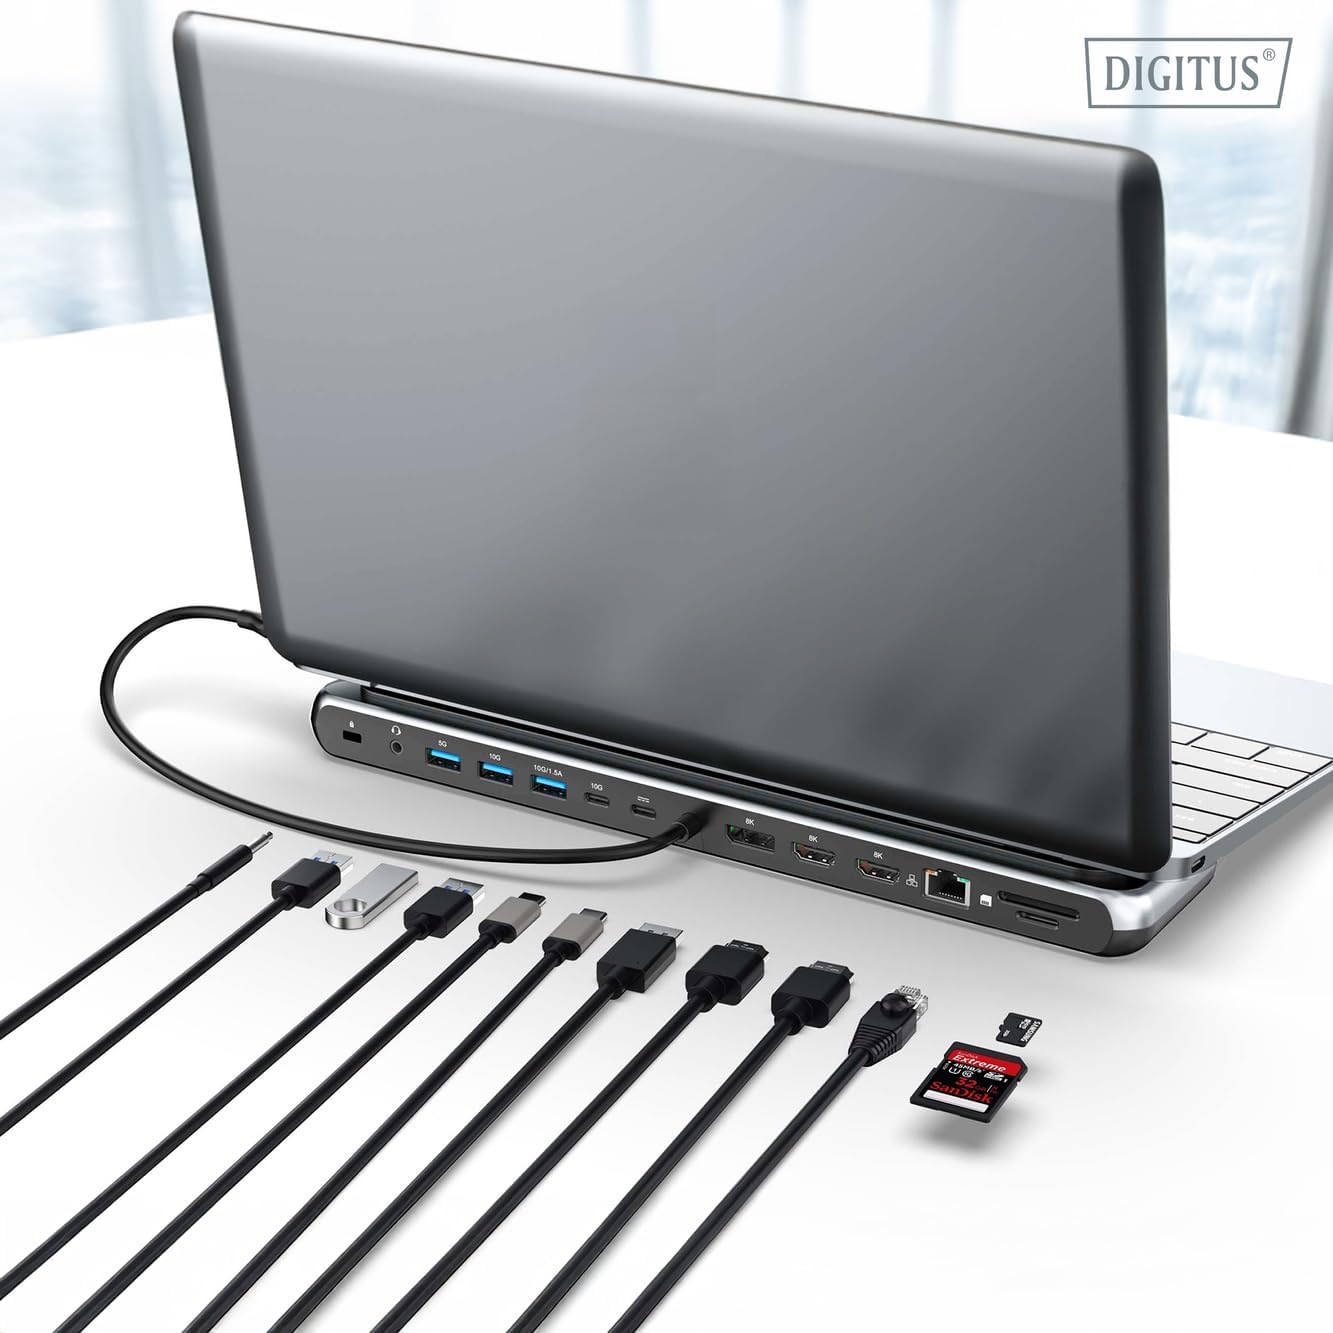
그림 5: Illustration of the docking station's fast charging capability via USB-C Power Delivery. This image demonstrates the Power Delivery function, showing a 100W input to the docking station and an 85W output to charge the connected laptop.
네트워크 연결
Connect an Ethernet cable to the RJ45 port for a stable and high-speed wired network connection (10/100/1000 Mbps Gigabit Ethernet).
카드 리더기
Insert SD or MicroSD cards into the dedicated slots for quick access to photos, videos, and other files. The card readers support transfer speeds up to 104 MBps.
오디오 출력
Connect your headphones or speakers to the 3.5mm audio jack for audio output.
유지
- 청소: Use a soft, dry cloth to clean the surface of the docking station. Avoid using liquid cleaners or solvents.
- 저장: 도킹 스테이션은 직사광선과 극한의 온도를 피해 시원하고 건조한 곳에 보관하세요.
- 손질: Avoid dropping or subjecting the device to strong impacts. Do not attempt to disassemble the docking station.
문제 해결
도킹 스테이션 사용 중 문제가 발생하면 다음의 일반적인 해결 방법을 참조하십시오.
- 디스플레이 출력 없음:
- 노트북의 USB-C 포트가 DisplayPort 대체 모드를 지원하는지 확인하세요.
- Check all video cables (HDMI/DP) are securely connected to both the docking station and the monitor.
- 모니터의 전원이 켜져 있고 올바른 입력 소스로 설정되어 있는지 확인하세요.
- 문제를 격리하려면 한 번에 한 대의 모니터를 연결해 보세요.
- 노트북의 그래픽 드라이버를 업데이트하세요.
- 노트북에 전원 공급이 되지 않음:
- Ensure a compatible USB-C PD power adapter (up to 100W) is connected to the docking station's PD input port.
- 노트북의 USB-C 포트가 Power Delivery를 지원하는지 확인하세요.
- 전원 어댑터와 케이블이 손상되었는지 확인하세요.
- USB 장치가 인식되지 않음:
- USB 장치를 도킹 스테이션의 다른 포트에 다시 연결하십시오.
- Ensure the docking station is properly connected to the host laptop.
- If using a high-power USB device, ensure the docking station is connected to an external power adapter.
- 이더넷 연결 문제:
- 도킹 스테이션과 라우터/모뎀 모두에 이더넷 케이블이 연결되어 있는지 확인하세요.
- 노트북의 네트워크 설정을 확인하세요.
- 라우터/모뎀과 노트북을 재시작하세요.
- 카드 리더기가 작동하지 않습니다:
- Ensure the SD/MicroSD card is inserted correctly and fully.
- Test the card with another device to confirm it is not damaged.
명세서
| 특징 | 사양 |
|---|---|
| 모델 | 다-70919 |
| 호스트 연결 | USB-C(통합 케이블) |
| 비디오 출력 | HDMI 2개, DisplayPort(DP) 1개 |
| Max. Single Display Resolution | 8K(7680x4320) @ 30Hz |
| Max. Dual Display Resolution (MST) | 2x 4K (3840x2160) @ 60Hz |
| Max. Triple Display Resolution (MST) | 1x 4K@60Hz + 2x 4K@30Hz |
| USB-A 데이터 포트 | 2x USB 3.2 Gen 2 (10Gbps), 1x USB 3.2 Gen 1 (5Gbps) |
| USB-C 데이터 포트 | 1x USB 3.2 Gen 2(10Gbps) |
| 전력 공급(PD) 입력 | USB-C PD 3.0 (up to 100W) |
| Power Delivery (PD) Output to Host | 최대 85W |
| 이더넷 | RJ45 Gigabit (10/100/1000 Mbps) |
| 카드 리더기 | SD, MicroSD (104 MBps) |
| 오디오 | 1x 3.5mm 오디오 잭 |
| 호환성 | 윈도우, 맥OS, 크롬OS |
| 작동 온도 | 0°C ~ 45°C(32°F ~ 113°F) |
| 보관 온도 | -10°C ~ 70°C(14°F ~ 158°F) |
보증 및 지원
The Digitus DA-70919 USB-C 8K 12-Port Docking Station comes with a 2년 보증 구매일로부터 적용됩니다. 이 보증은 제조상의 결함을 보장하며, 제품이 정상적인 사용 환경에서 설명된 대로 작동함을 보장합니다.
For technical support, warranty claims, or further assistance, please contact your retailer or visit the official Digitus website for contact information. Please have your product model number (DA-70919) and proof of purchase ready when seeking support.