plimpton P2
플림턴 플림패드 P2 안드로이드 15 태블릿 사용자 설명서
1. 제품 오버view
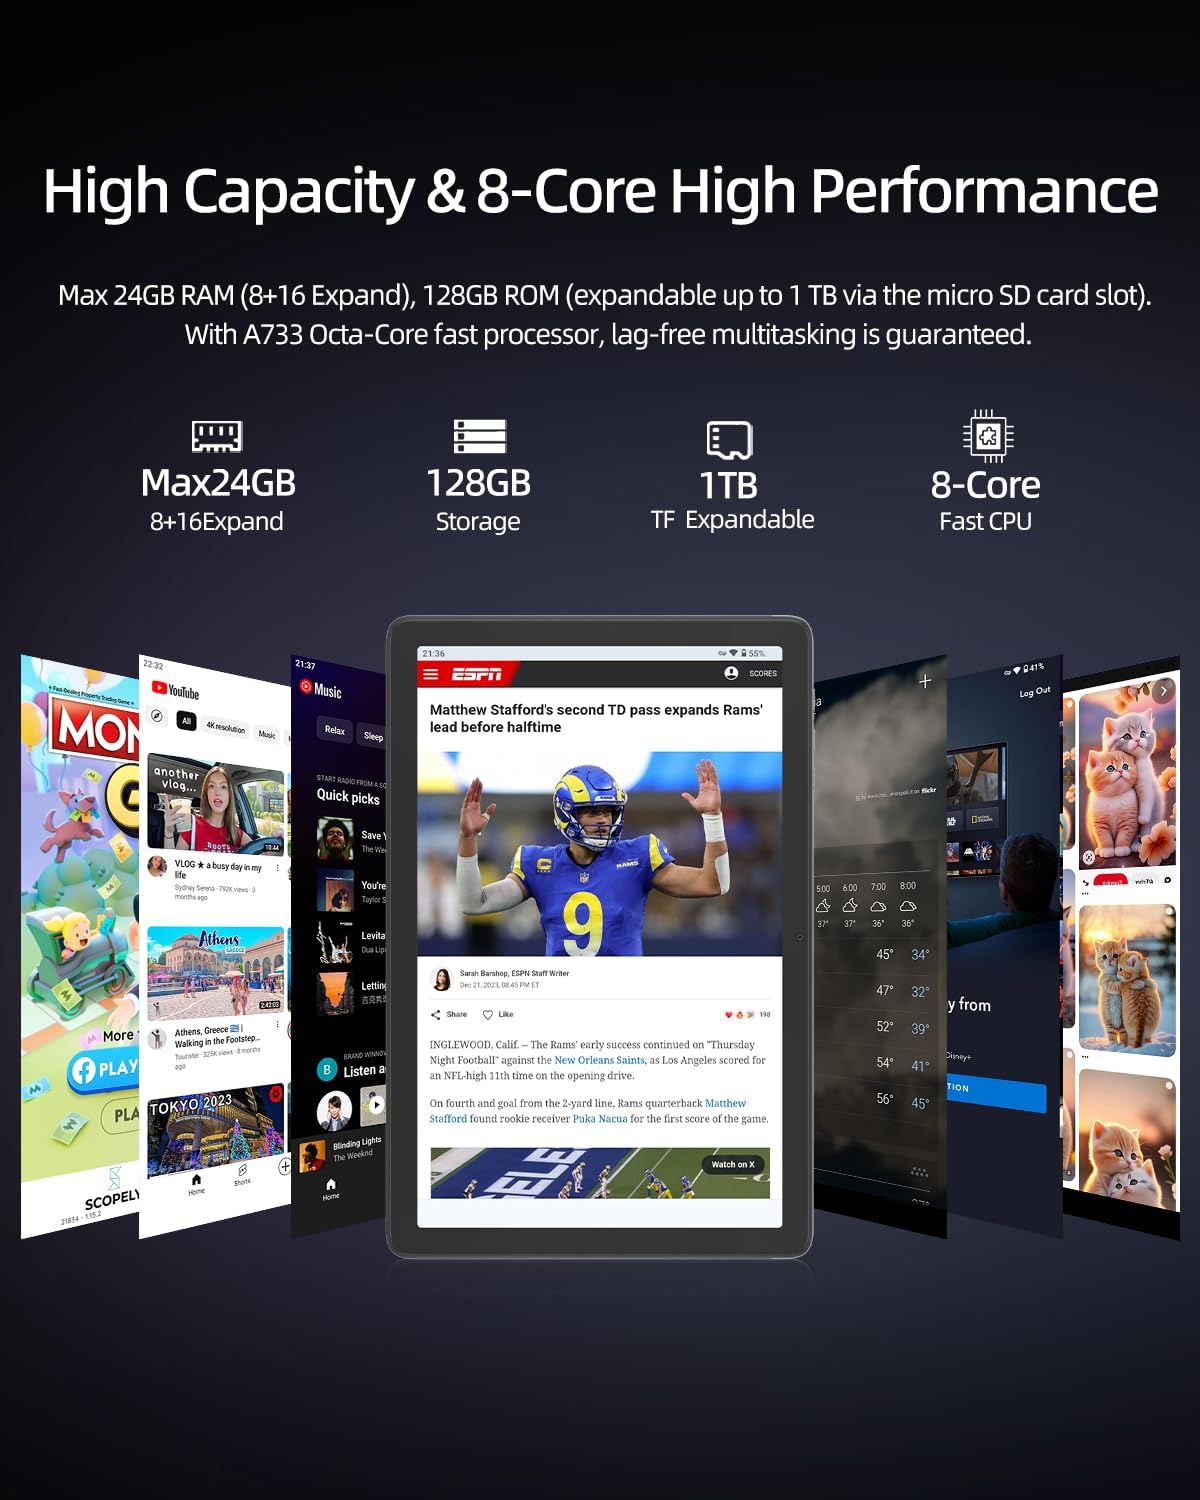
The plimpton PlimPad P2 is a 10-inch Android 15 tablet designed for work, study, and entertainment. It features a powerful 8-core CPU, 24GB RAM (8GB physical + 16GB virtual), and 128GB of UFS 3.1 internal storage, expandable up to 1TB via an external memory card. Equipped with a long-lasting 7500mAh battery, AI-powered gesture control, Wi-Fi 6, and Bluetooth 5.4, the PlimPad P2 offers a smooth, efficient, and intuitive user experience.
주요 특징:
- 운영 체제: Latest Android 15 for enhanced performance and security.
- 프로세서: Powerful 8-core CPU for smooth multitasking and gaming.
- 메모리 및 스토리지 : 24GB RAM (8GB + 16GB expandable) and 128GB UFS 3.1 storage, expandable to 1TB.
- 배터리: 7500mAh long-lasting battery for extended use.
- 표시하다: 10.1-inch screen with AI-adjusted eye protection mode.
- 연결성: Wi-Fi 6 and Bluetooth 5.4 for fast and stable connections.
- AI 기능: AI-powered gesture control, smart screen adjustment, and optimized power consumption.
- 설계: Durable and reliable aluminum alloy body for better heat dissipation and longevity.
2. 상자 안에 무엇이 들어있나요?
Your plimpton PlimPad P2 package includes the following items:
- 1 x plimpton PlimPad P2 Android 15 Tablet
- Type-C 충전 케이블에 USB-A 1개
- 1 x AC 전원 어댑터
- 1 x 사용자 설명서
- 1 x SIM Ejector Pin

3. 설정 가이드
3.1 전원 켜기/끄기
- 전원을 켜려면: Press and hold the Power button (located on the side) until the plimpton logo appears on the screen.
- 전원을 끄려면: Press and hold the Power button, then select 'Power off' from the options that appear.
- 재시작하기 위해: 전원 버튼을 길게 누른 다음 옵션에서 '다시 시작'을 선택합니다.
3.2 초기 구성
태블릿을 처음 켜면 초기 설정 과정을 안내합니다.
- 원하는 언어를 선택하세요.
- Wi-Fi 네트워크에 연결합니다.
- Google 계정으로 로그인하거나 새 계정을 만드세요.
- Follow on-screen prompts to set up security, privacy, and other preferences.
3.3 MicroSD 카드 삽입
To expand storage up to 1TB:
- 태블릿 측면에서 SIM/MicroSD 카드 트레이를 찾으세요.
- 제공된 SIM 카드 분리 핀을 트레이 옆의 작은 구멍에 넣어 트레이를 여십시오.
- Place the MicroSD card into the designated slot on the tray.
- 트레이를 태블릿에 다시 살짝 밀어 넣어 딸깍 소리가 나면서 제자리에 고정되도록 합니다.
3.4 태블릿 충전
Use the provided USB-A to Type-C cable and AC power adapter to charge your tablet. The reversible Type-C port allows for easy connection.
4. 사용 설명서
4.1 기본 탐색
The PlimPad P2 features a responsive touchscreen for intuitive interaction:
- 수도꼭지: Select items, open apps, or activate functions.
- 강타: 페이지, 메뉴 또는 홈 화면을 스크롤하세요.
- 핀치 투 줌: 화면의 콘텐츠를 확대하거나 축소하세요.
4.2 AI-Powered Gesture Control
Enhance your interaction with the tablet using AI gesture control. These features allow for hands-free operation:
- Enable Gestures: 로 이동 설정 > 시스템 > 제스처 to customize and enable specific gestures.
- 스크롤링: Use specific hand movements (e.g., waving hand up/down) to scroll through content without touching the screen.
- 스크린샷: A two-finger swipe gesture can capture a screenshot.
- Selfie Camera Activation: Certain hand signals can activate the front-facing camera for selfies.
4.3 Display Settings & Eye Protection
사용자 정의 viewing experience and protect your eyes:
- 밝기 조정: 이동하다 설정 > 디스플레이 > 밝기 to manually adjust or enable adaptive brightness.
- AI-Adjusted Eye Protection Mode: This mode minimizes blue light and reduces eye strain, ideal for long reading or work sessions. It automatically adjusts based on ambient light. Enable it under Settings > Display > AW Reading Mode.
- Black-White Mode: For a monochrome display, activate this feature under Settings > Display > Black-White Mode.
4.4 분할 화면을 이용한 멀티태스킹
The PlimPad P2 supports split-screen functionality, allowing you to run two applications simultaneously:
- 사용하고 싶은 첫 번째 앱을 엽니다.
- Swipe up from the bottom of the screen to access recent apps.
- Tap and hold the icon of the first app, then select 'Split screen'.
- 최근 사용한 앱 목록이나 앱 서랍에서 두 번째 앱을 선택하여 화면의 나머지 절반을 채우세요.
4.5 Connectivity (Wi-Fi 6 & Bluetooth 5.4)
Connect to networks and devices:
- 와이파이: 입장 설정 > 네트워크 및 인터넷 > Wi-Fi to connect to available networks. Wi-Fi 6 ensures super-fast and stable internet connections.
- 블루투스: 이동하다 설정 > 연결된 기기 > 블루투스 to pair with Bluetooth 5.4 compatible devices like headphones or speakers.
4.6 카메라 사용
The tablet features dual cameras (front and rear) for photos and video calls:
- 홈 화면이나 앱 서랍에서 카메라 앱을 엽니다.
- 화면의 아이콘을 사용하여 전면 카메라와 후면 카메라를 전환합니다.
- 셔터 버튼을 눌러 사진을 촬영하거나 동영상 녹화를 시작/정지하세요.
4.7 스토리지 관리
The PlimPad P2 utilizes UFS 3.1 storage for faster app loading and file transfers. You can manage your storage via 설정 > 저장소.
4.8 Parental Controls & Digital Wellbeing
Manage usage and set limits for a balanced digital life:
- 입장 설정 > 디지털 웰빙 및 자녀 보호.
- 설정 초점 모드 to pause distracting apps.
- 구성 앱 제한 for individual applications.
- 사용하세요 주의하세요 feature to receive reminders to look up from your tablet while walking.
5. 유지관리
5.1 태블릿 청소
- 부드럽고 보푸라기가 없는 천을 사용하여 화면과 본체를 닦으세요.
- 가혹한 화학물질이나 연마재의 사용은 피하세요.
5.2 소프트웨어 업데이트
Ensure your tablet is running the latest software for optimal performance and security. Check for updates via 설정 > 시스템 > 시스템 업데이트.
5.3 배터리 관리
- 극한의 온도를 피하세요.
- 배터리를 자주 완전히 방전시키지 마세요.
- 제공된 충전기만 사용하십시오.
5.4 신체적 관리
The PlimPad P2 features a durable aluminum alloy body and reinforced internal structure for enhanced longevity and heat dissipation. While designed to be robust, avoid dropping the device or exposing it to excessive force.
6. 문제 해결
6.1 일반적인 문제 및 해결 방법
- 장치가 켜지지 않음: 배터리가 충전되어 있는지 확인하세요. 충전기에 연결하고 몇 분 정도 기다린 후 다시 전원을 켜보세요.
- Wi-Fi 연결 문제: 설정에서 Wi-Fi가 활성화되어 있는지 확인하세요. 라우터와 태블릿을 다시 시작하세요. 네트워크를 삭제하고 다시 연결하세요.
- 앱이 충돌하거나 정지됨: 앱을 닫았다가 다시 엽니다. 앱의 캐시를 지웁니다(설정 > 앱 > [앱 이름] > 저장공간 > 캐시 지우기). Ensure the app is updated.
- 느린 성능: 불필요한 백그라운드 앱을 종료하세요. 캐시와 임시 파일을 삭제하세요. files. Consider expanding storage with a MicroSD card if internal storage is full.
6.2 공장 초기화
문제가 계속 발생하는 경우 공장 초기화를 통해 해결될 수 있습니다. 경고: 이렇게 하면 태블릿의 모든 데이터가 삭제됩니다. 진행하기 전에 중요한 데이터를 백업하십시오.
- 이동하다 설정 > 시스템 > 재설정 옵션.
- 선택하다 모든 데이터 삭제(공장 초기화).
- 선택 사항을 확인하고 화면의 지시를 따르세요.
7. 사양
| 특징 | 세부 사항 |
|---|---|
| 상표 | plimpton |
| 모델명 | P2 |
| 운영 체제 | 안드로이드 15 |
| 화면 크기 | 10.1 인치 |
| 디스플레이 해상도 | 1280x800 픽셀 |
| RAM 메모리 설치됨 | 8GB (24GB까지 확장 가능) |
| 메모리 저장 용량 | 128GB (1TB까지 확장 가능) |
| 프로세서 설명 | 8-Core ARM |
| 배터리 용량 | 7500밀리amp 시간 |
| 배터리 평균 수명 | 10시간 |
| 무선 기술 | Wi-Fi 6(802.11ax), 블루투스 5.4 |
| 카메라 설명 | 전면, 후면 |
| 품목 무게 | 800그램 |
| 색상 | 보라 |
8. 보증 및 지원
plimpton officially provides lifetime technical support and a 1-year free replacement warranty for non-human factor damage. For any questions or assistance, please feel free to contact us through the official plimpton web사이트 또는 소매업체의 지원 채널.
Ask a question about this manual
Ask about setup, troubleshooting, compatibility, parts, safety, or missing instructions. Manuals+ will review the question and use this page’s manual context to help answer it.