
1. 서론
This manual provides detailed instructions for the Tenlamp G9 Podcast Equipment Audio Mixer. Please read this manual thoroughly before using the device to ensure proper operation and to maximize its features. The G9 mixer is designed for podcasting, live streaming, short video recording, and other audio content creation, offering a range of audio control and enhancement functions.
2. 제품 오버view
The Tenlamp G9 is a versatile audio mixer featuring a 4.5-inch HD screen for real-time audio adjustments. It includes a 3-band EQ, dual reverb, voice changer, and noise reduction capabilities. The device is designed for plug-and-play compatibility with PCs, Macs, and mobile devices.
2.1 주요 특징
- 플러그 앤 플레이: Quick connection to PC, Mac, or mobile devices without complex setup.
- Visual Audio Mixing: 4.5-inch HD screen displays audio adjustments in real-time.
- 소음 감소: Ensures clear voice output for recordings and live broadcasts.
- 포괄적인 제어: Individual controls for microphone, music, headphone, main output, 3-band EQ, dual reverb, and pitch.
- 음성 사용자 정의: Includes voice changer and auto-tune functions.
2.2 패키지 내용
- 1x Tenlamp G9 Audio Mixer
- 1x USB A-C Cable
- 1x 3.5mm TRRS Audio Cable
- 1x USB-C OTG Cable
- 1x 사용자 매뉴얼(이 문서)
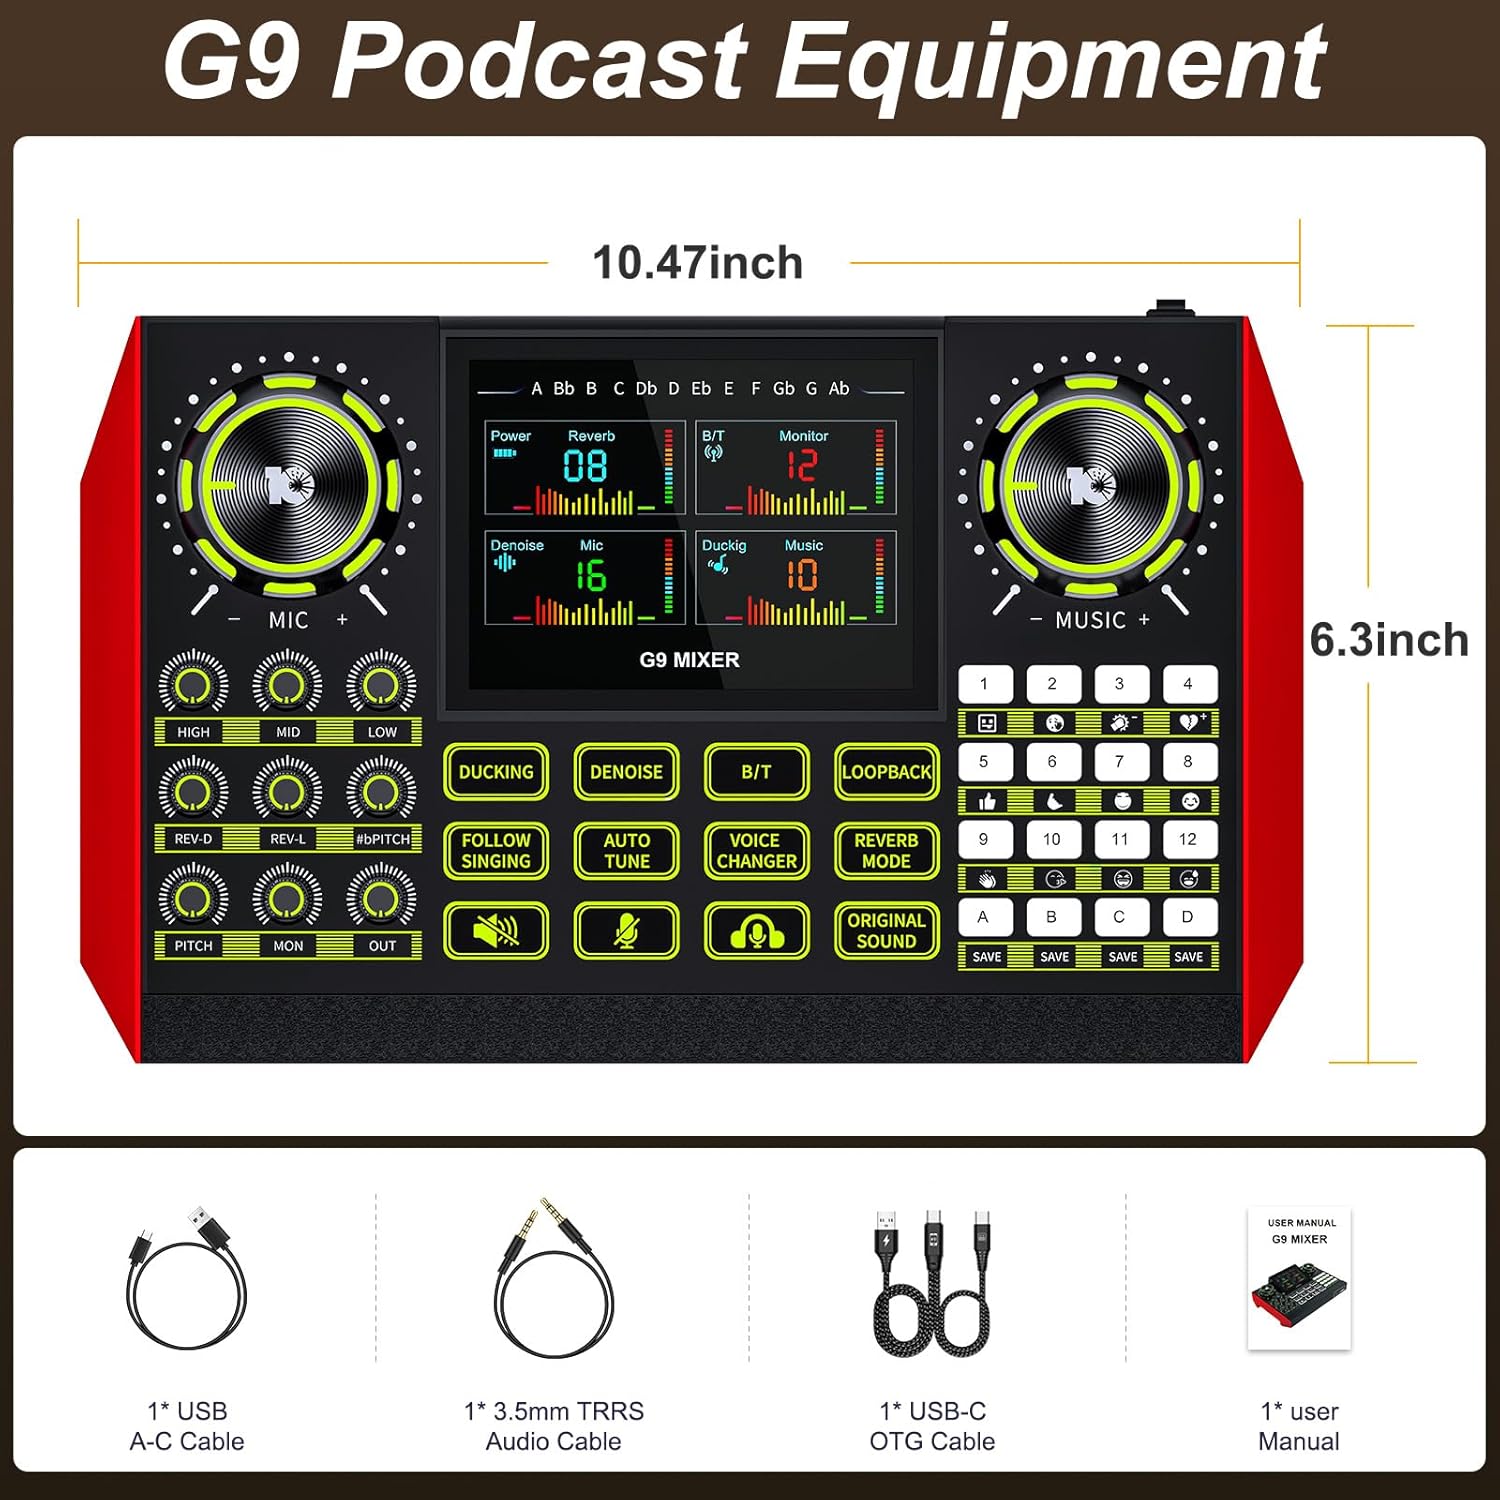
The G9 mixer measures approximately 10.47 inches in width and 6.3 inches in height.
3. 설정
The Tenlamp G9 mixer is designed for straightforward setup. Follow these steps to connect your device.
3.1 전원 연결
Connect the provided USB A-C cable to the DC 5V port on the mixer and to a power source (e.g., computer USB port, USB wall adapter). The mixer also features a built-in battery for portable use.
3.2 마이크 및 악기 연결
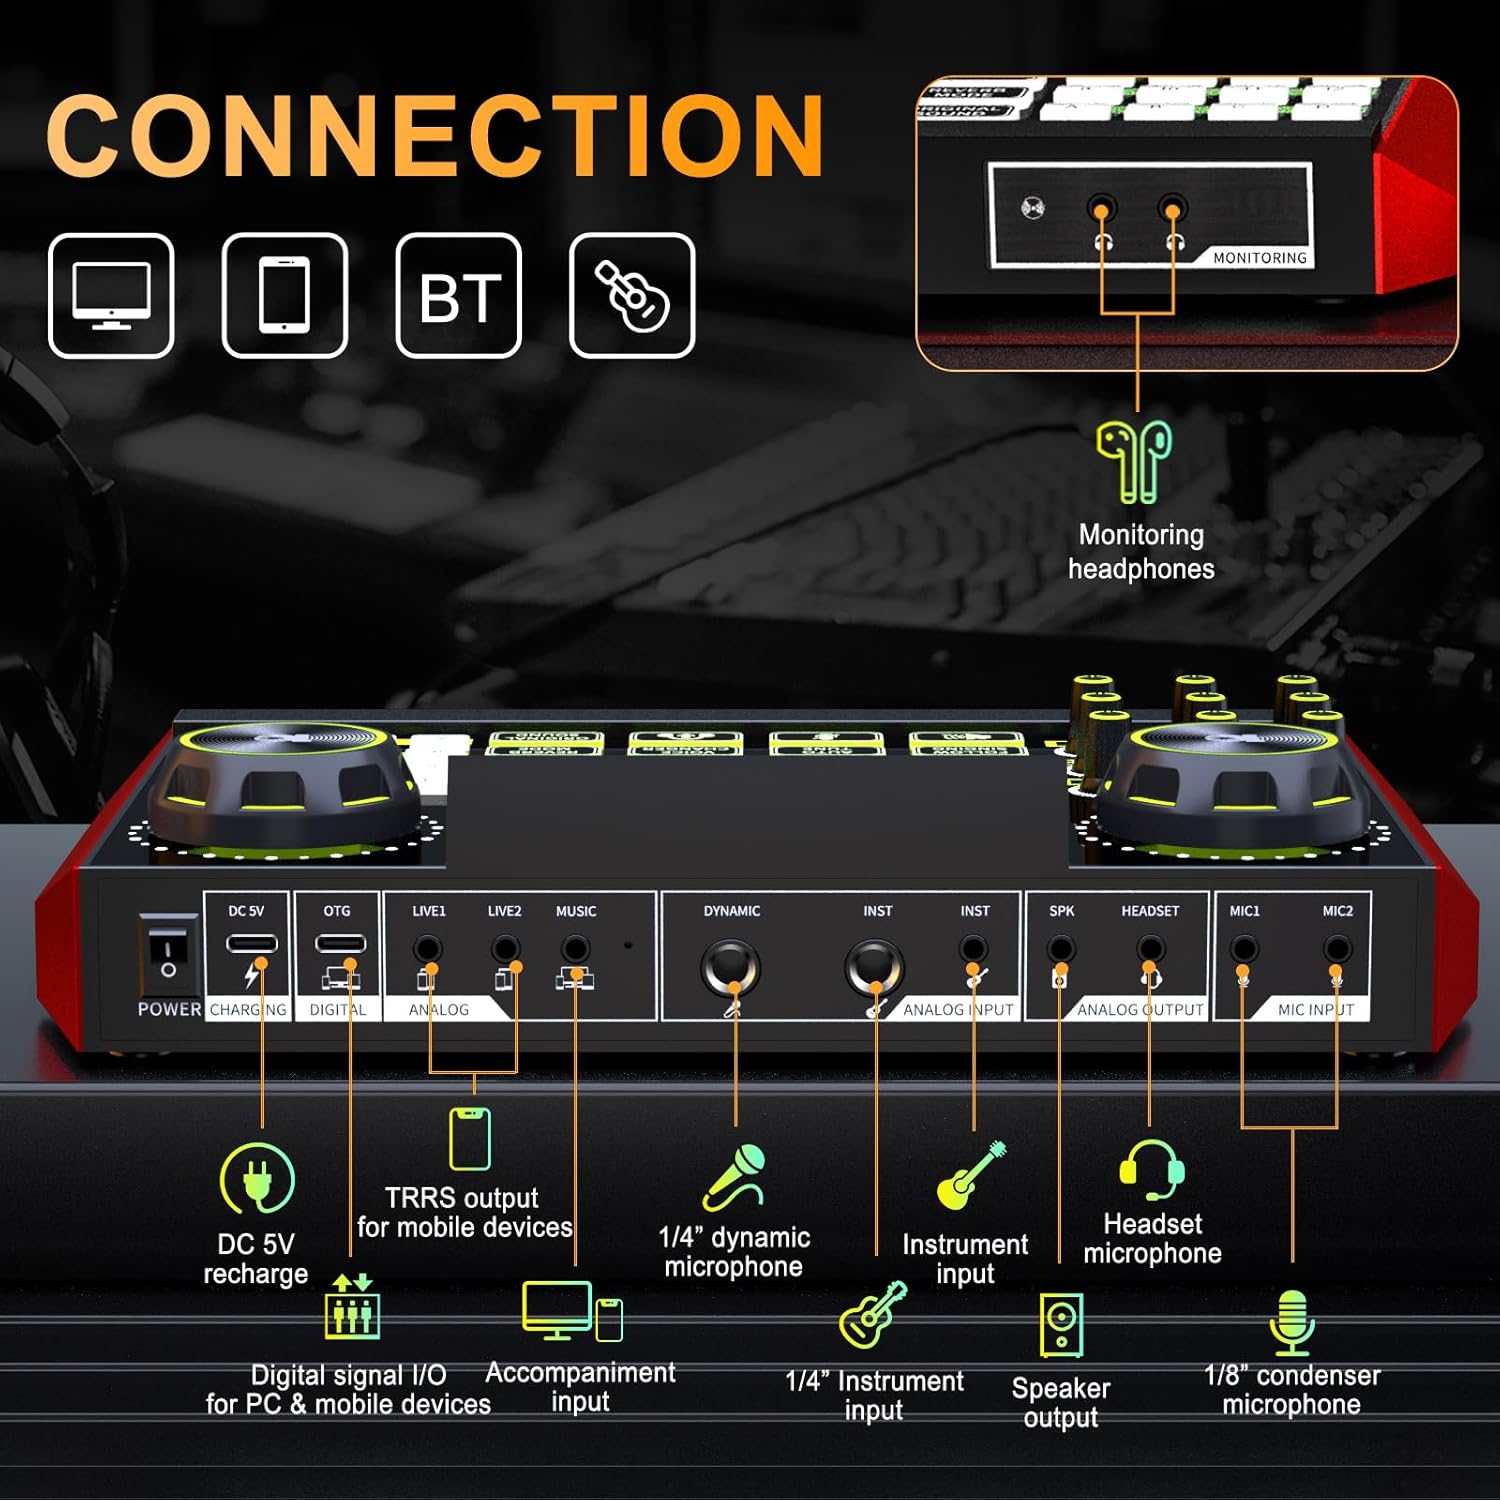
- Microphone Input (MIC1, MIC2): Use 1/8" (3.5mm) condenser microphones.
- Dynamic Microphone Input (DYNAMIC): Use a 1/4" dynamic microphone.
- Instrument Input (INST): Connect instruments via a 1/4" jack.
- 헤드셋 마이크: Connect a headset with a microphone to the dedicated headset port.
3.3 Connecting to Devices (PC, Mac, Mobile)
- Digital Signal I/O (DIGITAL): Use the USB-C OTG cable to connect to a PC, Mac, or compatible mobile device for digital audio input and output.
- Analog Input/Output (LIVE1, LIVE2, MUSIC): Use 3.5mm TRRS audio cables for analog connections to mobile devices or other audio sources.
- 블루투스(BT): Activate Bluetooth on the mixer and your device to pair wirelessly for music input.
3.4 Monitoring Headphones and Speaker Output
- Monitoring Headphones (MONITORING): Connect headphones to the 3.5mm monitoring jack to hear your mix in real-time.
- Speaker Output (SPK): 오디오 재생을 위해 외부 스피커를 연결하세요.
4. 운영
The G9 mixer provides intuitive controls for managing your audio. The 4.5-inch HD screen displays current settings and levels, allowing for precise adjustments.
4.1 전원 켜기/끄기
Press and hold the Power button to turn the mixer on or off. The screen will illuminate upon activation.
4.2 Adjusting Microphone Settings
Use the dedicated knobs for 높은, 중간, 그리고 낮은 to adjust the 3-band equalizer for your microphone. The REV-D 그리고 레브-엘 knobs control the dual reverb depth and length. The 정점 knob adjusts the microphone's pitch.

4.3 Music and Output Volume
그만큼 음악 knob controls the input volume of background music. The 월 knob adjusts the monitoring volume for your headphones, and the 밖으로 knob controls the main output volume.
4.4 특수 기능
- 물오리 사냥: 말할 때 배경 음악 볼륨이 자동으로 줄어듭니다.
- 잡음 제거: Activates the noise reduction feature for clearer vocals.
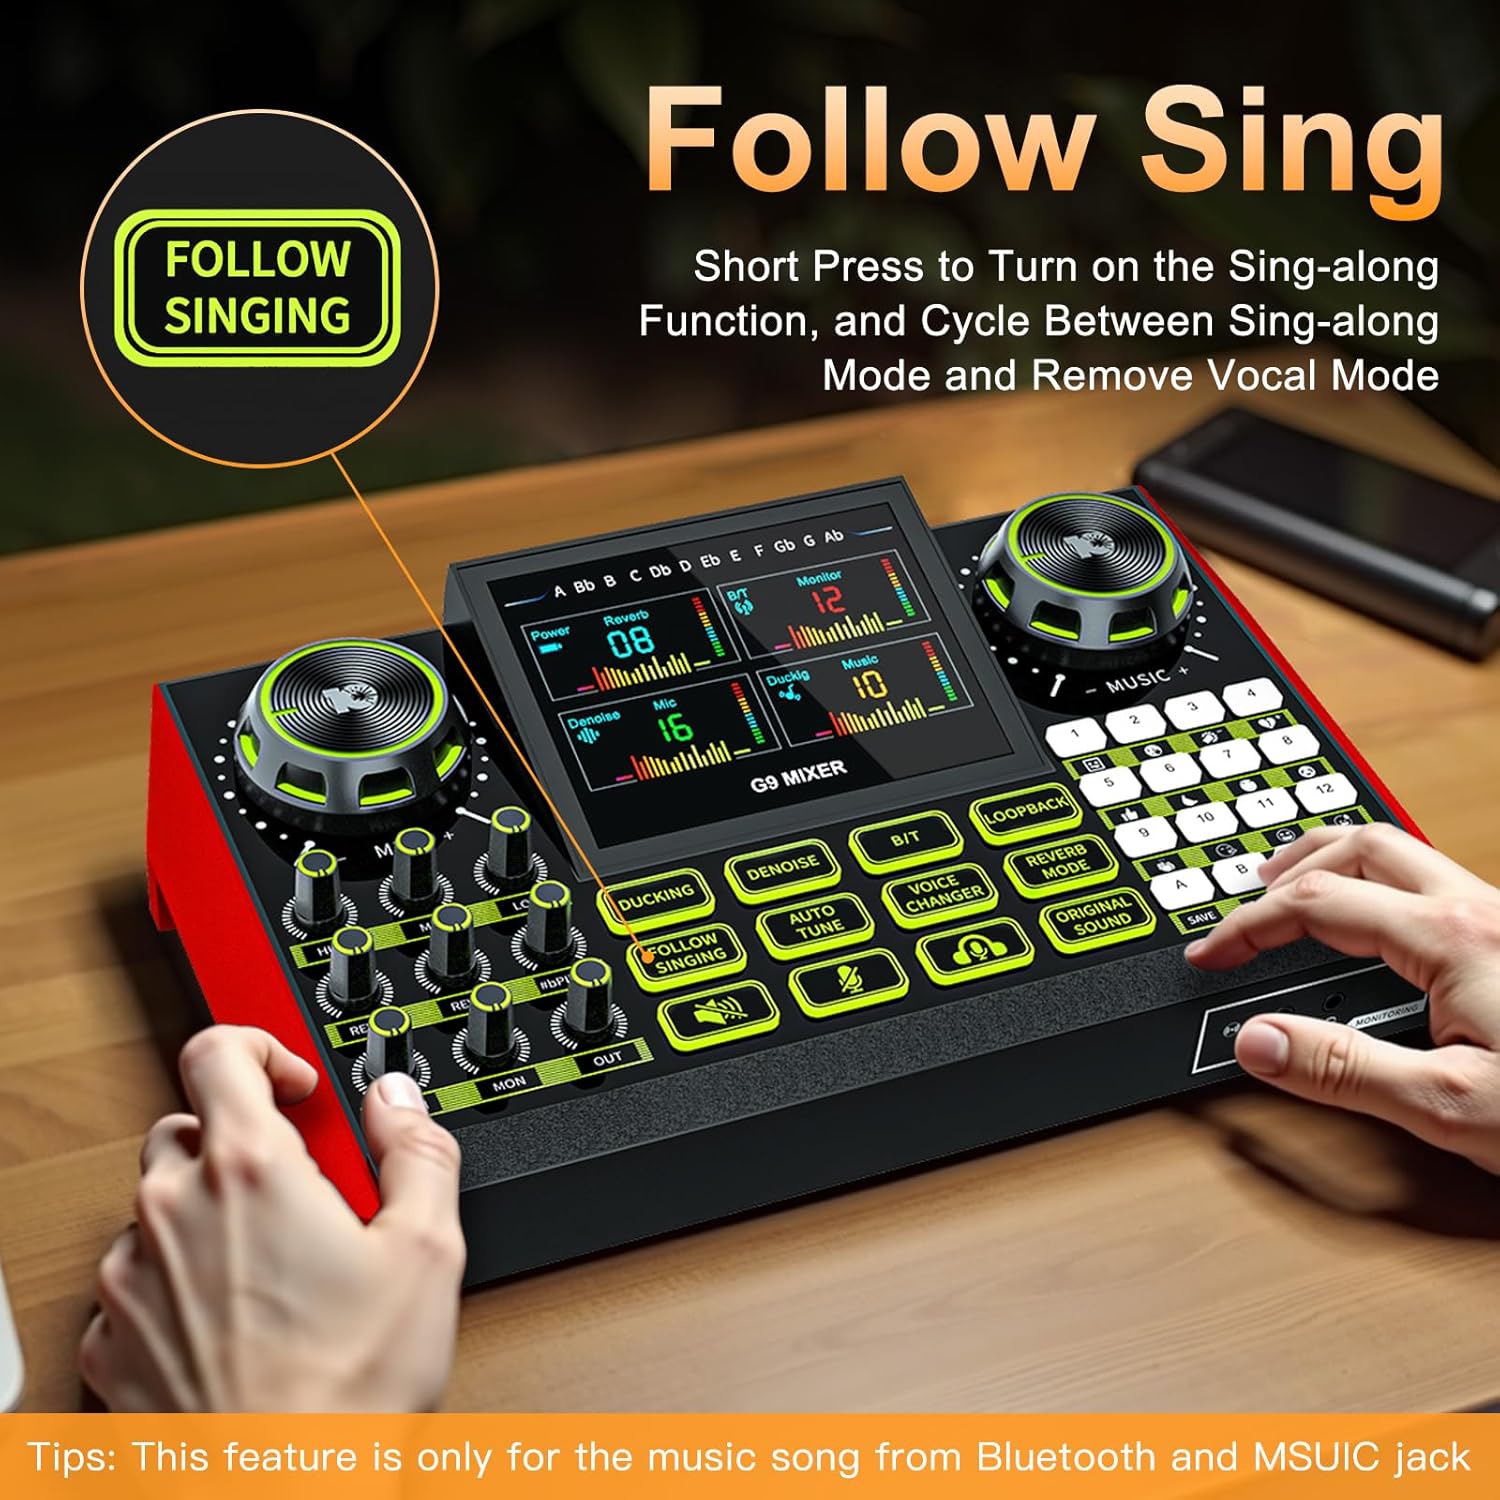
- FOLLOW SINGING: Short press to turn on the sing-along function, which cycles between sing-along mode and vocal removal mode. Note: This feature is primarily for music from Bluetooth and the MUSIC jack.
- 오토튠: Engages the auto-tune effect for vocals.
- 음성 변조기: Cycles through four different voice changing modes (female voice, uncle voice, baby voice, magic voice).
- 루프백: Enables or disables the loopback function, which sends the output audio back to the input for recording or streaming.
- 리버브 모드: 리버브 효과를 조정합니다.
- ORIGINAL SOUND: Restores the original sound without effects.

4.5 사용자 지정 가능한 사운드 패드
The G9 mixer features four customizable sound pads (A, B, C, D). You can save your favorite voice modes, including current microphone volume, EQ, reverb, pitch, and auto-tune settings, to these pads for quick recall.

5. 유지관리
To ensure the longevity and optimal performance of your Tenlamp G9 Audio Mixer, follow these maintenance guidelines:
- 청소: Use a soft, dry cloth to clean the surface of the mixer. Avoid using abrasive cleaners, solvents, or harsh chemicals.
- 저장: 믹서기는 직사광선과 극한의 온도를 피해 서늘하고 건조한 곳에 보관하세요.
- 손질: 기기를 조심스럽게 다루십시오. 떨어뜨리거나 강한 충격을 주지 마십시오.
- 액체 노출: Keep the mixer away from liquids. Moisture can damage internal components.
6. 문제 해결
If you encounter issues with your Tenlamp G9 Audio Mixer, refer to the following common problems and solutions:
6.1 사운드 출력 없음
- 연결 확인: Ensure all audio cables (microphone, headphones, speakers, device connections) are securely plugged into the correct ports.
- 볼륨 레벨: 확인해주세요 마이크, 음악, 월, 그리고 밖으로 volume knobs are not set to minimum or muted.
- 기기 설정: On your connected PC, Mac, or mobile device, ensure the G9 mixer is selected as the default audio input and output device.
- 힘: Confirm the mixer is powered on and has sufficient battery charge or is connected to a power source.
6.2 오디오 품질이 좋지 않음 / 소음
- 소음 감소: 활성화 노이즈 제거 function to reduce background noise.
- 마이크 배치: 마이크가 음원에서 너무 멀리 떨어져 있지 않고 올바른 위치에 있는지 확인하십시오.
- 케이블 품질: Use high-quality, shielded audio cables to minimize interference.
- 게인 레벨: Adjust microphone gain to prevent clipping or distortion.
6.3 Voice Changer / Effects Not Working
- 기능 활성화: Ensure the specific effect button (e.g., 보이스 체인저, 오토튠) is pressed and active.
- 마이크 입력: Confirm that your microphone is properly connected and receiving input.
6.4 Difficulty with Initial Setup
While the G9 is plug-and-play, some users may find initial setup challenging. Double-check all physical connections and ensure the mixer is recognized by your operating system. Refer to the
Ask a question about this manual
Ask about setup, troubleshooting, compatibility, parts, safety, or missing instructions. Manuals+ will review the question and use this page’s manual context to help answer it.