1. 서론
The PXN Z9 Steering Wheel Desk Mount provides a stable and adjustable platform for your sim racing wheel. Constructed from durable 5-series aluminum alloy, it offers multiple mounting options and compatibility with various wheel bases, ensuring a secure and comfortable racing experience. This manual provides detailed instructions for assembly, installation, operation, and maintenance of your PXN Z9 mount.

Figure 1: PXN Z9 Steering Wheel Desk Mount with clamps.
2. 제품 오버view
2.1 주요 특징
- 내구성 있는 구조: Crafted from high-strength 5-series aluminum alloy for long-lasting durability and reliable support.
- Adjustable Tilt Panel: Features a 4-level tilt panel, allowing adjustments up to 15° for optimal driving posture.
- 듀얼 CLamp 설계: Tool-free dual clamp system securely mounts to desktops up to 70mm (2.75 inches) thick.
- EVA Protection Pads: Integrated EVA pads protect desk surfaces from scratches and pressure marks.
- Multi-Hole Mounting Base: Designed with multiple mounting holes for compatibility with PXN VD Series wheelbases and other standard patterns.
- 다양한 장착 옵션: Supports desk clamp, flat base mount, and side-mount with aluminum profile brackets (sold separately).
2.2 구성 요소 및 치수

그림 2: 폭발 view of the PXN Z9 mount components and key dimensions. Includes top plate, base plate, EVA pads, desk clamp, and locking screws. Mount size: approx. 6.3 × 6.1 × 3.0 inches (assembled). Clamp size: approx. 1.38 × 3.23 × 4.53 inches (fully tightened). Fits desks up to 2.75 inches (70 mm) thick.
3. 설정 지침
Follow these steps to properly set up your PXN Z9 Steering Wheel Desk Mount.
3.1 데스크 클amp 설치
- Ensure your desktop surface is clean and free of obstructions. The desk must be between 0 and 70mm (2.75 inches) thick.
- Position the PXN Z9 mount on the edge of your desk where you intend to install your steering wheel.
- Slide the two desk clamps onto the underside of the mount, aligning them with the designated slots.
- Tighten the locking screws on the clamps by hand until the mount is securely fastened to the desk. Ensure the EVA pads are positioned between the clamps and your desk surface to prevent damage. Do not overtighten.

Figure 3: PXN Z9 Steering Wheel Desk Mount securely installed on a desktop using the dual clamps.
3.2 Wheel Stand Mount Installation
The PXN Z9 mount can be bolted directly onto most sim racing stands that feature a flat mounting surface.
- Remove the desk clamps if they are attached.
- Align the pre-drilled bottom holes of the PXN Z9 base plate with the mounting holes on your sim racing stand.
- Secure the mount to the stand using appropriate bolts and nuts (not included, typically supplied with the racing stand or wheel base).
3.3 알루미늄 프로file Side Mount Installation
For custom setups, the PXN Z9 supports side-mounted installation using aluminum profiles and corner brackets. These brackets are sold separately.
- Obtain compatible aluminum profile 괄호.
- Attach the brackets to the side of the PXN Z9 mount using appropriate hardware.
- Mount the assembly to your aluminum profile rig according to the bracket manufacturer's instructions.
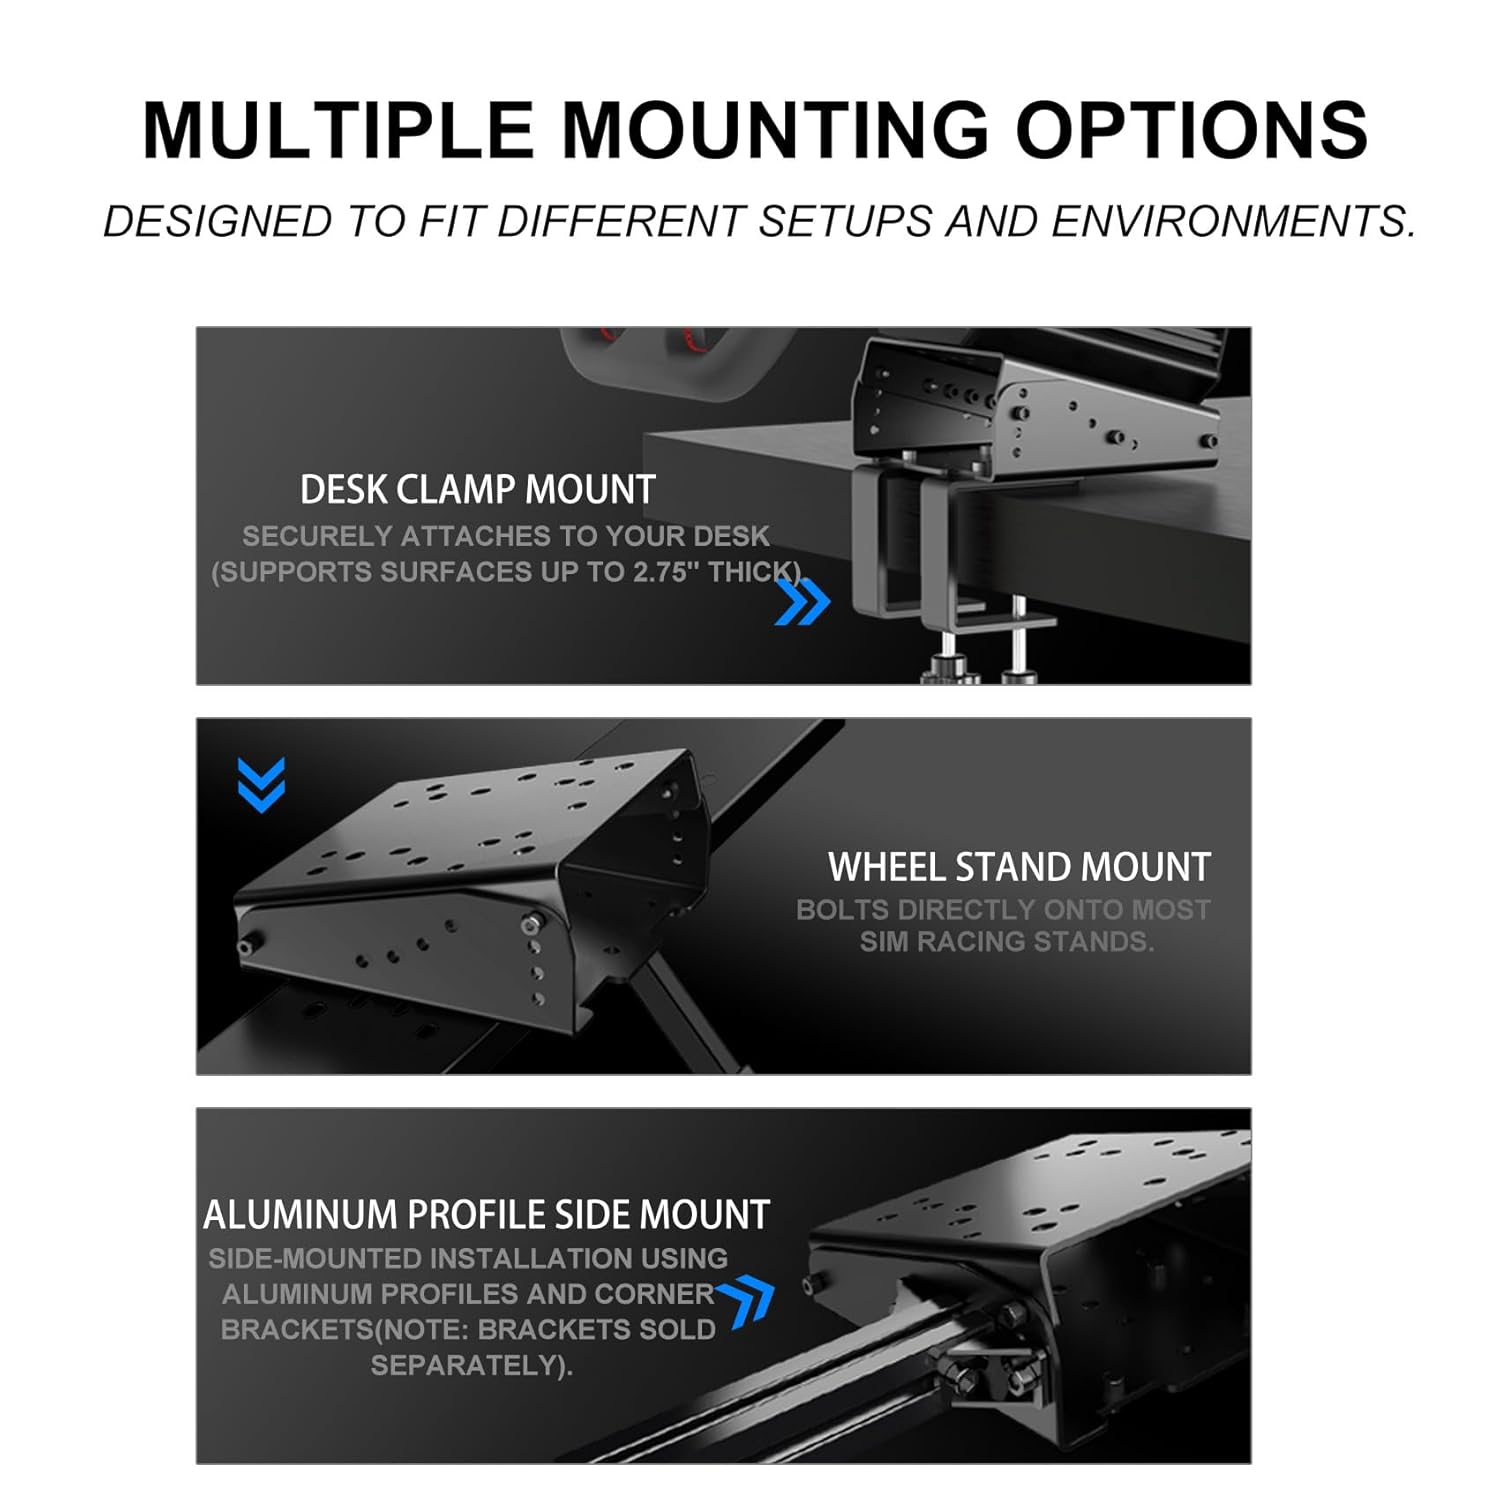
Figure 4: Multiple mounting options for the PXN Z9, including desk clamp, wheel stand, and aluminum profile side mount.
3.4 Wheel Base Compatibility
The PXN Z9 features a multi-slot design to accommodate a wide range of steering wheel bases. Refer to the diagram below for specific hole patterns and compatible models.

Figure 5: Hole pattern layout for PXN Z9, indicating compatibility with various wheel bases such as PXN VD4/VD6/VD10/V12, Moza R3/R5/R21/R16/R9, Logitech G27/G29/G920/G923, Simagic Alpha/M10, and Fanatec CSL/DD1/DD2.
To install your steering wheel base:
- Align the mounting holes on your steering wheel base with the corresponding holes on the PXN Z9 top plate.
- Secure the wheel base using the screws provided with your steering wheel. Ensure all screws are tightened firmly but do not overtighten.
4. 사용 설명서
The PXN Z9 mount allows for adjustment of the steering wheel's tilt angle to enhance comfort and ergonomics during gameplay.
4.1 기울기 각도 조정
- Locate the tilt adjustment mechanism on the side of the mount (refer to Figure 2).
- Loosen the securing bolts or levers that hold the top plate in place.
- Adjust the top plate to one of the four available tilt positions, up to a maximum of 15°.
- Once the desired angle is achieved, firmly tighten the securing bolts or levers to lock the top plate in position.
5. 유지관리
Regular maintenance ensures the longevity and optimal performance of your PXN Z9 Steering Wheel Desk Mount.
- 청소: Wipe the mount with a soft, dry cloth to remove dust and debris. Avoid using abrasive cleaners or solvents, as these may damage the finish.
- 점검: 주기적으로 모든 나사와 클립을 점검하십시오.amps to ensure they remain tight. Re-tighten any loose fasteners to maintain stability.
- EVA Pads: Inspect the EVA pads for wear or damage. Replace if necessary to continue protecting your desk surface.
6. 문제 해결
If you encounter issues with your PXN Z9 mount, refer to the following common solutions.
6.1 Mount Feels Unstable or Flexes
- CI 확인amp 견고함: Ensure both desk clamps are fully tightened. The locking screws should be firm.
- 책상 두께: Verify that your desk thickness is within the supported range (up to 70mm or 2.75 inches). If the desk is too thin or too thick, the clamps may not provide adequate grip.
- 표면 안정성: Ensure the desk itself is stable and not prone to wobbling.
- Wheel Base Fasteners: Confirm that your steering wheel base is securely attached to the mount's top plate with all necessary screws.
6.2 Steering Wheel Base Does Not Fit
- 호환성 확인: Refer to Figure 5 (Hole Pattern Layout) to confirm that your specific steering wheel base model is compatible with the PXN Z9 mount's pre-drilled holes.
- 조정: Ensure the wheel base is correctly aligned with the mounting holes before attempting to fasten.
7. 사양
| 특징 | 세부 사항 |
|---|---|
| 모델명 | Z9 |
| 상표 | PXN |
| 재료 | 5-Series Aluminum Alloy |
| 색상 | 검은색 |
| 품목 무게 | 0.9 킬로그램 |
| Mount Dimensions (Assembled) | 약 6.3 × 6.1 × 3.0인치 |
| 데스크 Clamp 용량 | Up to 70mm (2.75 inches) thick |
| 조정 가능한 틸트 각도 | Up to 15° (4 levels) |
| 호환성 | PXN VD Series, Moza, Logitech, Simagic, Fanatec (via multi-hole pattern) |
8. 보증 및 지원
For warranty information or technical support, please visit the official PXN website or contact PXN customer service directly. Keep your purchase receipt for any warranty claims.
PXN 공식 스토어: PXN 게이밍 스토어


