ASUS P520 ROG STRIX IMPACT III WL/WHT
ASUS ROG Strix Impact III Wireless Gaming Mouse
사용자 설명서
소개
The ASUS ROG Strix Impact III Wireless Gaming Mouse is engineered for precision and performance, featuring an ultralight 57-gram design, dual-mode wireless connectivity (2.4 GHz RF and Bluetooth), and an advanced ROG AimPoint optical sensor. This manual provides detailed instructions to help you set up, operate, and maintain your gaming mouse for an optimal experience.

그림 1: 상단 view ASUS ROG Strix Impact III 무선 게이밍 마우스에 대한 설명입니다.
상자 안에 무엇이 들어있나요?
제품 패키지에 모든 품목이 들어 있는지 확인하세요.
- ROG Strix Impact III Wireless Optical Wireless Gaming Mouse
- Wireless Receiver (ROG Omni Receiver)
- AA 배터리
- AAA 배터리
- 빠른 시작 가이드
설정
1. 배터리 설치
The ROG Strix Impact III Wireless Gaming Mouse supports both AA and AAA batteries. To install, remove the magnetic back cover and insert one AA or AAA battery into the compartment. Ensure correct polarity as indicated inside the compartment. The mouse is designed to be ultralight at 57 grams (excluding battery and receiver).

Figure 2: Battery compartment showing AA/AAA battery slot and magnetic back cover.
2. 마우스 연결
The mouse offers two wireless connectivity options: 2.4 GHz RF via the ROG Omni Receiver or Bluetooth.
2.1. 2.4 GHz RF Connection (ROG Omni Receiver)
- Locate the ROG Omni Receiver. This compact USB dongle allows you to connect both your mouse and a compatible ROG keyboard using a single receiver.
- Insert the ROG Omni Receiver into an available USB port on your computer.
- On the bottom of the mouse, slide the power switch to the 2.4 GHz RF position (indicated by a wireless icon).
- The mouse will automatically pair with the receiver. The indicator light on the mouse will confirm connection.

Figure 3: The ROG Omni Receiver allows connection of both mouse and keyboard via a single USB dongle.

Figure 4: Close-up of the ROG Omni Receiver plugged into a USB port.
2.2. 블루투스 연결
- On the bottom of the mouse, slide the power switch to the 블루투스 위치(블루투스 아이콘으로 표시됨).
- The mouse will enter pairing mode. The indicator light may blink.
- 컴퓨터나 기기에서 Bluetooth 설정으로 이동하여 새 기기를 검색하세요.
- Select "ROG Strix Impact III" from the list of available devices to complete the pairing process.
마우스 작동
1. DPI 조정
The ROG Strix Impact III features an ROG AimPoint optical sensor with a sensitivity range of 100-36,000 DPI. Use the DPI button located on the bottom of the mouse to cycle through preset DPI levels. For advanced customization and precise DPI settings, install the ASUS Armoury Crate software.
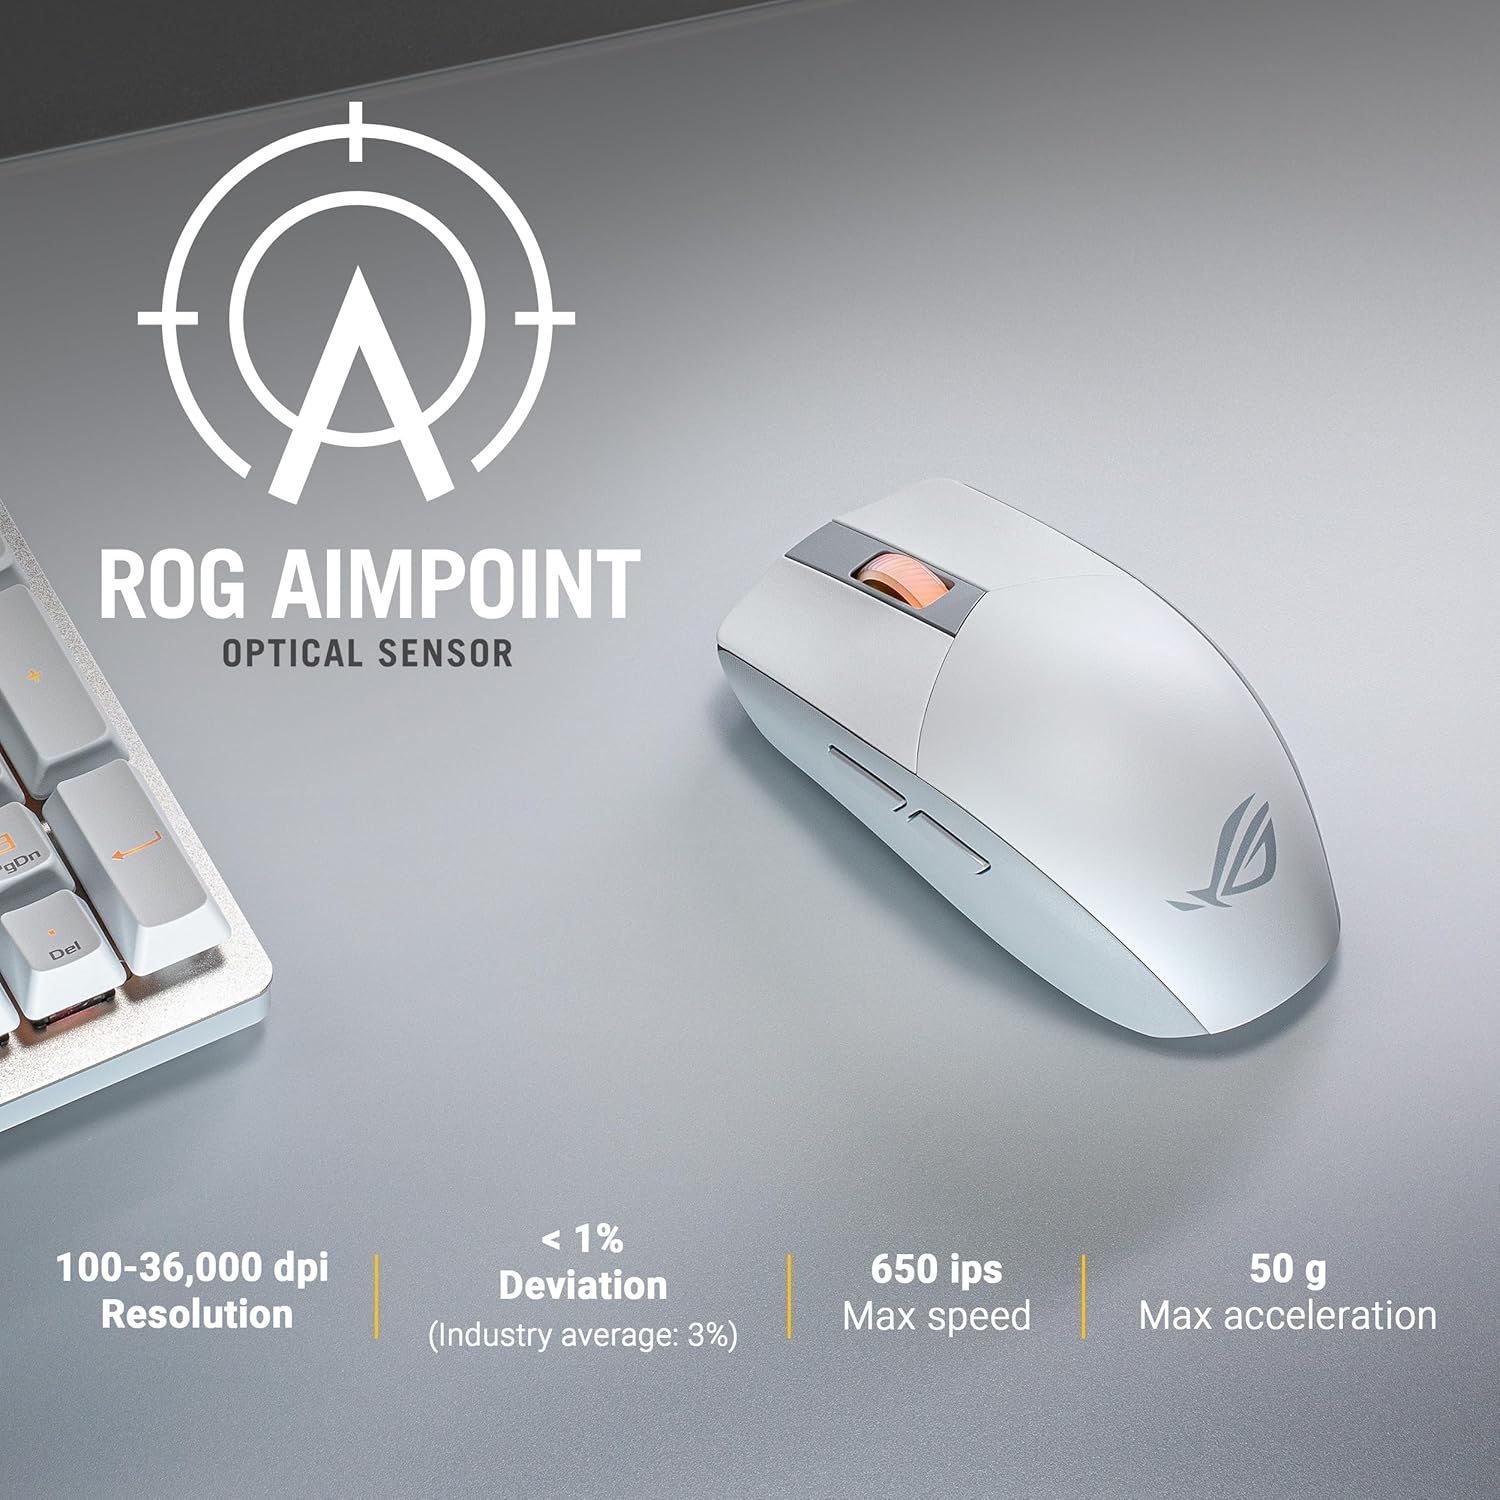
Figure 5: ROG AimPoint Optical Sensor specifications, including 100-36,000 DPI resolution.
2. 버튼 기능
The mouse features standard left and right click buttons, a scroll wheel, and two programmable side buttons. The left and right click buttons utilize durable L/R PBT material and ROG Micro Switches with a 70M click lifespan, providing a superior click feel.
3. Replaceable Switches
The ROG Strix Impact III is equipped with Push-Fit Switch Sockets, allowing for easy replacement of the mouse switches. This feature extends the lifespan of your mouse and allows for customization of click feel. To replace switches, carefully remove the magnetic back cover and then the top shell. Gently pull out the existing switches and insert new ones, ensuring they are properly seated.

그림 6: 내부 view highlighting the Push-Fit Switch Socket for easy switch replacement.
4. Battery Life and Power Efficiency
The mouse offers outstanding battery life, up to 450 hours in 2.4 GHz RF mode and up to 618 hours in Bluetooth mode, when using a single AA lithium or AAA battery. The ROG SpeedNova wireless technology ensures low-latency, reliable 2.4 GHz RF wireless performance with incredible energy efficiency.

Figure 7: ROG SpeedNova Wireless Technology emphasizes max speed, consistency, and power efficiency.
유지
1. 청소
마우스를 청소할 때는 부드럽고 마른 천을 사용하세요. 잘 지워지지 않는 얼룩은 약간 거친 천으로 닦아내세요.amp 순한 비누를 묻힌 천을 사용할 수 있지만, 액체가 마우스 내부로 들어가지 않도록 주의하십시오. 독한 화학 약품이나 연마재는 사용하지 마십시오.
2. 배터리 교체
When the mouse's performance degrades or the indicator light signals low battery, replace the AA or AAA battery. Follow the battery installation steps outlined in the Setup section.
문제 해결
- 마우스가 응답하지 않습니다.
- Ensure the mouse is powered on and the correct connectivity mode (2.4 GHz RF or Bluetooth) is selected.
- 배터리 잔량을 확인하고 필요한 경우 교체하십시오.
- For 2.4 GHz RF, ensure the ROG Omni Receiver is securely plugged into a USB port. Try a different USB port.
- 블루투스 연결의 경우, 기기에서 블루투스가 활성화되어 있고 마우스가 페어링되어 있는지 확인하세요. 마우스를 다시 페어링해 보세요.
- 커서 움직임이 불규칙하거나 부정확합니다.
- 마우스 바닥의 광학 센서를 청소하세요.
- 마우스를 적절한 표면에서 사용하고 있는지 확인하세요. 반사율이 높거나 투명한 표면은 피하세요.
- Adjust the DPI setting using the DPI button or Armoury Crate software.
- 연결 문제(지연, 연결 끊김):
- 마우스와 수신기/장치 사이의 거리를 줄이십시오.
- 다른 무선 장치(예: Wi-Fi 라우터, 무선 전화기)의 간섭을 최소화합니다.
- 컴퓨터 드라이버가 최신 상태인지 확인하세요.
명세서
| 특징 | 세부 사항 |
|---|---|
| 모델 번호 | P520 ROG STRIX IMPACT III WL/WHT |
| 연결성 | 2.4 GHz RF (ROG SpeedNova), Bluetooth |
| 감지기 | ROG AimPoint 광학 센서 |
| DPI 해상도 | 100 - 36,000 DPI (with <1% deviation) |
| 최대 속도 | 650 IPS |
| 최대 가속도 | 50G(지) |
| 무게 | 57그램 (배터리 및 수신기 제외) |
| 치수(길이x너비x높이) | 4.72 x 2.44 x 0.04 인치 |
| 배터리 유형 | 1 x AA or 1 x AAA battery |
| 배터리 수명 | Up to 618 hours (Bluetooth), Up to 450 hours (2.4 GHz RF) |
| 스위치 | ROG Micro Switches (70M click lifespan), Push-Fit Switch Socket |
| 버튼 | L/R PBT Buttons, Scroll Wheel, 2 Side Buttons, DPI Button |

그림 8: 하단 view of the mouse showing model and regulatory markings.
보증
ASUS products are manufactured to the highest quality standards. For detailed warranty information, please refer to the warranty card included with your product or visit the official ASUS support web사이트. 보증 청구를 위해 구매 증빙 자료를 보관하세요.
지원하다
추가 지원, 기술 지원 또는 드라이버 다운로드가 필요하시면 ASUS 공식 지원 페이지를 방문하십시오. website. You can also refer to the Quick Start Guide included in your package for initial setup instructions.
- ASUS 지원 Web대지: www.asus.com/support/
- Quick Start Guide (Digital): https://qs.asus.com/C6MPMV000001
Ask a question about this manual
Ask about setup, troubleshooting, compatibility, parts, safety, or missing instructions. Manuals+ will review the question and use this page’s manual context to help answer it.