1. 서론
This manual provides detailed instructions for the safe and effective use of your OLIGHT Perun 3 Mini rechargeable headlamp and OLIGHT Oclip Pro EDC flashlight. Please read this manual thoroughly before operation and retain it for future reference.

Image: The OLIGHT Perun 3 Mini headlamp attached to its elastic headband, ready for use.
2. 패키지 내용
- OLIGHT Perun 3 미니 헤드amp
- OLIGHT Oclip Pro EDC Flashlight
- Headband with quick-detach bracket
- 자기 충전 케이블
- 사용 설명서 (본 문서)
3. 설정
3.1. Perun 3 Mini Headlamp
- Attaching to Headband: Insert the Perun 3 Mini into the quick-detach bracket on the headband. Ensure it clicks securely into place.
- 머리띠 조정: Adjust the elastic straps for a comfortable and secure fit on your head.
- 핸드헬드 사용: The quick-detach bracket allows for easy removal of the Perun 3 Mini for handheld operation. Press the release button on the bracket to detach.
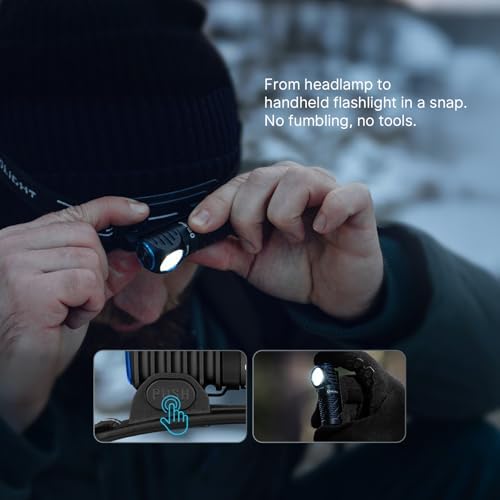
Image: Transitioning the Perun 3 Mini from headlamp to handheld flashlight by pressing the release button on the bracket.
3.2. Oclip Pro EDC Flashlight
- 잠금 해제: Before first use, press and hold the main button for approximately 1 second to unlock the Oclip Pro. A visual indicator may confirm unlocking.
- 깎는: Use the integrated clip to attach the Oclip Pro to clothing, gear, or other suitable surfaces.
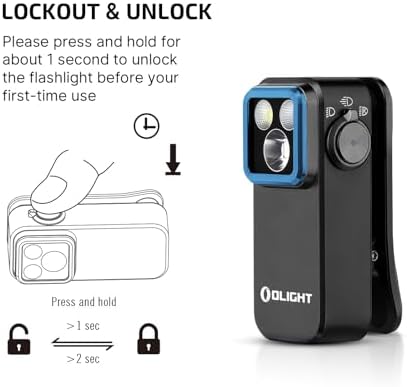
Image: Instructions for unlocking the Oclip Pro by pressing and holding the button for 1 second.
4. 사용 설명서
4.1. Perun 3 Mini Headlamp
The Perun 3 Mini features multiple white light modes and red light modes for various applications.
- 백색광 모드: Offers 5 different white light output levels, including a Moonlight mode for extended use.
- 적색등 모드: Provides 3 red light modes, suitable for preserving night vision or as an emergency signal.
- 모드 전환: Refer to the device's specific button press sequences for cycling through modes (e.g., single press, double press, press and hold).
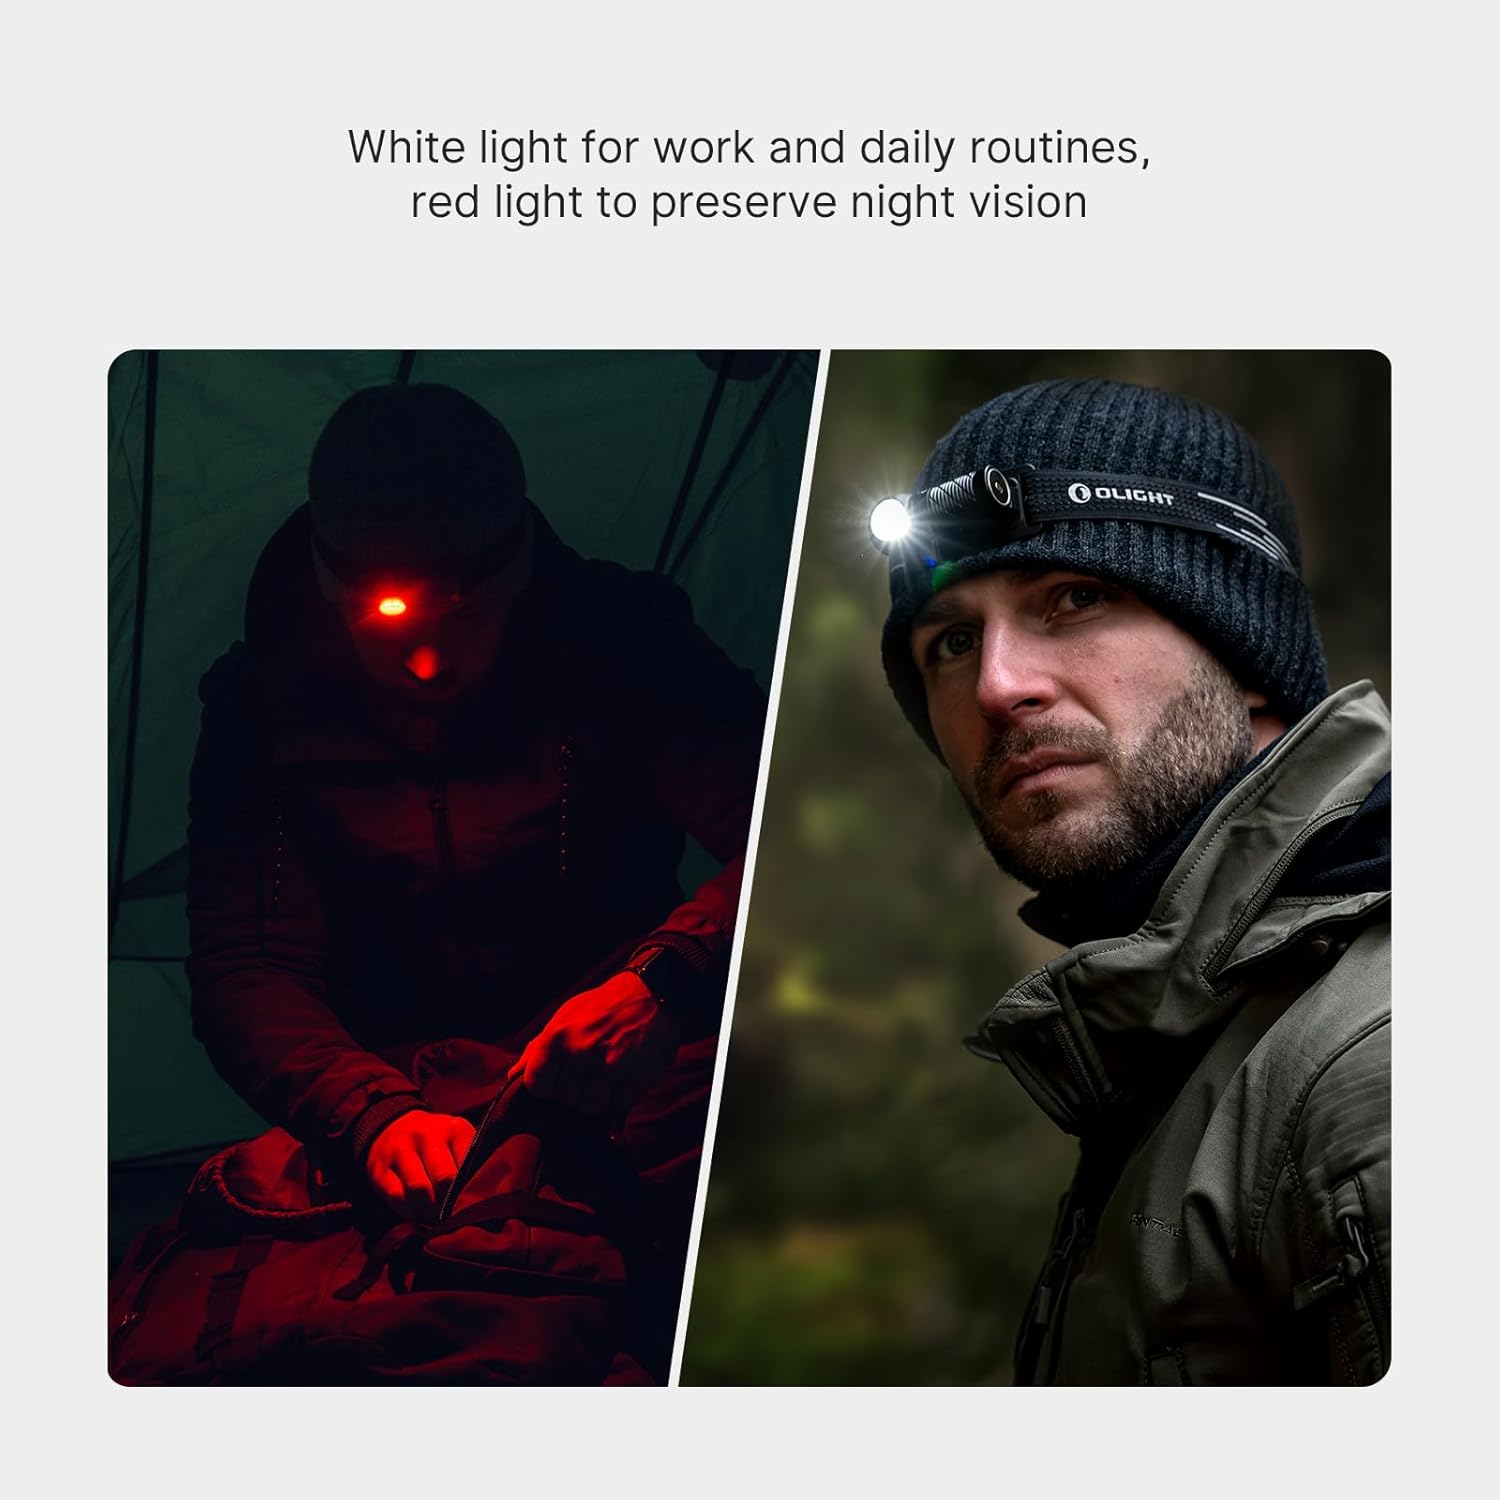
Image: The Perun 3 Mini in use, demonstrating both white light for general tasks and red light for night vision preservation.
4.2. Oclip Pro EDC Flashlight
The Oclip Pro offers three distinct lighting solutions controlled by a user-friendly interface.
- Lighting Solutions:
- 투광 조명: For wide area illumination (up to 500 lumens).
- 스포트라이트: For focused, long-range illumination (up to 120-meter range).
- 빨간불: For night vision preservation or signaling (40/4 lumens).
- 사용자 인터페이스: Modes are switched by toggling the selector.
- 배터리 표시기: A battery indicator located in the center of the switch displays the current battery level.

Image: Visual representation of the Oclip Pro's floodlight for daily routines, spotlight for focused tasks, and red light for night vision.
5. 유지관리
5.1. 충전
Both the Perun 3 Mini and Oclip Pro are rechargeable. Use the provided magnetic charging cable to recharge the devices. Connect the magnetic charging end to the flashlight's charging port and the USB end to a compatible power source.
The Perun 3 Mini's rechargeable battery offers up to 10 days of continuous use in Moonlight mode, reducing the frequency of recharging.
5.2. 청소 및 보관
- 청소: 부드러운 천으로 기기를 닦으세요.amp 천으로 먼지나 이물질을 제거하세요. 연마성 세제나 용제는 사용하지 마세요.
- 저장: Store the flashlights in a cool, dry place away from direct sunlight and extreme temperatures. For long-term storage, ensure the battery is partially charged (e.g., 50%) to prolong battery life.
6. 문제 해결
- 불이 켜지지 않음:
- 배터리 수준을 확인하고 필요한 경우 다시 충전하세요.
- Ensure the device is unlocked (refer to Setup section for Oclip Pro).
- Verify proper connection if using the Perun 3 Mini with the headband bracket.
- 희미한 조명 출력:
- Battery may be low; recharge the device.
- Lens may be dirty; clean according to maintenance instructions.
- 장치 과열:
- High output modes can generate heat. If the device becomes excessively hot, switch to a lower mode or turn it off to cool down.
7. 사양
7.1. OLIGHT Perun 3 Mini Headlamp
- 최대 출력: 최대 920루멘
- 빔 거리 : 최대 133미터
- 라이트 모드: 5 white light modes, 3 red light modes
- Battery Life (Moonlight Mode): 최대 10일
- 머리띠: Lightweight with breathable holes, anti-sweat strip, reflective material. Quick-detach bracket.

Image: Key specifications of the Perun 3 Mini, highlighting its compact size, lumen output, and beam distance.
7.2. OLIGHT Oclip Pro EDC Flashlight
- Floodlight Output: 최대 500루멘
- Spotlight Range: 최대 120미터
- Red Light Output: 40/4 루멘
- 클립 내구성: 10,000-open-close-cycle tested
- 사용자 인터페이스: Toggle selector for mode switching, integrated battery indicator.

이미지: 다양한 views of the Oclip Pro, showcasin디자인과 컴팩트한 폼 팩터가 특징입니다.

Image: The Oclip Pro emphasizing its versatile lighting options and the robust, tested clip mechanism.
8. 보증 및 지원
For detailed warranty information, please refer to the official OLIGHT website or contact OLIGHT customer service. OLIGHT products typically come with a manufacturer's warranty covering defects in materials and workmanship.
추가 지원, 기술 지원 또는 view other OLIGHT products, please visit the official OLIGHT store: