1. 서론
This manual provides comprehensive instructions for the installation, operation, maintenance, and troubleshooting of your ASUS Z790 MAX Gaming WIFI7 Intel Z790 (LGA 1700) ATX Motherboard. Please read this manual thoroughly before proceeding with installation and retain it for future reference. Proper installation and usage are crucial for optimal performance and longevity of the product.
2. 제품 오버view
The ASUS Z790 MAX Gaming WIFI7 motherboard is designed to support Intel Core 14th, 13th, and 12th Gen Processors, along with Pentium Gold and Celeron Processors, utilizing the LGA 1700 socket. It features advanced connectivity and power delivery solutions for high-performance computing.
주요 특징:
- 프로세서 지원: Intel LGA 1700 socket for 14th, 13th, and 12th Gen Intel Core processors.
- 전력 솔루션: 14+1 DrMOS 전원tages, 6-layer PCB, ProCool connectors, alloy chokes, and durable capacitors for stable power delivery.
- 메모리: Supports DDR5 memory technology.
- 연결성: PCIe 5.0, Wi-Fi 7, Realtek 1Gb LAN, HDMI, rear USB 20Gbps Type-C, front USB 5Gbps Type-C, and Thunderbolt (USB4) header support.
- 저장: Three PCIe 4.0 M.2 slots.
- 냉각: Large VRM heatsinks, PCH heatsink, hybrid fan headers, and Fan Xpert 4 with AI Cooling II.
- Exclusive Technologies: ASUS 강화 메모리 프로file II and ASUS OptiMem II.
- 진단: Q-LED Core for system status indication.
패키지 내용:
소매 패키지에는 일반적으로 다음과 같은 품목이 포함됩니다.

Image: Contents of the ASUS Z790 MAX Gaming WIFI7 motherboard package. This includes the motherboard itself, a Wi-Fi antenna, two SATA data cables, M.2 screw packages for securing SSDs, a rear I/O panel shield, and a quick start guide.

Image: The ASUS Z790 MAX Gaming WIFI7 motherboard displayed alongside its retail packaging and the included Wi-Fi antenna.
3. 설정 및 설치
설치를 시작하기 전에 시스템 전원이 꺼져 있고 전원 콘센트에서 분리되어 있는지 확인하십시오. 정전기 방전을 방지하기 위해 마더보드의 가장자리를 잡고 다루십시오.
3.1 마더보드 준비
- 마더보드를 포장에서 꺼내 정전기 방지 표면에 놓으십시오.
- Install the CPU into the LGA 1700 socket. Carefully align the CPU with the socket's orientation key and lower the load plate.
- 제조업체의 지침에 따라 CPU 쿨러를 설치하세요.
- Install DDR5 memory modules into the DIMM slots. Refer to the motherboard's quick start guide for recommended slot population for dual-channel operation.
- Install M.2 SSDs into the available M.2 slots, securing them with the provided screws or retention mechanisms. Remember to remove any protective plastic films from heatsinks before installation.
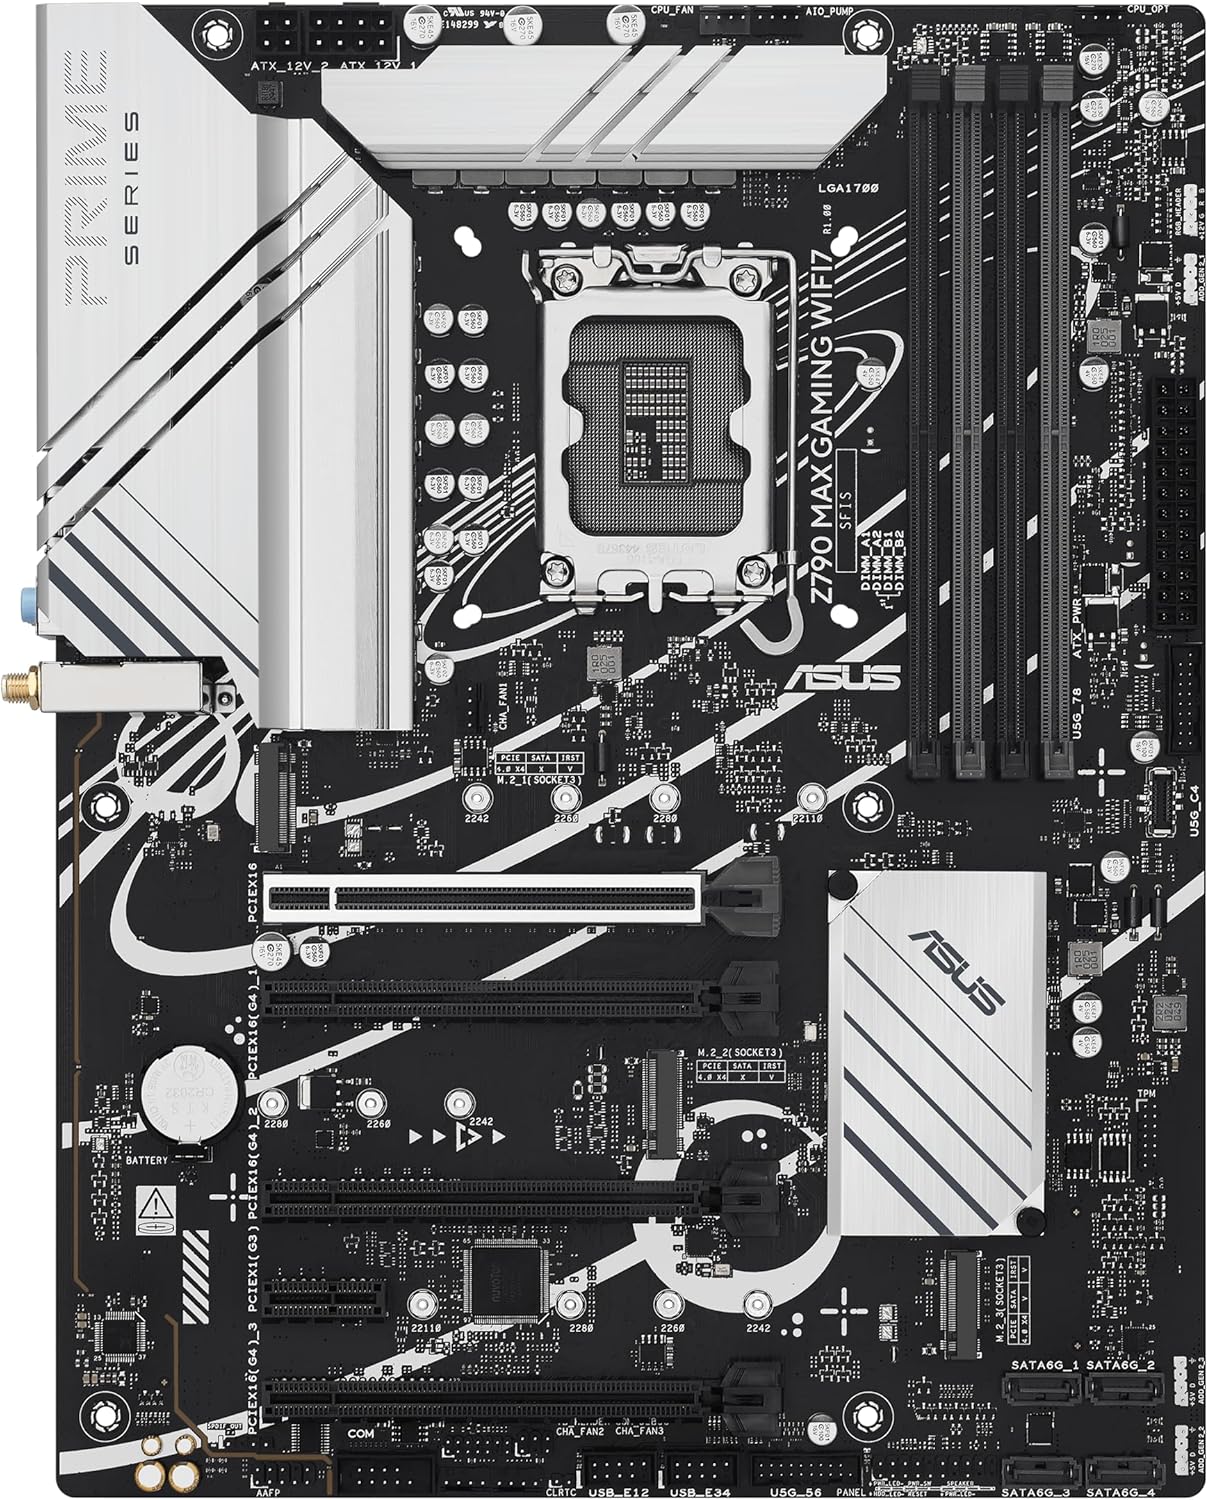
Image: A top-down perspective of the ASUS Z790 MAX Gaming WIFI7 motherboard, illustrating the central LGA 1700 CPU socket, the four DDR5 DIMM slots, and the locations of the M.2 storage slots.
3.2 섀시 설치
- Install the I/O shield into your PC chassis.
- 마더보드를 케이스에 조심스럽게 넣고 스탠드오프에 맞춰 정렬합니다. 나사를 사용하여 마더보드를 고정합니다.
- Install your graphics card(s) into the PCIe 5.0 or other available PCIe slots. Ensure the card is fully seated and secured.
- Connect all necessary power cables from your power supply unit (PSU) to the motherboard (24-pin ATX, 8-pin CPU, etc.).
- Connect front panel headers (power button, reset button, USB ports, audio) to the corresponding pins on the motherboard. Refer to the quick start guide for pin layouts.
- Connect SATA devices (HDDs, SSDs) using the provided SATA cables.
- Attach the Wi-Fi antenna to the rear I/O panel connectors for wireless connectivity.

이미지: 각도가 있는 view of the ASUS Z790 MAX Gaming WIFI7 motherboard, showcasing the various ports on the rear I/O panel and the multiple PCIe expansion slots.
4. 사용 설명서
4.1 최초 부팅 및 BIOS/UEFI 설정
- 조립 후 모니터, 키보드, 마우스를 연결하세요.
- 시스템의 전원을 켜세요. 델 BIOS/UEFI 설정 유틸리티를 시작하려면 시작 시 키를 누릅니다.
- In the BIOS, you can configure boot order, enable XMP/EXPO profiles for memory, adjust fan curves, and update firmware.
- 변경 사항을 저장하고 BIOS를 종료한 후 운영 체제 설치를 계속하십시오.
4.2 소프트웨어 및 드라이버
- After installing your operating system (Windows 10 or Windows 11), install the necessary drivers for the chipset, audio, LAN, and Wi-Fi. These can typically be found on the ASUS support web귀하의 특정 마더보드 모델에 대한 사이트입니다.
- The motherboard may prompt you to install ASUS Armoury Crate software. This utility can assist with driver installation, system monitoring, and Aura Sync RGB lighting control. Note that some users have reported stability issues with Armoury Crate; if encountered, drivers can be installed manually from the ASUS web대지.
- For Wi-Fi 7 functionality, Windows 11 version 24H2 or later is required for full features. Windows 11 21H2/22H2/23H2 only support Wi-Fi 6E. For Windows 10, drivers may not be available from ASUS; refer to the Wi-Fi chipset vendor's web자세한 내용은 사이트.
5. 유지관리
- 청소: PC 케이스와 마더보드 부품의 먼지는 압축 공기를 사용하여 정기적으로 청소하십시오. 청소하기 전에 시스템 전원을 끄고 전원 케이블을 뽑으십시오.
- BIOS 업데이트: 정기적으로 ASUS 지원을 확인하세요 website for BIOS/UEFI updates. Updates can improve stability, add new features, and enhance compatibility. Follow ASUS's instructions carefully when updating the BIOS.
- 드라이버 업데이트 : 최적의 성능과 새로운 소프트웨어 및 하드웨어와의 호환성을 보장하려면 드라이버를 최신 상태로 유지하십시오.
6. 문제 해결
문제가 발생하면 다음의 일반적인 문제 해결 단계를 참조하세요.
- 전원 없음/POST 불가:
- 모든 전원 연결(24핀 ATX, 8핀 CPU)을 확인하세요.
- CPU와 RAM이 올바르게 장착되었는지 확인하십시오.
- The motherboard features Q-LED Core diagnostic LEDs (red, yellow, white) which can indicate issues with CPU, DRAM, VGA, or Boot devices. Consult the quick start guide for LED interpretations.
- CPU, RAM 1개, 내장 그래픽이 없는 경우 GPU 등 필수 구성 요소만 사용하여 부팅해 보세요.
- 시스템 불안정/충돌:
- 모든 드라이버가 설치되어 있고 최신 버전인지 확인하십시오.
- CPU와 GPU 온도를 확인하세요.
- 특히 XMP/EXPO Pro를 사용하는 경우 RAM 안정성을 확인하십시오.files are enabled. Try disabling them to test.
- Ensure your power supply unit (PSU) is sufficient for your system's components.
- BIOS Flashback Issues: The motherboard supports BIOS Flashback for updating the BIOS without a CPU or RAM. If this feature is unresponsive, ensure the USB drive is formatted to FAT32, the BIOS file is correctly renamed (e.g., 'Z790MG.CAP'), and it is inserted into the designated BIOS Flashback USB port. Refer to the ASUS quick start guide for precise instructions.
- Wi-Fi 연결 문제:
- 와이파이 안테나가 제대로 연결되어 있는지 확인하세요.
- Verify Wi-Fi drivers are correctly installed.
- Check operating system compatibility for Wi-Fi 7 features as noted in the Operating Instructions section.
추가적인 도움이 필요하시면 ASUS 지원팀에 문의하십시오. web해당 웹사이트를 방문하거나 ASUS 고객 서비스에 문의하십시오.
7. 사양
| 특징 | 사양 |
|---|---|
| 상표 | 아수스 |
| 모델명 | Z790 MAX 게이밍 와이파이7 |
| CPU 소켓 | LGA 1700 |
| 호환 프로세서 | Intel Core 14th & 13th Gen Processors, Intel Core 12th Gen, Pentium Gold and Celeron Processors |
| 칩셋 유형 | 인텔 Z790 |
| RAM 메모리 기술 | DDR5 |
| 메모리 속도 | 4800MHz (베이스) |
| 메모리 저장 용량 | 최대 192GB |
| PCIe 슬롯 | PCIe 5.0 지원 |
| M.2 슬롯 | 3 x PCIe 4.0 M.2 |
| 랜 | Realtek 1Gb LAN |
| 무선 연결 | 와이파이 7 |
| USB 포트 | Rear USB 20Gbps Type-C, Front USB 5Gbps Type-C, Thunderbolt (USB4) header support |
| 비디오 출력 | HDMI |
| 플랫폼 | 윈도우 10, 윈도우 11 |
| 색상 | 검은색 |
| 품목 무게 | 3.47파운드 |
| 패키지 크기 | 13.46 x 10.79 x 2.8 인치 |
8. 보증 정보
ASUS provides a limited warranty for its motherboards. The specific terms and duration of the warranty may vary by region and retailer. Please retain your proof of purchase for warranty claims. For detailed warranty information, including coverage and procedures, please visit the official ASUS support web사이트를 방문하거나 구매처에 문의하세요.
Optional protection plans may be available from retailers, offering extended coverage beyond the standard manufacturer's warranty. These plans are separate from the ASUS product warranty.
9. 지원
기술 지원, 드라이버 다운로드, BIOS 업데이트 및 기타 제품 정보는 ASUS 공식 지원 페이지를 방문하십시오. web대지:
When contacting support, please have your motherboard model name (Z790 MAX GAMING WIFI7) and serial number ready. You may also refer to the quick start guide included in your package, which often contains QR codes or links for direct assistance.