ASUS PRIME B850-PLUS WIFI
ASUS Prime B850-PLUS WiFi 마더보드 사용 설명서
모델: PRIME B850-PLUS WIFI
1. 서론
The ASUS PRIME B850-PLUS WIFI motherboard is engineered to provide a robust foundation for your PC build, offering advanced features for performance, stability, and compatibility. This motherboard supports AMD AM5 socket processors, DDR5 memory, and PCIe 5.0 connectivity, making it suitable for demanding computing tasks and future-proof systems. It integrates Wi-Fi 6E and 2.5Gb LAN for high-speed networking, along with comprehensive cooling solutions and user-friendly DIY features.

Figure 1.1: ASUS Prime B850-PLUS WiFi Motherboard, retail packaging, and included Wi-Fi antenna.
2. 상자 안에 무엇이 들어있나요?
Upon unboxing your ASUS Prime B850-PLUS WiFi motherboard, verify that all components are present:
- ASUS Prime B850-PLUS WiFi 메인보드
- 사용 설명서 / 빠른 시작 가이드
- ASUS Wi-Fi Q-Antenna
- SATA 6Gb/s 케이블
- M.2 Screw Packages
- M.2 Rubber Packages
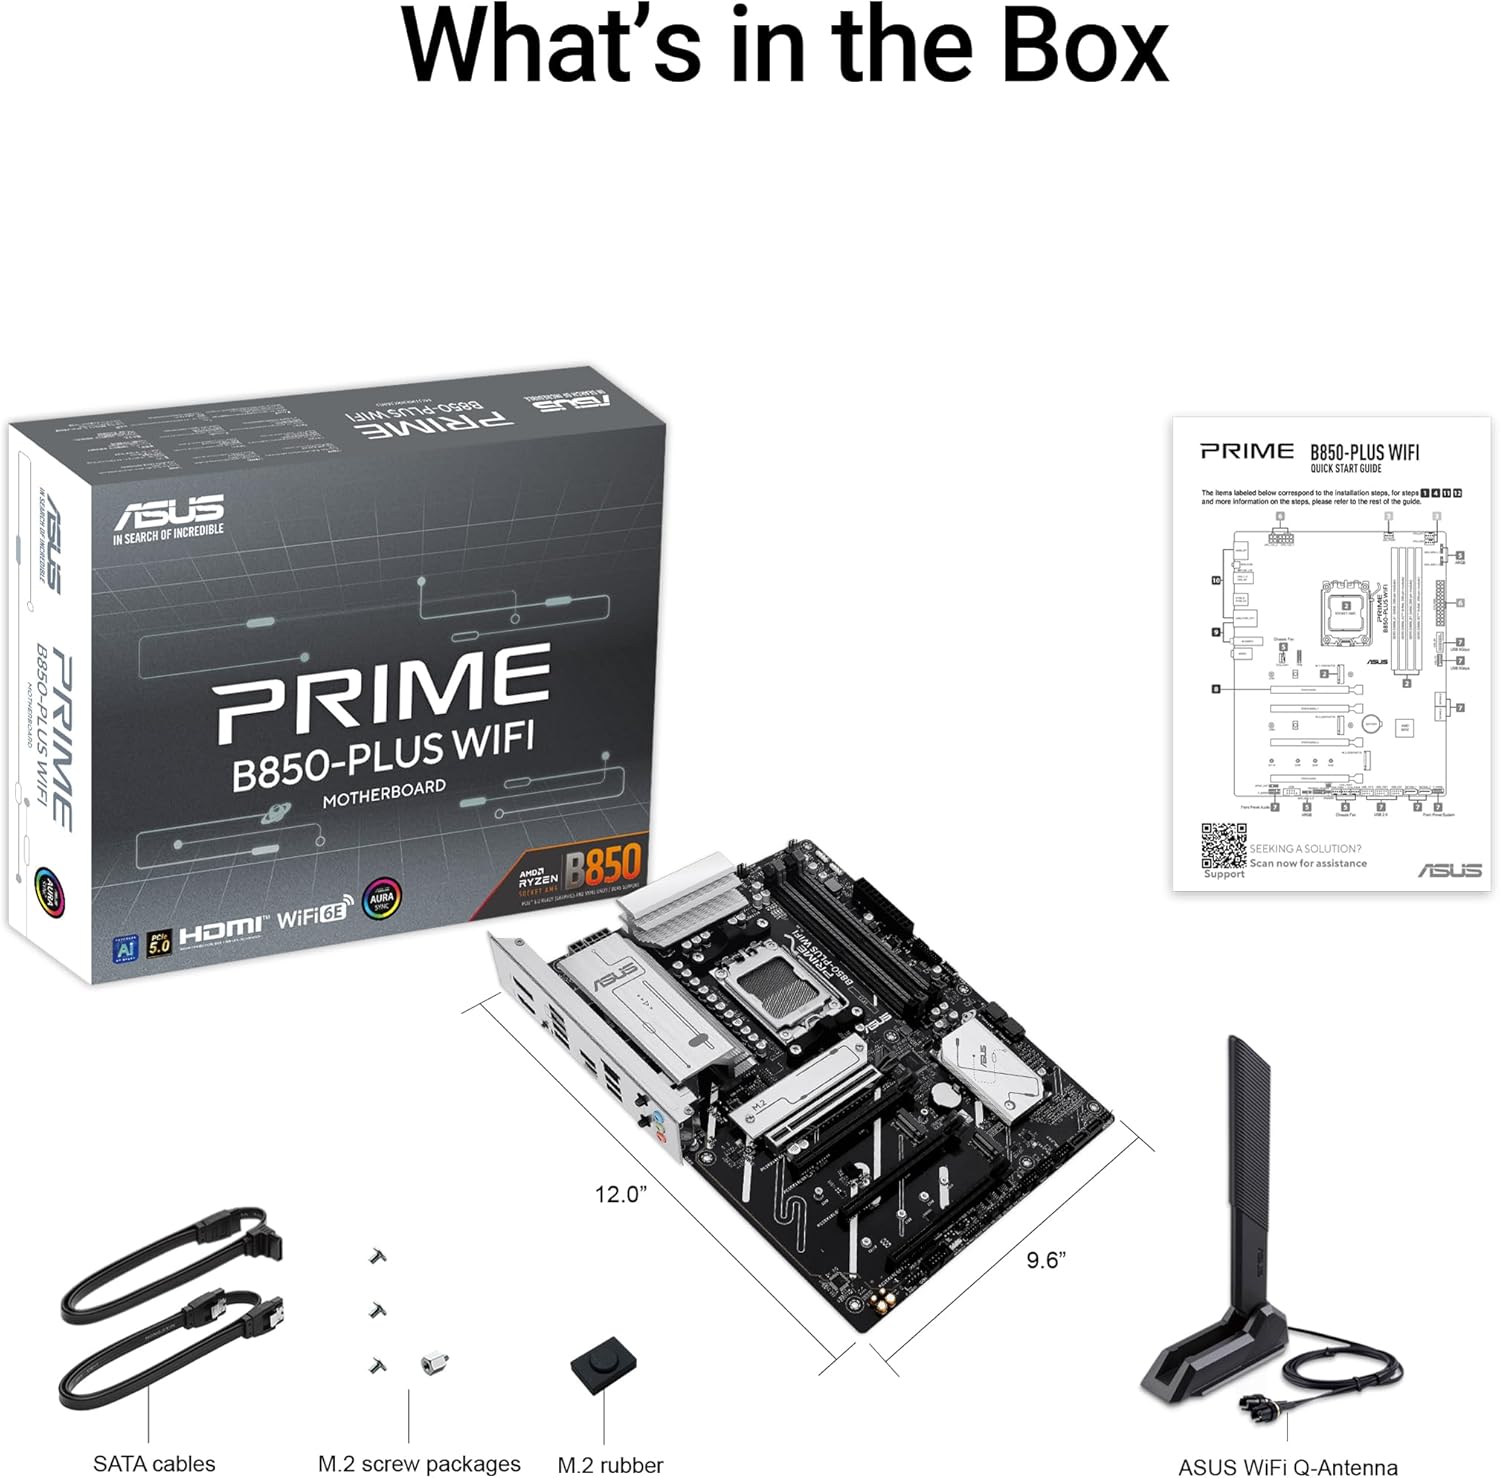
Figure 2.1: All included accessories and the motherboard as found in the product packaging.
3. 설정 및 설치
This section guides you through the physical installation of the motherboard and its primary components into your PC chassis.
3.1 마더보드 레이아웃

그림 3.1: 이상view of the motherboard layout, highlighting key component areas such as the CPU socket, RAM slots, and PCIe slots.
3.2 구성 요소 설치
- CPU 설치: Carefully align your AMD AM5 processor with the socket on the motherboard. Ensure the triangular mark on the CPU matches the mark on the socket. Gently lower the CPU into place and secure it with the retention arm.
- DDR5 메모리 설치: Open the clips on both ends of the DIMM slots. Align the memory module's notch with the key on the DIMM slot. Press down firmly on both ends of the memory module until the clips snap into place.
- M.2 SSD 설치: The motherboard features multiple M.2 slots, including a PCIe 5.0 M.2 slot. Remove the M.2 heatsink if present. Insert the M.2 SSD into the slot at an angle, then gently push it down and secure it with the provided M.2 screw or Q-Latch mechanism. Reinstall the heatsink if applicable.
- 그래픽 카드(GPU) 설치: Insert your PCIe 5.0 or PCIe 4.0 graphics card into the primary PCIe x16 slot (SafeSlot). Ensure it is fully seated and the retention clip locks. Secure the card to your chassis with screws.
- 전원 연결 : Connect the 24-pin ATX power connector and the 8-pin (or 4+4 pin) CPU power connector from your power supply to the motherboard. Connect SATA power cables to your storage drives.
- 전면 패널 연결: Connect the front panel headers (power button, reset button, USB ports, audio jacks) from your chassis to the corresponding pins on the motherboard. Refer to the motherboard manual for exact pin layouts.
- 와이파이 안테나 설치: Screw the included ASUS Wi-Fi Q-Antenna onto the antenna connectors on the rear I/O panel. Position the antenna for optimal signal reception.
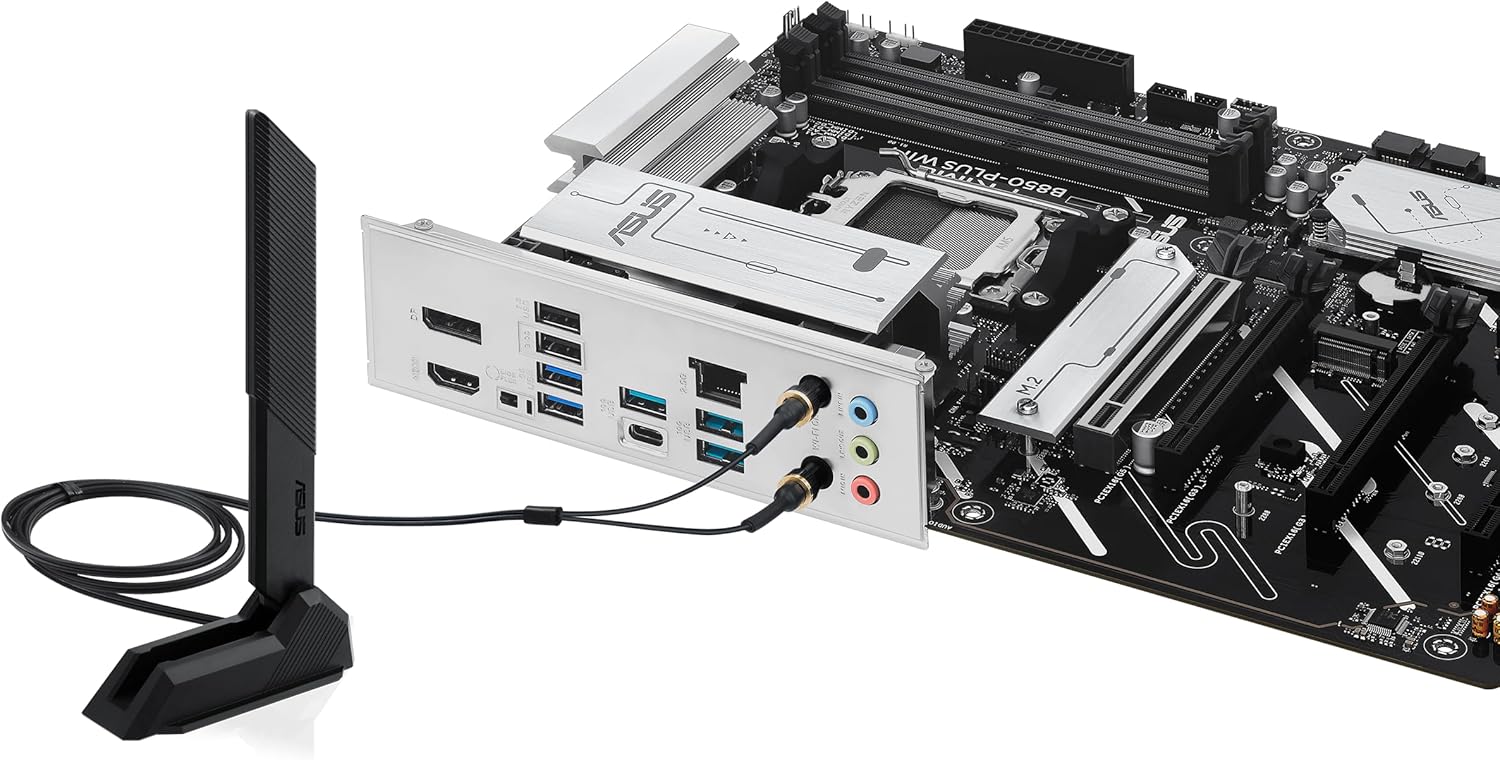
Figure 3.2: Rear I/O panel with Wi-Fi antenna connected, showing various ports including USB, DisplayPort, HDMI, and LAN.
4. 마더보드 작동
Once the hardware is installed, the next steps involve configuring the system software and drivers.
4.1 BIOS/UEFI 구성
처음 부팅 시, 다음을 누르십시오. 삭제 키 또는 F2 key during the Power-On Self-Test (POST) to enter the BIOS/UEFI setup utility. Here you can:
- Set boot order for your operating system drive.
- Configure memory profiles (e.g., AMD EXPO™ for DDR5 performance).
- 시스템 온도와 팬 속도를 모니터링합니다.
- Adjust CPU and other component settings.
The BIOS FlashBack™ feature allows you to update the BIOS without a CPU or memory installed, using a USB drive and the dedicated BIOS FlashBack™ port on the rear I/O panel.

Figure 4.1: Key DIY features of the motherboard, including BIOS FlashBack™ for convenient firmware updates.
4.2 드라이버 및 소프트웨어 설치
After installing your operating system, install the necessary drivers for optimal performance. ASUS provides a utility called 무기고 상자 which can automatically detect and install drivers, utilities, and firmware updates. It also provides access to:
- ASUS AI 어드바이저: Utilizes AI technology to help users understand and explore motherboard functionalities.
- ASUS Fan Xpert 2+: 고급 팬 제어 및 시스템 냉각 최적화를 위해.
- 오라 동기화: For customizing RGB lighting effects across compatible components.

Figure 4.2: ASUS AI Advisor, an AI-powered tool to assist users with motherboard features.
5. 유지관리
정기적인 유지보수는 마더보드의 수명과 최적의 성능을 보장합니다.
- 먼지 제거: 압축 공기를 사용하여 마더보드와 부품의 먼지를 주기적으로 청소하십시오. 청소하기 전에 시스템 전원이 꺼져 있고 플러그가 뽑혀 있는지 확인하십시오.
- BIOS 업데이트: Keep your BIOS updated to the latest version to benefit from performance improvements, bug fixes, and support for new hardware. Use the ASUS EZ Flash utility within the BIOS or the BIOS FlashBack™ feature.
- 냉각 시스템 점검: Ensure all fans (CPU cooler, case fans) are functioning correctly and that heatsinks (VRM, M.2, PCH) are free from obstructions. The motherboard features flexible M.2 heatsinks for improved thermal performance of M.2 SSDs.

Figure 5.1: Features contributing to system cooling and performance, such as the flexible M.2 heatsink.
6. 문제 해결
이 섹션에서는 일반적으로 발생할 수 있는 문제에 대해 설명합니다.
| 문제 | 가능한 원인 | 해결책 |
|---|---|---|
| 시스템 전원이 켜지지 않습니다. | 전원 케이블이 헐거워졌거나, 전원 공급 장치가 불량이거나, 전면 패널 연결이 잘못되었을 수 있습니다. | Verify all power cables (24-pin ATX, 8-pin CPU) are securely connected. Check front panel power switch connection. Test power supply. |
| 디스플레이 출력이 없습니다. | 그래픽 카드가 제대로 장착되지 않았거나, 모니터 케이블에 문제가 있거나, 디스플레이 출력이 잘못 선택되었을 수 있습니다. | Reseat the graphics card. Ensure monitor cable is connected to the graphics card (not motherboard if discrete GPU is used). Try a different display output port or cable. |
| System boots but no OS detected. | Incorrect boot order in BIOS, corrupted OS, faulty storage drive. | Enter BIOS/UEFI and set the correct boot priority for your OS drive. Check storage drive connections. Reinstall OS if necessary. |
| Memory (RAM) issues (e.g., system not booting with all modules). | Incorrect memory seating, incompatible memory, faulty memory module. | Ensure memory modules are fully seated. Refer to the motherboard's QVL (Qualified Vendor List) for compatible memory. Test modules one by one. Update BIOS. |
| 와이파이 또는 블루투스 연결 문제. | Missing or outdated drivers, antenna not connected, interference. | Install or update Wi-Fi/Bluetooth drivers via Armoury Crate or ASUS support website. Ensure Wi-Fi Q-Antenna is securely connected. Check for physical obstructions or interference. |
7. 사양
Key technical specifications for the ASUS Prime B850-PLUS WiFi Motherboard:
| 특징 | 세부 사항 |
|---|---|
| 모델명 | 프라임 B850-플러스 와이파이 |
| CPU 소켓 | AMD AM5 Socket (Supports Ryzen™ 9000 & 8000 & 7000 Series Desktop Processors) |
| 칩셋 | AMD B850 |
| RAM 메모리 기술 | DDR5 |
| 메모리 속도 | Up to 6 GHz (OC) |
| PCIe 슬롯 | 1 x PCIe 5.0 x16, Multiple PCIe 4.0/3.0 slots |
| M.2 슬롯 | 3 x M.2 slots (including 1 x PCIe 5.0 M.2) |
| 이더넷 | 리얼텍 2.5Gb 이더넷 |
| 무선 연결 | Wi-Fi 6E, 블루투스 |
| USB 포트 | USB 10Gbps Type-A & Type-C, USB 5Gbps Type-C (front support) |
| 비디오 출력 | DisplayPort, HDMI™ (requires integrated graphics on CPU) |
| 폼 팩터 | 에이티엑스 |
| 치수 | Approximately 12.0 inch x 9.6 inch (30.5 cm x 24.4 cm) |
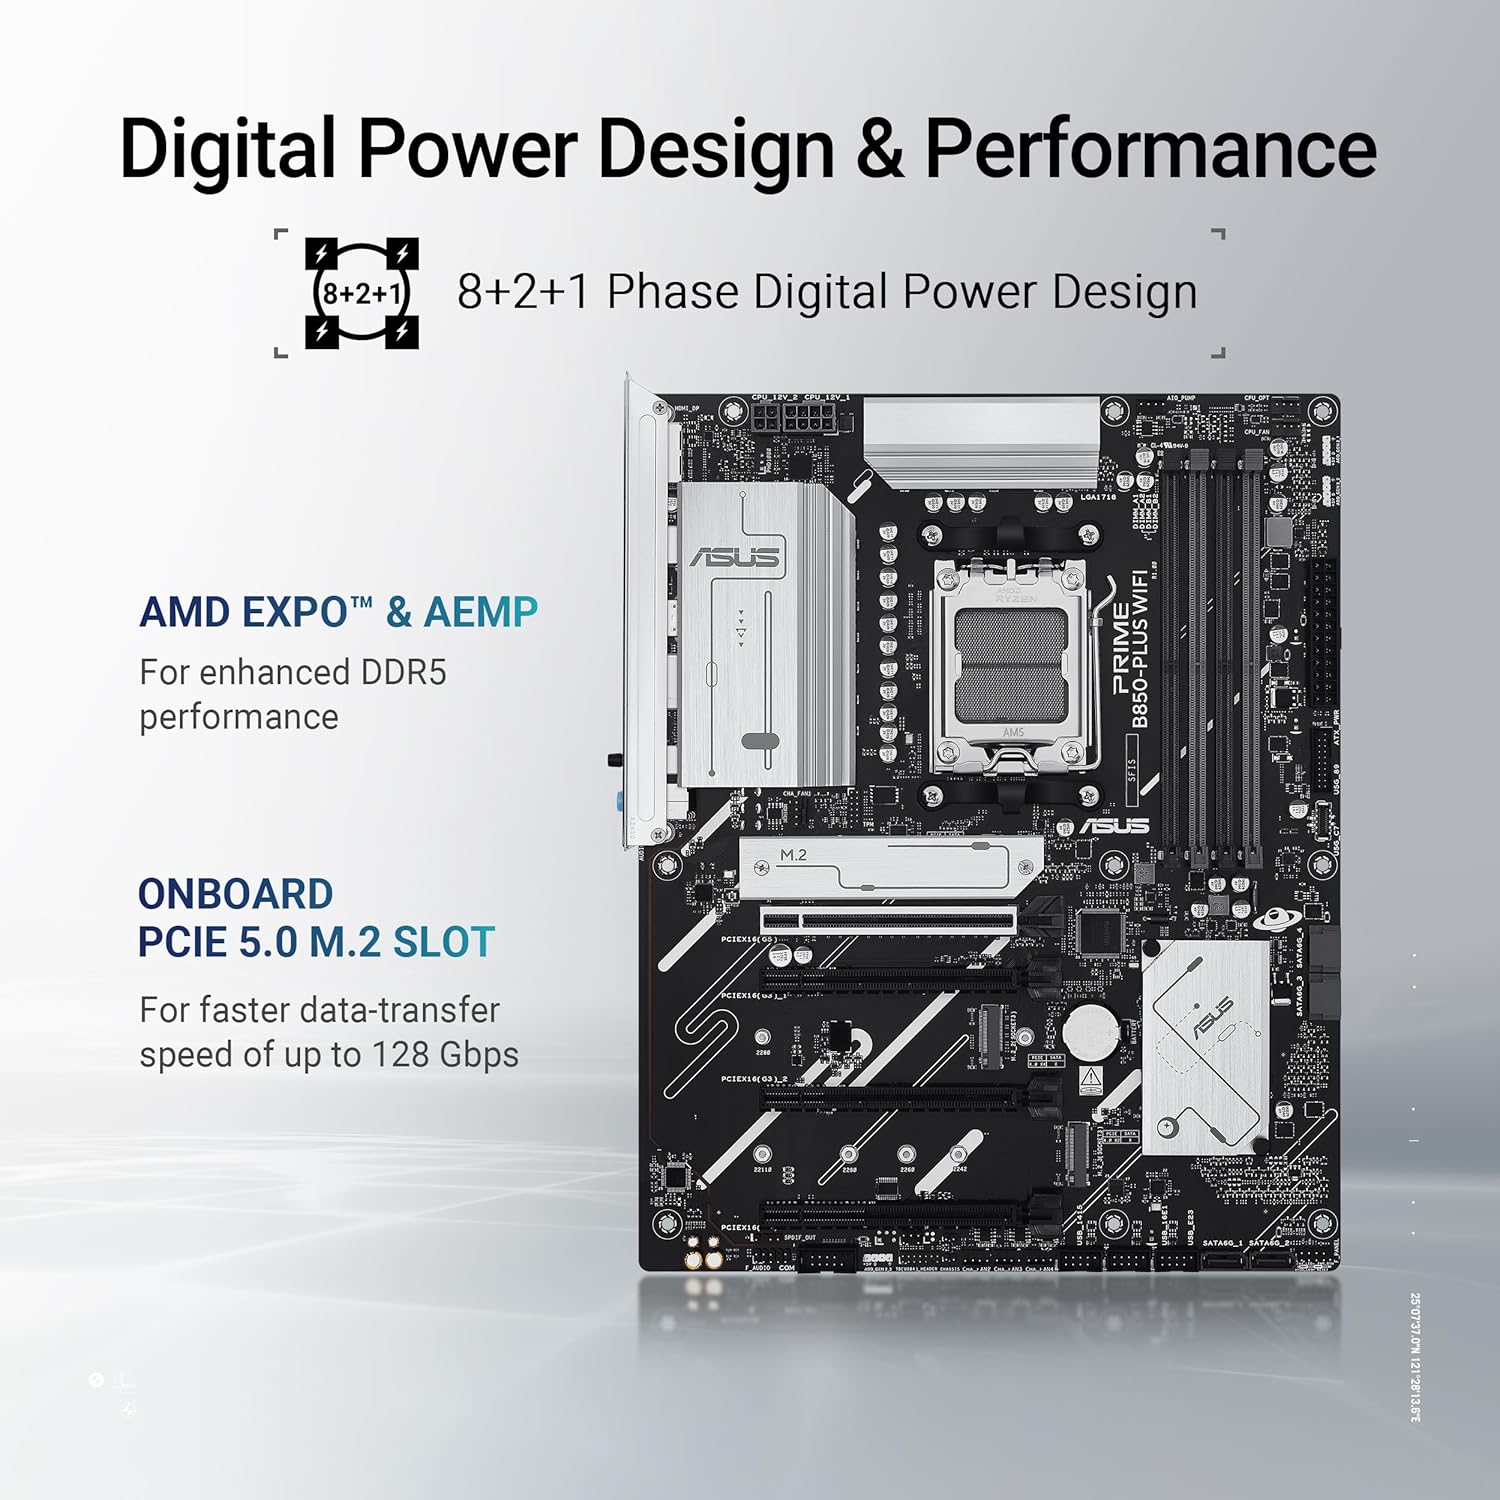
Figure 7.1: Key performance features of the motherboard, including its power delivery system and PCIe 5.0 M.2 slot.
8. 보증 및 지원
ASUS provides a limited warranty for its motherboards. For detailed warranty terms and conditions, please refer to the warranty card included with your product or visit the official ASUS support web사이트. 보증 청구를 위해 구매 증빙 자료를 보관하세요.
8.1 기술 지원
기술 지원, 드라이버 다운로드, BIOS 업데이트 및 FAQ는 ASUS 공식 지원 페이지를 방문하십시오. web대지:
When contacting support, please have your motherboard's model name (PRIME B850-PLUS WIFI) and serial number ready.
Ask a question about this manual
Ask about setup, troubleshooting, compatibility, parts, safety, or missing instructions. Manuals+ will review the question and use this page’s manual context to help answer it.