
SwitchBot B0F37Z1132
SwitchBot 스마트 스위치 버튼 푸셔
사용자 설명서
1. 서론
The SwitchBot Smart Switch Button Pusher is a versatile device designed to automate existing rocker-style and one-way switches without requiring any wiring. It allows for remote control, scheduling, and integration with smart home ecosystems, enhancing convenience and accessibility in your home.
This device is compatible with most rocker switches and one-way buttons found on various appliances and light fixtures. It is not compatible with extremely stiff, outdated toggle switches, mini switches, or touch-screen panels.
2. 패키지 내용
설치를 진행하기 전에 모든 구성품이 있는지 확인하십시오.
- SwitchBot Smart Switch Button Pusher unit
- 3M VHB adhesive pad (pre-attached or separate)
- CR2 3V Lithium Metal battery (pre-installed or separate)
- 사용 설명서 (본 문서)
3. 설정
3.1 물리적 설치
The SwitchBot Bot attaches to your existing switch using a strong 3M adhesive pad. No tools or wiring modifications are required.
- Clean the surface around your switch to ensure proper adhesion.
- Peel off the protective film from the 3M adhesive pad on the back of the SwitchBot Bot.
- Align the SwitchBot Bot next to your switch, ensuring the arm can freely press or flip the switch. For rocker switches, ensure the Bot's arm is positioned to engage the switch effectively.
- Press firmly for 30 seconds to secure the Bot in place.

Figure 3.1: The SwitchBot Bot is easily installed next to a light switch using its adhesive backing. The image shows the device attached to a standard rocker switch, with an illustration of the adhesive pad and its on/off functionality.

Figure 3.2: A hand pressing the SwitchBot Bot onto a wall-mounted light switch, demonstrating the simple adhesive installation process.
3.2 앱 페어링
Download the SwitchBot App from your device's app store. Follow the in-app instructions to pair your SwitchBot Bot via Bluetooth.
- Open the SwitchBot App and create an account or log in.
- '+' 아이콘을 탭하여 새로운 기기를 추가하세요.
- Select 'Bot' from the list of devices.
- Ensure your phone is within Bluetooth range of the Bot and follow the prompts to complete pairing.
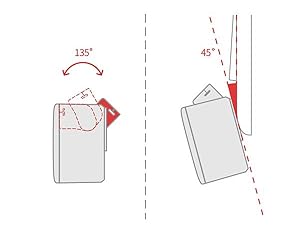
Figure 3.3: The SwitchBot mobile application displaying controls for a connected Bot, allowing users to toggle a switch remotely.
4. 사용 설명서
4.1 제어 모드
The SwitchBot Bot supports various control modes to suit different switch types and automation needs:
- 프레스 모드: Ideal for push buttons, where the Bot presses and releases the button.
- 스위치 모드: Designed for rocker switches, allowing the Bot to flip the switch up (on) and down (off).
- 커스텀 모드 : Advanced settings for specific actions, including press-hold time, repeat actions, and delays.

Figure 4.1: Visual representation of the three primary control modes for the SwitchBot Bot, demonstrating its adaptability to various button and switch types.

Figure 4.2: The SwitchBot Bot attached to a thermostat, illustrating its use in Custom Mode for precise temperature control.
4.2 스케줄링
Set up automated schedules directly within the SwitchBot App. Once configured, the Bot can execute these schedules independently, even without your phone or a SwitchBot Hub nearby.

Figure 4.3: The SwitchBot App's scheduling screen, showing options to set daily or weekly timers for automated actions, such as turning lights on or off.
Figure 4.4: A SwitchBot Bot attached to a coffee machine, demonstrating how schedules can automate morning coffee preparation.
4.3 Enhanced Features with SwitchBot Hub (Sold Separately)
Pairing your SwitchBot Bot with a SwitchBot Hub unlocks additional functionalities:
- 원격 제어: Control your Bot from anywhere via the internet.
- 음성 지원 통합: Use voice commands with Amazon Alexa, Google Assistant, and Siri.
- Unlimited Automation: Create complex automation routines and integrate with IFTTT.

Figure 4.5: An Amazon Echo device interacting with a SwitchBot Bot on a light switch, illustrating voice control capabilities when paired with a SwitchBot Hub.

Figure 4.6: The SwitchBot App displaying various connected smart home devices, including a Bot, highlighting the remote control functionality through a SwitchBot Hub.
Video 4.1: This video demonstrates the SwitchBot Smart Switch Button Pusher's functionality, showcasing its wireless app and timer control without complex wiring. It highlights how the device can automate various switches for enhanced convenience.
4.4 HomeKit Support via Matter
When used with a SwitchBot Hub 2 (2nd Gen, sold separately), the SwitchBot Bot supports Matter, allowing integration into the Apple HomeKit ecosystem for a unified smart home experience.

Figure 4.7: The Apple Home application interface displaying various smart home devices, including SwitchBot products, integrated through Matter for seamless control within the HomeKit ecosystem.
5. 유지관리
5.1 배터리 교체
The SwitchBot Bot uses a standard 3V CR2 battery. The SwitchBot App will notify you when the battery level is low. To replace the battery:
- Gently remove the front cover of the SwitchBot Bot.
- 기존 CR2 배터리를 제거하세요.
- Insert a new 3V CR2 battery, ensuring correct polarity.
- Replace the front cover, ensuring it snaps securely into place.
With typical usage (approximately twice per day), the battery can last up to 600 days.
6. 문제 해결
6.1 일반적인 문제 및 해결 방법
- 연결 문제: If the Bot is not connecting, try checking or replacing the battery, ensuring your app and firmware are up to date. Move closer to the Bot to ensure you are within Bluetooth range.
- Adhesive Pad Issues: If the adhesive pad experiences quality-related issues, contact customer support for a replacement during the warranty period.
- 스위치 호환성: The Bot is designed for most rocker-style and one-way switches. It is not compatible with switches that are extremely stiff or outdated, such as Toggle switches, Mini switches, or touch-screen panels.

Figure 6.1: A visual guide illustrating various switch types, indicating which are compatible (rocker switch, one-way button) and incompatible (toggle, mini, touch screen) with the SwitchBot Bot.
For further assistance, please reach out to SwitchBot customer support.
7. 사양
| 특징 | 세부 사항 |
|---|---|
| 상표 | 스위치봇 |
| 모델 번호 | B0F37Z1132 |
| 작동 모드 | 오토매틱 |
| 현재 평가 | 1 Amps |
| 운영 볼륨tage | 120 볼트 |
| 연락처 유형 | 일반적으로 닫힘 |
| 커넥터 유형 | Clamp |
| 품목 치수(L x W x H) | 1.65 x 1.44 x 0.94 인치 |
| 회로 유형 | 1방향 |
| 접촉 재료 | 구리, 황동 |
| 위치 수 | 1 |
| 상한 온도 등급 | 섭씨 80도 |
| 컨트롤러 유형 | 아마존 알렉사 |
| 제어 방법 | 원격, 터치, 음성 |
| 연결 프로토콜 | Bluetooth, Matter, Wi-Fi |
| 색상 | 하얀색 |
| 품목 무게 | 0.634 온스 |
| 배터리 | 1개의 리튬 금속 배터리(포함) |
| 한국어: | 810150544121 |
8. 보증 및 지원
SwitchBot products come with a limited warranty. For specific warranty details, product support, or to report any issues, please contact SwitchBot customer support directly. Ensure you have your product model number and purchase information available when contacting support.
연락처 정보: Refer to the official SwitchBot website or your product packaging for the most up-to-date customer support contact details.
Ask a question about this manual
Ask about setup, troubleshooting, compatibility, parts, safety, or missing instructions. Manuals+ will review the question and use this page’s manual context to help answer it.