
1. 서론
This manual provides detailed instructions for the assembly, operation, and maintenance of your Perlegear Mobile TV Cart, models PGTVMC06 and PGTVMC20. Please read this manual thoroughly before installation and use to ensure safe and correct operation. Keep this manual for future reference.
This mobile TV cart is designed to accommodate most LED, LCD, and OLED flat screen or curved TVs ranging from 23 ~ 60 인치, with a maximum weight capacity of 88파운드(40kg). It supports VESA mounting patterns from 100x100mm ~ 400x400mm.

Image 1.1: TV size, weight, and VESA compatibility overview.
2. 안전 정보
- 모든 지침을 읽어보세요 before assembly and use. If you have any questions, contact customer support.
- 중량 용량을 초과하지 마십시오 of 88 lbs (40 kg). Exceeding this limit may result in serious injury or property damage.
- Ensure the TV's VESA pattern and weight are within the specified limits before attempting installation.
- Do not allow children to climb on the TV cart or play with its components.
- Use safety gear during assembly, such as safety glasses.
- Tighten all screws firmly but do not overtighten. Overtightening can damage components.
- 모든 연결을 확인하세요 periodically to ensure they remain secure.
- Do not move the cart over uneven surfaces or obstacles, as this may cause the cart to tip over.
- 바퀴를 잠그십시오 when the cart is in a stationary position to prevent accidental movement.
3. 패키지 내용
Verify that all components are present and undamaged. If any parts are missing or damaged, contact Perlegear customer service for assistance. While specific part numbers may vary, your package should generally include:
- 베이스 조립
- Support column/pole
- TV 마운팅 브래킷
- Media shelf (if applicable)
- 캐스터(바퀴)
- Power outlet unit (for PGTVMC20)
- Assorted hardware (screws, washers, spacers, wrenches)
4. 설치 및 조립
Follow these general steps for assembling your mobile TV cart. Refer to the included assembly diagram for specific hardware and step-by-step visuals.
- Attach Casters to the Base: Securely fasten the casters to the bottom of the base using the provided hardware. Ensure locking casters are positioned for easy access.
- Assemble Base and Support Column: Connect the support column to the base. Ensure all bolts are tightened to provide a stable foundation.
- Install Media Shelf (Optional): If your model includes a media shelf, attach it to the support column at your desired height.
- TV 마운팅 브래킷을 TV에 부착하세요: Secure the TV mounting brackets to the back of your television using the appropriate screws, washers, and spacers for your TV's VESA pattern.
- Mount TV to Support Column: Carefully lift the TV and hook the mounting brackets onto the support column's TV plate. Secure the TV in place using the safety screws or locking mechanisms.
- Adjust TV Height: The TV bracket offers 3가지 높이 설정, adjustable in 2.17인치 단위. The maximum TV height from the floor can reach approximately 60.43인치, and the minimum is approximately 56.1인치. Adjust to your preferred viewing height before finalizing the setup.

Image 4.1: TV bracket height adjustment options.
5. 사용 설명서
5.1 조정 View잉 각도
Your TV cart allows for flexible viewing angle adjustments:
- 경사: The TV can be tilted from -10° (downward) to +15° (upward) to reduce glare and optimize your viewing experience. Loosen the tilt knobs on the TV brackets, adjust to the desired angle, and then retighten the knobs securely.
- 받침: The TV can be swiveled ±35° (left or right) to direct the screen towards different areas of a room. Gently push the TV to the desired swivel angle.
- 수준 측량: The TV can be leveled by +3°/-3° to correct any slight horizontal misalignment after installation.

Image 5.1: TV tilt adjustment range.
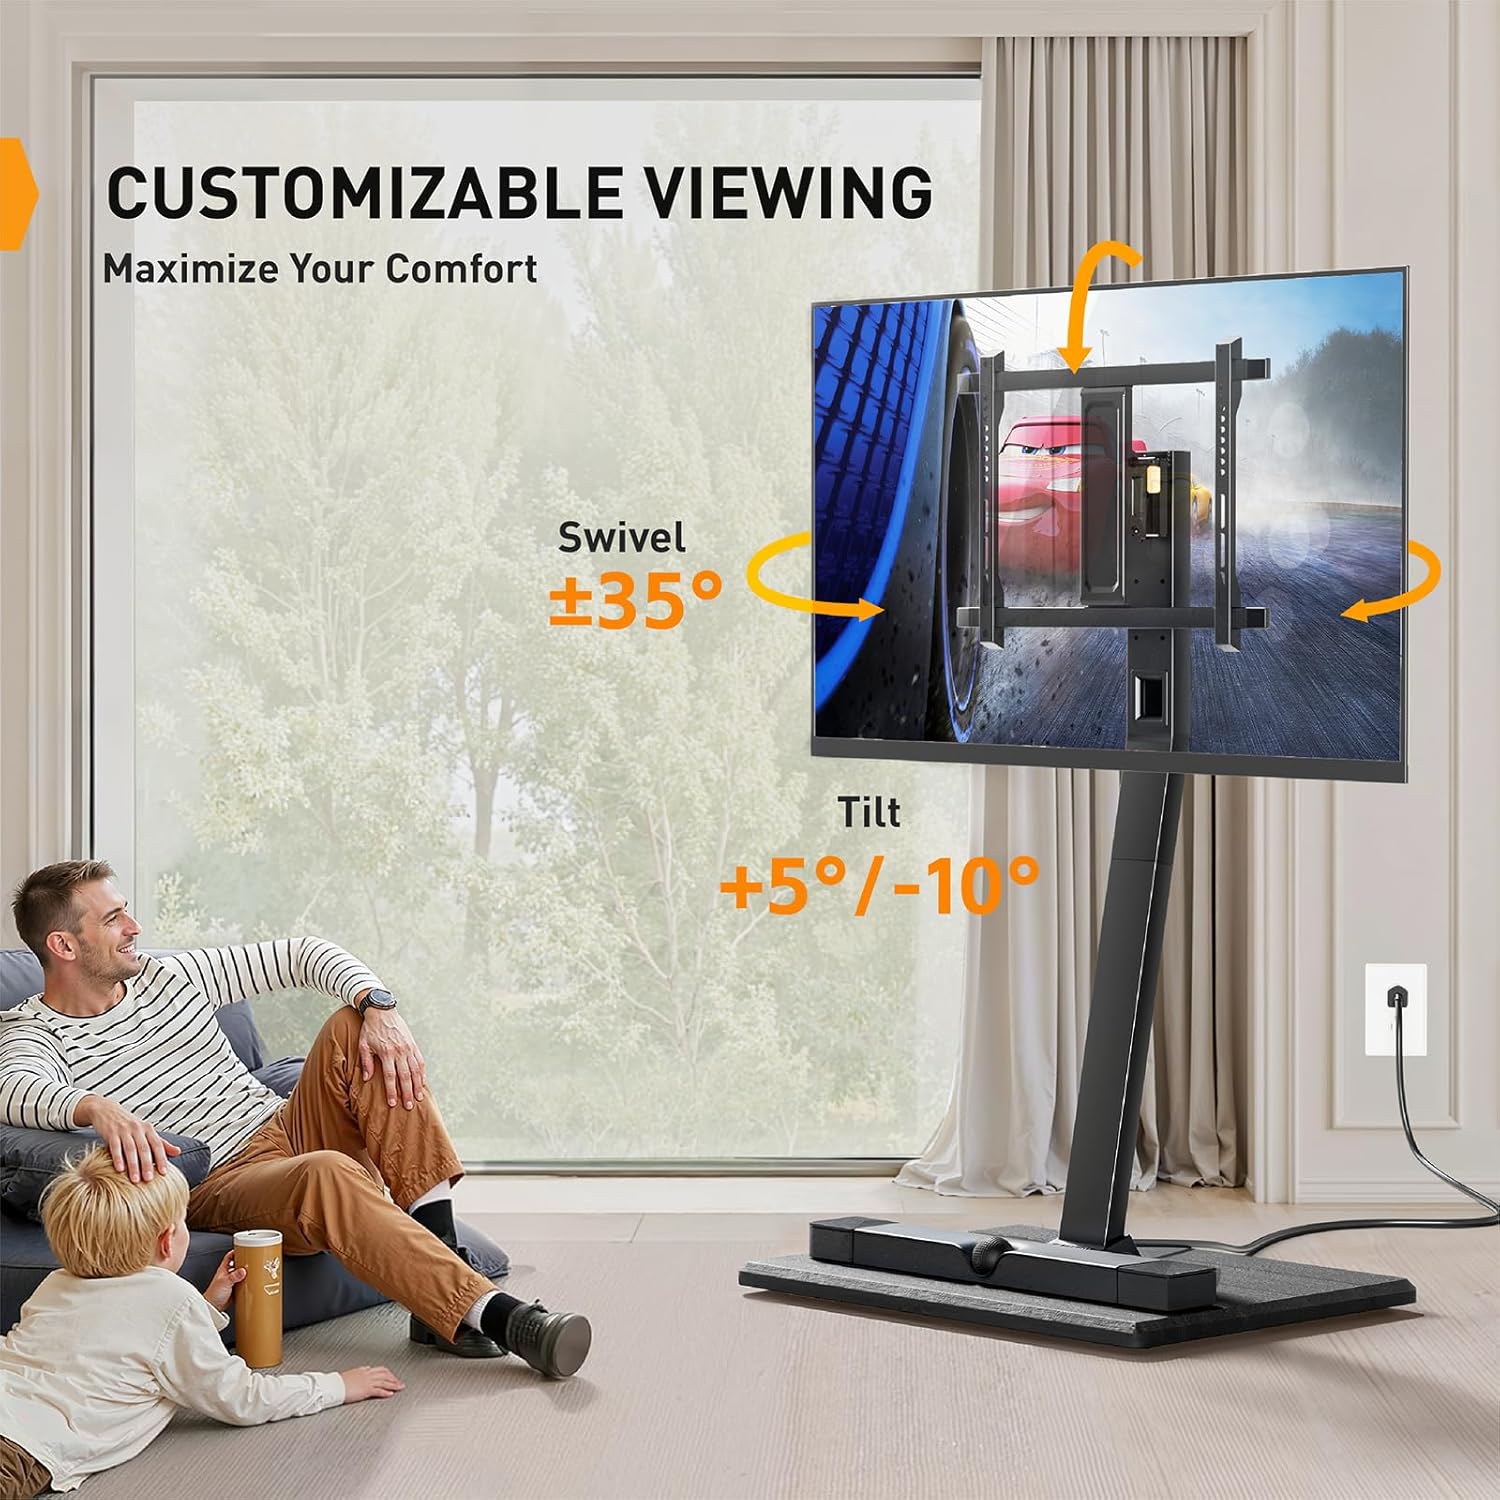
Image 5.2: Customizable viewing with swivel and tilt options.
5.2 이동성
The integrated casters allow you to easily move the TV cart to different locations. Unlock the casters before moving and lock them once the cart is in its desired position to ensure stability.

Image 5.3: Demonstrating the ease of moving the TV cart.
디자인 특징 hidden casters for a cleaner aesthetic, maintaining stability while allowing for easy movement without obstruction.

Image 5.4: Hidden casters for a streamlined appearance and mobility.
5.3 Built-in Power Outlet (PGTVMC20)
The PGTVMC20 model includes a built-in power outlet for convenient device charging and power supply. It features:
- 2개의 USB 포트 (5V / 2.1A)
- 3 개의 AC 콘센트 (120V / 12A)
- A 6.5피트 전원 코드
This allows you to power your TV and other electronic devices directly from the stand, reducing cable clutter.
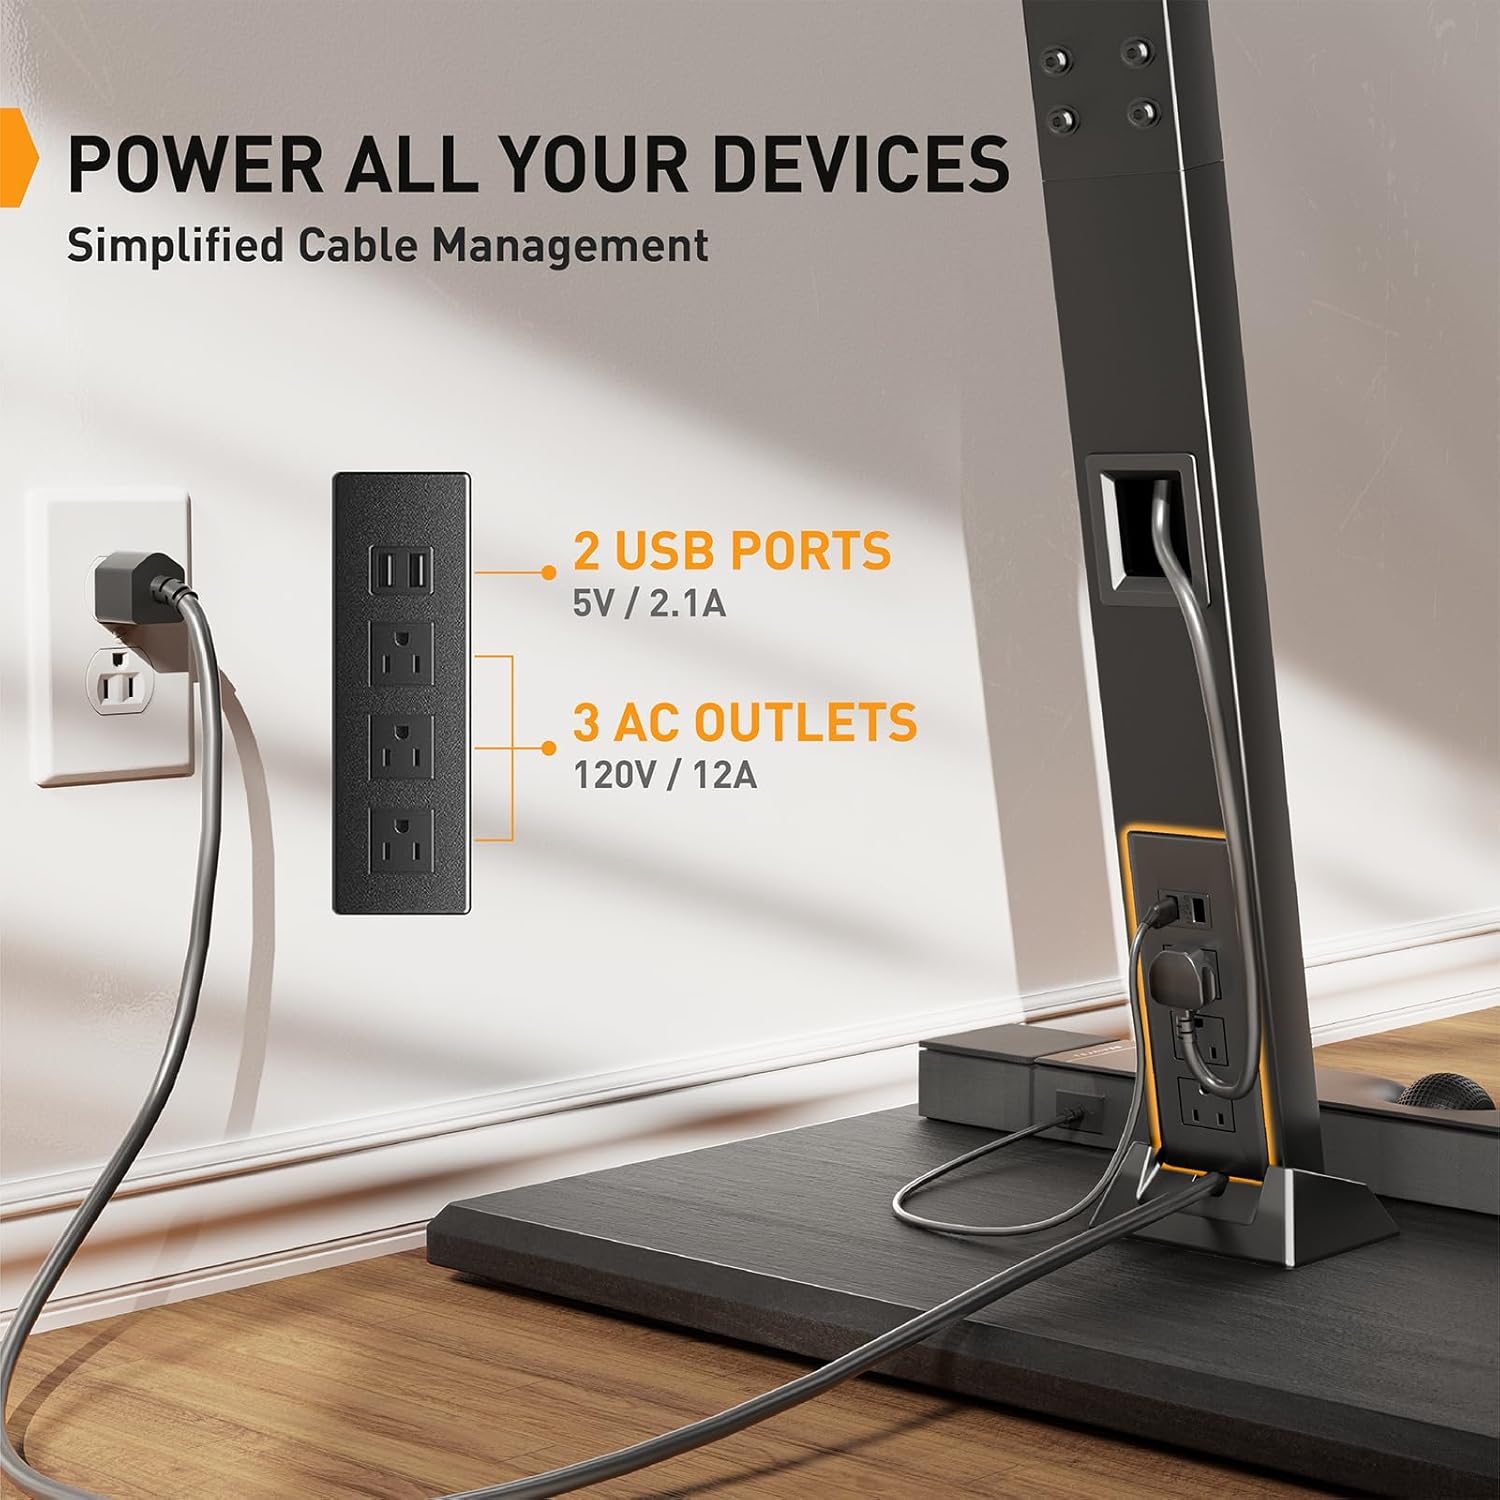
Image 5.5: Integrated power outlet for devices.
6. 유지관리
- 청소: Wipe the cart with a soft, damp 천으로 닦으세요. 강한 화학 물질이나 연마성 세제는 피하세요.
- 연결 확인: Periodically inspect all screws and bolts to ensure they are tight and secure. Retighten if necessary.
- 캐스터 기능: 바퀴에 이물질이 끼지 않도록 하여 원활한 이동을 보장하십시오.
7. 문제 해결
- 카트가 불안정합니다. Ensure all assembly screws are tightened. Verify the TV weight and size are within specifications. Ensure casters are locked when stationary.
- 카트를 옮기는 데 어려움: Check if casters are unlocked. Clean any debris from the caster wheels.
- TV가 수평이 아닙니다: Use the leveling adjustment feature (+3°/-3°) on the TV brackets. Ensure the floor surface is even.
- 전원 콘센트가 작동하지 않습니다: Check if the cart's main power cord is securely plugged into a working wall outlet. Ensure devices are properly connected to the cart's outlets.
8. 사양
| 특징 | 사양 |
|---|---|
| 호환 가능한 TV 크기 | 23~60인치 |
| 최대 TV 무게 | 88파운드(40kg) |
| VESA 호환성 | 100x100mm ~ 400x400mm |
| 기울기 조정 | -10° ~ +15° |
| 회전 조정 | ±35° |
| 레벨링 조정 | ±3° |
| 높이 조정 | 3 settings, 2.17" increments (Min 56.1", Max 60.43") |
| Power Outlet (PGTVMC20) | 2 USB (5V/2.1A), 3 AC (120V/12A), 6.5 ft cord |
| 기본 치수 | 17.72" (width) x 23.62" (depth) |

Image 8.1: Product dimensions and compatibility overview.
9. 보증 및 지원
Perlegear products are designed for durability and performance. For warranty information, technical support, or if you encounter any issues not covered in this manual, please contact Perlegear customer service. You can typically find contact details on the Perlegear official web사이트나 구매 플랫폼을 통해서도 구매하실 수 있습니다.
Please have your model number (PGTVMC06/PGTVMC20) and purchase information ready when contacting support.