1. 서론
This manual provides detailed instructions for the installation, operation, and maintenance of your GIGABYTE B550M DS3H AC R2 motherboard. This micro-ATX motherboard is designed to support AMD Ryzen 5000, 4000, and 3000 series CPUs on the AM4 socket, offering a robust platform for various computing needs. Please read this manual thoroughly before beginning installation to ensure proper setup and functionality.
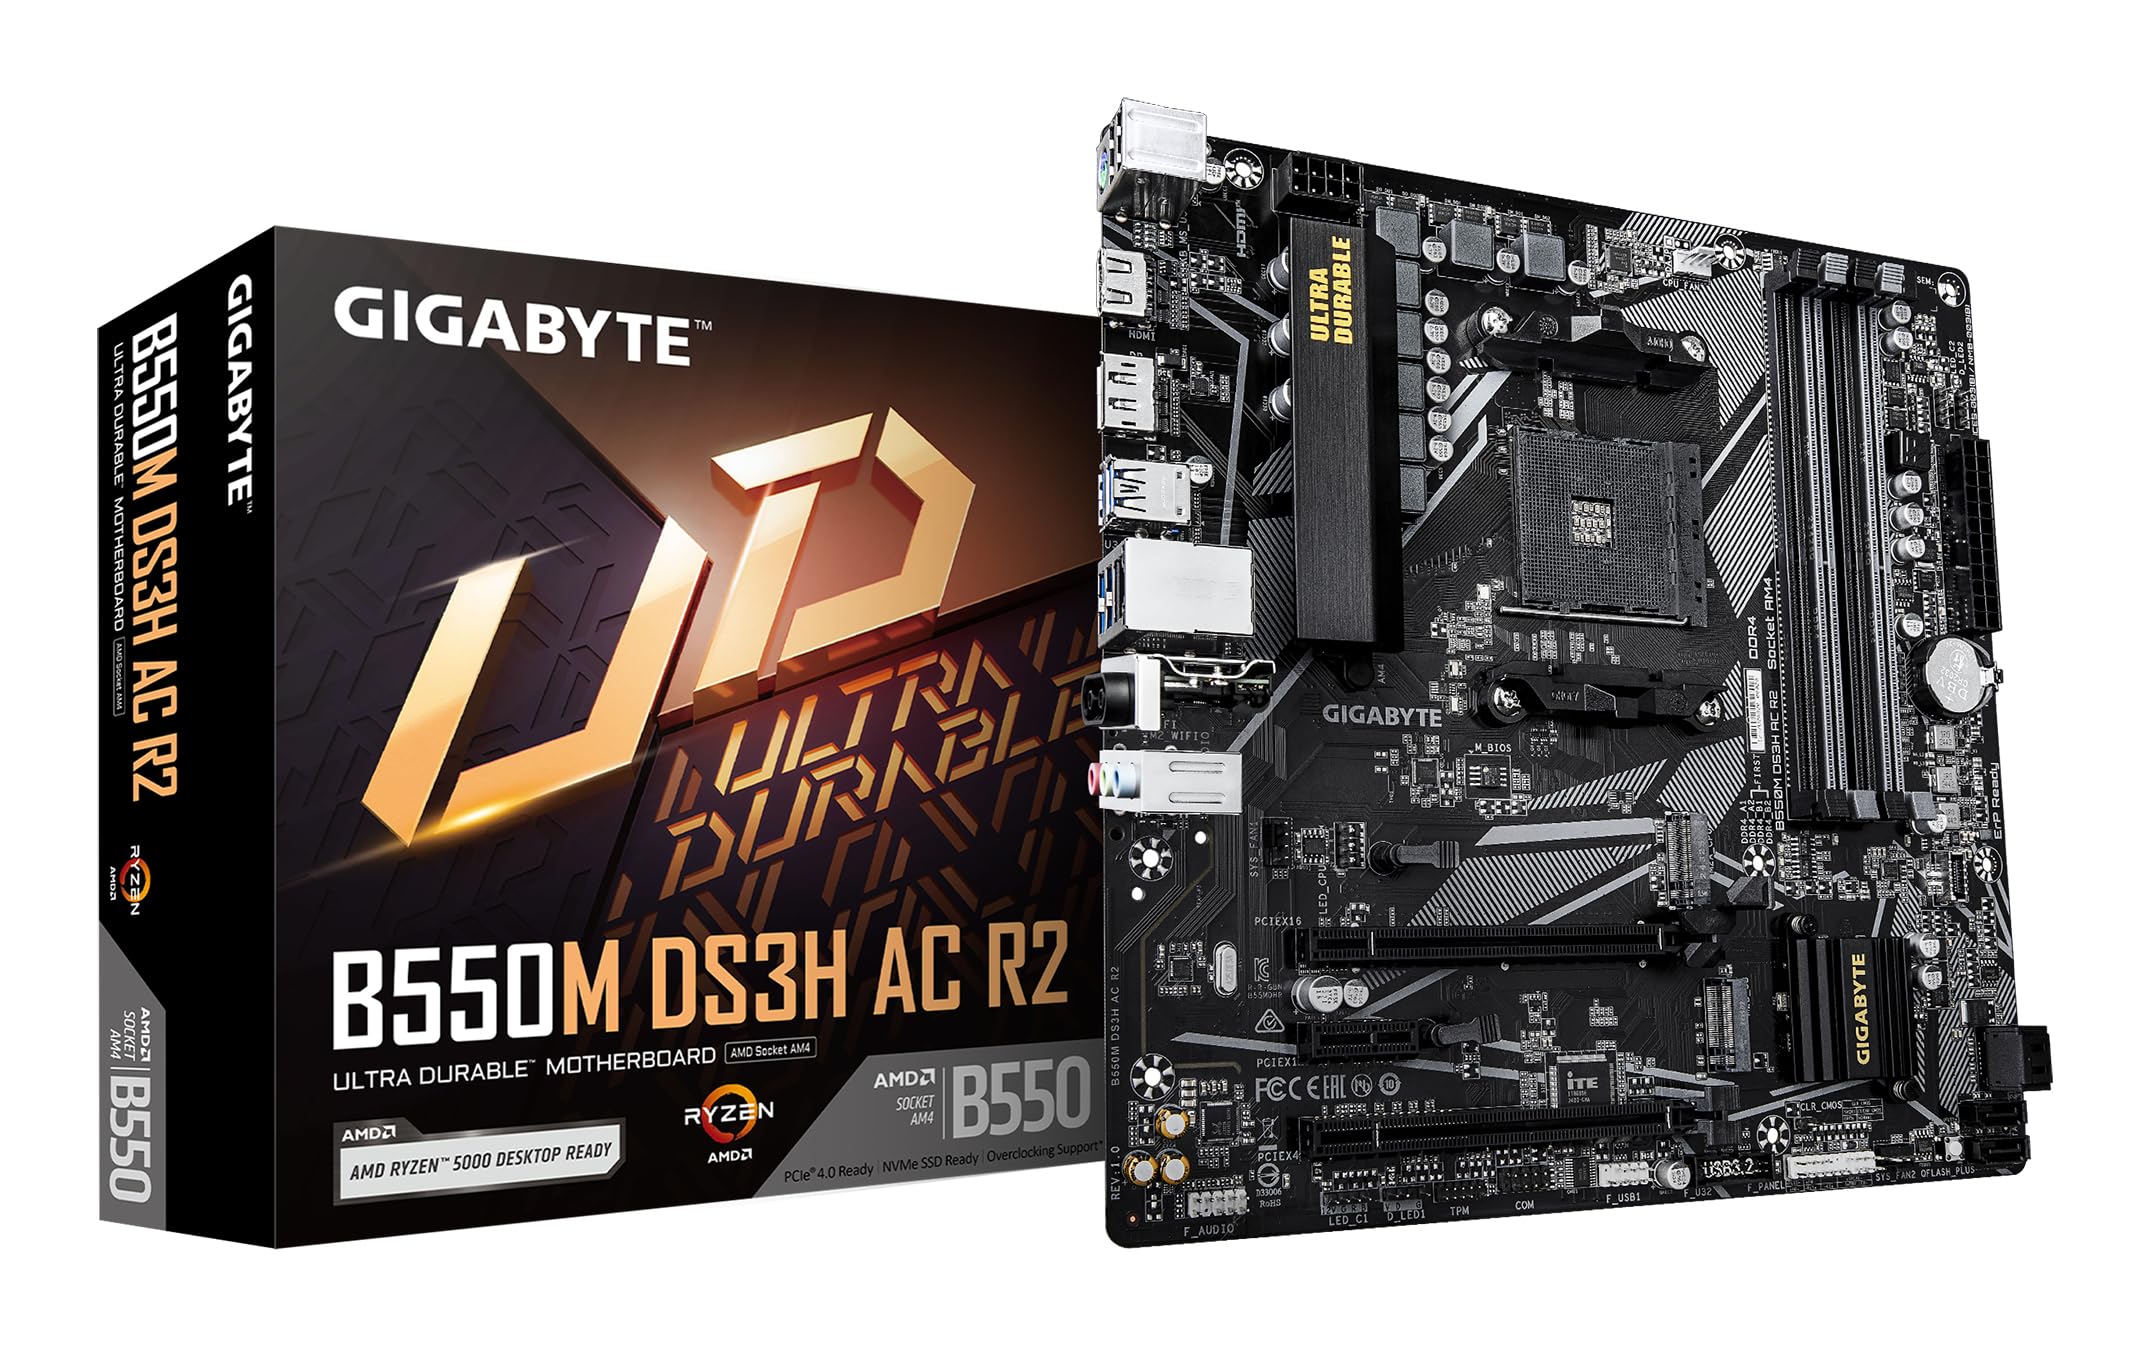
그림 1.1: 상향식 view of the GIGABYTE B550M DS3H AC R2 Motherboard, showcasing its layout including the CPU socket, DIMM slots, and various connectors.
2. 주요 특징
- AMD B550 칩셋: Supports AMD Ryzen 5000, 4000, and 3000 series CPUs with AM4 socket.
- 고속 DDR4 메모리: Dual-channel support for up to 4733MHz (O.C.) across 4 DIMM slots.
- Advanced Storage Options: Includes one PCIe 4.0 M.2 slot and one PCIe 3.0 M.2 slot, alongside PCIe slots for graphics and expansion.
- 통합 연결성: Features Wi-Fi 5, Bluetooth 5.0, and 1GbE LAN for reliable network connections.
- Flexible Display Outputs: Equipped with HDMI and DisplayPort for multi-monitor configurations.
- 스마트 냉각 시스템: Smart Fan 6 with multiple temperature sensors ensures efficient thermal management.
- Q-플래시 플러스: Allows BIOS updates without the need for CPU, memory, or graphics card installation.
3. 설정 및 설치
3.1 CPU 설치
- CPU 소켓 레버가 열린 위치에 있는지 확인하세요.
- Carefully align the triangular mark on the AMD Ryzen CPU with the mark on the AM4 socket.
- CPU를 억지로 끼우지 말고 조심스럽게 소켓에 넣으세요.
- 레버를 내려 CPU를 제자리에 고정합니다.
- 제조업체의 지침에 따라 CPU 쿨러를 설치하세요.
3.2 메모리(RAM) 설치
- DIMM 슬롯 양쪽 끝에 있는 클립을 엽니다.
- DDR4 메모리 모듈의 노치를 DIMM 슬롯의 키에 맞춥니다.
- Insert the memory module firmly until the clips snap into place. For dual-channel operation, refer to the motherboard manual for recommended slot configurations.
3.3 저장장치 설치
This motherboard supports both M.2 NVMe SSDs and SATA drives.
- M.2 SSD: Locate the M.2 slots (one PCIe 4.0, one PCIe 3.0). Insert the M.2 SSD at an angle and secure it with the provided screw.
- SATA 드라이브: Connect SATA data cables from your SSDs/HDDs to the SATA ports on the motherboard. Connect power cables from your power supply to the drives.
3.4 확장 카드 설치
Install your graphics card or other PCIe expansion cards into the appropriate PCIe slots. Ensure they are seated firmly and secured with the case screw.
3.5 전원 연결
- 파워서플라이의 24핀 ATX 메인 전원 커넥터를 마더보드에 연결하십시오.
- 8핀 ATX 12V CPU 전원 커넥터를 마더보드에 연결하십시오.
3.6 후면 I/O 패널 오버view

Figure 3.1: The rear I/O panel of the GIGABYTE B550M DS3H AC R2 motherboard, showing various ports including USB, HDMI, DisplayPort, LAN, and audio jacks.
The rear I/O panel provides connectivity for external devices. It includes USB 2.0, USB 3.2 Gen 1, HDMI, DisplayPort, 1GbE LAN, Wi-Fi antenna connectors, and audio jacks. Refer to the detailed diagram in the physical manual for specific port identification.
4. 사용 설명서
4.1 BIOS 설정
The BIOS (Basic Input/Output System) is firmware that initializes hardware during the booting process. To enter BIOS Setup, press the 델 key during the Power-On Self-Test (POST). Here you can configure system settings, boot order, and monitor hardware status.
4.2 Q-Flash Plus
Q-Flash Plus를 사용하면 CPU, 메모리 또는 그래픽 카드를 설치하지 않고도 BIOS를 업데이트할 수 있습니다. 최신 BIOS를 다운로드하기만 하면 됩니다. file 기가바이트에서 website, rename it to GIGABYTE.bin, save it to a USB flash drive, and insert it into the designated Q-Flash Plus USB port. Press the Q-Flash Plus button to initiate the update.
4.3 드라이버 설치
After installing your operating system, install the necessary drivers for the motherboard chipset, audio, LAN, Wi-Fi, and other integrated components. These drivers are typically provided on a support DVD or can be downloaded from the official GIGABYTE web대지.
5. 유지관리
5.1 청소
Regularly clean your computer's interior to prevent dust buildup, which can lead to overheating and reduced performance. Use compressed air to remove dust from components, especially heatsinks and fans. Ensure the system is powered off and unplugged before cleaning.
5.2 BIOS 업데이트
기가바이트를 주기적으로 확인하세요 website for BIOS updates. Updates can improve system stability, add support for new hardware, or fix known issues. Follow the instructions provided by GIGABYTE carefully when performing a BIOS update.
5.3 스마트 팬 6
Utilize the Smart Fan 6 utility in the BIOS or GIGABYTE's software to monitor system temperatures and adjust fan speeds. Proper fan configuration helps maintain optimal operating temperatures and extends component lifespan.
6. 문제 해결
- 시스템 부팅 실패: Check all power connections (24-pin ATX, 8-pin CPU), ensure RAM modules are properly seated, and verify the CPU is correctly installed. Try clearing the CMOS.
- 디스플레이 출력 없음: Confirm the graphics card is fully seated in its PCIe slot and connected to power (if required). Ensure your monitor cable is connected to the graphics card, not the motherboard's integrated graphics ports (unless using an APU).
- 주변 문제: If USB devices or other peripherals are not working, ensure drivers are installed and check BIOS settings for port enablement.
- 시스템 불안정/충돌: This can be caused by outdated drivers, overheating, or faulty hardware. Update drivers, monitor temperatures, and test components individually if possible.
- BIOS 업데이트 실패: If a BIOS update fails, use the Q-Flash Plus feature to recover the BIOS.
7. 사양
| 특징 | 사양 |
|---|---|
| 상표 | 기가바이트 |
| 모델명 | B550M DS3H AC R2 |
| CPU 소켓 | 소켓 AM4 |
| 호환 프로세서 | AMD Ryzen 3000 시리즈, AMD Ryzen 4000 시리즈, AMD Ryzen 5000 시리즈 |
| 칩셋 유형 | AMD B550 |
| RAM 메모리 기술 | DDR4 |
| 메모리 클럭 속도 | 최대 4733MHz(오버클럭) |
| 사용 가능한 메모리 슬롯 | 4 |
| RAM 메모리 최대 크기 | 128GB (XNUMX기가바이트) |
| 그래픽 카드 인터페이스 | PCI 익스프레스 4.0 |
| Total PCIe Ports | 1 (PCIe 4.0 x16 for GPU) + other PCIe slots |
| M.2 슬롯 | PCIe 4.0 M.2 슬롯 1개, PCIe 3.0 M.1 슬롯 2개 |
| 총 SATA 포트 수 | 4 |
| 무선 연결 | 와이파이 5, 블루투스 5.0 |
| 랜 | 1GbE 랜 |
| 총 USB 포트 | 6 (Rear I/O) + Internal Headers |
| 디스플레이 출력 | HDMI 1개, 디스플레이포트 1개 |
| 폼 팩터 | 마이크로 ATX |
| 품목 치수 L x W x H | 24.4L x 24.4W x 3.5H 센티미터 |
| 품목 무게 | 980그램 |
8. 보증 정보
The GIGABYTE B550M DS3H AC R2 motherboard comes with a 3-YEAR Manufacturer Warranty. Please retain your proof of purchase for warranty claims. For detailed terms and conditions, refer to the official GIGABYTE warranty policy available on their web대지.
9. 지원 및 연락처
기술 지원, 드라이버 다운로드, BIOS 업데이트 및 기타 제품 정보는 GIGABYTE 공식 웹사이트를 방문하십시오. website. You can also contact GIGABYTE customer service for assistance.
제조업체 연락처 정보:
GIGABYTE Technology (India) Pvt. Ltd.
Unit No. 807 & 808, 8th Floor, Naman Midtown B-Wing,
Elphinstone Road, Mumbai – 400013, India
For the most up-to-date contact details and support resources, please refer to the GIGABYTE official web대지: www.기가바이트.com