
1. 제품 오버view
The FILTA 6 Pack Privacy Door Lever is designed for interior doors requiring a simple locking mechanism, such as bedrooms and bathrooms. These keyless door levers provide privacy without the need for a key, featuring a push-button lock on the interior side and an emergency unlock hole on the exterior. Crafted from durable metal with a matte black finish, these levers offer both functionality and a modern aesthetic.
The design ensures ease of use, particularly for individuals who may find traditional doorknobs challenging. The levers are reversible, accommodating both left- and right-handed door installations.
2. 패키지 내용
설치를 시작하기 전에 패키지에 모든 구성 요소가 포함되어 있는지 확인하십시오.
- Lever Set (Interior and Exterior Levers)
- 래치 메커니즘
- 스트라이크 플레이트
- 스트라이크 박스
- Screw Bag (various screws for installation)
- Square Bar (Spindle)
- Backup Square Bar (Spare Spindle)
- 설치 지침

Image: All hardware components included in the FILTA door lever package, laid out clearly with labels for the lever set, latch, strike plate, strike box, screw bag, square bar, backup square bar, and instructions.
3. 사양
| 특징 | 사양 |
|---|---|
| 재료 | 금속 |
| 색상 | 매트블랙 |
| 잠금 유형 | Keyless Privacy (Push Button) |
| 도어 두께 호환성 | 1-3/8" (35MM) to 1-3/4" (45MM) |
| Adjustable Backset Size | 2-3/8" (60MM) or 2-3/4" (70MM) |
| 마운팅 플레이트 치수 | 2-1/2" x 2-1/2" |
| 손의 방향 | 양손잡이(양손잡이) |

Image: A detailed diagram illustrating the dimensions of the door lever, including the handle length, projection, and the adjustable latch backset sizes of 2-3/8" (60MM) and 2-3/4" (70MM).
4. 설치 지침
Tools required: Phillips head screwdriver, measuring tape, pencil, drill (optional, for new installations).
- 문 준비: If installing on a new door, use the provided template to mark and drill holes for the latch and the main lever assembly. Ensure the holes are correctly sized for the 2-1/8" cross bore and 1" edge bore. For existing doors, remove the old hardware.
- 래치 조정: The latch mechanism is adjustable for either a 2-3/8" (60MM) or 2-3/4" (70MM) backset. Adjust the latch by twisting the housing until the desired backset is achieved. Insert the latch into the edge bore of the door, ensuring the bevel of the latch bolt faces the door frame. Secure with screws.
- 외부 레버 설치: Insert the exterior lever assembly through the cross bore, ensuring the spindle (square bar) passes through the latch mechanism.
- 내부 레버 설치: Place the interior lever assembly over the spindle and align the mounting holes with the exterior assembly. Secure the two assemblies together using the provided mounting screws. Tighten firmly but do not overtighten.
- 테스트 작업: Before closing the door, test the lever action and the privacy lock function. Ensure the latch retracts smoothly and the lock engages and disengages correctly.
- 스트라이크 플레이트 및 박스 설치: Install the strike box into the door frame. Align the strike plate with the latch bolt and secure it to the door frame with the provided screws. Ensure the latch bolt engages smoothly with the strike plate when the door is closed.

Image: A four-step visual guide demonstrating the installation process: marking and drilling holes, adjusting the latch, inserting the cylinder and indoor handle, and installing the outside handle unit with the locking bar and spindle.

Image: A visual representation of the door levers installed on both a left-opening and a right-opening door, demonstrating the product's reversibility and adaptability to different door orientations.
5. 사용 설명서
The FILTA Privacy Door Lever is designed for simple and secure operation.
- 잠그려면: From the interior side of the door, locate the small push button on the lever's rosette. Press this button to engage the privacy lock. The door is now locked from the outside.
- 잠금 해제하려면: From the interior side, simply turn the lever handle. This action will automatically disengage the privacy lock.
- Emergency Unlock (Exterior): In case of an emergency or accidental lockout, an emergency unlock hole is located on the exterior rosette. Insert a small, pointed object (such as a paperclip or the emergency key provided with some sets) into this hole and push firmly to disengage the lock.
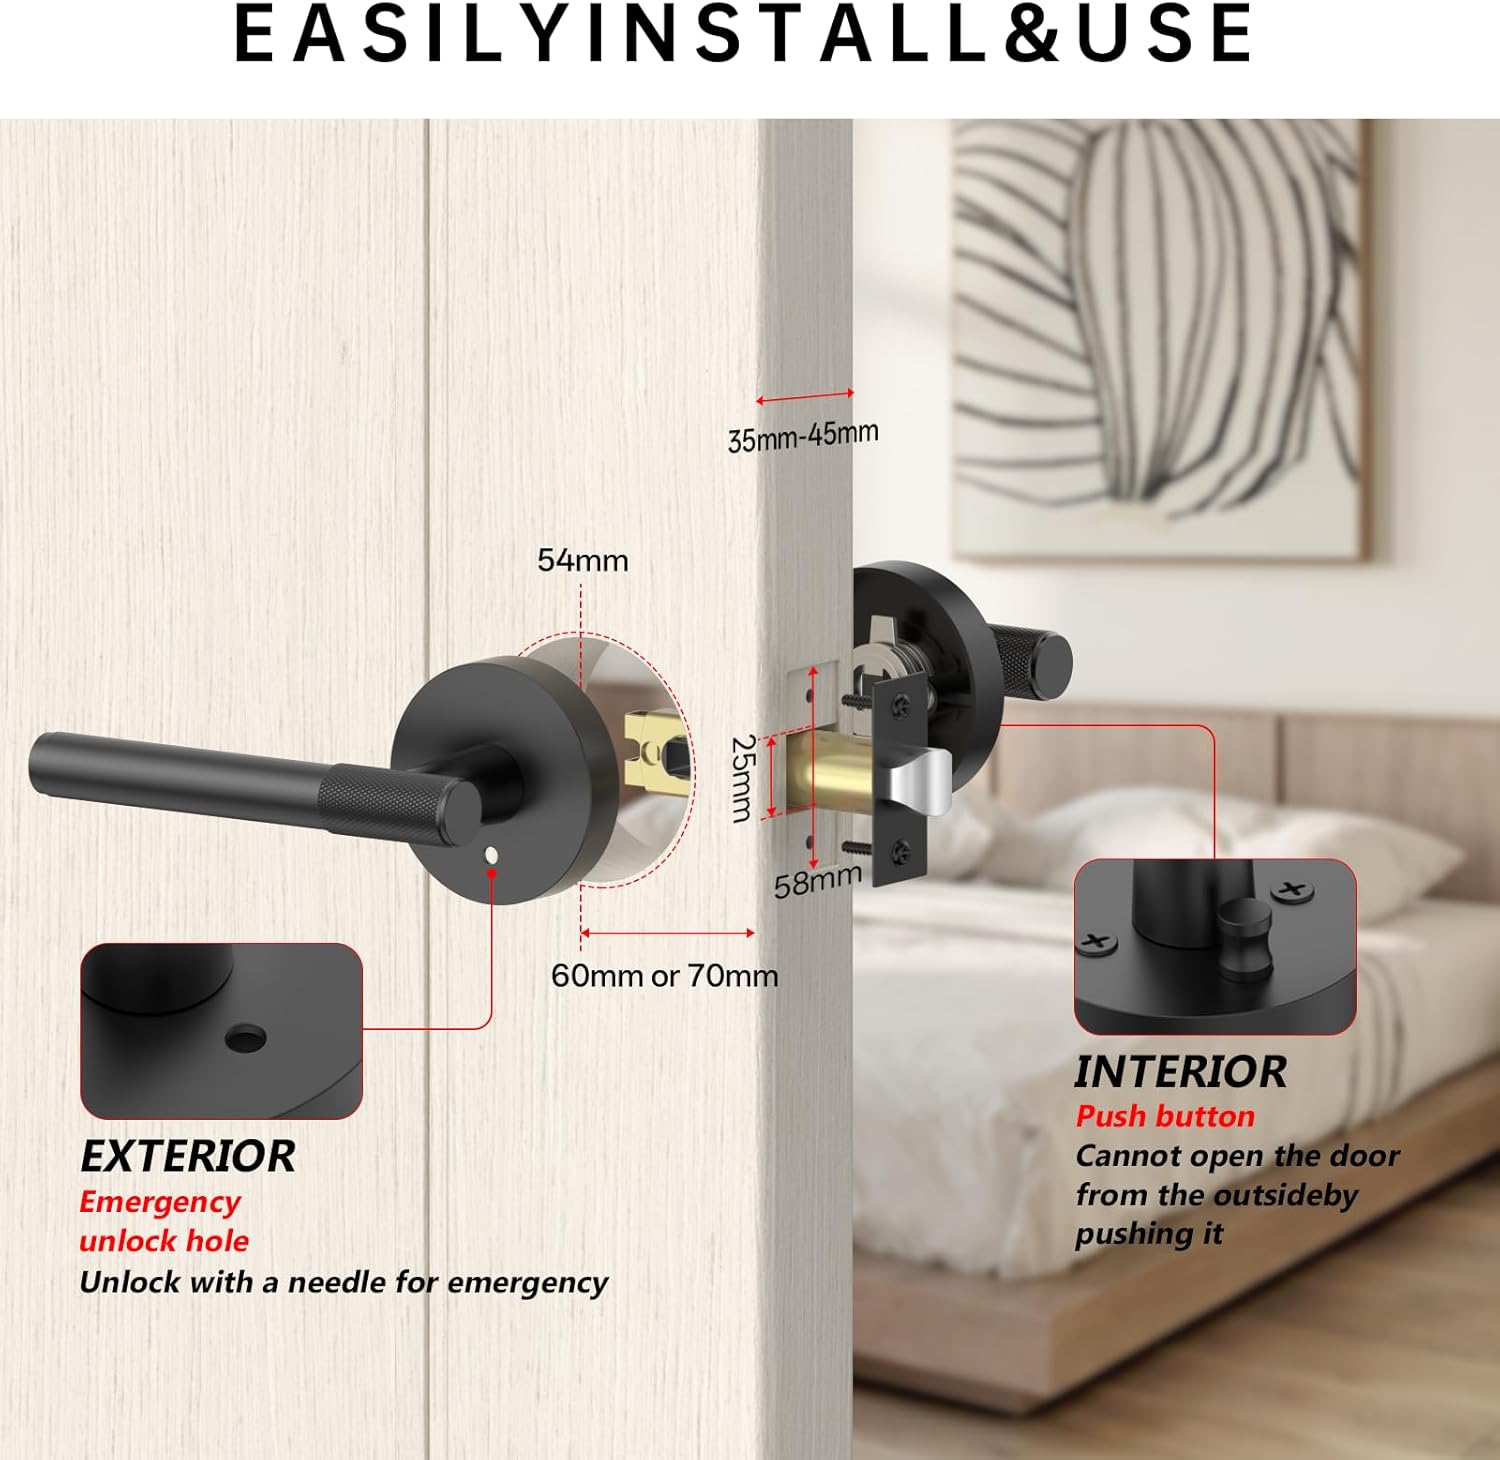
Image: A cutaway diagram of the door lever assembly, highlighting the interior push button for locking and the exterior emergency unlock hole, along with key dimensions for installation.
6. 유지관리
To ensure the longevity and appearance of your FILTA door levers, follow these simple maintenance guidelines:
- 청소: Wipe the levers with a soft, damp cloth. Avoid using abrasive cleaners, harsh chemicals, or polishes, as these can damage the matte black finish.
- 매끄럽게 하기: Periodically, a small amount of silicone-based lubricant can be applied to the latch bolt and internal mechanisms to maintain smooth operation. Do not use oil-based lubricants, which can attract dust and grime.
- 나사 조이기: Over time, screws may loosen. Periodically check and tighten all visible screws on the lever assemblies and strike plate to ensure secure installation.
7. 문제 해결
If you encounter issues with your door lever, refer to the following common problems and solutions:
| 문제 | 가능한 원인 | 해결책 |
|---|---|---|
| Lever is loose or wobbly | 장착 나사가 느슨합니다. | Tighten the mounting screws on both sides of the door lever assembly. |
| Latch does not retract smoothly | Misalignment of components; lack of lubrication. | Check for proper alignment of the spindle through the latch. Apply a silicone-based lubricant to the latch mechanism. |
| Privacy lock does not engage/disengage | Internal mechanism obstruction or misalignment. | Ensure the push button is not obstructed. Recheck internal assembly for correct alignment during installation. If the lock mechanism is sticky, a small amount of lubricant may help. |
| Door does not latch or close properly | Strike plate misalignment; latch bolt not extending fully. | Adjust the position of the strike plate on the door frame. Ensure the latch bolt extends fully when the door is open. |
8. 보증 및 지원
For information regarding product warranty, returns, or technical support, please refer to the official FILTA website or contact FILTA customer service directly. Keep your purchase receipt as proof of purchase.