
사르메르트 C2
Sarmert C2 4K 듀얼 대시캠 및 하드와이어 키트 사용 설명서
모델 : C2
1. 서론
Thank you for choosing the Sarmert C2 4K Dual Dash Cam and Hardwire Kit. This manual provides detailed instructions for the installation, operation, and maintenance of your new dash camera system. Please read this manual thoroughly before use to ensure proper functionality and to maximize the benefits of your device. This system is designed to provide reliable video recording for your vehicle, enhancing safety and security.
2. 제품 오버view
2.1 패키지 내용
- Sarmert C2 4K Dual Dash Cam (Front Camera)
- 후방 카메라
- USB C Hardwire Kit (11.5ft)
- 64GB 마이크로SD 카드
- 사용자 설명서
2.2 주요 특징
- 4K Ultra-Clear Sensor: Provides high-resolution video capture for both front and rear views.
- 슈퍼 나이트 비전: Enhances low-light performance for clear recordings in dark conditions.
- 24시간 연중무휴 주차 감시: Continuous surveillance with motion detection and collision alerts (requires hardwire kit).
- G-센서 보호: 음식을 자동으로 잠그고 저장합니다.tag충돌 감지 시 덮어쓰기를 방지합니다.
- 낮은 볼륨tage 보호: Hardwire kit automatically cuts power to prevent car battery drain.
- Built-in 2.4GHz & 5G WiFi: For faster video download and app control.
- 내장 GPS: Tracks routes and speed, viewable via complimentary GPS player software.
- Universal Compatibility (Hardwire Kit): Compatible with most USB Type-C dash cams, GPS navigators, and radar detectors.
- Multiple Safety Protections (Hardwire Kit): Includes short circuit, overheating, adjustable low voltage, and cable reversal prevention.
2.3 Product Components and Features Visuals

그림 2.3.1: 이상view of the Sarmert C2 4K Dual Dash Cam system components, including the front dash cam, rear camera, USB-C hardwire kit, and a 64GB microSD card.
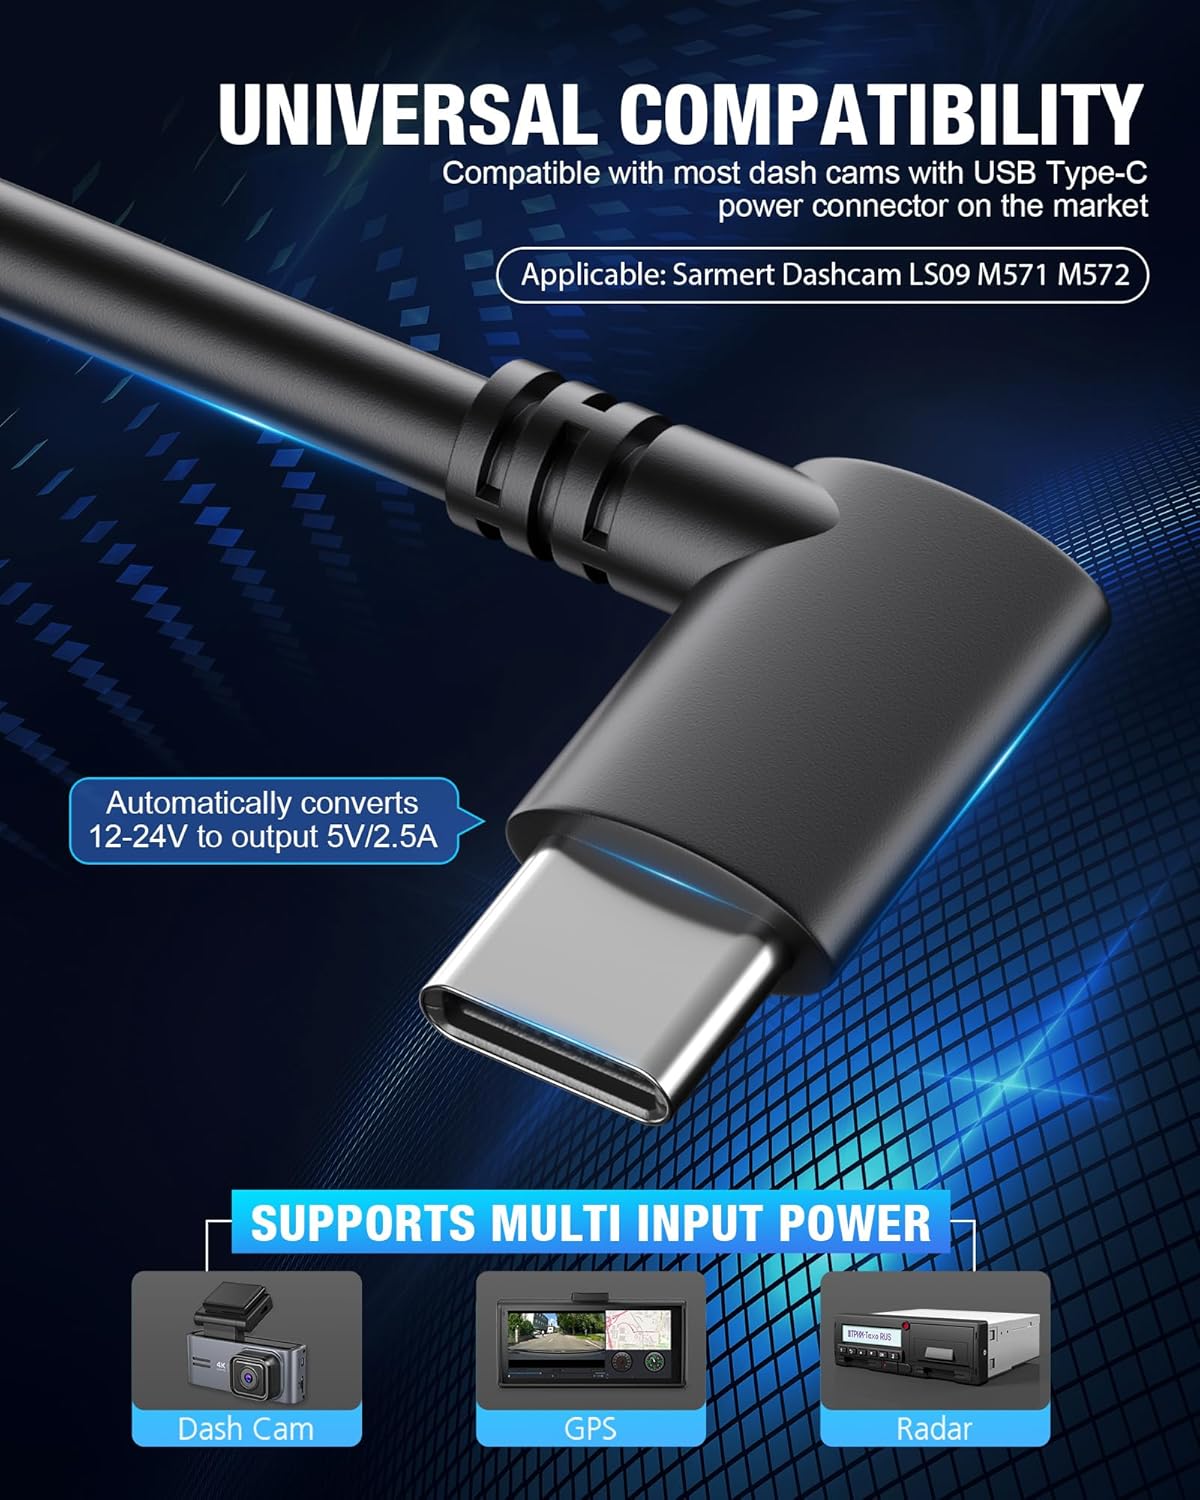
Figure 2.3.2: Illustration of the 24-hour parking monitor and G-sensor functionality, which activates and locks footage upon collision detection, theft, or vicious scratch detection.

Figure 2.3.3: The USB Type-C hardwire kit, demonstrating its universal compatibility with various USB Type-C powered devices such as dash cams, GPS units, and radar detectors, converting 12-24V to 5V/2.5A output.

Figure 2.3.4: The C2 4K Dual Dash Cam's Super Night Vision technology, which enhances low-light performance for clear capture of details like license plates in darkness.

Figure 2.3.5: Features such as built-in 2.4GHz & 5G WiFi for faster video download and OTA firmware upgrades, along with built-in GPS for tracking routes and speed.
3. 설정 및 설치
3.1 블랙박스 설치
- 대시캠이 장착될 앞유리 부분을 청소하세요.
- Attach the front dash cam to the windshield using the provided adhesive mount, ensuring a clear view 도로의.
- Route the power cable neatly along the windshield trim and dashboard.
- 후방 카메라를 뒷유리에 설치하고, 카메라가 깨끗한 시야를 확보하도록 하십시오. view. Connect its cable to the main dash cam unit.
3.2 하드와이어 키트 설치
The hardwire kit enables 24-hour parking monitoring and protects your car battery from draining. Installation typically takes 10-25 minutes.

Figure 3.2.1: Detailed diagram of the hardwire kit, showing the USB Type-C output cable, hardwire kit box, input cable, and the three lead wires (GND, ACC, BAT+).
- Locate your vehicle's fuse box. Refer to your vehicle's manual for its location.
- Connect the Black wire (GND): Attach this wire to a metal bolt or screw on the vehicle's chassis for a ground connection.
- Connect the Red wire (ACC): Connect this wire to a fuse in your fuse box that is only powered when the ignition is on (Accessory power).
- Connect the Yellow wire (BAT+): Connect this wire to a fuse in your fuse box that has constant power, even when the ignition is off (Battery power).
- Route the hardwire kit cable neatly and discreetly to the dash cam.
- Plug the USB-C connector of the hardwire kit into the dash cam's power port.
메모: If you are not experienced with car electrical systems, it is highly recommended to seek professional installation to avoid damage to your vehicle or the device.
3.3 낮은 볼륨tage Protection Settings
The hardwire kit features smart low voltage protection to prevent your car battery from draining. It automatically cuts off power after 60 seconds if the car battery drops to a preset voltage.
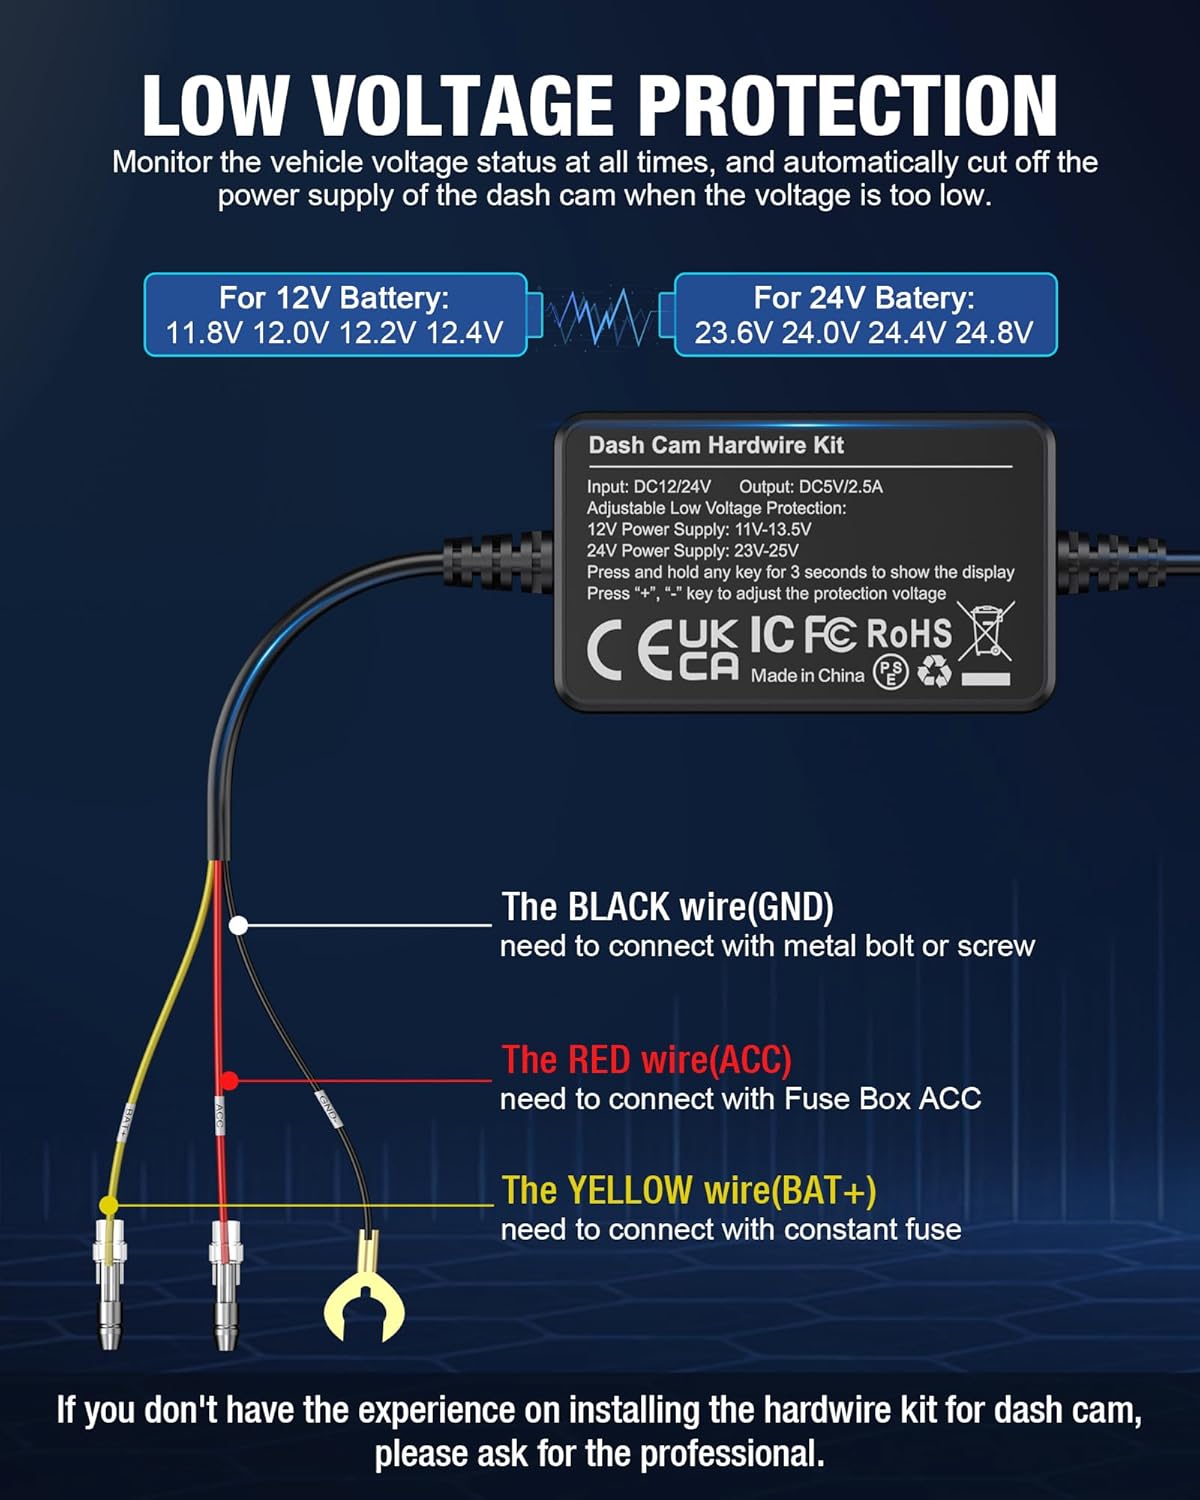
Figure 3.3.1: Low voltage protection settings. For a 12V battery, cutoff options are 11.8V, 12.0V, 12.2V, 12.4V. For a 24V battery, options are 23.6V, 24.0V, 24.4V, 24.8V. Press and hold any key for 3 seconds to show the display, then use '+' or '-' to adjust the voltage.
To adjust the protection voltage:
- Press and hold any key on the hardwire kit for 3 seconds to activate the digital display.
- Use the '+' and '-' buttons to select your desired low voltage cutoff threshold.

Figure 3.3.2: The 3-lead hardwire kit provides multiple safety protections including battery drain prevention, over-current protection, short-circuit protection, reverse connection protection, and overheat protection.

Figure 3.3.3: The complete hardwire kit package, including the main unit and various fuse taps for different vehicle fuse box types, ensuring broad compatibility.
4. 사용 설명서
4.1 전원 켜기/끄기
- The dash cam will automatically power on and begin recording when your vehicle's ignition is turned on (if connected to ACC power).
- 점화가 꺼진 직후에 자동으로 전원이 꺼집니다.
4.2 녹음 모드
- 루프 녹음: 블랙박스는 짧은 시간 간격(예: 1분, 3분 또는 5분)으로 영상을 연속 녹화합니다. 메모리 카드가 가득 차면 가장 오래된 잠금 해제된 파일을 자동으로 덮어씁니다.tage.
- G-센서(비상 녹화): In the event of a sudden impact or collision, the built-in G-sensor will detect the event and automatically lock the current video segment, preventing it from being overwritten by loop recording.
- 주차 모니터링 : When the vehicle is parked and the hardwire kit is installed, the dash cam can monitor for motion or impacts. If an event is detected, it will automatically record and save the footage.
4.3 Using WiFi and App Control
The Sarmert C2 dash cam features built-in 2.4GHz and 5G WiFi for easy access to recordings and settings via a mobile application.
- Download the official Sarmert app (e.g., 'RoadRec' or similar, check product packaging for exact app name) from the App Store or Google Play.
- Enable WiFi on your dash cam through its menu settings.
- On your smartphone, connect to the dash cam's WiFi network (SSID and password usually displayed on the dash cam screen).
- 앱을 열어서 view 라이브 푸tag예, 녹화된 비디오 재생, 다운로드 files to your phone, and adjust dash cam settings.
4.4 GPS 기능
The built-in GPS module records your vehicle's driving route and speed. This data can be viewed using a complimentary GPS player software on your PC or Mac. Refer to the Sarmert website or app for details on downloading the GPS player.
5. 유지관리
- 청소: Use a soft, dry cloth to clean the dash cam lens and screen. Do not use liquid cleaners or abrasive materials.
- 메모리 카드: Format the microSD card regularly (e.g., once a month) through the dash cam's settings to ensure optimal performance and prevent data corruption. Use a high-quality Class 10 or U3 microSD card.
- 펌웨어 업데이트: Check the Sarmert official website or app periodically for firmware updates. Keeping your dash cam's firmware updated can improve performance and add new features.
- 온도: 대시캠을 장시간 극한의 온도에 노출시키지 마세요.
6. 문제 해결
6.1 일반적인 문제 및 해결 방법
- 대시캠 전원이 켜지지 않음:
해결책: Check the power connection. Ensure the hardwire kit is correctly installed and receiving power from the vehicle's fuse box. Verify the USB-C cable is securely plugged into the dash cam.
- 주차 모니터가 작동하지 않음:
해결책: Ensure the hardwire kit is correctly installed with both ACC and BAT+ connections. Verify that parking monitoring is enabled in the dash cam's settings. Check the low voltage protection setting to ensure it's not cutting power prematurely.
- 비디오 푸tage가 흐릿하거나 불분명합니다.
해결책: Clean the dash cam lens with a soft cloth. Ensure the protective film (if any) has been removed from the lens. Check if the windshield area in front of the camera is clean. Verify the video resolution settings in the dash cam menu.
- Memory Card Error/Full:
해결책: Format the microSD card through the dash cam's settings. If the issue persists, try a different high-quality microSD card (Class 10 or U3 recommended). Ensure loop recording is enabled.
- WiFi 연결 문제:
해결책: Ensure WiFi is enabled on the dash cam. Restart both the dash cam and your smartphone. Make sure you are connecting to the correct WiFi network broadcasted by the dash cam. Try reinstalling the mobile application.
7. 사양
| 특징 | 사양 |
|---|---|
| 모델명 | C2 |
| 비디오 캡처 해상도 | 2160p(4K) |
| 연결 기술 | USB-C, Wireless (WiFi) |
| 장착 유형 | 대시 보드 마운트 |
| 하드와이어 키트 입력 볼륨tage | 12V-24V |
| Hardwire Kit Output Voltag전자/현재 | 5V/2.5A |
| 디스플레이 유형 | 주도의 |
| 포함된 구성 요소 | 하드 와이어 키트 |
| 색상 | 검은색 |
| 차량 서비스 유형 | Car, Truck, Van, SUV, Motorcycle |
8. 보증 및 지원
Sarmert products are designed for reliability and performance. For warranty information, technical support, or service inquiries, please refer to the contact details provided on the official Sarmert web웹사이트 또는 제품 포장에서 구매 내역을 확인하십시오. 보증 청구를 위해 구매 증빙 자료를 보관해 주십시오.
For the latest information and support, visit the official Sarmert store: Sarmert Store on Amazon
Ask a question about this manual
Ask about setup, troubleshooting, compatibility, parts, safety, or missing instructions. Manuals+ will review the question and use this page’s manual context to help answer it.