1. 서론
This manual provides detailed instructions for the installation, operation, maintenance, and troubleshooting of your ASUS ROG Strix Z890-H Gaming WiFi Motherboard. Please read this manual thoroughly before proceeding with installation or use to ensure proper functionality and to prevent damage to your components.
2. 제품 오버view
The ASUS ROG Strix Z890-H Gaming WiFi motherboard is designed for Intel Core Ultra Processors (Series 2) with an LGA 1851 socket. It features robust power delivery, advanced cooling solutions, and comprehensive connectivity options, including DDR5 memory support, PCIe 5.0, WiFi 7, and multiple M.2 slots. Integrated AI technologies enhance performance and system management.

Figure 2.1: ASUS ROG Strix Z890-H Gaming WiFi Motherboard and included accessories.
주요 특징:
- 인텔 LGA 1851 소켓: Intel Core Ultra 프로세서(시리즈 2)와 호환됩니다.
- 견고한 전력 솔루션: 16+2+1+2 power stages for stable power delivery.
- 최적화된 열 설계: Features massive heatsinks, a U-shaped heatpipe, and high-conductivity thermal pads.
- DDR5 메모리 지원: Enhanced signal routing for high-speed DDR5 modules.
- Advanced Storage: Multiple M.2 slots, including PCIe 5.0 M.2, with cooling solutions.
- 고성능 네트워킹: On-board Wi-Fi 7 (802.11be) with ASUS WiFi Q-Antenna, Intel 2.5Gb Ethernet, and Realtek 5Gb Ethernet.
- 풍부한 연결성: Dual Thunderbolt 4 USB Type-C ports, USB 20Gbps Type-C, and multiple USB 10Gbps ports.
- 독점 AI 기술: ASUS AI Overclocking, AI Cooling II, AI Networking II, and AI Advisor.
- DIY 친화적인 디자인: PCIe Slot Q-Release Slim, M.2 Q-Latch, M.2 Q-Release, M.2 Q-Slide, Q-Antenna, Q-Code, Q-LED, and BIOS FlashBack button.

그림 2.2: 이상view of ASUS exclusive AI technologies.
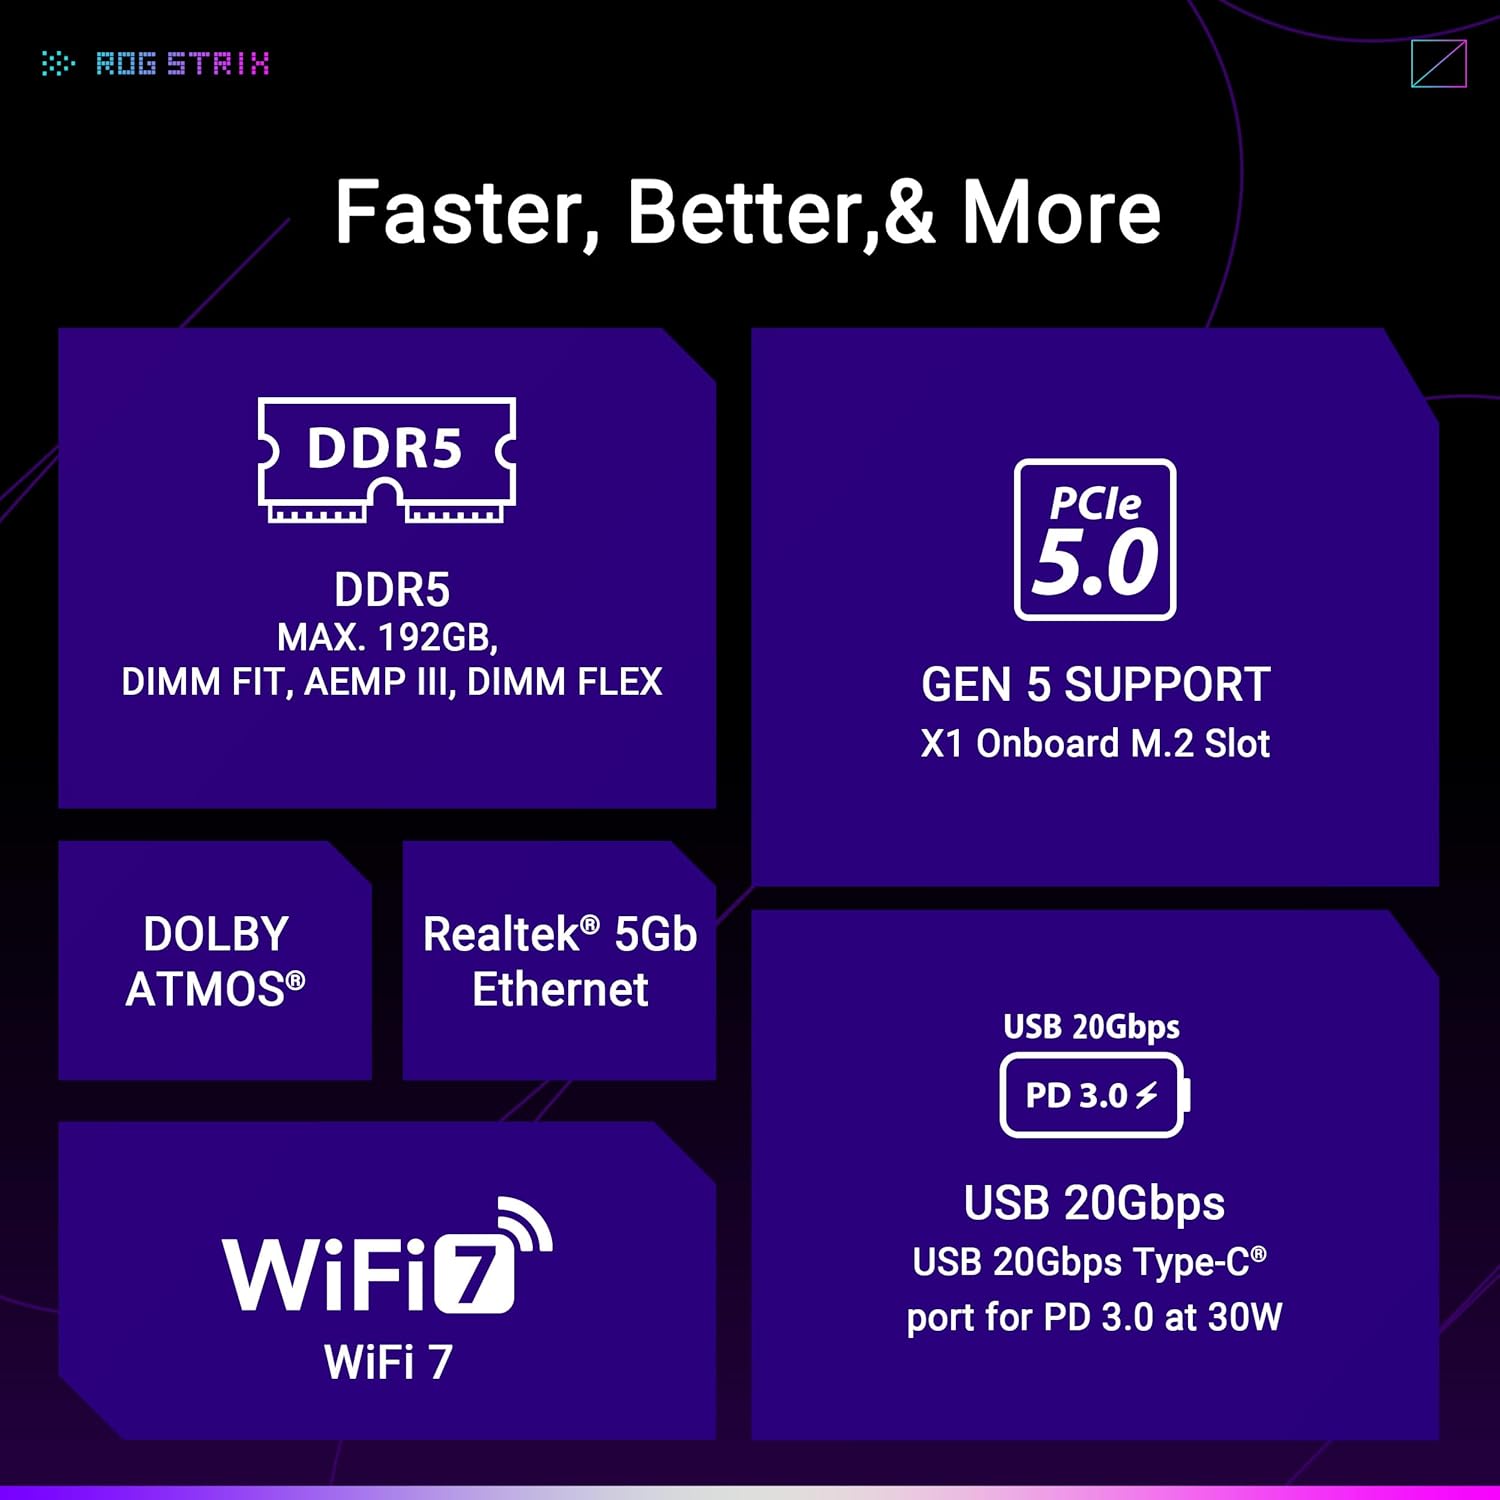
Figure 2.3: Performance and cooling features of the motherboard.
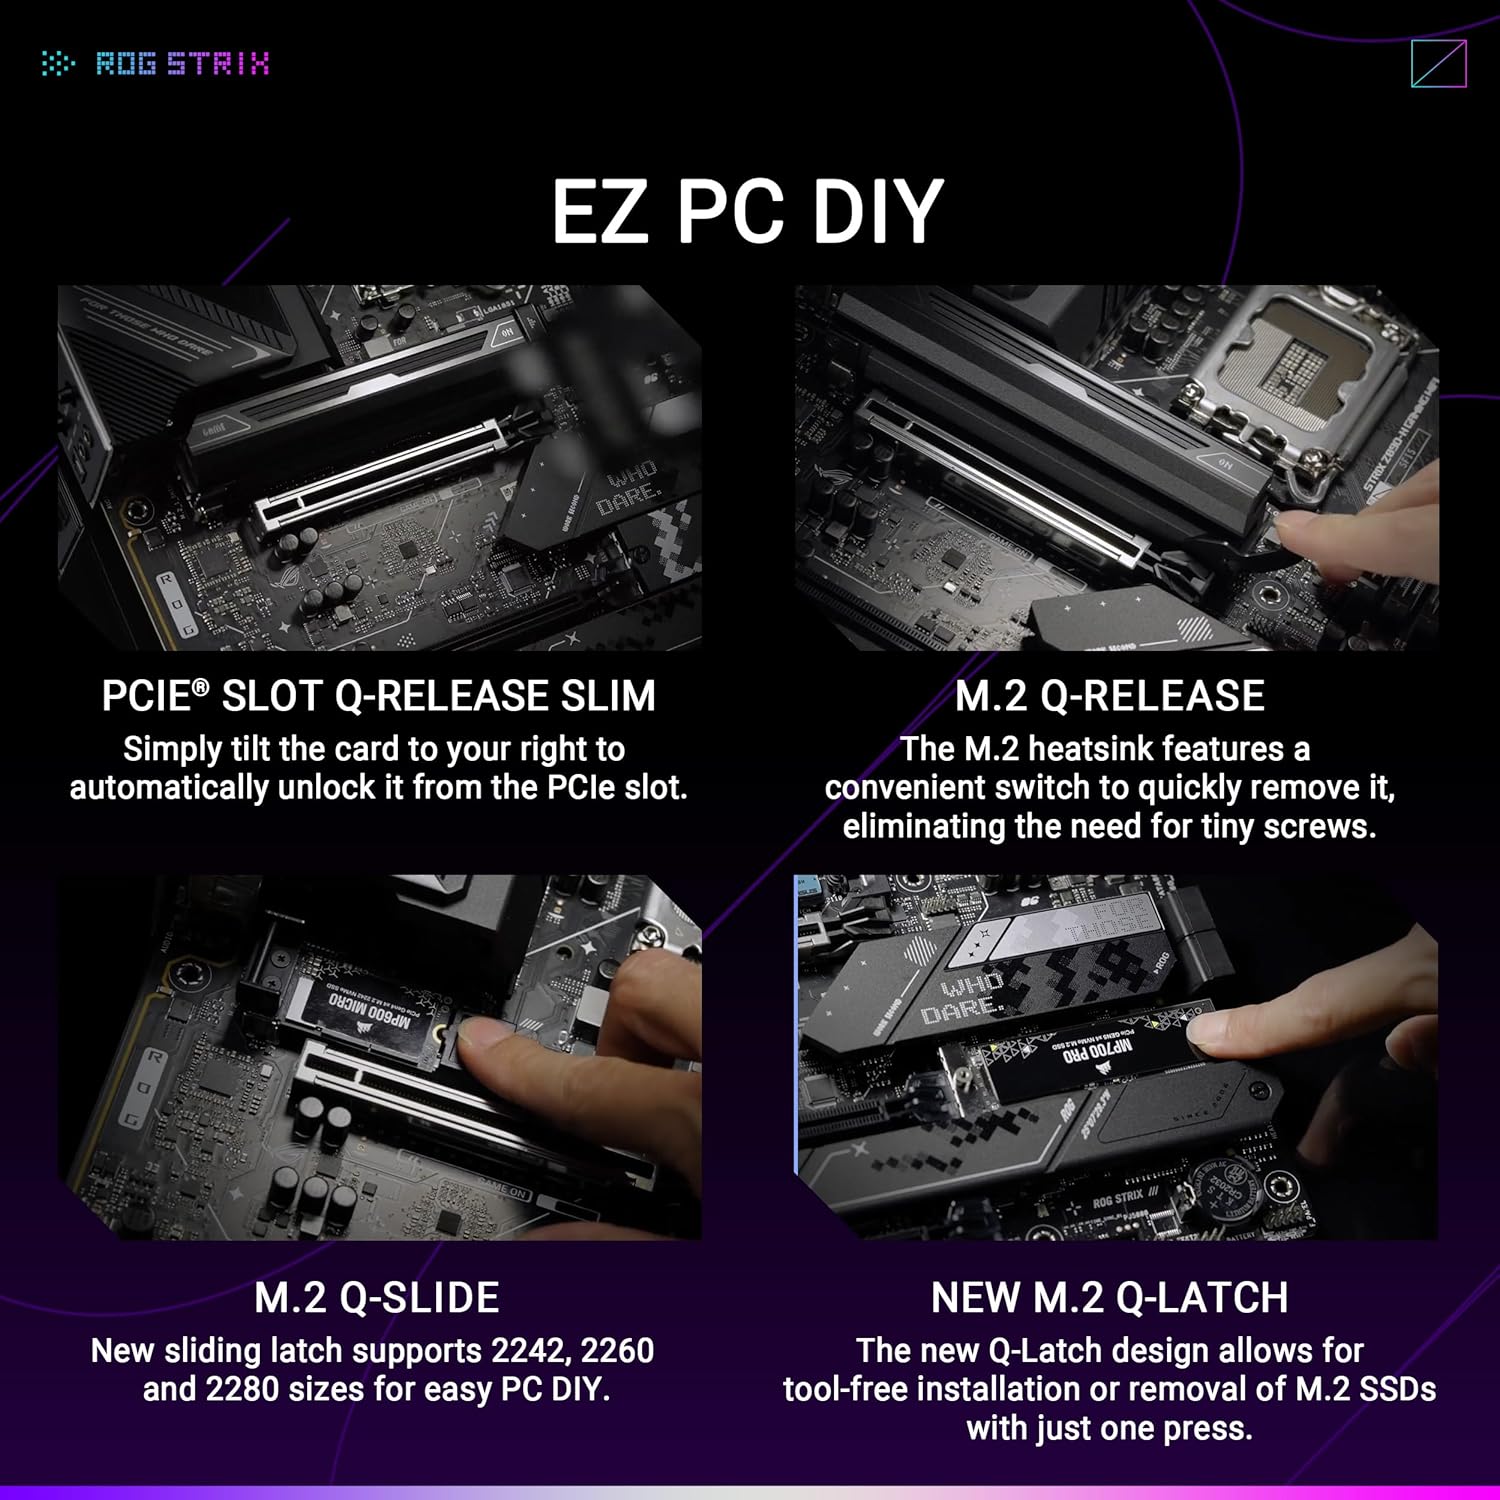
Figure 2.4: Connectivity and speed enhancements.
3. 설치 가이드
3.1. 시작하기 전에
- 안전 예방 조치: Always disconnect the power supply before installing or removing any components. Wear an anti-static wrist strap to prevent electrostatic discharge (ESD) damage.
- 필요한 도구: Phillips-head screwdriver, anti-static wrist strap, thermal paste (for CPU cooler).
- 호환성 확인: Ensure your CPU, RAM, and other components are compatible with the Z890 chipset and LGA 1851 socket.
3.2. 구성 요소 설치 단계
- CPU 설치:
- CPU 소켓 레버를 열고 보호 덮개를 제거하십시오.
- CPU를 소켓에 조심스럽게 맞추고 CPU의 황금 삼각형이 소켓의 삼각형과 일치하는지 확인하세요.
- CPU를 소켓에 조심스럽게 넣으세요. 무리하게 힘을 주지 마세요.
- 소켓 레버를 닫아 CPU를 고정합니다.

Figure 3.1: LGA 1851 CPU Socket.
- CPU 쿨러 설치: Apply thermal paste to the CPU (if not pre-applied on the cooler) and install the cooler according to its manufacturer's instructions.
- 메모리 모듈(RAM) 설치:
- DIMM 슬롯 양쪽 끝에 있는 클립을 엽니다.
- DDR5 메모리 모듈의 홈을 DIMM 슬롯의 키에 맞춰 정렬하십시오.
- 클립이 제자리에 고정될 때까지 메모리 모듈의 양쪽 끝을 단단히 누릅니다.
- M.2 SSD 설치:
- Locate the M.2 slots and remove any pre-installed heatsinks.
- M.2 SSD를 슬롯에 비스듬히 삽입합니다.
- Secure the SSD using the M.2 Q-Latch mechanism or a screw, then reattach the heatsink.

Figure 3.2: M.2 Q-Latch and other DIY features.
- 그래픽 카드(GPU) 설치:
- PCIe 5.0 x16 슬롯의 고정 클립을 엽니다.
- Align the GPU with the slot and press down firmly until it clicks into place.
- Secure the GPU to the case with screws.
- 전원 공급 장치 연결: Connect the 24-pin ATX power connector and the 8-pin/4-pin CPU power connectors from your power supply to the motherboard.
- 전면 패널 케이블 연결: Connect the power button, reset button, USB ports, and audio jacks from your case to the corresponding headers on the motherboard. Refer to the motherboard layout diagram for header locations.
- Install the WiFi Q-Antenna: Screw the included WiFi Q-Antenna onto the antenna connectors on the rear I/O panel.

그림 3.3: 후면 I/O 패널.
4. 사용 설명서
4.1. 초기 부팅 및 BIOS 설정
After assembling your system, connect a monitor, keyboard, and mouse. Power on your system. During the boot process, press the 델 or F2 key to enter the BIOS/UEFI setup utility. Here you can configure system settings, boot order, and enable features like XMP for memory overclocking.
4.2. 소프트웨어 및 드라이버
After installing your operating system, install the necessary drivers for your motherboard components (chipset, audio, LAN, WiFi, etc.). These can be found on the ASUS support website for your specific motherboard model. ASUS also provides utility software such as Armoury Crate for system monitoring, RGB lighting control, and driver updates.
4.3. AI 기능
- AI 오버클럭킹: This feature intelligently profiles your CPU and cooling system to predict optimal overclocking settings, allowing for enhanced performance with stability.
- AI 냉각 II: Balances system thermals and acoustics by optimizing fan speeds based on system load and temperature, configurable through software.
- AI 네트워킹 II: Prioritizes network traffic for gaming and other critical applications, ensuring stable and low-latency connectivity.
- ASUS AI 어드바이저: An intelligent tool that uses AI to understand natural language questions, providing guidance and information about motherboard functionalities.
5. 유지관리
정기적인 유지관리는 마더보드의 수명과 최적의 성능을 보장하는 데 도움이 됩니다.
- BIOS 업데이트: 정기적으로 ASUS 지원을 확인하세요 website for BIOS updates. Updates can improve compatibility, stability, and performance. Use the BIOS FlashBack feature for convenient updates without a CPU or RAM installed.
- 드라이버 업데이트 : 새 소프트웨어와의 호환성을 확보하고 성능 향상 및 버그 수정의 이점을 누리려면 드라이버를 최신 상태로 유지하십시오.
- 물리적 청소: Regularly clean dust from your system components, especially heatsinks and fans, using compressed air. Ensure the system is powered off and unplugged before cleaning.
6. 문제 해결
이 섹션에서는 일반적으로 발생할 수 있는 문제에 대해 설명합니다.
- 전원 없음/부팅 불가:
- 모든 전원 연결(24핀 ATX, 8핀 CPU, GPU)을 확인하세요.
- 전원 공급 장치가 켜져 있는지 확인하십시오.
- 전면 패널 전원 버튼의 연결 상태를 확인하십시오.
- 디스플레이 없음:
- 모니터 케이블이 그래픽 카드(내장 그래픽을 사용하는 경우 마더보드)에 연결되어 있는지 확인하십시오.
- 그래픽 카드와 메모리 모듈을 다시 장착하세요.
- Check the Q-LED indicators on the motherboard for diagnostic codes.
- Q-LED 표시등: The motherboard features Q-LEDs (CPU, DRAM, VGA, BOOT) that light up to indicate the status of key components during boot. A lit LED indicates a problem with that component.
- Q-코드 표시: The Q-Code display provides a two-digit code that corresponds to specific boot stages or errors. Refer to the motherboard manual for a complete list of Q-Codes and their meanings.
- 네트워크 연결 문제:
- 이더넷 케이블이 단단히 연결되어 있는지 확인하십시오.
- Verify WiFi antenna is properly installed.
- Check network driver installation.
- CMOS 지우기: If system instability or incorrect settings prevent booting, use the Clear CMOS button on the rear I/O panel to reset BIOS settings to default.
7. 기술 사양
| 특징 | 사양 |
|---|---|
| 상표 | 아수스 |
| 모델명 | ROG STRIX Z890-H 게이밍 와이파이 |
| CPU 소켓 | LGA 1851 |
| 호환 프로세서 | Intel® Core™ Ultra processors (Series 2) |
| 칩셋 유형 | 인텔 Z890 |
| RAM 메모리 기술 | DDR5 |
| 메모리 속도 | 320MHz (기본 클럭, 오버클럭을 통해 더 높은 클럭 지원) |
| 플랫폼 | 윈도우 11 |
| 주 전원 커넥터 유형 | 24핀 |
| 품목 무게 | 5.08파운드 |
| 패키지 크기 | 13.98 x 10.71 x 2.87 인치 |
| 색상 | 검은색 |
8. 보증 및 지원
ASUS products are manufactured to high quality standards. For specific warranty terms and conditions, please refer to the warranty card included with your product or visit the official ASUS support website. Technical support, driver downloads, and further documentation can be found at www.asus.com/support/.