
1. 서론
The Osee G7 Pro is a high-brightness 7-inch touchscreen camera monitor designed for professional video production. It features a 3000-nit display, HDR capabilities, camera control functions, and extensive monitoring tools. This manual provides detailed instructions for setting up, operating, and maintaining your G7 Pro monitor.
2. 주요 특징
- 3000-Nit High Brightness Display: Ensures clear visibility in outdoor environments without the need for a sunshade.
- 카메라 제어: Direct control over camera functions (WB, ISO, Aperture, Shutter Speed, Record/Shoot, Touch Focus) via a Type-C cable when powered by an NP-F battery. Supported cameras include EOS R5 II, EOS R6 II, EOS R6, EOS R8, EOS 5D Mark IV, A7 IV, ZV-E10M2, FX3, Z9, Z6 III, Z6 II, Z6, GFX100 II, X-H2, X-H2S, X-T5, X-S20, LUMIX GH5S, LUMIX GH6, LUMIX S5, LUMIX S5 II, E2, E2C.
- Touch to Focus & Dynamic Focus Tracking: Trigger photo capture and track focus directly from the touchscreen.
- 향상된 대비: New IPS technology and anti-reflection coating provide a 1300:1 contrast ratio.
- 3G-SDI & 4K HDMI Connectivity: Supports up to 1080p60 via SDI and 4Kp30 via HDMI for versatile signal input/output.
- Advanced Analysis Modes: Simultaneous display of waveform, histogram, and vectorscope. Customizable false color and 8 preview MySets.
- 3D-LUT Support: Precise 3D-LUT reproduction for accurate skin tones and HDR footage, with 22-bit internal processing for 18 stops of dynamic range. Upload LUTs via SD card.
- 유연한 전원 공급 장치: Can be powered by NP-F battery, D-tap, or Type-C cable. The monitor can also power the camera via USB-PD.
- New User Interface (UI): Optimized UI logic and reorganized function layout for improved user experience.
- 내구성 있는 구조: High-aluminum silicate glass touchscreen and internal die-cast aero aluminum plate for shock resistance and effective heat dissipation.
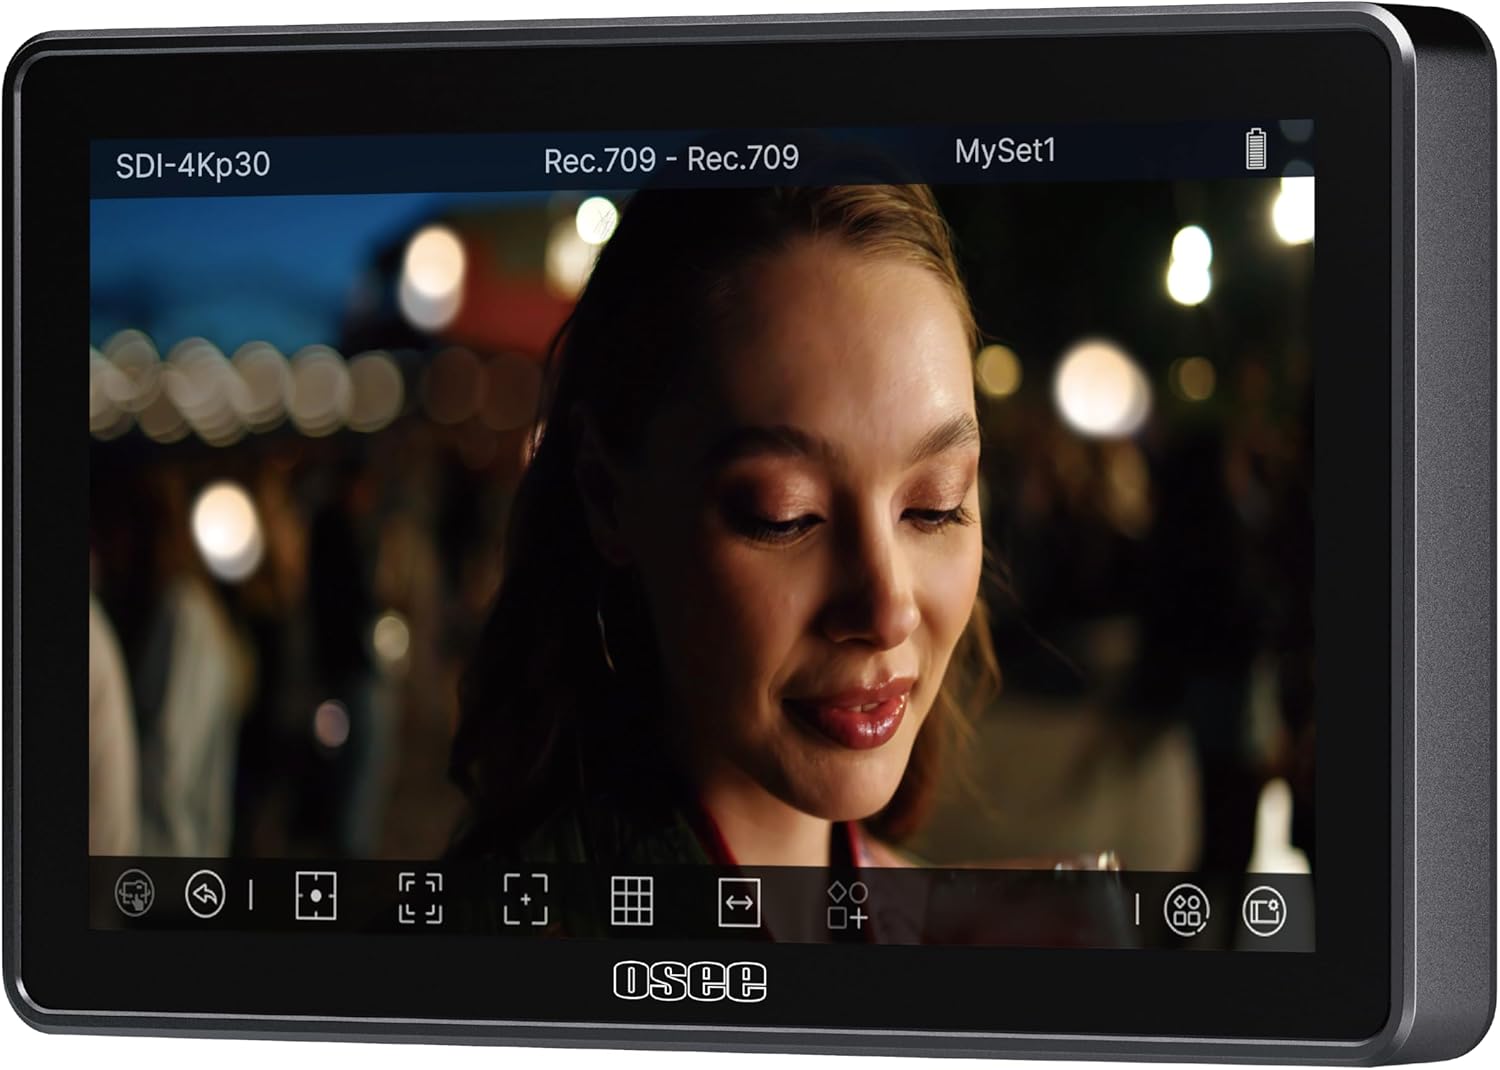
Figure 2.1: The Osee G7 Pro monitor displaying a video feed with its user interface elements visible at the bottom.

Figure 2.2: Illustration of the camera control feature, showing the monitor connected to a camera and listing compatible camera models.
3. 설정
3.1 포장 풀기 및 초기 검사
Carefully unpack the Osee G7 Pro monitor and all included accessories. Verify that all components listed in the packaging are present and undamaged. The package typically includes the camera monitor.
3.2 모니터 전원 켜기
The G7 Pro offers flexible power options:
- NP-F 배터리: Attach a compatible NP-F battery to the battery plate on the rear of the monitor. This is required for camera control functionality.
- D-tap: Connect a D-tap power source using a D-tap DC cable.
- 타입 C : Use a Type-C cable to connect to a compatible power source.

Figure 3.1: Powering options for the Osee G7 Pro, including NP-F battery, D-tap, and Type-C connections. The diagram also shows the monitor powering a camera via Type-C.
3.3 카메라에 연결하기
The G7 Pro features 3G-SDI and 4K HDMI input/output ports.
- HDMI 연결: Use an HDMI cable to connect your camera's HDMI output to the monitor's HDMI input. The monitor supports up to 4Kp30 signals.
- SDI 연결: Use an SDI cable to connect your camera's SDI output to the monitor's SDI input. The monitor supports up to 1080p60 signals.
- Camera Control Connection: For camera control functionality, connect your camera to the monitor via a Type-C cable. Ensure the monitor is powered by an NP-F battery for this feature to be active.

그림 3.2: 후면 view of the Osee G7 Pro highlighting the 3G-SDI and 4K HDMI input/output interfaces.
4. 사용 설명서
4.1 기본 작업
- 전원 켜기/끄기: 전원 버튼을 길게 눌러 모니터를 켜거나 끕니다.
- 터치스크린 인터페이스: Navigate the monitor's functions and settings using the touchscreen. The optimized UI provides intuitive access to various tools.
4.2 카메라 제어
Once connected via Type-C and powered by an NP-F battery, you can control supported camera functions directly from the G7 Pro's touchscreen.
- 지원되는 기능: Adjust White Balance (WB), ISO, Aperture, Shutter Speed, initiate Record/Shoot, and utilize Touch Focus.
- 스위칭 제어: A one-click option allows switching between monitor and camera control.
- Touch to Focus: Tap on the screen to set focus. The monitor supports dynamic focus tracking for moving subjects.
4.3 Monitoring Tools and Analysis Modes
The G7 Pro offers a suite of professional monitoring tools to assist with exposure, focus, and color accuracy.
- Waveform, Histogram, Vectorscope: These tools can be displayed simultaneously to provide comprehensive video signal analysis.
- 거짓 색상 : Customizable false color modes assist in evaluating exposure levels.
- 피킹 포커스 어시스트: 정확한 수동 초점을 위해 초점이 맞춰진 영역을 강조 표시합니다.
- 얼룩말: 과다 노출된 영역을 나타냅니다.
- 3D-LUTs: Apply up to 10 custom 3D-LUTs for accurate color preview. Upload LUTs via an SD card.
- MySets: Configure and save up to 8 custom monitoring tool layouts (MySets) for quick access during different shooting scenarios.

그림 4.1: 예amples of the G7 Pro's analysis modes, such as false color, peaking focus assist, zebras, and waveform, aiding in precise image evaluation.
5. 유지관리
5.1 모니터 청소
To clean the touchscreen and body of the monitor, use a soft, lint-free cloth. For stubborn smudges, a small amount of screen cleaning solution can be applied to the cloth (not directly to the screen). Avoid abrasive materials or harsh chemicals.
5.2 펌웨어 업데이트
It is recommended to regularly check for and install the newest firmware versions to ensure optimal performance and access to new features. Refer to the Osee official website for firmware download instructions.
5.3 보관
사용하지 않을 때는 모니터를 직사광선과 극한 온도 변화를 피해 건조하고 서늘한 곳에 보관하십시오. 긁힘이나 충격을 방지하기 위해 보호 케이스를 사용하십시오.
6. 문제 해결
6.1 신호 없음 표시
- Ensure all HDMI/SDI cables are securely connected to both the camera and the monitor.
- Verify that the camera is outputting a compatible video signal (up to 4Kp30 for HDMI, up to 1080p60 for SDI).
- Try disconnecting and reconnecting the video cable.
- Check the camera's video output settings.
6.2 카메라 제어가 작동하지 않음
- Confirm the monitor is powered by an NP-F battery. Camera control is only enabled with this power source.
- Ensure your camera model is listed as supported for camera control.
- Verify the Type-C cable is correctly connected between the monitor and the camera.
- Check for available firmware updates for both the monitor and your camera.
6.3 Overheating or Fan Noise
The G7 Pro features a silent fan with a temperature sensor designed to balance noise and heat. If you experience unusual overheating or excessive fan noise, ensure the fan vents are not obstructed. Prolonged use in extremely hot environments may affect performance.
6.4 Display Artifacts or Glitches
In rare cases, minor display artifacts may occur. These are often temporary and do not affect the image quality. If persistent, try restarting the monitor or checking for firmware updates.
7. 사양
| 특징 | 사양 |
|---|---|
| 모델 번호 | G7 프로 |
| 화면 크기 | 7인치 |
| 명도 | 3000니트 |
| 대비율 | 1300시 1분 |
| 해결 | 1920x1080 (1080p) |
| 픽셀 밀도(PPI) | 360PPI |
| 색상 깊이 | 10비트 |
| 새로 고침 빈도 | 60Hz |
| 비디오 입력 | 3G-SDI (up to 1080p60), 4K HDMI (up to 4Kp30) |
| 비디오 출력 | 3G-SDI (up to 1080p60), 4K HDMI (up to 4Kp30) |
| 전원 공급 장치 | NP-F Battery, D-tap, Type-C |
| 치수 | 9 x 8 x 1.53 인치 |
| 품목 무게 | 1.76파운드 |
| 제조업체 | Osee |
8. 보증 및 지원
8.1 제품 보증
The Osee G7 Pro monitor typically comes with a 1-year warranty. Please refer to your purchase documentation or the official Osee web구체적인 보증 약관은 해당 사이트에서 확인하세요.
8.2 고객 지원
For technical assistance, troubleshooting, or any questions regarding your Osee G7 Pro monitor, please contact the Osee customer service team. Osee provides lifetime technical support and 24/7 live chat services.
- 온라인 지원: Visit the official Osee webFAQ, 지원 리소스, 연락처 정보를 제공하는 사이트입니다.
- 라이브 채팅: 24시간 연중무휴로 즉각적인 지원을 제공합니다.
- 이메일 지원: 자세한 문의 사항은 이메일로 연락주세요.

Figure 8.1: Osee customer support team available for assistance.