
소개
This manual provides essential information for the safe and effective use of your nvmw 42V 2A Scooter Charger. This charger is designed to power 36V lithium battery electric scooters from brands such as GOTRAX, Ninebot, and Hiboy. Please read these instructions carefully before use and retain them for future reference.

Image: The nvmw 42V 2A Scooter Charger main unit with various connector cables.
안전 정보
- Use this charger only with compatible 36V lithium batteries. Do not use with lead-acid batteries or batteries of different voltages (e.g., 24V, 25.2V, 29.4V).
- Ensure the charger is disconnected from the power outlet when not in use.
- 충전기를 물, 습기 또는 극한 온도에 노출시키지 마세요.
- Avoid dropping or physically damaging the charger. If damaged, discontinue use immediately.
- 어린이의 손이 닿지 않는 곳에 보관하세요.
- 충전기를 분해하거나 개조하지 마십시오.
- Always plug the charger into the scooter first, then into the wall outlet. When disconnecting, unplug from the wall first, then from the scooter.
패키지 내용
패키지에는 다음 항목이 포함되어 있어야 합니다.
- 1x 42V 2A Scooter Charger Unit
- 1x DC 5.5*2.5MM Plug Connector
- 1x 8MM Connector with Mini 3-prong
- 1x RCA 8MM Plug Connector
- 1x Standard AC Power Cord

Image: The charger unit and its interchangeable connector cables.
설정
The nvmw 42V 2A Scooter Charger features removable connectors to ensure wide compatibility. Follow these steps to set up your charger:
- 올바른 커넥터를 식별하십시오: Examine your scooter's charging port to determine which of the three provided connectors (DC 5.5*2.5MM, 8MM Mini 3-prong, or RCA 8MM) is compatible.
- 커넥터를 부착하세요: Securely plug the identified connector into the output port of the main charger unit. Ensure it clicks firmly into place.
- AC 전원 코드를 연결하세요: Plug the standard AC power cord into the charger unit and then into a wall outlet.

이미지: 이상view of the three different plug types included with the charger.

Image: Illustration of connecting the various adapter cables to the charger's main output.
작동 지침
전기 스쿠터를 충전하려면:
- Ensure the correct connector is attached to the charger unit and the AC power cord is plugged into a wall outlet.
- Plug the charger's output connector into your scooter's charging port.
- Observe the LED indicator light on the charger:
- 빨간불: Indicates the scooter battery is currently charging.
- 녹색불: Indicates the battery is fully charged or the charger is disconnected from the scooter.
- Once the LED turns green, the battery is fully charged. Disconnect the charger from the wall outlet first, then from the scooter.

Image: Charger LED indicator showing red for charging and green for fully charged.
호환성
This charger is specifically designed for 36V Lithium Battery systems. It is compatible with various electric scooters, including models from:
- 고트락스
- 나인봇
- 히보이
중요 호환성 참고 사항:
- 아니다 for 24V, 25.2V, or 29.4V versions.
- 아니다 for Lead Acid batteries.
- 아니다 for Razor scooters and dirt bikes.
- 오직 fits for 36V Lithium Batteries.
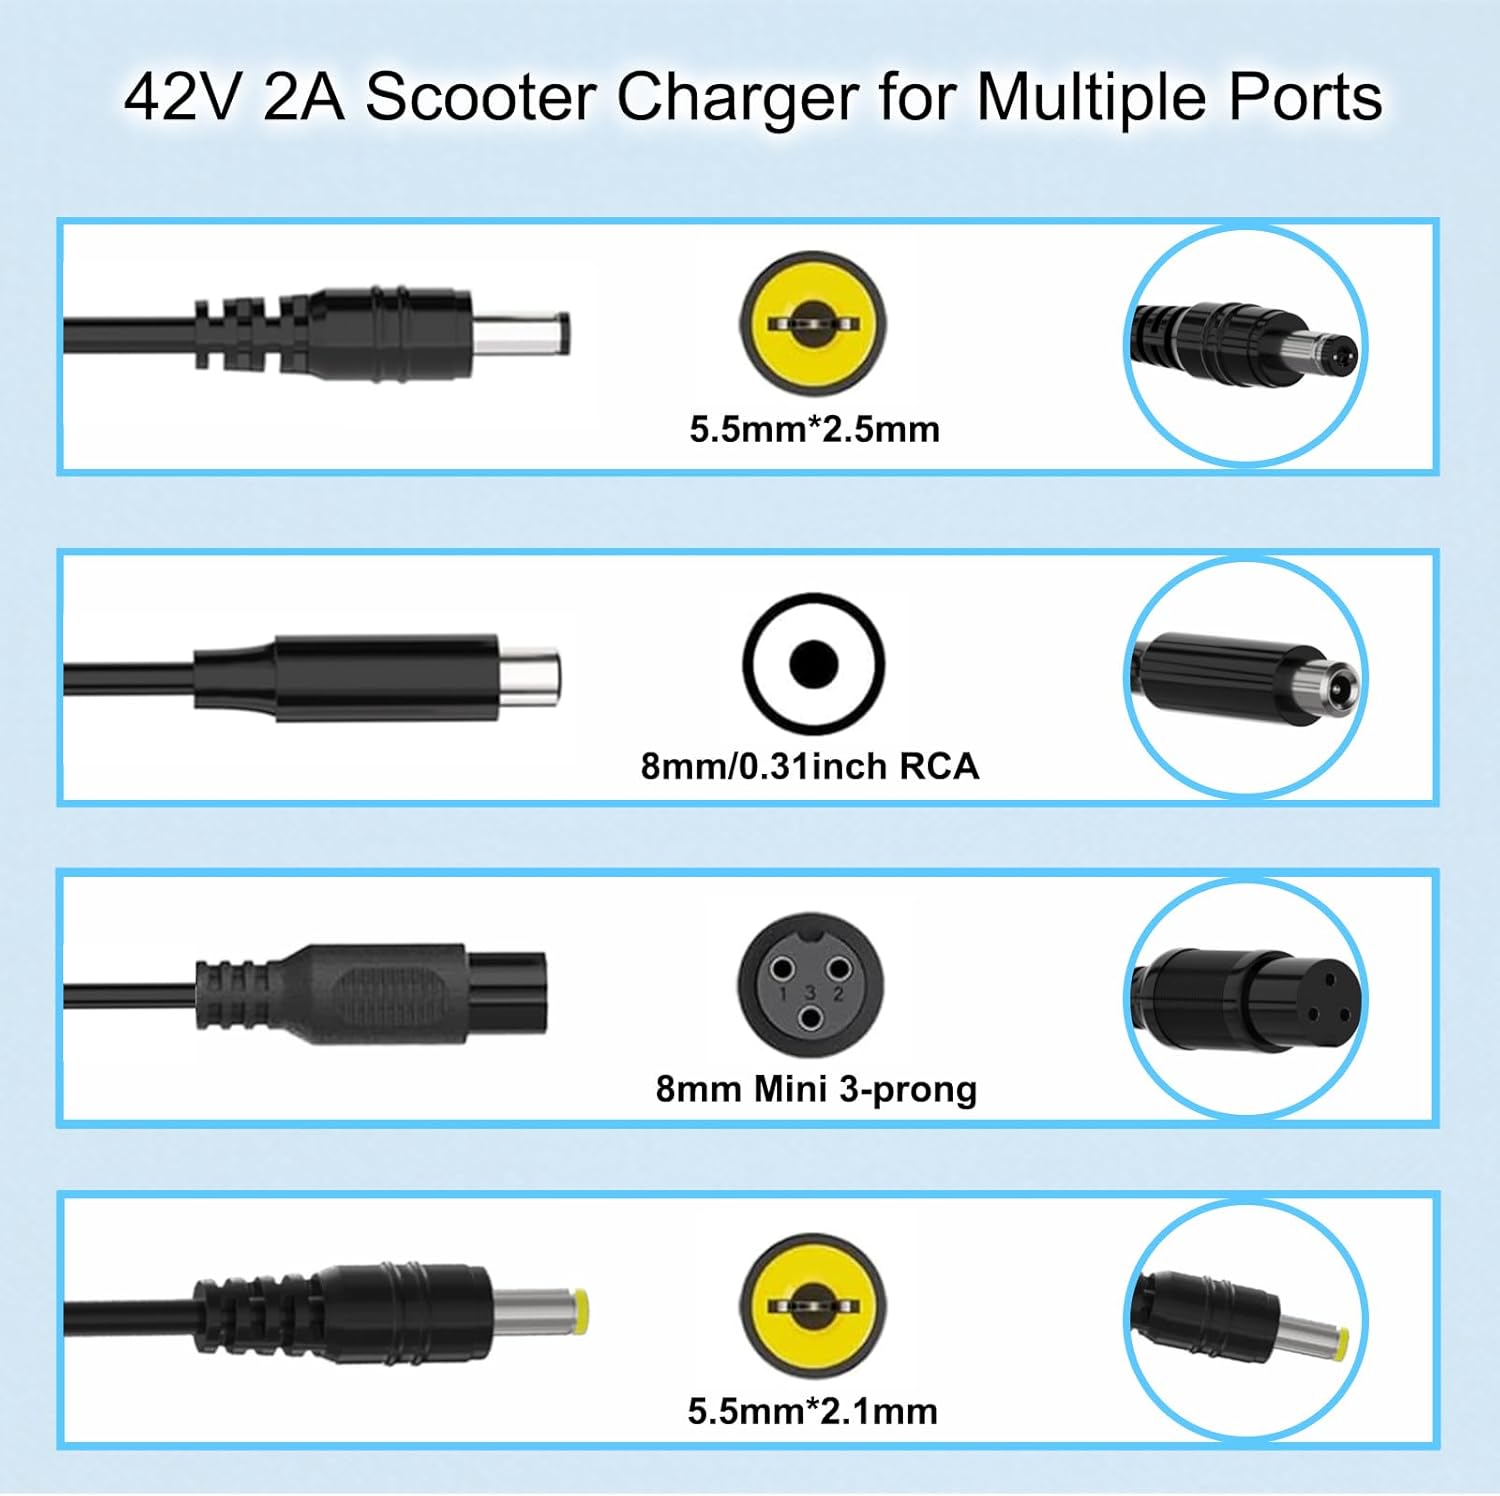
Image: Visual representation of the multiple port types supported by the charger.
다중 보호 기능
This charger is equipped with several protective mechanisms to ensure safe and reliable charging:
- 오버볼tage 보호: 과도한 볼륨으로 인한 손상을 방지합니다.tag전자 입력.
- 과전류 보호 : 현재 급증하는 수요에 대한 안전장치.
- 단락 보호: 단락이 발생하면 자동으로 꺼집니다.

Image: Icons representing the charger's built-in safety protections.
명세서
| 특징 | 사양 |
|---|---|
| 상표 | nvmw |
| 모델 번호 | GZL-42Vcharger |
| 입력 Voltage | 100-240VAC, 50/60Hz |
| 출력 볼륨tage | 42V |
| 현재 평가 | 2 Amps |
| 제품 크기(D x W x H) | 1인치 깊이 x 1인치 너비 x 1인치 높이 |
| 품목 무게 | 0.41 킬로그램 |
| 색상 | 검은색 |
| 안전인증 | CE |
유지
충전기의 수명과 최적의 성능을 보장하려면 다음 사항을 준수하십시오.
- 충전기를 깨끗하게 유지하고 먼지와 이물질이 묻지 않도록 하십시오. 마른 부드러운 천으로 닦아주세요.
- 사용하지 않을 때에는 충전기를 서늘하고 건조한 곳에 보관하십시오.
- Avoid wrapping the cable too tightly around the charger, as this can damage the internal wires.
- Regularly inspect the cables and connectors for any signs of wear or damage. Replace if necessary.
문제 해결
| 문제 | 가능한 원인 | 해결책 |
|---|---|---|
| 충전기 LED에 불이 들어오지 않습니다. | No power from outlet; loose connection; charger malfunction. | Check wall outlet with another device; ensure all connections are secure; try a different outlet. |
| Charger LED remains green when connected to scooter. | Scooter battery is already full; incorrect connector used; scooter charging port issue. | Verify scooter battery level; ensure the correct connector is firmly attached; consult scooter manual. |
| Charger is getting unusually hot. | 과부하; 환기 불량; 내부 결함. | Ensure charger is in a well-ventilated area; discontinue use if excessive heat persists and contact support. |
| Scooter not charging. | Incompatible battery; faulty charger/cable; scooter battery issue. | Confirm battery voltage (must be 36V Lithium); check all connections; test charger with another compatible scooter if possible. |
보증 및 지원
This nvmw charger comes with a 1년 보증 구매일로부터 제조상의 결함에 대한 보증을 제공합니다.
If you have any questions about the product, require technical assistance, or need to claim warranty service, please feel free to contact us at any time through the retailer's customer service portal or the contact information provided with your purchase.