
1. 설치 및 조립
Before beginning assembly, ensure all parts are present and undamaged. It is recommended to assemble the vanity on a soft, clean surface like a carpet to prevent scratches. This product is shipped in two packages, which may arrive separately.
1.1 패키지 내용
- 패키지 1 : Main cabinet, all hardware for cabinet assembly, installation manual.
- 패키지 2 : Vessel sink, faucet, pop-up drain, hot/cold lines, and mounting hardware for sink.

This diagram illustrates that the product is shipped in two packages: Package 1 contains the main cabinet and hardware, while Package 2 contains the vessel sink, faucet, drain, and additional hardware.
1.2 필요한 도구(포함되지 않음)
- Phillips 헤드 스크루 드라이버
- 망치
- 전기 드릴
- 연필
- 유틸리티 나이프
1.3 내각 회의
Follow the detailed steps in the provided installation manual for assembling the MDF wood cabinet. Ensure all cam bolts and screws are tightened securely. Pay close attention to the orientation of each panel.
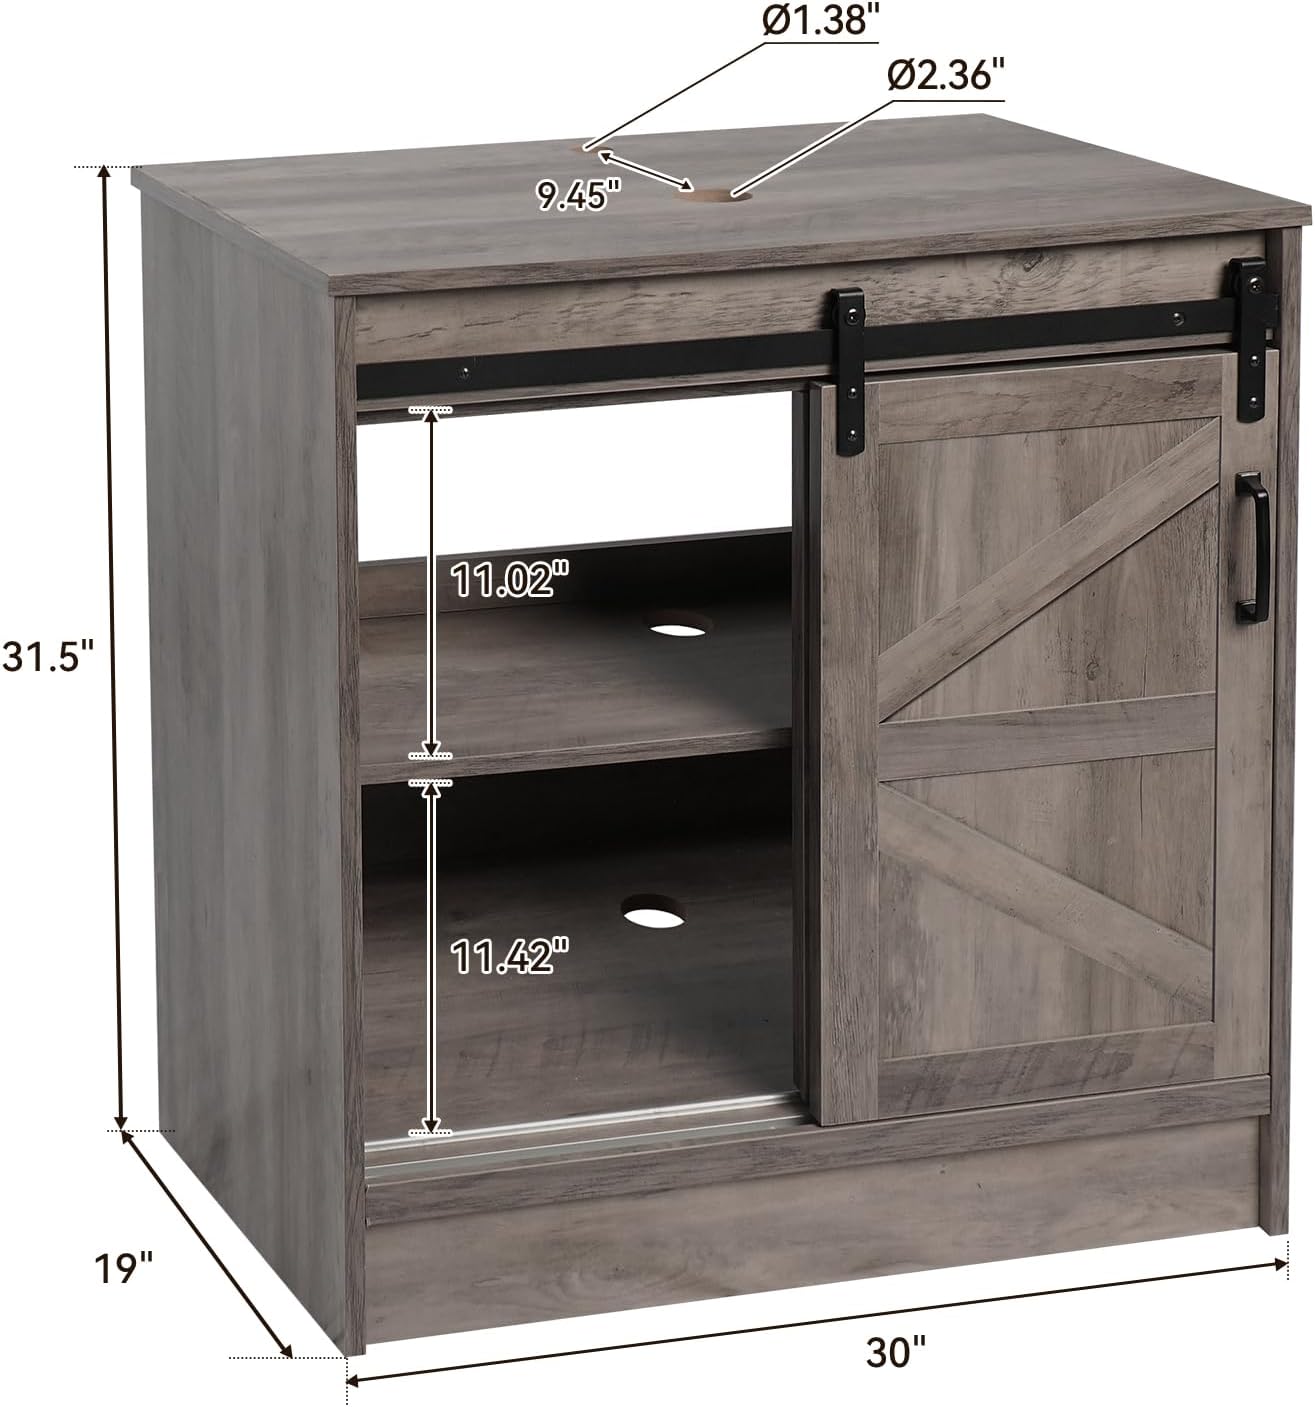
This image displays the overall dimensions of the vanity cabinet, measuring 19 inches deep, 30 inches wide, and 31.5 inches high.
1.4 Wall-Mounting Hardware Installation
To enhance stability and prevent tipping, install the wall-mounting hardware as demonstrated in the video below. Mark the wall, drill pilot holes, insert expansion bolts, and secure the L-shaped brackets flush with the cabinet back.
This video demonstrates the installation process for wall-mounting hardware, ensuring the cabinet is securely attached to the wall to prevent tipping.
1.5 Hinge Installation and Adjustment
Install the cabinet door hinges according to the instructions. If the door alignment needs adjustment, refer to the hinge adjustment guide in the video below for vertical, depth, and horizontal fine-tuning.
This video provides a detailed demonstration of how to install and adjust cabinet door hinges, covering vertical, depth, and horizontal adjustments for proper door alignment.
1.6 Sink and Faucet Installation
Install the faucet and pop-up drain onto the ceramic vessel sink. Carefully place the assembled sink onto the vanity cabinet. Ensure all plumbing connections are secure and watertight.

자세한 view of the black and white ceramic vessel sink, showcasing its rectangular shape and contrasting colors.

This diagram provides specifications for the basin, including its 4-layered glaze spraying ceramic material, top-mounted vessel bowl style, and features like scratch resistance and oil-free surface.

This image shows the complete set of components for the sink installation, including the faucet, pop-up drain, and hot/cold water supply lines.
1.7 전체 조립 비디오 가이드
For a complete visual guide on the assembly process, please refer to the comprehensive video below:
A comprehensive tutorial video guiding through the complete assembly and installation of a bathroom vanity, from unpacking to final setup of the cabinet and sink components.
2. 운영
2.1 슬라이딩 헛간 문
The vanity features an innovative sliding barn door. To access the storage compartment, gently slide the door along its track. Ensure the track is free from obstructions for smooth operation.

This image highlights the upgraded storage design within the vanity, featuring internal shelving for organized storage.
2.2개의 보관 서랍
The vanity includes built-in drawers for additional storage. Pull the drawers open and push them closed smoothly. Avoid forcing the drawers if they encounter resistance.
2.3 싱크대 사용법
The ceramic vessel sink is designed for daily bathroom use. Ensure the faucet is properly installed and water lines are connected before use. The pop-up drain allows for easy water drainage.
3. 유지관리
3.1 캐비닛 청소
- Wipe the MDF wood surfaces with a soft, damp 옷감.
- 독한 화학 약품, 연마성 세척제 또는 과도한 습기는 마감재를 손상시킬 수 있으므로 사용을 피하십시오.
- 물로 인한 손상을 방지하기 위해 액체를 쏟았을 경우 즉시 닦아내십시오.
3.2 Cleaning the Ceramic Sink
- Clean the ceramic vessel sink with mild soap and water.
- Use a soft sponge or cloth to avoid scratching the glazed surface.
- 물 얼룩이 생기는 것을 방지하려면 깨끗이 헹구고 깨끗한 천으로 말리세요.
3.3 Sliding Door and Drawer Maintenance
- Periodically check the sliding door track for any debris and clean as needed to ensure smooth operation.
- Inspect drawer slides for smooth movement. If necessary, a small amount of silicone lubricant can be applied to the slides.
4. 문제 해결
4.1 Cabinet Wobbles After Assembly
- Ensure all cam bolts and screws are fully tightened.
- Verify that the wall-mounting hardware is correctly installed and secured.
- Check if the floor is even. If not, use furniture levelers (not included) to stabilize the cabinet.
4.2 Doors/Drawers Do Not Align Properly
- For doors, refer to the hinge adjustment guide (Section 1.5) to fine-tune vertical, depth, and horizontal positions.
- For drawers, ensure the drawer slides are correctly installed and aligned on both the drawer box and the cabinet frame.
4.3 Plumbing Issues (Leaks, Low Pressure)
- Check all water supply line connections for tightness. Hand-tighten first, then use a wrench for a quarter turn if needed, being careful not to overtighten.
- Ensure the pop-up drain is correctly seated and sealed.
- Verify that the main water supply valves are fully open.
5. 사양
| 특징 | 세부 사항 |
|---|---|
| 상표 | 솔리디 |
| 모델명 | BA20701 |
| 색상 | Black and White Ceramic Sink |
| 제품 치수 | 19인치 깊이 x 30인치 너비 x 31.5인치 높이 |
| 재료 | 엔지니어링 목재 |
| 장착 유형 | 플로어 마운트 |
| 문 스타일 | 헛간 문 |
| 포함된 구성 요소 | Vanity, Sink, Faucet, Pop-up Drain |
| 조립이 필요합니다 | 예 |
| 품목 무게 | 34 파운드 |
6. 안전 정보
경고: 가구가 넘어져 아이들이 사망했습니다. 가구 전복 위험을 줄이려면:
- 항상 전복 방지 장치를 설치하세요.
- 이 제품 위에 TV를 절대로 놓지 마십시오.
- 아이들이 서랍, 문, 선반에 서거나 올라가거나 매달리는 것을 절대 허용하지 마세요.
- 한 번에 두 개 이상의 서랍을 열지 마십시오.
- 가장 무거운 물건은 가장 낮은 서랍에 넣으세요.
- 서랍 인터록 시스템을 손상시키거나 제거하지 마십시오.
- 이것은 영구 라벨입니다. 제거하지 마세요!
Always follow the assembly instructions carefully. Wear appropriate safety gear when handling heavy or sharp objects. Keep the area around the cabinet clear during and after assembly to prevent tripping hazards. Do not overload the cabinet as it may cause instability.
7. 보증 및 지원
7.1 보호 계획
추가 보장 플랜은 별도로 구매 가능합니다.
- 2년 보호 계획: 52.99달러(일회성 결제)에 구매 가능합니다.
- 3년 보호 계획: 67.99달러(일회성 결제)에 구매 가능합니다.
- 완벽한 보호: 하나의 요금제로 과거 및 미래의 모든 적격 구매 내역을 월 16.99달러(월별 청구)에 이용할 수 있습니다.
7.2 고객 지원
If you have any questions regarding assembly, missing parts, or product functionality, please contact SOLIDEE customer support for assistance. Refer to your purchase documentation for specific contact details.