1. 서론
Thank you for choosing the FEELWORLD P215-9HSD 21.5 Inch Broadcast Production Monitor. This monitor is designed for professional video production environments, offering a 1920x1080 Full HD display, multiple input/output options including 4K HDMI and 3G-SDI, and advanced monitoring features. This manual provides essential information for the safe and efficient operation of your device. Please read it thoroughly before use and retain it for future reference.

그림 1.1: 전면 view of the FEELWORLD P215-9HSD monitor, highlighting its 21.5-inch screen, Full HD 1920x1080 resolution, 3000:1 contrast, and 250 nits brightness.
2. 안전 정보
- 전원: Use only the provided 3A DC power adapter. Ensure the power supply voltage는 지정된 범위 내에 있습니다.
- 통풍: Do not block ventilation openings. Ensure adequate airflow around the monitor to prevent overheating.
- 물과 습기: Do not expose the monitor to rain, moisture, or immerse it in water. If liquid enters the unit, disconnect power immediately and contact service personnel.
- 청소: 청소하기 전에 전원을 분리하세요. 부드럽고 마른 천을 사용하세요. 액체 또는 에어로졸 세척제는 사용하지 마세요.
- 놓기: Place the monitor on a stable surface. Avoid placing it in direct sunlight, near heat sources, or in environments with excessive dust or vibration.
- 서비스: 이 제품을 직접 수리하려고 하지 마십시오. 모든 서비스는 자격을 갖춘 서비스 담당자에게 문의하십시오.
3. 패키지 내용
아래 나열된 모든 품목이 패키지에 포함되어 있는지 확인하세요. 품목이 누락되었거나 손상된 경우 판매점에 문의하세요.
- FEELWORLD P215-9HSD 21.5 Inch Broadcast Production Monitor
- 3A DC Power Adapter
- V Battery Plate
- 미니 HDMI 케이블
- 집계 키트
- 양산
- U 브라켓
- 사용 설명서
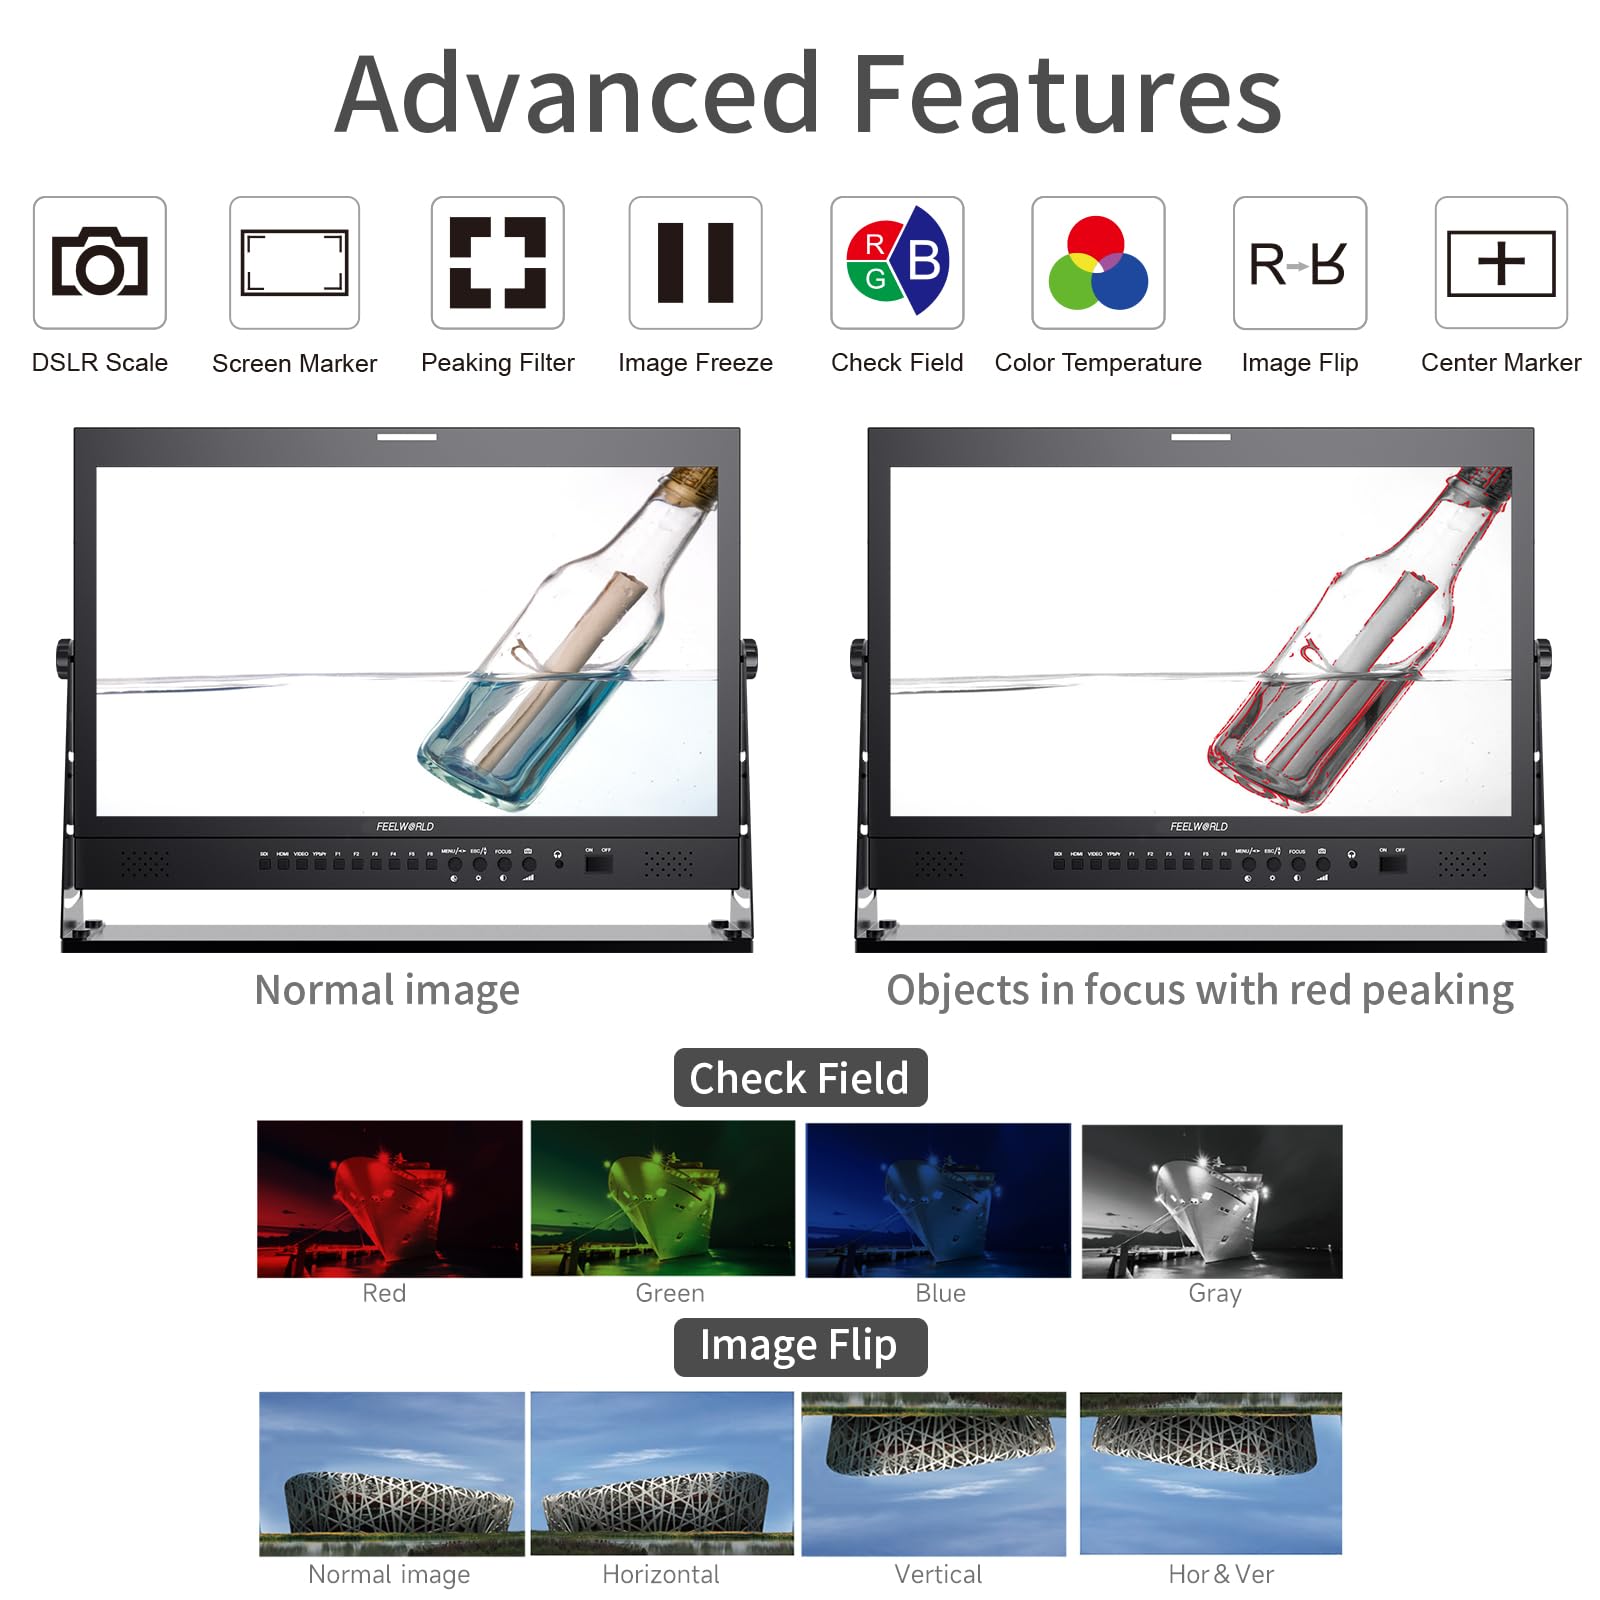
Figure 3.1: Included accessories with the FEELWORLD P215-9HSD monitor, showing the monitor, Mini HDMI cable, V battery plate, 3A power adapter, Tally Kit, Jib Crane Bracket (U bracket), and Operation Manual.
4. 제품 오버view
4.1 전면 패널 컨트롤
The front panel features various buttons and indicators for controlling the monitor's functions and navigating the On-Screen Display (OSD) menu.
- 입력 선택 버튼: SDI, HDMI, VIDEO, YPbPr for selecting video sources.
- 기능 버튼(F1-F6): Customizable shortcut buttons for quick access to frequently used features.
- MENU/ESC/◄/► Buttons: Used for OSD menu navigation, entering sub-menus, and adjusting settings.
- FOCUS Button: Activates peaking focus assist.
- 켜기/끄기 버튼: 모니터를 켜거나 끕니다.
- 내장 스피커: 오디오 모니터링용.
- 3.5mm Stereo Earphone Jack: For private audio monitoring.
4.2 후면 패널 연결
The rear panel provides all necessary input and output ports for connecting video and audio sources, as well as power.
- DVI 입력: Digital Visual Interface input.
- HDMI 입력/출력: High-Definition Multimedia Interface for both input and loop-through output.
- YPbPr Input: 컴포넌트 비디오 입력.
- 비디오 입력 / 출력 : 컴포지트 비디오 입력 및 루프스루 출력.
- 오디오 입력/출력: RCA connectors for analog audio.
- 3G-SDI Input/Output: Serial Digital Interface for professional video input and loop-through output.
- XLR 커넥터: For professional audio input.
- DC Barrel (5.5, 2.1): Power input for the 3A DC adapter.
- USB Upgrade Port: 펌웨어 업데이트용.
- LAN IN: 이더넷 포트.
- TALLY Port: DP-9 connector for Tally light control.

Figure 4.1: Top section shows the front panel OSD operation buttons. Bottom section details the rear panel connections including DVI, HDMI, YPbPr, Video, Audio, 3G-SDI, XLR, DC power, USB, LAN, and Tally.
그림 4.2: 클로즈업 view of the rear panel, emphasizing the 3G-SDI, HDMI, Video, and Audio input/output connections, along with the USB upgrade port and DC power input.
5. 설정
5.1 모니터 장착
The monitor comes with an adjustable U bracket for desktop placement. Ensure the bracket is securely attached to the monitor and placed on a stable, flat surface. The monitor also supports VESA mounting for alternative setups (mounting hardware not included).
5.2 전원 연결
- Connect the provided 3A DC power adapter to the DC barrel input on the rear of the monitor.
- 전원 어댑터를 적절한 전원 콘센트에 꽂습니다.
- Alternatively, attach a compatible V-mount battery to the V Battery Plate on the rear of the monitor for portable power.
5.3 비디오 소스 연결
Connect your video source (camera, video switcher, etc.) to the appropriate input port on the monitor's rear panel.
- HDMI : Use an HDMI cable (Mini HDMI cable included) to connect to the HDMI IN port.
- 3G-SDI: Use an SDI cable to connect to the 3G-SDI IN port.
- YPbPr을 : Use component video cables to connect to the YPbPr IN ports.
- 동영상: Use a composite video cable to connect to the VIDEO IN port.
If you need to loop out the signal to another device, connect an appropriate cable from the corresponding OUT port (HDMI OUT, 3G-SDI OUT, VIDEO OUT) to your next device.
6. 사용 설명서
6.1 전원 켜기/끄기
를 누르세요 켜짐/꺼짐 button on the front panel to power the monitor on or off.
6.2 입력 선택
Press the corresponding input button (에스디, HDMI, 동영상, YPbPr) on the front panel to switch between video sources.
6.3 OSD 메뉴 탐색
를 누르세요 메뉴 button to open the On-Screen Display menu. Use the ◄ 그리고 ► buttons to navigate through menu options and adjust values. Press 메뉴 again to confirm a selection or 키보드 메뉴를 종료합니다.
6.4 고급 기능
The monitor includes several advanced features to assist with professional monitoring:
- 피킹 포커스 어시스트: Highlights sharp edges in the image to aid in achieving precise focus. Activate with the 집중하다 button or assign to a function button.
- 센터 마커: 화면 중앙에 십자선을 표시합니다.
- 화면 마커: Provides various aspect ratio markers (e.g., 16:9, 4:3, 2.35:1) and safety area markers.
- 이미지 정지: 현재 비디오 프레임을 일시 정지합니다.
- 이미지 뒤집기 : Flips the image horizontally, vertically, or both. Useful for specific mounting orientations.
- Camera 5D II Mode: Optimizes display for Canon 5D Mark II camera output.
- 체크 필드 : 색상 보정을 위해 빨강, 초록, 파랑 또는 흑백 채널만 표시합니다.
- 픽셀 대 픽셀 : 크기 조정 없이 원래 해상도로 이미지를 표시합니다.
- 모두 확대: Magnifies the entire image.
- U/D & L/R Zoom: Allows independent vertical and horizontal zooming.
- 종횡비: 화면 비율을 조정합니다.
- 색온도 조정: 디스플레이의 색온도를 세밀하게 조정할 수 있습니다.

Figure 6.1: Visual demonstration of advanced features including Peaking Filter (red peaking), Check Field (Red, Green, Blue, Gray channels), and Image Flip (Normal, Horizontal, Vertical, Horizontal & Vertical).
6.5 집계등 시스템
The monitor features a 3-color Tally light system (Red, Green, Yellow) on both the front and rear panels, controlled via the DP-9 Tally port. This allows for clear indication of live, preview, and standby states in a multi-camera setup.
- 빨간색: Indicates the camera is live (On Live).
- 녹색: Indicates the camera is on preview (On Preview).
- 노란색 : Indicates the camera is on standby (Standby).

Figure 6.2: Illustration of the Red, Green, and Yellow Tally lights and their corresponding states (On Live, Standby, On Preview), controlled via the DP-9 Barrel on the rear.
7. 유지관리
- 화면 청소: 부드럽고 보풀이 없는 천으로 화면을 부드럽게 닦으세요. 잘 지워지지 않는 얼룩은 가볍게 닦아주세요.amp천에 물이나 화면 전용 세척액을 묻혀 닦으세요. 화면에 직접 액체를 뿌리지 마세요.
- C 청소asing: 부드럽고 마른 천을 사용하여 모니터의 c를 닦으십시오.asing. 연마성 세척제나 용제 사용을 피하세요.
- 저장: 장기간 사용하지 않을 경우 모니터를 직사광선과 극한 온도 변화를 피해 서늘하고 건조한 곳에 보관하십시오.
- 펌웨어 업데이트: 주기적으로 FEELWORLD 공식을 확인하세요 website for any available firmware updates to ensure optimal performance and access to new features. Use the USB Upgrade Port for this purpose.
8. 문제 해결
모니터에 문제가 발생하면 다음의 일반적인 문제와 해결 방법을 참조하세요.
| 문제 | 가능한 원인 | 해결책 |
|---|---|---|
| 전원이 없습니다 | 전원 어댑터가 연결되지 않았거나 결함이 있습니다. 전원 콘센트 문제입니다. | Ensure power adapter is securely connected to monitor and outlet. Test outlet with another device. Check if V-mount battery is charged and properly installed. |
| 비디오 신호 없음 | Incorrect input selected; cable not connected or faulty; source device not outputting signal. | Select the correct input source (HDMI, SDI, etc.). Check all video cables for secure connection. Verify the source device is powered on and outputting video. Try a different cable. |
| 이미지가 왜곡되었거나 색상이 잘못되었습니다. | Incorrect display settings; faulty cable; source issue. | Reset monitor settings to default via OSD menu. Check cable connections. Verify source device output. Adjust color temperature settings. |
| 오디오 없음 | Audio cable not connected; volume too low; source device not outputting audio. | Ensure audio cables are connected (if applicable). Increase monitor volume. Check audio settings on the source device. |
| Tally light not working | Tally cable not connected or faulty; switcher not sending Tally signal. | Ensure the Tally Kit is correctly wired and connected to the DP-9 port. Verify your video switcher is configured to send Tally signals. |
9. 사양
Detailed technical specifications for the FEELWORLD P215-9HSD Broadcast Production Monitor:
- 화면 크기: 21.5 인치
- 네이티브 해상도: 1920 x 1080(풀HD)
- 디스플레이 유형: LED IPS Panel
- 종횡비: 16시 9분
- 명도: 400칸델라/제곱미터
- View각도: 160도 (수평/수직)
- 대비율: 3000시 1분
- 색상 깊이: 8비트, 16.7만 색상
- 비디오 입력 : 1x HDMI, 1x 3G-SDI, 1x YPbPr, 1x Video, 1x DVI
- 비디오 출력: 1x HDMI, 1x 3G-SDI, 1x Video
- 오디오 입력 : Analog Audio (RCA), XLR
- 오디오 출력 : 3.5mm Stereo Earphone Jack, Built-in Speakers
- 전원 입력: DC 12V(3A)
- 연결 기술 : HDMI, 3G-SDI
- 특별 기능: Peaking Focus Assist, Center Marker, Screen Marker, Image Freeze, Image Flip, Camera 5D II Mode, Check Field, Pixel to Pixel, Zoom All, U/D & L/R Zoom, Aspect Ratio, Color Temperature Adjustment, 3-Color Tally Light
그림 9.1: 이상view of key specifications and features including 8-bit color, HDMI input/output, 3G-SDI input/output, 1920x1080 resolution, 3000:1 contrast, and 250 nits brightness.
10. 보증 및 지원
The FEELWORLD P215-9HSD Broadcast Production Monitor comes with a 1년 제조사 보증 구매일로부터. 이 보증은 정상적인 사용 하에서 재료 및 제조상의 결함을 포함합니다.
For warranty claims, technical support, or service inquiries, please contact your authorized FEELWORLD dealer or visit the official FEELWORLD website for customer service contact information. Please retain your proof of purchase for warranty validation.
For more information about FEELWORLD products, visit the Amazon의 FEELWORLD 스토어.