
1. 서론
The BOYA V35 is a compact and easy-to-use 2.4GHz wireless microphone system designed for capturing clear, high-quality audio. It is ideal for content creators, journalists, and anyone needing a reliable wireless audio solution for cameras and camcorders with a 3.5mm input. This manual provides detailed instructions for setting up, operating, and maintaining your BOYA V35 system.
2. 상자 안에 무엇이 들어있나요?
모든 품목이 들어 있는지 확인하려면 패키지 내용물을 확인하세요.
- BY-V35 Transmitter (TX) x 2
- BY-V35 RX Receiver x 1
- BY-V35 Foam Windscreen x 2
- USB-C to USB-A Charging Cable x 1
- 3.5mm TRS-TRS 오디오 케이블 x 1
- 충전 케이스 x 1
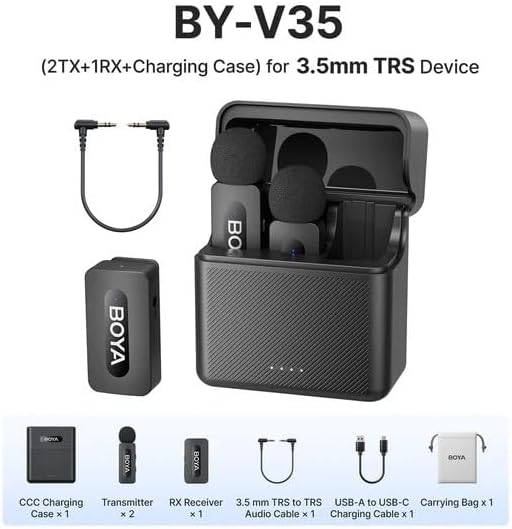
그림 2.1: Diagram showing all components included in the BOYA V35 package, including two transmitters, one receiver, a charging case, foam windscreens, and cables.
3. 제품 오버view
3.1. 송신기(TX)

그림 3.1: 앞쪽 view of the BY-V35 Transmitter with the foam windscreen attached, showing the BOYA logo and indicator light.

그림 3.2: 옆 view of the BY-V35 Transmitter, illustrating the integrated clip for attachment to clothing and the foam windscreen.
The transmitter is a compact unit with an integrated microphone and clip. It features a power button, a status indicator light, and a USB-C charging port. The omnidirectional microphone is designed to capture sound from all directions.
3.2. 수신기(RX)

그림 3.3: 옆 view of the BY-V35 Receiver, showing the USB-C port, power button, and 3.5mm output jack.
The receiver connects to your recording device (camera, camcorder). It includes a 3.5mm TRS output jack, a power button, a status indicator light, and a USB-C charging port. The receiver is designed for easy connection and stable signal reception.
3.3. 충전 케이스
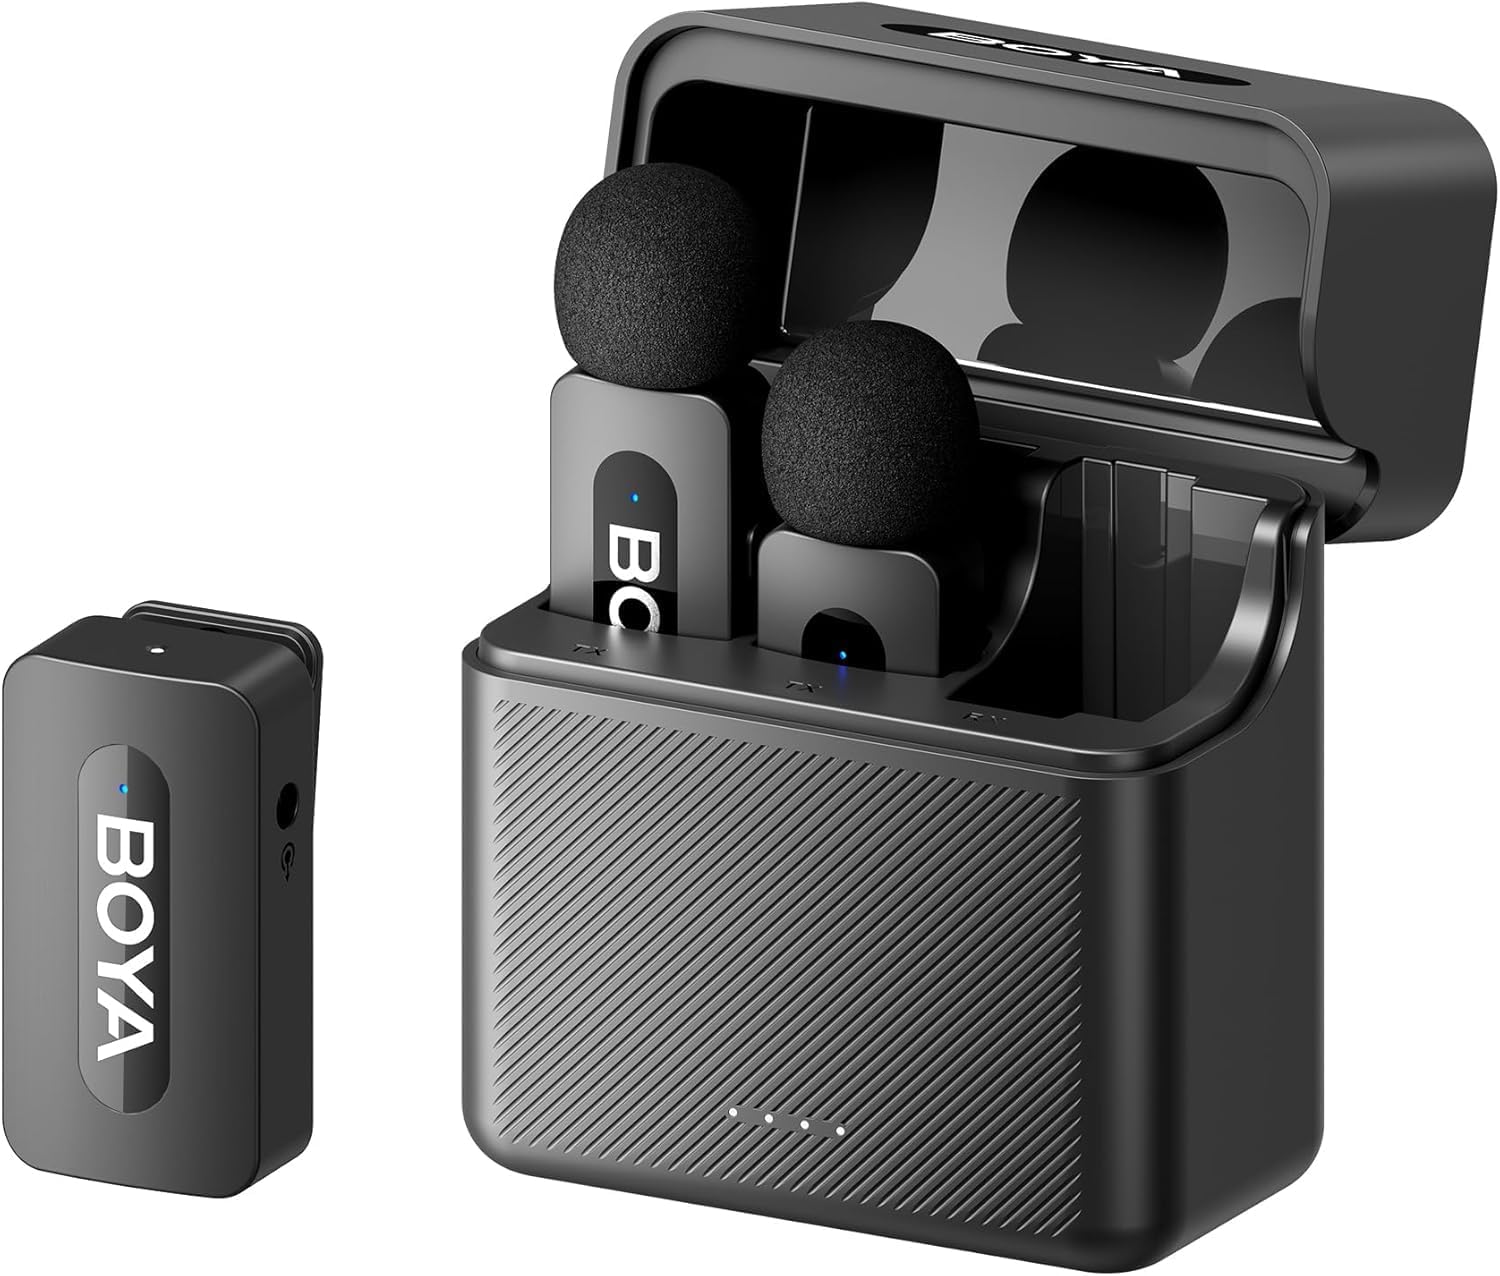
그림 3.4: The complete BOYA V35 system, including the charging case, two transmitters, and one receiver, ready for storage or charging.
The charging case provides convenient storage and charging for both transmitters and the receiver. It has its own USB-C charging port and LED indicators to show the charging status of the case and the devices inside.
4. 설정 가이드
4.1. 장치 충전
- 송신기와 수신기를 충전 케이스에 넣으세요.
- Connect the USB-C to USB-A charging cable to the charging case and a USB power adapter (not included).
- The LED indicators on the charging case will show the charging status. The device indicators will also light up during charging.
- Ensure all devices are fully charged before first use for optimal battery life.
4.2. 전원 켜기 및 페어링
- Press and hold the power button on both the transmitter(s) and the receiver for a few seconds until the indicator lights turn on.
- The devices will automatically attempt to pair. A solid blue light on both the transmitter and receiver indicates a successful connection. A blinking light indicates searching for a connection.
4.3. 녹음 장치 연결하기
- Connect one end of the 3.5mm TRS to TRS audio cable to the 3.5mm output jack on the BY-V35 receiver.
- Connect the other end of the 3.5mm TRS to TRS audio cable to the microphone input jack on your camera or camcorder.
- Ensure your recording device's audio input is set to external microphone if applicable.
4.4. 송신기 부착
- Attach the foam windscreen to the transmitter's microphone to reduce wind noise and plosives.
- Use the integrated clip on the back of the transmitter to securely attach it to the speaker's clothing, ideally about 6-8 inches (15-20 cm) from the mouth.
5. 사용 설명서
5.1. 전원 켜기/끄기
To power on or off the transmitter or receiver, press and hold the power button for approximately 3 seconds. The indicator light will illuminate or turn off accordingly.
5.2. 오디오 녹음
- Ensure the transmitter(s) and receiver are powered on and successfully paired (solid blue indicator light).
- Start recording on your connected camera or camcorder.
- Monitor the audio levels on your recording device to ensure proper sound capture.
5.3. Status Indicator Lights
- 솔리드 블루: Device is powered on and successfully paired.
- 파란색 깜박임: Device is powered on and searching for a connection.
- 단색 빨간색: 배터리가 부족합니다.
- Blinking Red (while charging): 충전 중입니다.
- Solid Green (while charging): 완전히 충전됨.
6. 유지관리
6.1. 청소
- 부드럽고 마른 천으로 기기를 닦으세요.
- 독한 화학 물질이나 연마성 세제를 사용하지 마십시오.
- Ensure the foam windscreens are clean and free of debris. Replace if damaged.
6.2. 보관
- Store the BOYA V35 system in its charging case when not in use to protect it from dust and damage.
- 직사광선 및 극한의 온도를 피하고 서늘하고 건조한 곳에 보관하십시오.
6.3. 배터리 관리
- Charge the devices regularly, even if not used frequently, to maintain battery health.
- 배터리를 장시간 완전히 방전시키지 마십시오.
7. 문제 해결
| 문제 | 가능한 원인 | 해결책 |
|---|---|---|
| 소리가 나지 않거나 볼륨이 작음 | Devices not powered on; Not paired; Incorrect cable connection; Recording device volume too low. | Ensure TX and RX are on and paired. Check 3.5mm cable connection. Increase recording device's input volume. |
| 음질 불량 (잡음, 끊김 현상) | Interference; Out of range; Low battery; Damaged windscreen. | Move closer to the receiver. Charge devices. Replace windscreen. Avoid strong electromagnetic fields. |
| 페어링되지 않은 장치 | Devices too far apart; Interference; One device not powered on. | Ensure TX and RX are close to each other. Power cycle both devices. Check battery levels. |
| Charging case not charging devices | Charging case battery empty; Poor contact; Faulty cable. | Charge the charging case. Ensure devices are correctly seated. Try a different USB-C cable. |
8. 사양
| 특징 | 세부 사항 |
|---|---|
| 상표 | 보야 |
| 모델 번호 | BY-V35 |
| 연결 기술 | 무선 2.4GHz |
| 커넥터 유형 | 3.5 mm 잭 |
| 극성 패턴 | 전방위 |
| 주파수 범위 | 20Hz-16kHz |
| 신호 대 잡음 비율 | 80데시벨 |
| 전원 | 배터리 구동 |
| 품목 무게 | 0.2 Kilograms (approximate, for entire kit) |
| 품목 치수 | 6.1 x 2.2 x 3.4 inches (approximate, for entire kit) |
| 호환 장치 | 캠코더, 카메라 |
9. 보증 및 지원
보증 정보 및 기술 지원에 대해서는 BOYA 공식 웹사이트를 참조하십시오. web사이트를 방문하거나 가까운 대리점에 문의하세요. 보증 청구를 위해 구매 증빙 자료를 보관하세요.