
1. 소개 및 이상view
The GODIYMODULES Mini USB Host Shield 2.0 is designed to enable Arduino (specifically Arduino Pro Mini 3.3V/8MHz/328) to function as a USB host. This capability allows the Arduino to communicate with various USB slave devices such as USB keyboards, mice, USB flash drives, and cameras. It also supports implementation of Google ADK (Android Open Accessory Development Kit) for interaction with Android system mobile phones.
This shield utilizes an SPI interface for communication with the microcontroller and supports USB hub functionality. It operates at a voltag3.3V DC의 e.
2. 주요 특징
- Enables USB host functionality for Arduino Pro Mini (3.3V/8MHz/328).
- Compatible with USB slave devices including keyboards, mice, USB flash drives, and cameras.
- Supports Google ADK for Android mobile phone communication.
- Utilizes SPI interface for microcontroller communication.
- Supports USB hub functionality.
- Compact size: 38mm * 18mm.
- 운영 볼륨tag전자: 3.3V DC.
3. 설정 및 연결
This Mini USB Host Shield 2.0 is designed for use with Arduino Pro Mini (3.3V/8MHz/328) and 3.3V FTDI adapters. Ensure your Arduino board operates at 3.3V to prevent damage.
The shield connects to the Arduino via the SPI interface. Refer to the schematic diagram below for detailed pin connections and component layout.

Figure 3.1: Schematic diagram of the Mini USB Host Shield 2.0, showing power regulation, USB interface, and SPI connections.
주요 연결 지점:
- VCC: Connect to 3.3V power supply from your Arduino.
- GND : 접지에 연결합니다.
- SPI 핀: MOSI, MISO, SCK, SS (Slave Select), INT (Interrupt), GPX (General Purpose I/O). These pins should be connected to the corresponding SPI pins on your Arduino Pro Mini.
- USB 포트: Standard USB Type-A female connector for connecting USB slave devices.
Ensure all connections are secure before applying power. Incorrect voltage or wiring can damage the shield or your Arduino board.
4. 사용 설명서
Once the Mini USB Host Shield 2.0 is correctly connected to your Arduino Pro Mini, you can begin programming your Arduino to interact with USB devices.
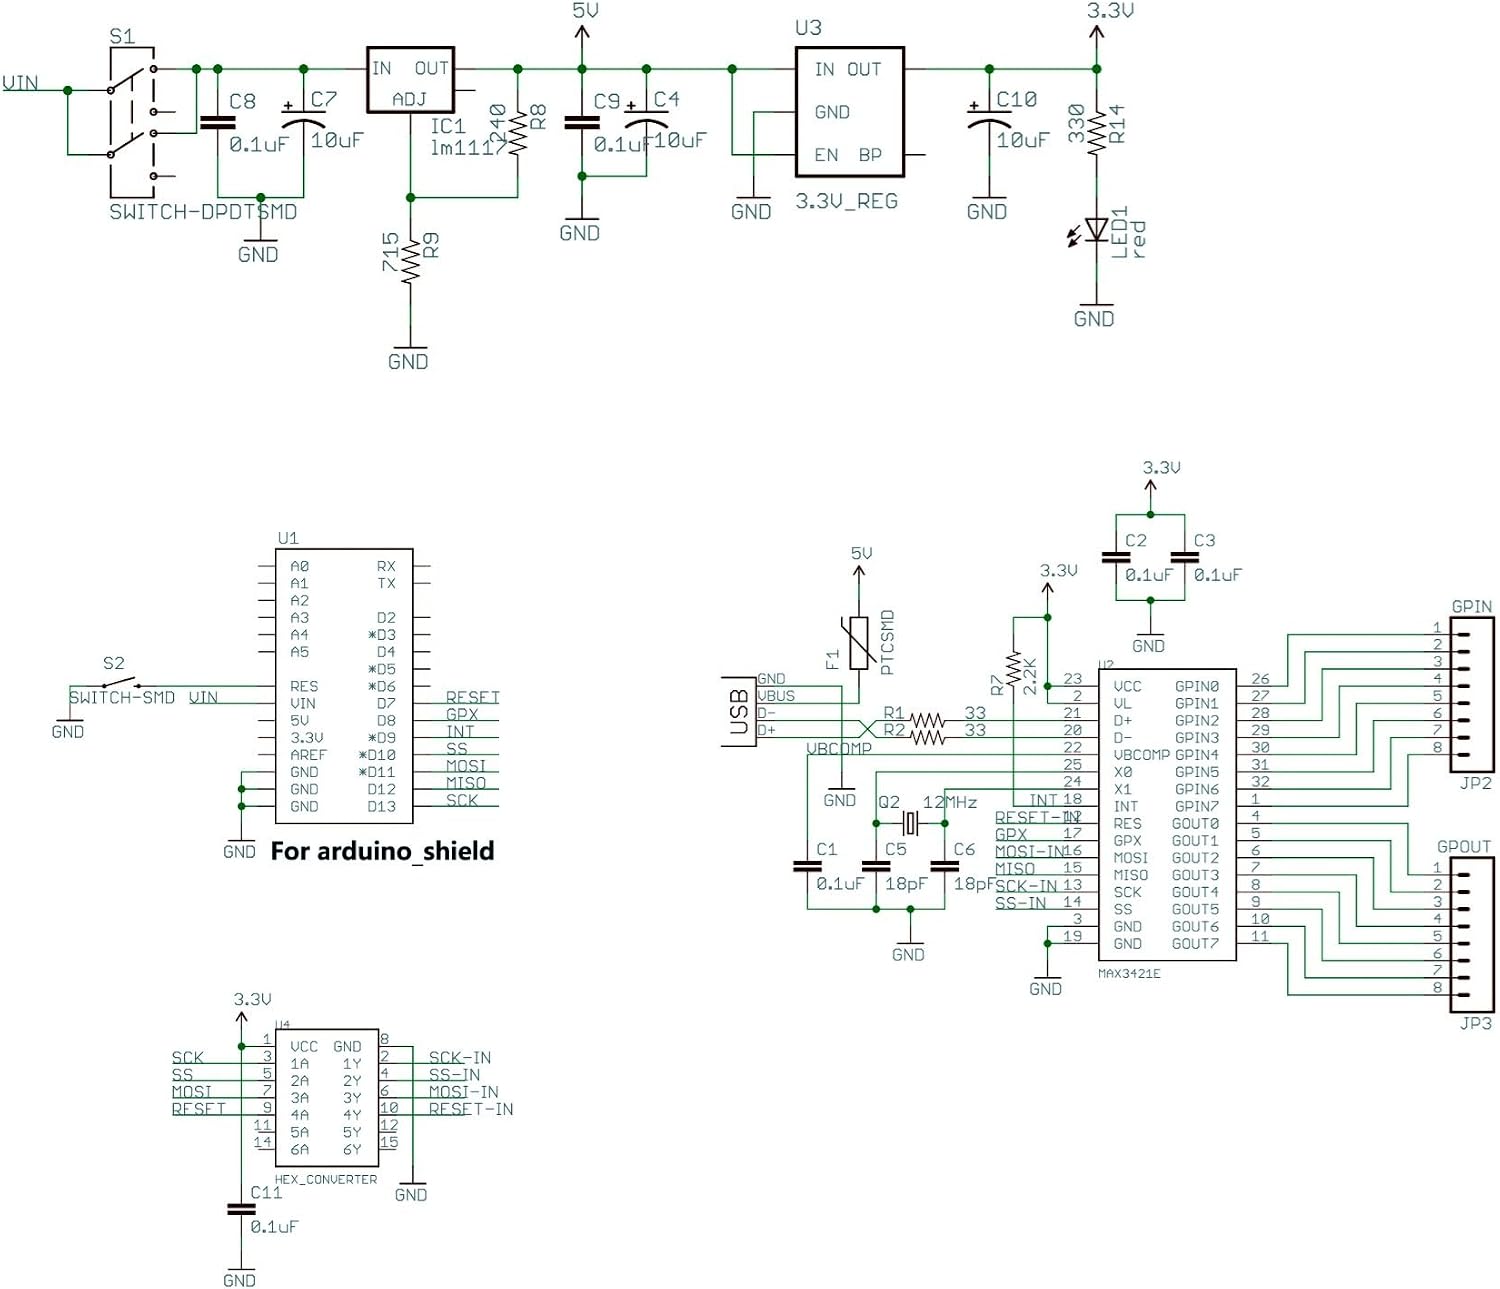
그림 4.1: 상단 view of the Mini USB Host Shield 2.0, showing the USB Type-A port, MAX3421EE chip, and pin headers.

그림 4.2: 하단 view of the Mini USB Host Shield 2.0, showing additional pin labels and solder points.
Programming for USB Host Functionality:
- Install USB Host Library: Download and install the necessary USB Host Shield 2.0 library for Arduino IDE. This library provides functions to interact with various USB devices.
- USB 장치를 연결하세요: Plug your desired USB slave device (e.g., keyboard, mouse, flash drive) into the USB Type-A port on the shield.
- Upload Sketch: Write and upload an Arduino sketch that utilizes the USB Host library to detect and communicate with the connected device. Examples for common devices are usually included with the library.
Google ADK Implementation:
For Google ADK applications, the product provides compiled APK installation packages and ADK source files. These resources are compatible with the shield and can be used to develop Android applications that interact with your Arduino project via the USB Host Shield.
5. 사양
| 매개변수 | 값 |
|---|---|
| 상표 | 고디모듈 |
| 모델명 | Mini USB Host Shield 2.0 |
| 연결 기술 | USB |
| 포함된 구성 요소 | 1pcs Mini USB Host Shield |
| 운영 체제 호환성 | Android (for ADK) |
| 호환 장치 | USB keyboard, mouse, USB disk, Camera, Android system mobile phone |
| Processor Brand (Controller) | Atmel (referring to compatible Arduino) |
| 제품 치수 | 38mm x 18mm |
| 순중량 | 4.5g |
| 운영 볼륨tage | 직류 3.3V |
6. 문제 해결
- 호환성 문제: This shield is primarily designed for Arduino Pro Mini (3.3V/8MHz/328). While it may work with Arduino Uno with appropriate level shifters, it is generally not compatible with Arduino Mega 2560 without significant modifications and advanced knowledge. Ensure your Arduino board operates at 3.3V or use proper voltage level conversion.
- Unclear Pin Labels: If the silk screening on the board for pin identification is unclear, refer to the provided schematic diagram (Figure 3.1) for accurate pin assignments and connections.
- 장치가 감지되지 않음:
- Verify all connections between the shield and Arduino are correct and secure.
- Ensure the USB Host library is correctly installed and the sketch is properly configured for the specific USB device.
- Check the power supply to the shield and Arduino. Insufficient power can prevent USB devices from functioning.
- Test with a different USB device to rule out issues with the device itself.
7. 유지관리
To ensure the longevity and proper functioning of your Mini USB Host Shield 2.0, follow these general maintenance guidelines:
- 조심스럽게 다루십시오: Electronic components are sensitive. Avoid dropping the board or subjecting it to excessive force.
- 건조하게 유지하세요: 기판을 습기나 액체로부터 보호하십시오. 습기와 액체는 단락 및 부식을 유발할 수 있습니다.
- 청결: 보드에 먼지와 이물질이 묻지 않도록 하십시오. 필요한 경우 부드럽고 마른 브러시나 압축 공기를 사용하여 청소하십시오.
- 적절한 보관: When not in use, store the shield in an anti-static bag to protect it from electrostatic discharge.
8. 보증 및 지원
This GODIYMODULES Mini USB Host Shield 2.0 comes with a 2년 제조사 보증. 본 보증은 정상적인 사용 중에 발생하는 재료 및 제조상의 결함을 보장합니다.
For technical support, inquiries, or warranty claims, please contact GODIYMODULES directly through their official channels or the retailer from whom the product was purchased. Please provide your purchase details and a clear description of the issue when seeking support.