
1. 서론
This manual provides detailed instructions for the assembly, installation, operation, and maintenance of your TOOQ DB1202TN-B Dual Monitor Desk Mount with Laptop Tray. Please read this manual thoroughly before installation and use to ensure proper setup and safe operation. Keep this manual for future reference.

Figure 1: TOOQ DB1202TN-B Dual Monitor Desk Mount with Laptop Tray in use.
2. 안전 정보
- 모든 지침을 읽으십시오. Ensure you understand all instructions and warnings before installation and use.
- 중량 용량: Do not exceed the maximum weight capacity of 9 kg (19.8 lbs) per monitor arm and 9 kg (19.8 lbs) for the laptop tray. Exceeding this limit may result in serious injury or property damage.
- 모니터 크기: 이 거치대는 17인치에서 32인치 사이의 모니터에 맞게 설계되었습니다.
- 노트북 크기: The tray is suitable for laptops between 12 and 17 inches.
- VESA 호환성: Ensure your monitors are VESA compatible (75x75mm or 100x100mm).
- 책상 두께: Verify your desk thickness is within the specified range for clamp 또는 그로밋 설치.
- 집회: Assemble the product according to the instructions. Incorrect assembly can lead to product failure or injury.
- 어린이들: 작은 부품은 어린이의 손이 닿지 않는 곳에 보관하세요.
- 유지: Regularly check that the mount is secure and all fasteners are tight.
3. 패키지 내용
Please verify that all components are present and undamaged before proceeding with installation. If any parts are missing or damaged, contact customer support.
- 1x Main Pole
- 2x Monitor Arms
- 1x Laptop Tray
- 1x 책상 Clamp 집회
- 1x Grommet Mount Assembly
- 1x Hardware Kit (screws, washers, Allen keys)
- 1x 사용 설명서

Figure 2: Included mounting hardware (M-A: M4x12, M-B: M5x12, M-C: D5 washers).
4. 사양
| 특징 | 세부 사항 |
|---|---|
| 모델 | DB1202TN-B |
| 모니터 크기 호환성 | 17인치 - 32인치 |
| Monitor Weight Capacity | 9 kg (19.8 lbs) per arm |
| 노트북 크기 호환성 | 12인치 - 17인치 |
| Laptop Tray Weight Capacity | 9kg(19.8파운드) |
| VESA 호환성 | 75x75mm, 100x100mm |
| 기울기 각도 | +45° / -45° |
| 회전 각도 | +90° / -90° |
| 회전 각도 | +180° / -180° |
| 재료 | 합금강 |
| 색상 | 검은색 |
| 제품 치수 | 43.5 x 29.5 x 13.5cm (포장 상태 기준 대략적인 크기) |
| 제품 무게 | 5.4kg |

Figure 3: Detailed technical drawing with dimensions.
5. 설정 및 설치
The TOOQ DB1202TN-B offers two installation options: desk clamp or grommet mount. Choose the method best suited for your desk.
5.1 데스크 클amp 설치
- 책상 cl 부착amp base to the main pole using the provided screws.
- cl 위치amp on the edge of your desk. Ensure the desk thickness is compatible with the clamp의 범위입니다.
- cl을 조여주세요amp screw until the mount is securely fastened to the desk. Do not overtighten.

그림 4: 책상 clamp 설치.
5.2 그로밋 마운트 설치
- 책상에 케이블 통과 구멍이 있다면 기존의 케이블 통과 구멍 덮개를 제거하십시오.
- Assemble the grommet base components as per the diagram in the manual (not provided here, but implied).
- Insert the main pole through the grommet hole.
- Secure the grommet base from underneath the desk using the provided plate and nut. Tighten firmly.

Figure 5: Grommet mount installation.
5.3 Attaching Monitor Arms and Laptop Tray
- Slide the monitor arms onto the main pole at your desired height. Secure them with the locking collars.
- Slide the laptop tray arm onto the main pole and secure it.
- Attach the VESA plates to the back of your monitors using the appropriate M4x12 or M5x12 screws and D5 washers from the hardware kit. Ensure the screws are not overtightened and do not damage the monitor.
- Carefully slide the monitors (with VESA plates attached) onto the monitor arms. Ensure they click into place securely.
- Place your laptop onto the laptop tray. Adjust the width-adjustable claws to securely hold your laptop.

Figure 6: Attaching monitor arms and adjusting height.

Figure 7: Laptop holder with adjustable width claws (276-472mm).
6. 작동 지침 및 조정
This monitor mount offers various adjustment options to achieve an ergonomic setup.
- 높이 조정: Loosen the locking collar on the main pole to slide the monitor arms and laptop tray up or down. Retighten the collar once the desired height is reached.
- 기울기 조정: The monitor and laptop tray can be tilted +45° to -45°. Use the provided Allen key to adjust the tension if the screen does not hold its position.
- 회전 조정: Swivel your monitors up to 90° horizontally or vertically.
- 회전 조정: Rotate your monitors +180° to -180° for portrait or landscape orientation.
- Laptop Tray Tilt: The laptop tray also offers tilt adjustment for comfortable typing and view각도를 나타냅니다.
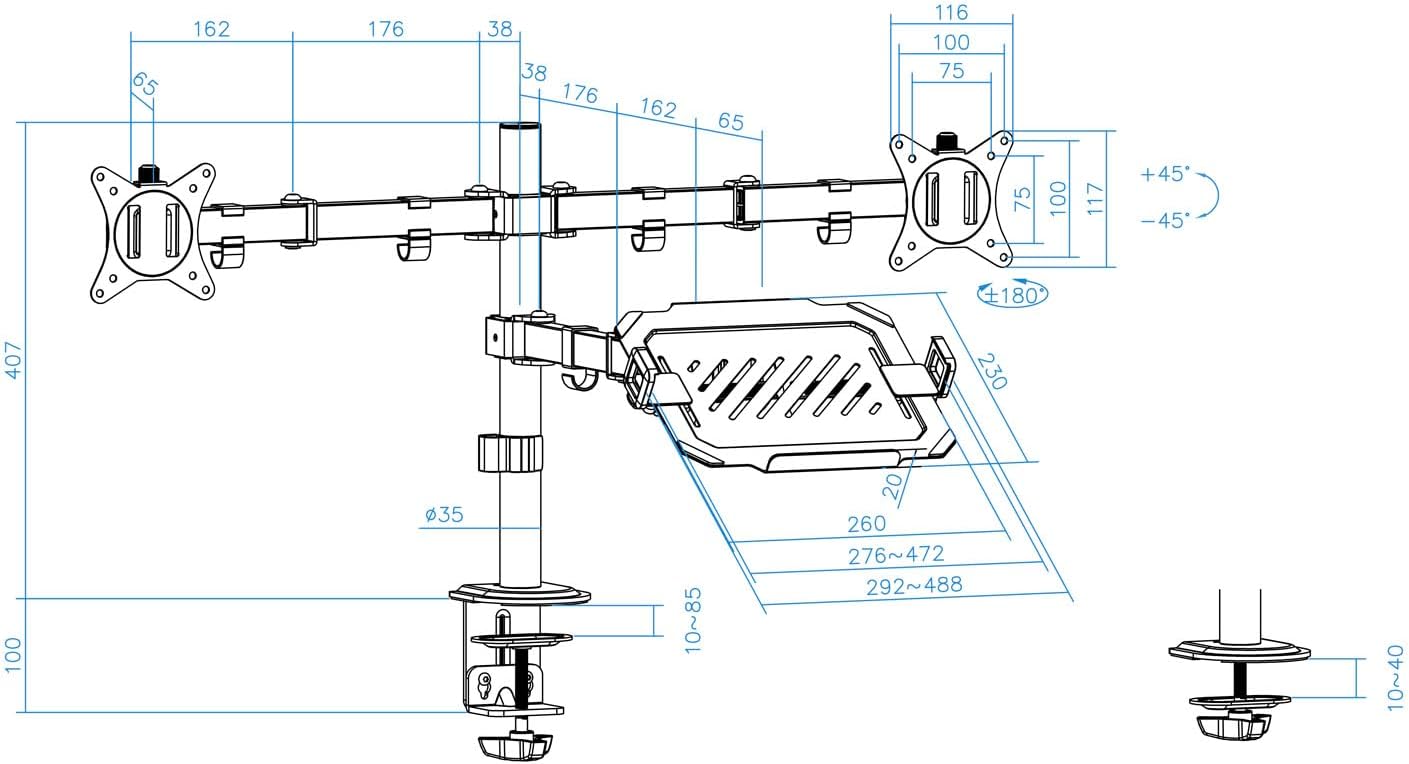
Figure 8: Laptop tray tilt adjustment.

Figure 9: Monitor swivel and rotation capabilities.
6.1 케이블 관리
Utilize the integrated cable clips along the arms and main pole to route and organize your monitor and laptop cables. This helps maintain a clean and tidy workspace.

Figure 10: Cable management clips.
7. 유지관리
- 청소: 부드러운 천으로 마운트를 닦아주세요.amp 천으로 닦으세요. 연마성 세제나 용제는 사용하지 마세요.
- 견고성 확인: Periodically check all screws and fasteners to ensure they remain tight and secure. Retighten as necessary.
- 매끄럽게 하기: No lubrication is required for normal operation.
8. 문제 해결
- Monitor sags or does not hold position:
- Ensure the monitor weight does not exceed the maximum capacity (9 kg per arm).
- Tighten the tilt adjustment screw on the VESA plate using the provided Allen key.
- 마운트가 불안정합니다:
- Verify the desk clamp or grommet mount is securely tightened to the desk.
- Ensure the main pole and arm collars are tightened.
- Laptop tray sags:
- Ensure the laptop weight does not exceed the maximum capacity (9 kg).
- Tighten the tilt adjustment screw for the laptop tray.
- 잃어버린 부분들:
- Refer to the "Package Contents" section. If parts are missing, contact customer support.
9. 보증 및 지원
For warranty information or technical support, please refer to the documentation included with your purchase or visit the official TOOQ web사이트. 구매 증빙 자료로 구매 영수증을 보관하세요.