1. 서론
This manual provides detailed instructions for the installation, operation, and maintenance of your Denash X79SE Plus LGA 2011 Motherboard. This motherboard is designed to support Xeon E5 V1 V2 series processors and DDR3 memory, offering robust performance for various computing needs. Please read this manual thoroughly before installation and use to ensure proper setup and functionality.
2. 주요 특징
- NVME M.2 Interface: Equipped with an NVME M.2 hard drive interface, providing theoretical bandwidth up to 4 Gbit/s for high-speed storage.
- LGA 2011 소켓: Supports Xeon E5 V1 V2 series processors.
- PCIe 3.0 x16 슬롯: Features a dedicated slot for graphics cards, ensuring high-performance visual output.
- 기가비트 이더넷 : Integrated RTL8111H Gigabit LAN for stable and fast network connectivity.
- DDR3 메모리 지원: Four DDR3 memory slots supporting up to 128GB (1066/1333/1600 MHz).
- 8-Layer PCB Design: Constructed with an 8-layer printed circuit board for enhanced stability and reliability.
- High-Capacity Power Supply: Utilizes a robust 1x8 and 1x24 pin power supply design for stable performance.
- USB 2.0 포트: Includes six USB 2.0 ports for peripheral connectivity.

Figure 2.1: M.2 NVME/NGFF Slot for high-speed storage.

Figure 2.2: Gigabit Ethernet port for reliable network connection.

Figure 2.3: Solid capacitors ensuring stable power delivery and extended motherboard life.

Figure 2.4: Illustration of the durable 8-layer PCB material.
3. 설정 및 설치
3.1 패키지 내용
패키지에 모든 품목이 들어 있는지 확인하세요.
- 1 x Denash X79SE Plus Motherboard
- 1 x I/O Backplate
- 1 x SATA 데이터 케이블

Figure 3.1: Motherboard, I/O backplate, and SATA cable included in the package.
3.2 마더보드 레이아웃
마더보드의 다양한 구성 요소와 커넥터에 대해 알아보세요.
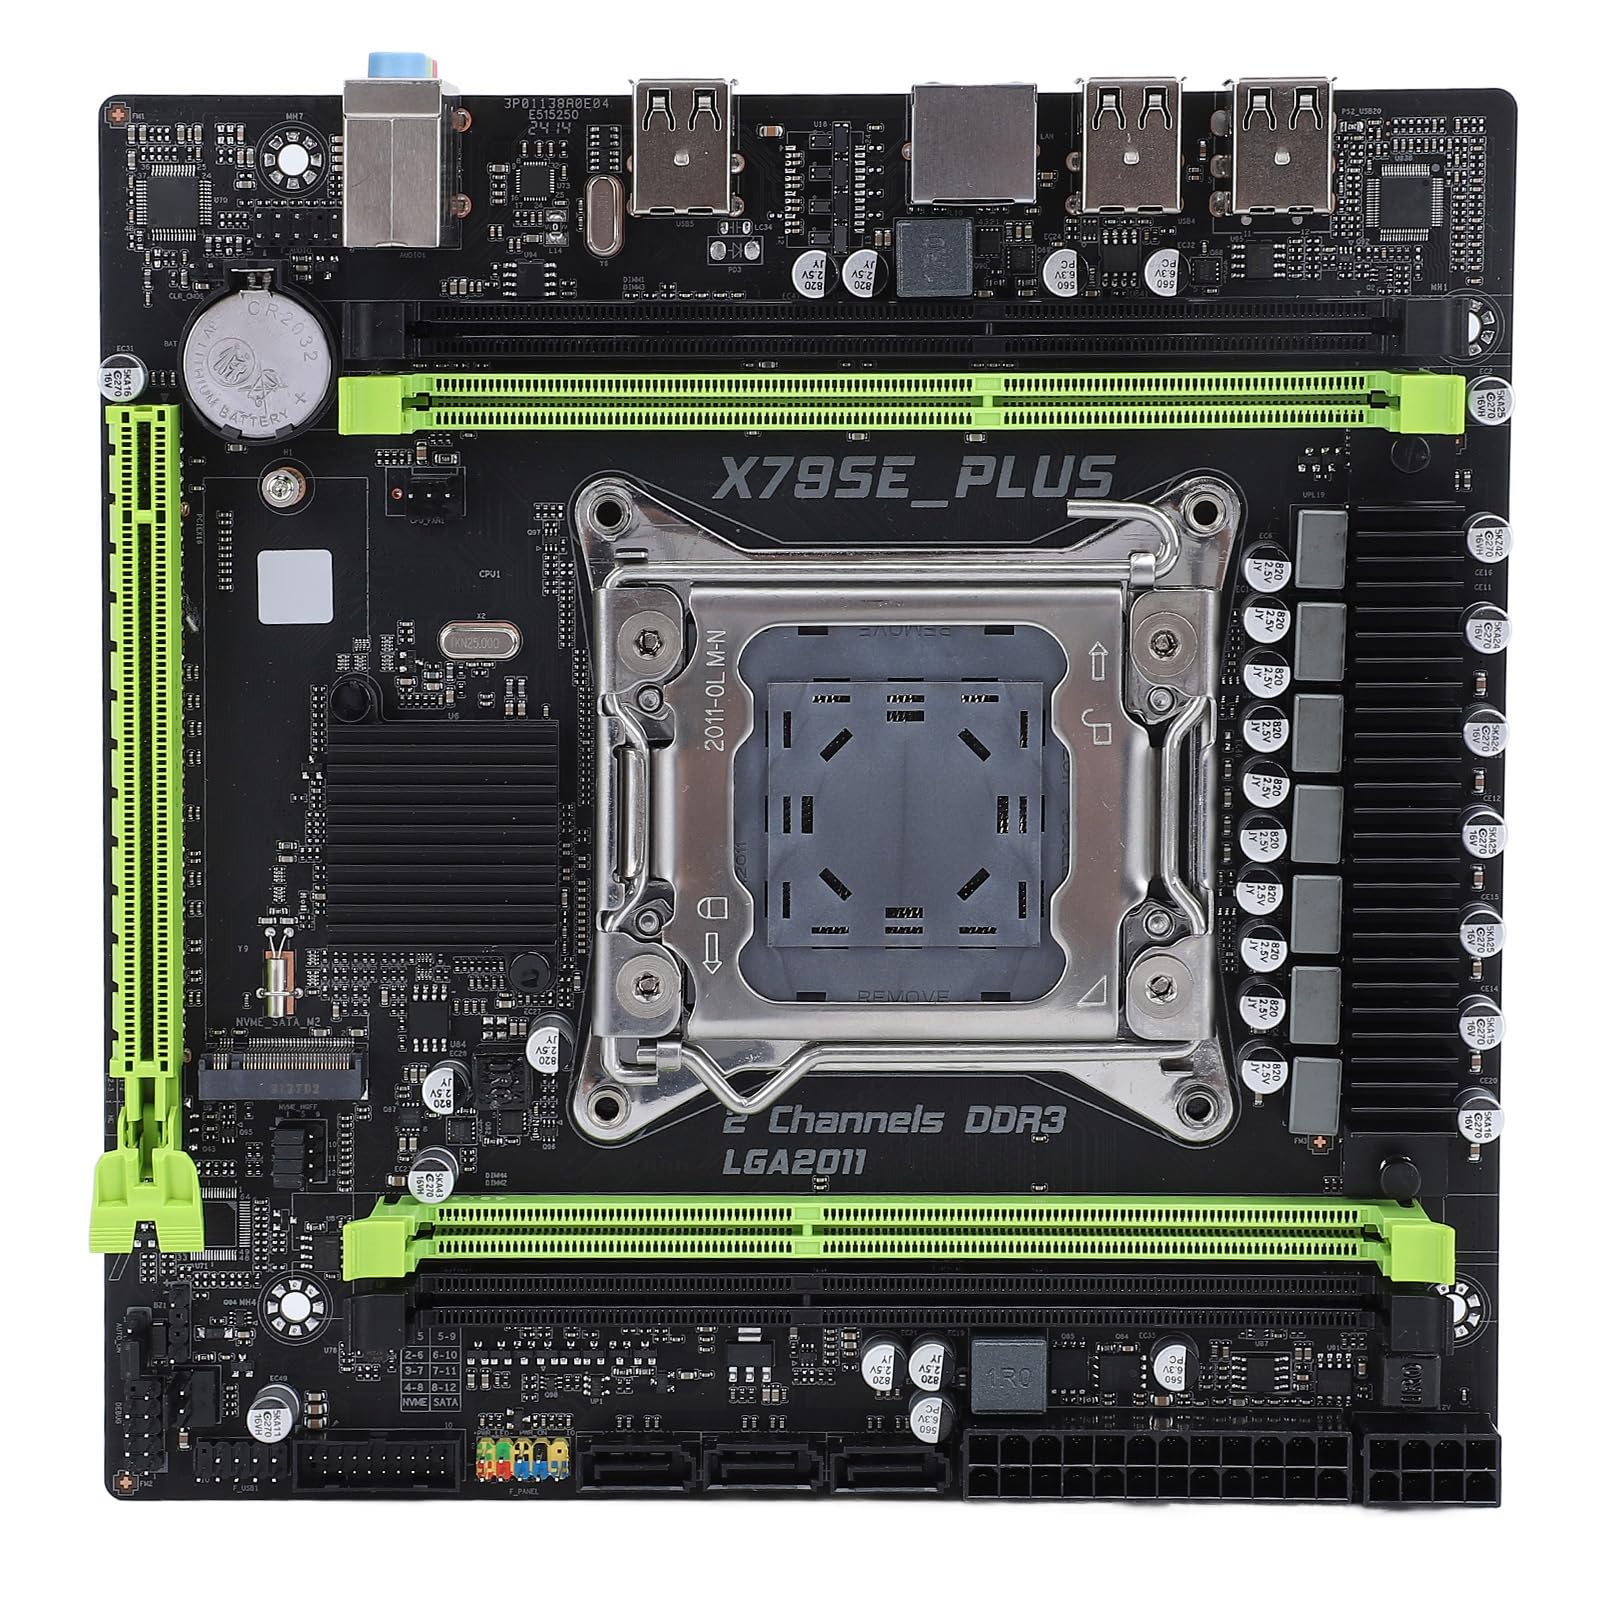
그림 3.2: 이상view of the Denash X79SE Plus motherboard.
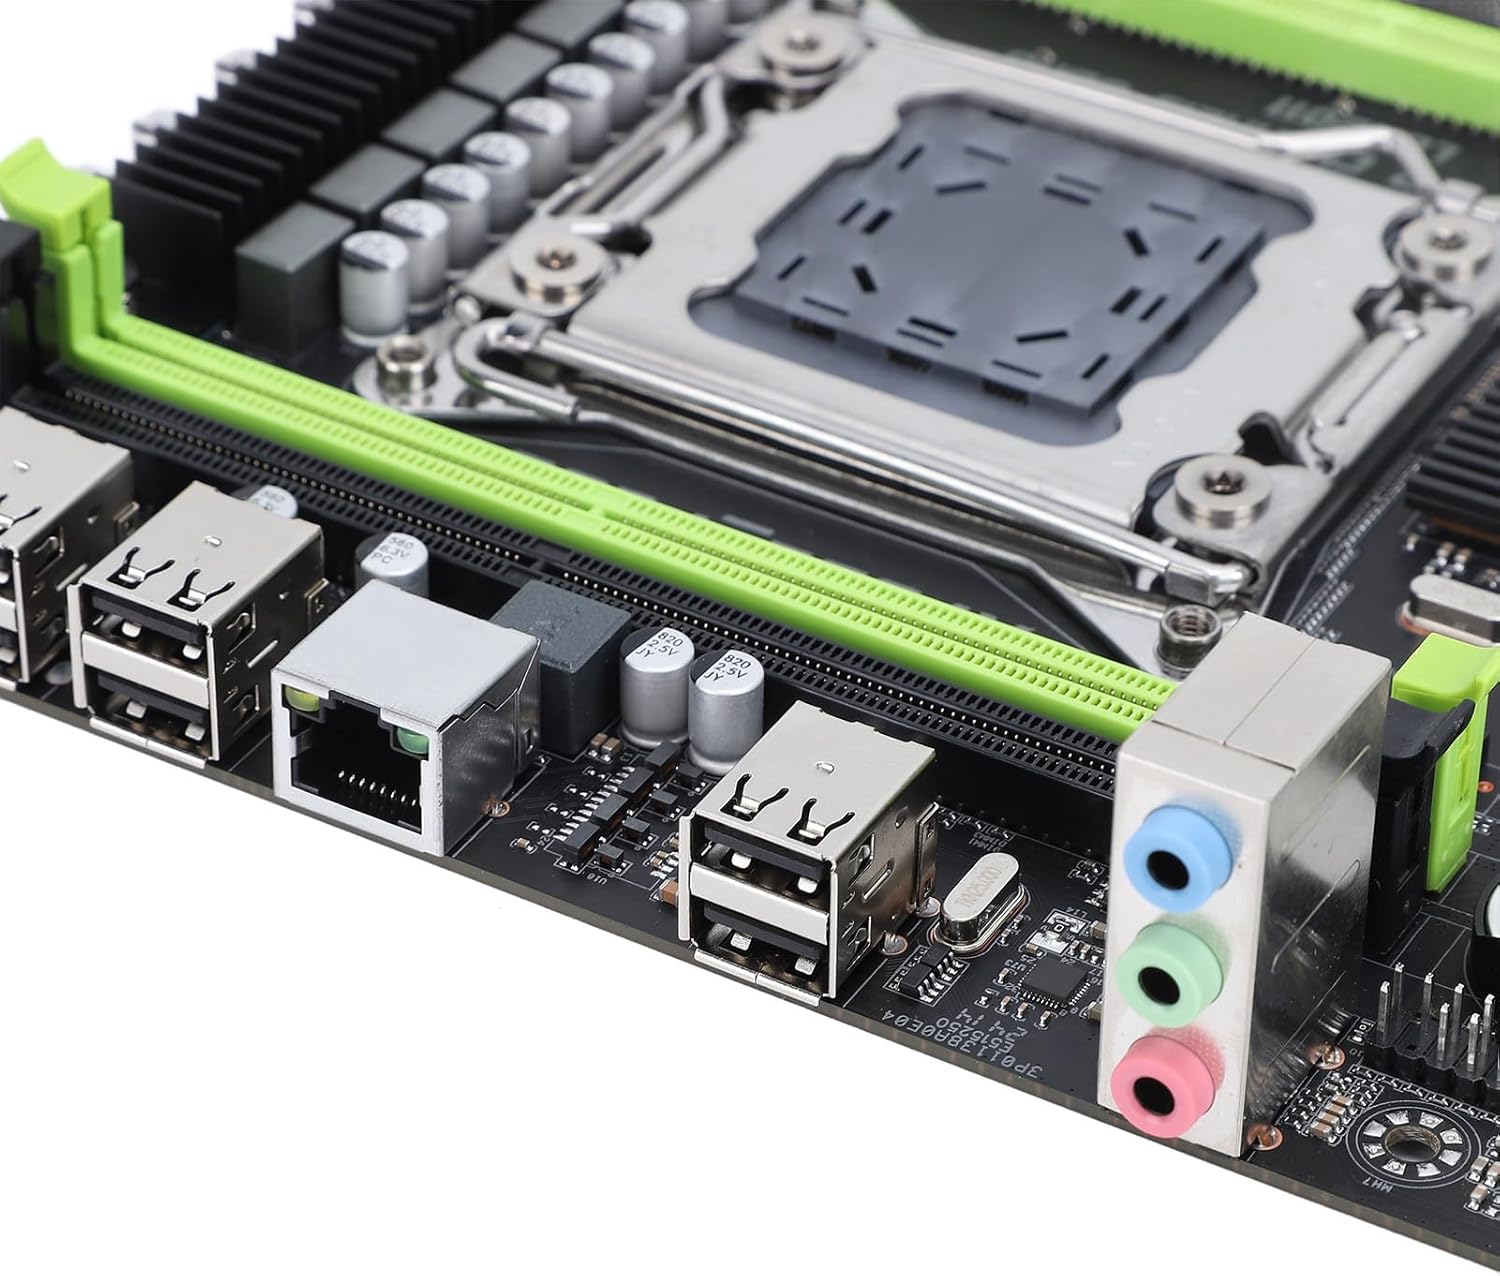
그림 3.3: USB, 이더넷 및 오디오 포트가 있는 후면 I/O 패널.

Figure 3.4: SATA 2.0 ports and DDR3 memory slots.
3.3 구성 요소 설치 가이드
Follow these steps to install essential components onto your motherboard:
- CPU 설치:
- Carefully open the LGA 2011 CPU socket lever.
- Align the CPU (Xeon E5 V1/V2 series) with the socket, ensuring the triangular mark on the CPU matches the mark on the socket.
- CPU를 억지로 끼우지 말고 조심스럽게 소켓에 넣으세요.
- 소켓 레버를 닫아 CPU를 고정합니다.
- 써멀 페이스트를 바르고 CPU 쿨러를 설치하세요.
- Memory (DDR3) Installation:
- DDR3 메모리 슬롯의 양쪽 끝에 있는 클립을 엽니다.
- 메모리 모듈의 홈을 슬롯의 키에 맞추십시오.
- 클립이 제자리에 고정될 때까지 메모리 모듈의 양쪽 끝을 단단히 누릅니다.
- 저장 장치 설치:
- M.2 NVME SSD: Insert the M.2 SSD into the M.2 slot at an angle, then push it down and secure it with a screw.
- SATA 드라이브: Connect SATA data cables from your storage drives (HDD/SSD) to the SATA 2.0 ports on the motherboard. Connect SATA power cables from your power supply to the drives.
- Graphics Card (PCIe 3.0 x16) Installation:
- PCIe 3.0 x16 슬롯의 고정 클립을 엽니다.
- 그래픽 카드를 슬롯에 맞춰 놓고 완전히 장착되고 고정 클립이 잠길 때까지 세게 누르십시오.
- 그래픽 카드를 나사를 사용하여 PC 케이스에 고정하십시오.
- 전원 공급 장치 연결:
- 전원 공급 장치의 24핀 ATX 전원 커넥터를 마더보드의 주 전원 소켓에 연결합니다.
- 8핀 CPU 전원 커넥터를 CPU 근처의 해당 소켓에 연결하십시오.
- Connect any additional power cables required for your graphics card or other components.
- 전면 패널 커넥터:
- Connect the front panel headers (power button, reset button, HDD LED, power LED, USB 2.0, audio) from your PC case to the corresponding pins on the motherboard. Refer to your PC case manual for specific pin assignments.
4. 사용 설명서
4.1 첫 번째 전원 켜기
After assembling all components and connecting power, press the power button on your PC case. The system should power on, and you should see a display on your monitor.
4.2 BIOS 설정
To enter the BIOS/UEFI setup utility, press the designated key (usually 델 or F2) during the initial boot sequence. In the BIOS, you can configure boot order, system time, CPU settings, and other hardware parameters.
4.3 운영 체제 설치
Once the BIOS is configured, you can proceed with installing your preferred operating system (e.g., Windows, Linux). Boot from your OS installation media (USB drive or DVD) and follow the on-screen instructions.
5. 유지관리
5.1 청소
컴퓨터 내부를 정기적으로 청소하여 먼지 축적을 방지하세요. 먼지가 쌓이면 과열 및 성능 저하를 유발할 수 있습니다. 압축 공기를 사용하여 팬, 방열판 및 기타 부품의 먼지를 제거하십시오. 청소하기 전에 시스템 전원을 끄고 전원 케이블을 뽑으십시오.
5.2 BIOS 업데이트
BIOS updates can provide improved compatibility, stability, and new features. Check the manufacturer's website for the latest BIOS versions and follow their instructions carefully. Incorrect BIOS updates can damage your motherboard.
6. 문제 해결
6.1 일반적인 문제
- 전원 없음:
- 모든 전원 연결(24핀 ATX, 8핀 CPU, GPU)을 확인하세요.
- 전원 공급 스위치가 'ON' 위치에 있는지 확인하세요.
- 전면 패널 전원 버튼이 마더보드에 연결되어 있는지 확인하세요.
- 디스플레이 없음:
- 모니터가 그래픽 카드(메인보드 내장 그래픽이 아닌)에 연결되어 있는지 확인하십시오.
- 그래픽 카드와 메모리 모듈을 다시 장착하세요.
- 다른 모니터나 디스플레이 케이블을 사용하여 테스트해 보세요.
- 시스템 불안정/충돌:
- CPU와 GPU 온도를 확인하세요.
- 모든 구성 요소가 제대로 장착되었는지 확인하십시오.
- 메모리 진단 도구를 실행합니다.
- Update drivers for all components.
- 부팅 장치를 찾을 수 없습니다:
- Check SATA/M.2 cable connections to storage drives.
- BIOS에서 부팅 순서를 확인하십시오.
- 운영 체제가 드라이브에 올바르게 설치되었는지 확인하십시오.
7. 기술 사양
| 특징 | 사양 |
|---|---|
| 상표 | 데나쉬 |
| 모델명 | X79SE Plus |
| 모델 번호 | Denashsh8g1qz45g |
| CPU 소켓 | LGA 2011 (Supports Xeon E5 26XXV1/V2) |
| 메모리 슬롯 | 4 x DDR3 (Max 128GB, 1066/1333/1600 MHz) |
| SATA 인터페이스 | 3 x SATA 2.0 |
| M.2 슬롯 | 1 x M.2 2280 NVMe 3.0x4, 1 x M.2 2280 NGFF SATA 2.0 Protocol Port SSD |
| 그래픽 카드 슬롯 | 1 x PCIe 3.0 x16 |
| 오디오 칩 | HD 5.1 Channel Sound Chip |
| 네트워크 카드 | 1 x Gigabit Ethernet (RTL8111H) |
| USB 포트 | 6개의 USB 2.0 |
| 폼 팩터 | 마이크로 ATX |
| 통합 배터리 | CR2032x1 240 mAh |
| 보증 | 2 years manufacturer |
8. 보증 및 지원
The Denash X79SE Plus LGA 2011 Motherboard is covered by a 2년 제조사 보증 from the date of purchase. This warranty covers defects in materials and workmanship under normal use. For warranty claims or technical support, please contact your retailer or the manufacturer directly. Keep your proof of purchase for warranty validation.