
HOCO QS2
Hoco QS2 Portable Smart Air Pump & Emergency Start-Up Power Bank User Manual
모델: QS2
1. 서론
Thank you for choosing the Hoco QS2 Portable Smart Air Pump & Emergency Start-Up Power Bank. This device is a multi-functional tool designed to provide reliable assistance in various situations, including jump-starting vehicles, inflating tires, and charging electronic devices. Please read this manual thoroughly before use to ensure proper operation and to maximize the lifespan of your device.
2. 안전수칙
Always observe the following safety guidelines to prevent injury or damage to the device and property.
- 기기를 극한 온도, 직사광선 또는 화기에 노출시키지 마십시오.
- 어린이의 손이 닿지 않는 곳에 보관하세요.
- 기기를 직접 분해, 개조 또는 수리하려고 시도하지 마십시오. 자격을 갖춘 서비스 담당자에게 문의하십시오.
- Ensure proper ventilation during operation, especially when using the air pump or jump start function.
- 출력 단자가 단락되지 않도록 주의하세요.
- 배터리가 방전된 경우 점프 스타터를 사용하지 마십시오.amp또는 케이블이 손상되었습니다.
- When jump-starting, ensure the vehicle's ignition is off and all accessories are unplugged.
- Do not over-inflate tires. Always refer to the recommended tire pressure for your vehicle.
- 사용 중 기기가 과열될 경우 즉시 작동을 중단하십시오.
3. 패키지 내용
다음 항목에 대한 상자를 체크해 주세요.
- 1 x Hoco QS2 8000 mAh Portable Smart Air Pump Emergency Start-Up Power Bank
- 1 x Jump Start Cables (Red and Black Clamps)
- 1 x Air Hose with Valve Connector
- Various Nozzle Adapters (e.g., for bicycles, balls)
- 1 x USB 유형 C 충전 케이블

Figure 1: Hoco QS2 and its complete set of accessories.
4. 제품 구성품
Familiarize yourself with the different parts of your Hoco QS2 device.
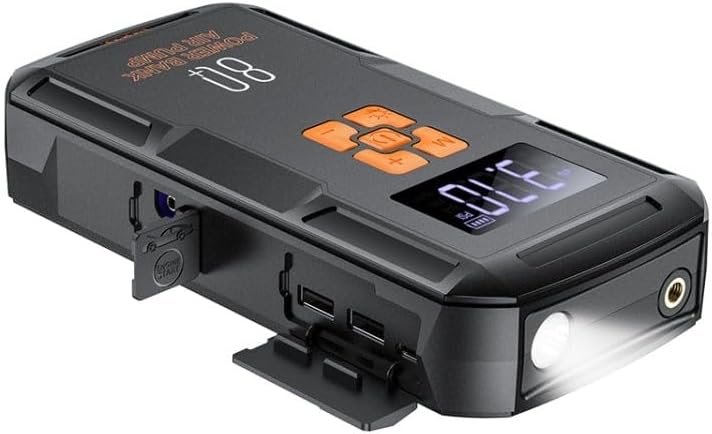
그림 2: 이상view of the Hoco QS2 device.
- 디지털 디스플레이: Shows current pressure, battery level, and selected mode.
- 제어 버튼: Power, Mode selection, Increase/Decrease pressure.
- 공기 호스 포트: Connects the inflation hose.
- 점프 스타트 포트: Connects the jump start cables.
- USB Output Ports (2x): For charging external devices (5V/2.4A).
- C형 입력 포트: For charging the Hoco QS2 itself (5V/2.4A).
- LED 손전등: 조명을 제공합니다.
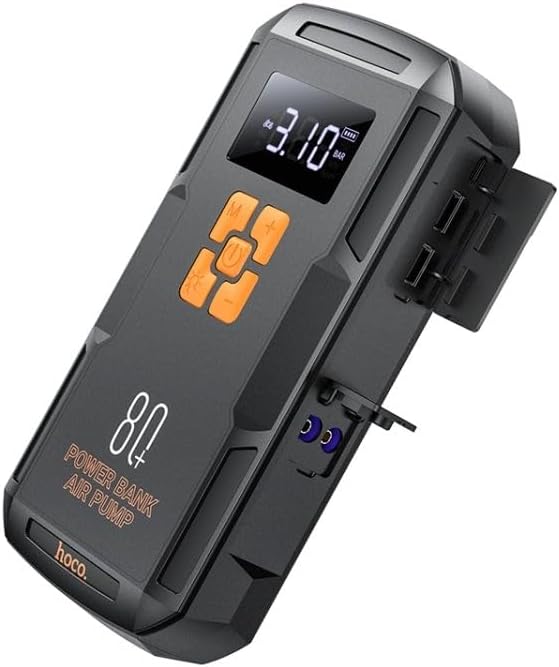
그림 3: 측면 view of the Hoco QS2 with ports visible.
5. 설정 및 충전
5.1 Charging the Hoco QS2
Before first use, fully charge the Hoco QS2. It is recommended to keep the device charged above 50% for optimal performance, especially for jump-starting.
- Connect the provided USB Type-C charging cable to the Type-C input port on the Hoco QS2.
- Connect the other end of the USB cable to a 5V/2.4A USB wall adapter (not included) or a compatible USB port.
- The digital display will indicate the charging status and battery level.
- 충전 시간은 전원에 따라 달라질 수 있습니다.
6. 사용 설명서
6.1 Jump Start Function
The Hoco QS2 can jump-start vehicles with up to 4.0L gasoline or 2.0L diesel engines.
- Ensure the Hoco QS2 is sufficiently charged (at least 75% battery recommended).
- Turn off the vehicle's ignition and all electrical accessories.
- 빨간색(+) cl을 연결합니다.amp of the jump start cable to the positive (+) terminal of the vehicle's battery.
- 검은색(-) cl을 연결합니다.amp to the negative (-) terminal of the vehicle's battery or a solid, unpainted metal part of the engine block (ground point).
- Insert the blue connector of the jump start cable into the jump start port on the Hoco QS2.
- Once connected, the Hoco QS2 will automatically enter jump start mode.
- Start the vehicle's engine. If it doesn't start immediately, wait 30 seconds before trying again. Do not crank for more than 3 seconds per attempt.
- Once the vehicle starts, immediately disconnect the jump start cable from the Hoco QS2, then remove the black (-) clamp, 그 뒤에 빨간색 (+) cl이 옵니다.amp 차량 배터리에서.
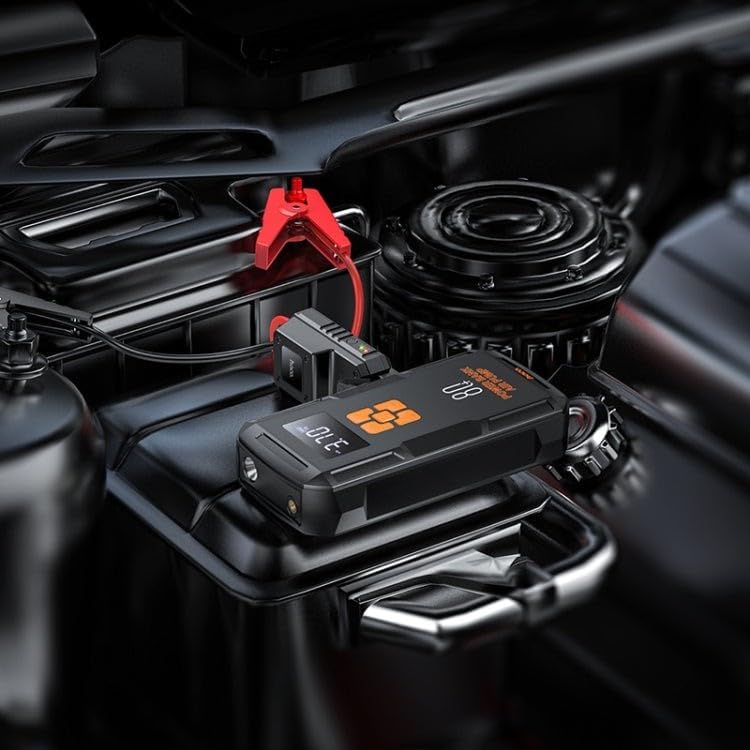
Figure 4: Using the Hoco QS2 for jump-starting a vehicle.
6.2 Tire Inflation Function (Air Pump)
The Hoco QS2 can inflate tires up to 10.3 bar (150 PSI) and features multiple inflation modes.
- Connect the air hose to the air hose port on the Hoco QS2.
- Attach the other end of the air hose to the tire valve. Ensure a secure connection to prevent air leakage. Use appropriate nozzle adapters for other inflatables (e.g., bicycle tires, sports balls).
- Press the Power button to turn on the device. The display will show the current tire pressure.
- Press the 'M' (Mode) button to cycle through the inflation modes: Car, Motorcycle, Bicycle, Basketball. Each mode has a default pressure setting, which can be adjusted.
- Use the '+' and '-' buttons to set your desired target pressure.
- Press the Power button again to start inflation. The pump will automatically stop once the target pressure is reached.
- 타이어 밸브와 장치에서 공기 호스를 분리하십시오.

Figure 5: Inflating a car tire with the Hoco QS2.
6.3 파워뱅크 기능
The Hoco QS2 can charge your electronic devices via its dual USB output ports.
- Connect your device's USB charging cable to one of the USB output ports on the Hoco QS2.
- Connect the other end of the cable to your electronic device (e.g., smartphone, tablet).
- The Hoco QS2 will automatically begin charging your device.
- The digital display will show the remaining battery level of the power bank.
6.4 LED 손전등 기능
내장형 LED 손전등은 다양한 상황에서 조명을 제공합니다.
- To turn on the flashlight, press and hold the 'Light' button (usually indicated by a light bulb icon).
- Press the 'Light' button again to cycle through different light modes (e.g., steady on, SOS signal, strobe).
- Press and hold the 'Light' button again to turn off the flashlight.
7. 유지 관리 및 보관
- 부드럽고 마른 천으로 기기를 닦으세요. 강한 화학 물질이나 연마성 세제는 사용하지 마세요.
- Store the Hoco QS2 in a cool, dry place, away from direct sunlight and moisture.
- For long-term storage, charge the device every 3-6 months to maintain battery health.
- Ensure all ports are covered when not in use to prevent dust and debris from entering.
8. 문제 해결
| 문제 | 가능한 원인 | 해결책 |
|---|---|---|
| 장치가 켜지지 않습니다. | 배터리가 부족합니다. | 장치를 완전히 충전하십시오. |
| 차량 점프 스타트가 불가능합니다. | Incorrect cable connection; Device battery too low; Vehicle battery severely discharged. | Ensure correct polarity (+ to +, - to -). Charge the Hoco QS2. Allow more time for the vehicle battery to receive a charge, or seek professional assistance if the battery is completely dead. |
| Air pump not inflating or inflating slowly. | Air hose not securely connected; Nozzle adapter not suitable; Device battery low. | Check all connections for leaks. Use the correct adapter. Charge the device. |
| USB 충전이 작동하지 않습니다. | Device battery low; Cable faulty; Device not compatible. | Charge the Hoco QS2. Try a different USB cable. Ensure your device is compatible with 5V/2.4A charging. |
9. 기술 사양
| 특징 | 사양 |
|---|---|
| 모델 번호 | QS2 |
| 배터리 용량 | 8000mAh(29.6Wh) |
| Type-C 입력 | 5V / 2.4A |
| USB Output 1/2 | 5V / 2.4A |
| 총 USB 출력 | 5V / 2.4A |
| 점프 스타트 출력 | 12V (for vehicle emergency start) |
| 최대 공기압 | 10.3바 / 150파운드 |
| 치수 | 대략. 12 x 10 x 8cm |
| 무게 | 약 800그램 |
| 작동 온도 | 구체적인 범위는 제품 포장을 참조하십시오. |
10. 보증 및 지원
HOCO products are designed and manufactured to the highest quality standards. For warranty information and customer support, please refer to the warranty card included with your purchase or visit the official HOCO web사이트. 보증 청구에 대비해 구매 증빙 자료로 구매 영수증을 보관하세요.
Ask a question about this manual
Ask about setup, troubleshooting, compatibility, parts, safety, or missing instructions. Manuals+ will review the question and use this page’s manual context to help answer it.