
1. 서론
The Pronomic DX-50 USB MKII is a professional 4-channel DJ mixer designed for a wide range of applications, including discos, parties, restaurants, and presentations. Its user-friendly design ensures that both experienced and less experienced users can fully utilize its features. This manual provides detailed instructions for setting up, operating, and maintaining your mixer.
Key features include a recording function, integrated Bluetooth interface, USB player with transport controls, and multiple input channels.
2. 중요 안전 지침
- 지침을 읽어보세요: 제품을 사용하기 전에 모든 안전 및 작동 지침을 읽으십시오.
- 지시사항을 보관하세요: 나중에 참조할 수 있도록 안전 및 작동 지침을 보관하십시오.
- 경고를 주의하세요: 제품 및 작동 지침에 있는 모든 경고를 준수하십시오.
- 지시사항을 따르세요: 모든 작동 및 사용 지침을 따르세요.
- 물과 습기: Do not use this apparatus near water (e.g., bathtub, washbowl, kitchen sink, laundry tub, wet basement, or swimming pool).
- 통풍: 환기구를 막지 마십시오. 제조업체의 지침에 따라 설치하십시오.
- 열: 라디에이터, 난방 조절기, 스토브 또는 기타 장치(다음을 포함)와 같은 열원 근처에 설치하지 마십시오. amp열을 생성하는 발전기.
- 전원: Use only power sources specified by the manufacturer.
- 전원 코드 보호 : 전원 코드가 밟히거나 끼지 않도록 보호하세요. 특히 플러그, 편의용 콘센트 및 기기에서 나오는 부분은 보호하세요.
- 청소: 마른 천으로만 닦으십시오.
- 서비스: 이 제품을 직접 수리하려고 하지 마십시오. 덮개를 열거나 제거하면 위험한 전압에 노출될 수 있습니다.tage 또는 기타 위험. 모든 서비스는 자격을 갖춘 서비스 담당자에게 의뢰하세요.
3. 패키지 내용
아래 목록에 있는 모든 품목이 패키지에 포함되어 있는지 확인하십시오. 누락되거나 손상된 품목이 있는 경우 즉시 판매점에 문의하십시오.
- Pronomic DX-50 USB MKII DJ Mixer
- Power Adapter (AC 12V)
- USB Stick (32 GB, if included in your specific bundle)
- 사용 설명서 (본 문서)
4. 제품 오버view
Familiarize yourself with the various controls and connections on your DX-50 USB MKII mixer.
4.1 전면 패널 컨트롤
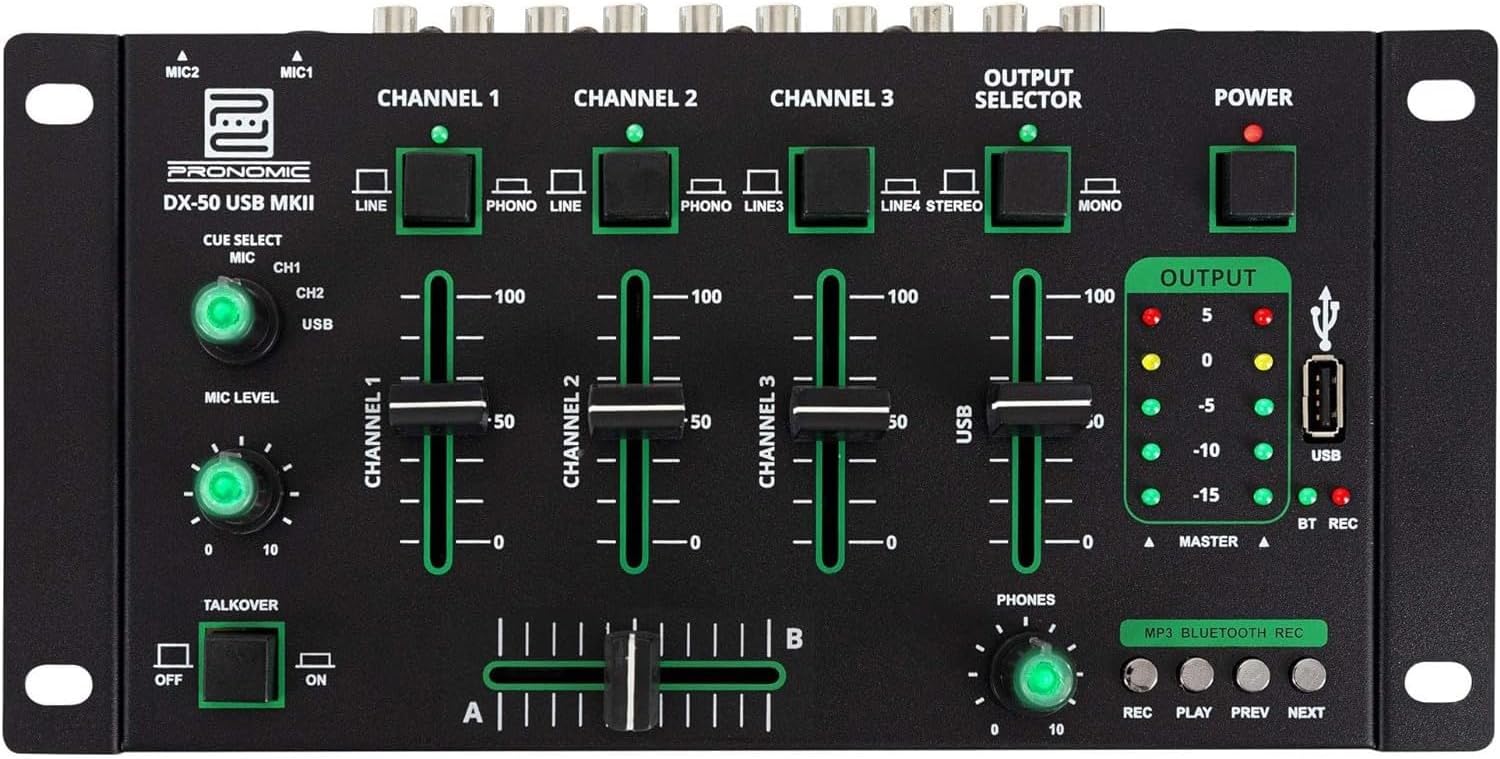
- MIC 1/2 Inputs: 마이크를 연결하세요.
- Channel 1-4 Input Selectors: Switch between LINE, PHONO, or USB/Bluetooth inputs for each channel.
- 채널 페이더 : Adjust the volume level for each channel.
- CUE Select Buttons: Route specific channels to the headphone output for monitoring.
- MIC 레벨 조절 노브: Adjust the volume of the microphone inputs.
- Talkover Switch: Activates the talkover function, which automatically lowers music volume when speaking into the microphone.
- 출력 선택기: Choose between Stereo or Mono master output.
- 전원 스위치: 믹서를 켜거나 끕니다.
- 출력 레벨 미터: LED indicators showing the master output level.
- USB 포트: Connect a USB drive for MP3 playback and recording.
- MP3/Bluetooth/REC Player Controls: Buttons for Play/Pause, Previous, Next, and Record functions for the integrated player.
- 휴대폰 수평 조절 손잡이: 헤드폰 출력 볼륨을 조절합니다.
- Crossfader (A/B): Blends between channels assigned to A and B.
4.2 후면 패널 연결

- AC 12V 전원 입력: 제공된 전원 어댑터를 여기에 연결하세요.
- 전화 출력: 헤드폰 연결용 6.3mm 잭.
- MASTER OUT L/R (RCA): Connect to your main amp전원 공급기 또는 전원 스피커.
- Channel 1 & 2 Inputs (RCA Line/Phono): Connect turntables (Phono) or other line-level devices (CD players, media players). Use the front panel selector to switch.
- Channel 3 & 4 Inputs (RCA Line): Connect line-level devices.
- MIC 1 & 2 Inputs (6.3mm Jack): 마이크를 연결하세요.
5. 설정
Follow these steps to set up your Pronomic DX-50 USB MKII mixer:
- 전원 연결: Ensure the mixer's power switch is in the OFF position. Connect the supplied AC 12V power adapter to the "AC 12V" input on the rear panel of the mixer. Plug the adapter into a suitable power outlet.
- Master Output Connection: Connect the "MASTER OUT L/R" RCA outputs on the rear panel to the inputs of your amp전원 공급기 또는 전원 스피커.
- 입력 장치 연결:
- 턴테이블: Connect turntables to the "CHANNEL 1" or "CHANNEL 2" RCA inputs. Set the corresponding input selector on the front panel to "PHONO".
- CD Players/Line Devices: Connect CD players, media players, or other line-level devices to "CHANNEL 1", "CHANNEL 2", "CHANNEL 3", or "CHANNEL 4" RCA inputs. Set the corresponding input selector on the front panel to "LINE".
- 마이크: Connect microphones to the "MIC 1" or "MIC 2" 6.3mm jack inputs on the rear panel.
- 헤드폰 연결: Connect your headphones to the "PHONES" 6.3mm jack on the rear panel.
- USB Drive (Optional): If using a USB drive for playback or recording, insert it into the "USB" port on the front panel.
- 전원 켜기: Once all connections are made, switch the mixer's power switch to the ON position. The power indicator LED will illuminate.
6. 사용 설명서
6.1 기본 혼합
- 입력 선택: For each channel, use the input selector switch (LINE/PHONO/USB/BT) to choose the desired audio source.
- Adjust Channel Volume: Use the vertical faders for each channel to adjust its individual volume level.
- 마스터 출력: Monitor the "OUTPUT" LED meters and adjust the master volume knob (if present, otherwise rely on channel faders and amplifier volume) to achieve a suitable overall output level without clipping.
- 크로스 페이더 : Use the crossfader to smoothly transition between channels assigned to A and B. Channels 1 and 2 are typically assigned to the crossfader.
6.2 마이크 사용
- Connect your microphone to one of the MIC inputs on the rear panel.
- Adjust the "MIC LEVEL" knob on the front panel to control the microphone's volume.
- 통화 전환 기능: Activate the "TALKOVER" switch to automatically reduce the volume of the music when you speak into the microphone. This is useful for announcements.
6.3 USB 재생 및 녹음
- USB 재생 : MP3가 들어있는 USB 드라이브를 삽입하세요 files into the "USB" port. Select "USB" as the input source for the dedicated USB channel. Use the "PLAY/PAUSE", "PREV", and "NEXT" buttons to control playback.
- USB 녹음: Press the "REC" button to start recording the master output to the connected USB drive. Press "REC" again to stop recording. Ensure your USB drive has sufficient free space and is formatted correctly (FAT32 is commonly supported).
6.4 블루투스 연결
- 블루투스 활성화: Select "BT" as the input source for the dedicated Bluetooth channel. The mixer will enter pairing mode.
- 페어링 장치: On your Bluetooth-enabled device (smartphone, tablet, etc.), search for available Bluetooth devices. Select "Pronomic DX-50 USB MKII" (or similar name) from the list to pair.
- 오디오 재생: Once paired, you can play audio from your device through the mixer. Control playback from your device or using the mixer's transport controls (if supported by your device).
6.5 헤드폰을 사용한 모니터링
- Connect headphones to the "PHONES" output.
- Use the "CUE SELECT" buttons to choose which channels you want to monitor in your headphones without affecting the main output.
- Adjust the "PHONES" level knob to set your desired headphone volume.
7. 유지관리
- 청소: Disconnect the power before cleaning. Use a soft, dry cloth to wipe the surface of the mixer. Do not use liquid cleaners, aerosols, or solvents.
- 저장: 믹서기는 직사광선과 극한의 온도를 피해 서늘하고 건조한 곳에 보관하세요.
- Fader and Knob Care: Avoid excessive force when operating faders and knobs. Periodically check for dust or debris accumulation around moving parts.
- 케이블 관리 : Ensure cables are not kinked or strained, which can lead to damage.
8. 문제 해결
| 문제 | 가능한 원인 | 해결책 |
|---|---|---|
| 전원이 없습니다 | Power adapter not connected; Power switch off; Faulty power outlet. | Check power adapter connection; Ensure power switch is ON; Try a different power outlet. |
| No sound from main output | Master volume too low; Amplifier/speakers off or disconnected; Incorrect input selection; Channel faders down. | Increase master volume; Check amplifier/speaker connections and power; Verify correct input selected for channels; Raise channel faders. |
| 헤드폰에서 소리가 나지 않음 | Headphone volume too low; Headphones not connected; No CUE selected. | Increase PHONES level; Connect headphones properly; Press CUE button for desired channel. |
| 블루투스가 페어링되지 않습니다 | Mixer not in pairing mode; Device too far; Interference. | Ensure BT input is selected; Bring device closer; Restart mixer and device. |
| USB 재생이 작동하지 않습니다 | USB 드라이브가 올바르게 삽입되지 않았습니다. file 포맷 오류; USB 드라이브가 올바르게 포맷되지 않았습니다. | USB 드라이브를 다시 삽입하세요. files are MP3; Format USB drive to FAT32. |
9. 사양
| 모델 | Pronomic DX-50 USB MKII |
| 채널 수 | 4 |
| 연결 기술 | 블루투스, USB |
| 오디오 입력 | RCA (line/phono), 6.3mm microphone, Bluetooth, USB |
| 출력 커넥터 유형 | RCA (Master Out), 6.3mm (Phones) |
| 전원 | 전기 케이블 (AC 12V 어댑터) |
| Dimensions (without corner brackets and controls) | 222 x 129 x 28 mm (폭 x 깊이 x 높이) |
| Total Dimensions (with corner brackets and controls) | 267 x 136 x 51 mm (폭 x 깊이 x 높이) |
| 무게 | 790g |
10. 보증 및 지원
보증 정보 및 기술 지원에 대한 자세한 내용은 구매 시 제공된 설명서를 참조하거나 판매점에 문의하십시오. 보증 청구를 위해 구매 증빙 자료를 보관하십시오.
For further assistance, you may also visit the official Pronomic web사이트 또는 고객 서비스 부서에 문의하십시오.