
1. 서론
This manual provides detailed instructions for the setup, operation, maintenance, and troubleshooting of your Andonstar AD246SM-Plus Digital Microscope. Please read this manual thoroughly before using the device to ensure proper functionality and to prevent damage.
2. 패키지 내용
아래 나열된 모든 품목이 패키지에 포함되어 있는지 확인하세요.
- 현미경 x1
- Metal stand x1
- Extension Base x1
- Tool holder x1
- Soldering Clamp x1
- Soldering mat x1
- Lens A x1 (18X-720X)
- Lens D x1 (1800X-2040X)
- Lens L x1 (60X-240X)
- USB 케이블 x1
- Switch cable x1
- HDMI 케이블 x1
- 리모컨 x1
- Slide holder x1
- Slides kit x5
- Observation box x1
- 핀셋 x1
- 32G Micro SD card x1
- 설명서 x1
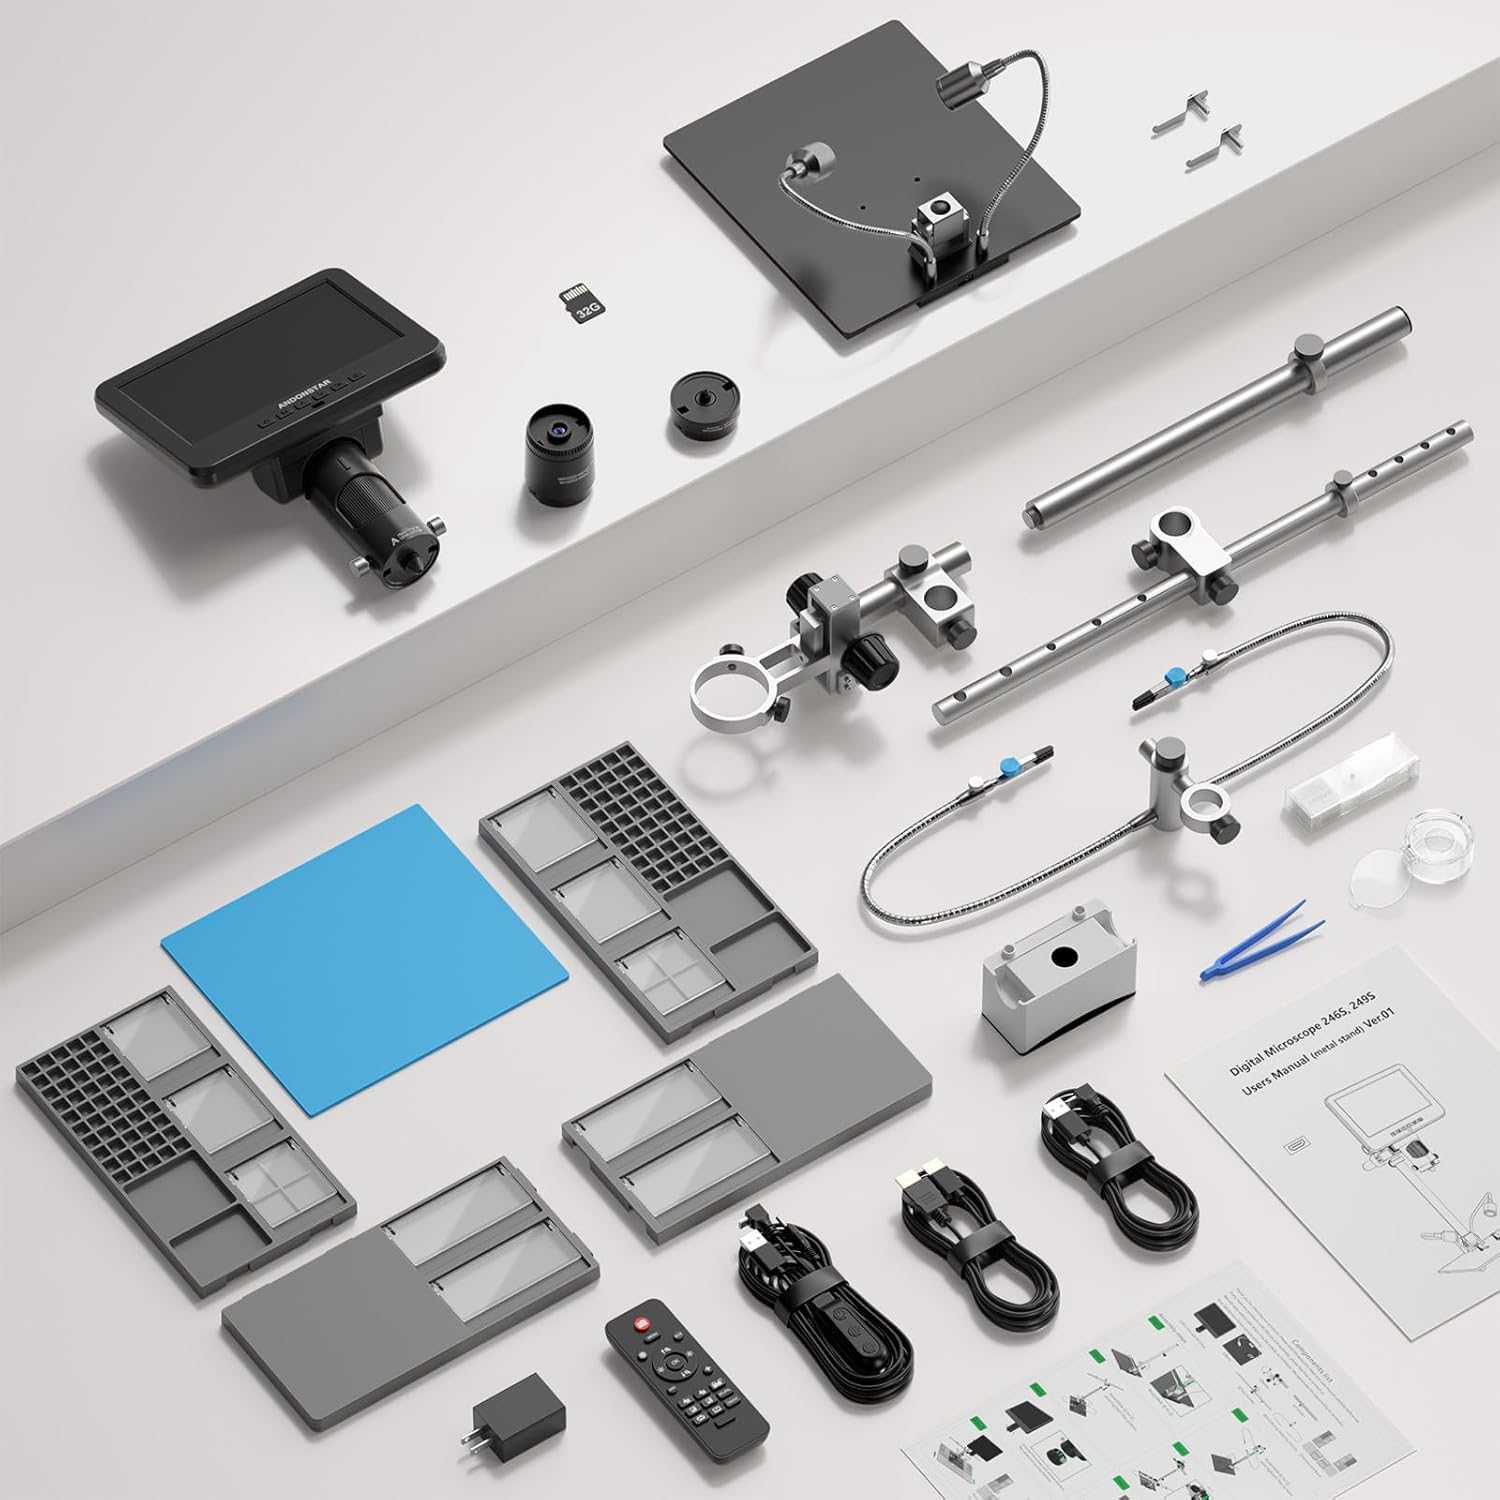
Image: All components included in the Andonstar AD246SM-Plus Digital Microscope package, laid out for inspection.
3. 설정 지침
3.1 Assembling the Stand and Workstation
- Place the main metal stand base on a stable surface.
- Attach the extension base components to the main stand base to create a larger workspace. Ensure they are securely interlocked.
- Mount the flexible helping hands with clamps onto the designated slots on the extension base. Adjust their position as needed.
- Install the tool holder bar onto the main stand's vertical pole.
- Place the soldering mat in the center of the extended base.

Image: The fully assembled workstation of the Andonstar AD246SM-Plus microscope, showing the extended base, helping hands, and tool holder.

Image: A visual guide illustrating the step-by-step assembly process for the microscope stand and its extended base components.
3.2 Attaching the Microscope Unit
- Carefully attach the microscope unit to the adjustable holder on the vertical pole of the stand.
- Tighten the securing screws to ensure the microscope is firmly in place.
- Connect the flexible LED lights to the stand and position them to illuminate the working area.

Image: The microscope unit mounted on its stand, with the flexible LED lights positioned for optimal illumination of the observation area.
3.3 전원 켜기 및 초기 연결
- Connect the power adapter to the microscope and a power outlet.
- 전원 버튼을 눌러 현미경을 켭니다.
- 더 큰 경우 viewing, connect the microscope to an external display (monitor or TV) using the provided HDMI cable or to a PC via USB.

Image: The Andonstar AD246SM-Plus microscope displaying its view on a large external monitor via HDMI connection, illustrating the dual-screen capability.
Video: This video demonstrates the assembly process of the Andonstar AD246SM-Plus digital microscope, including attaching the base, helping hands, and the microscope unit itself. It also shows the microscope in operation with different lenses.
4. 사용 설명서
4.1 렌즈 선택 및 사용
The AD246SM-Plus comes with three interchangeable lenses, each designed for specific observation distances and magnification ranges:
- 렌즈 A (18배-720배): Ideal for observing larger objects such as coins, stamps, circuit boards, and stones. Observation distance: 12mm-320mm.
- Lens L (60X-240X): Suitable for PCB/SMD soldering and general circuit board observation. Observation distance: 90mm-300mm.
- 렌즈 D (1800배-2040배): Designed for microscopic slides and very fine details. Observation distance: 4mm-5mm.
To change a lens, gently twist the current lens counter-clockwise to remove it, then align the new lens and twist clockwise until secure.

Image: Microscope with Lens A, demonstrating its use for magnifying a coin, suitable for larger objects.

Image: Microscope with Lens L, showing a magnified view of a circuit board, ideal for soldering tasks.

Image: Microscope with Lens D, displaying a highly magnified view of a microscopic slide, for very fine details.
4.2 Focusing and Magnification Adjustment
Use the focus knob on the microscope body to achieve a clear image. Adjust the distance between the lens and the object by moving the microscope unit up or down on the stand for optimal magnification and clarity.
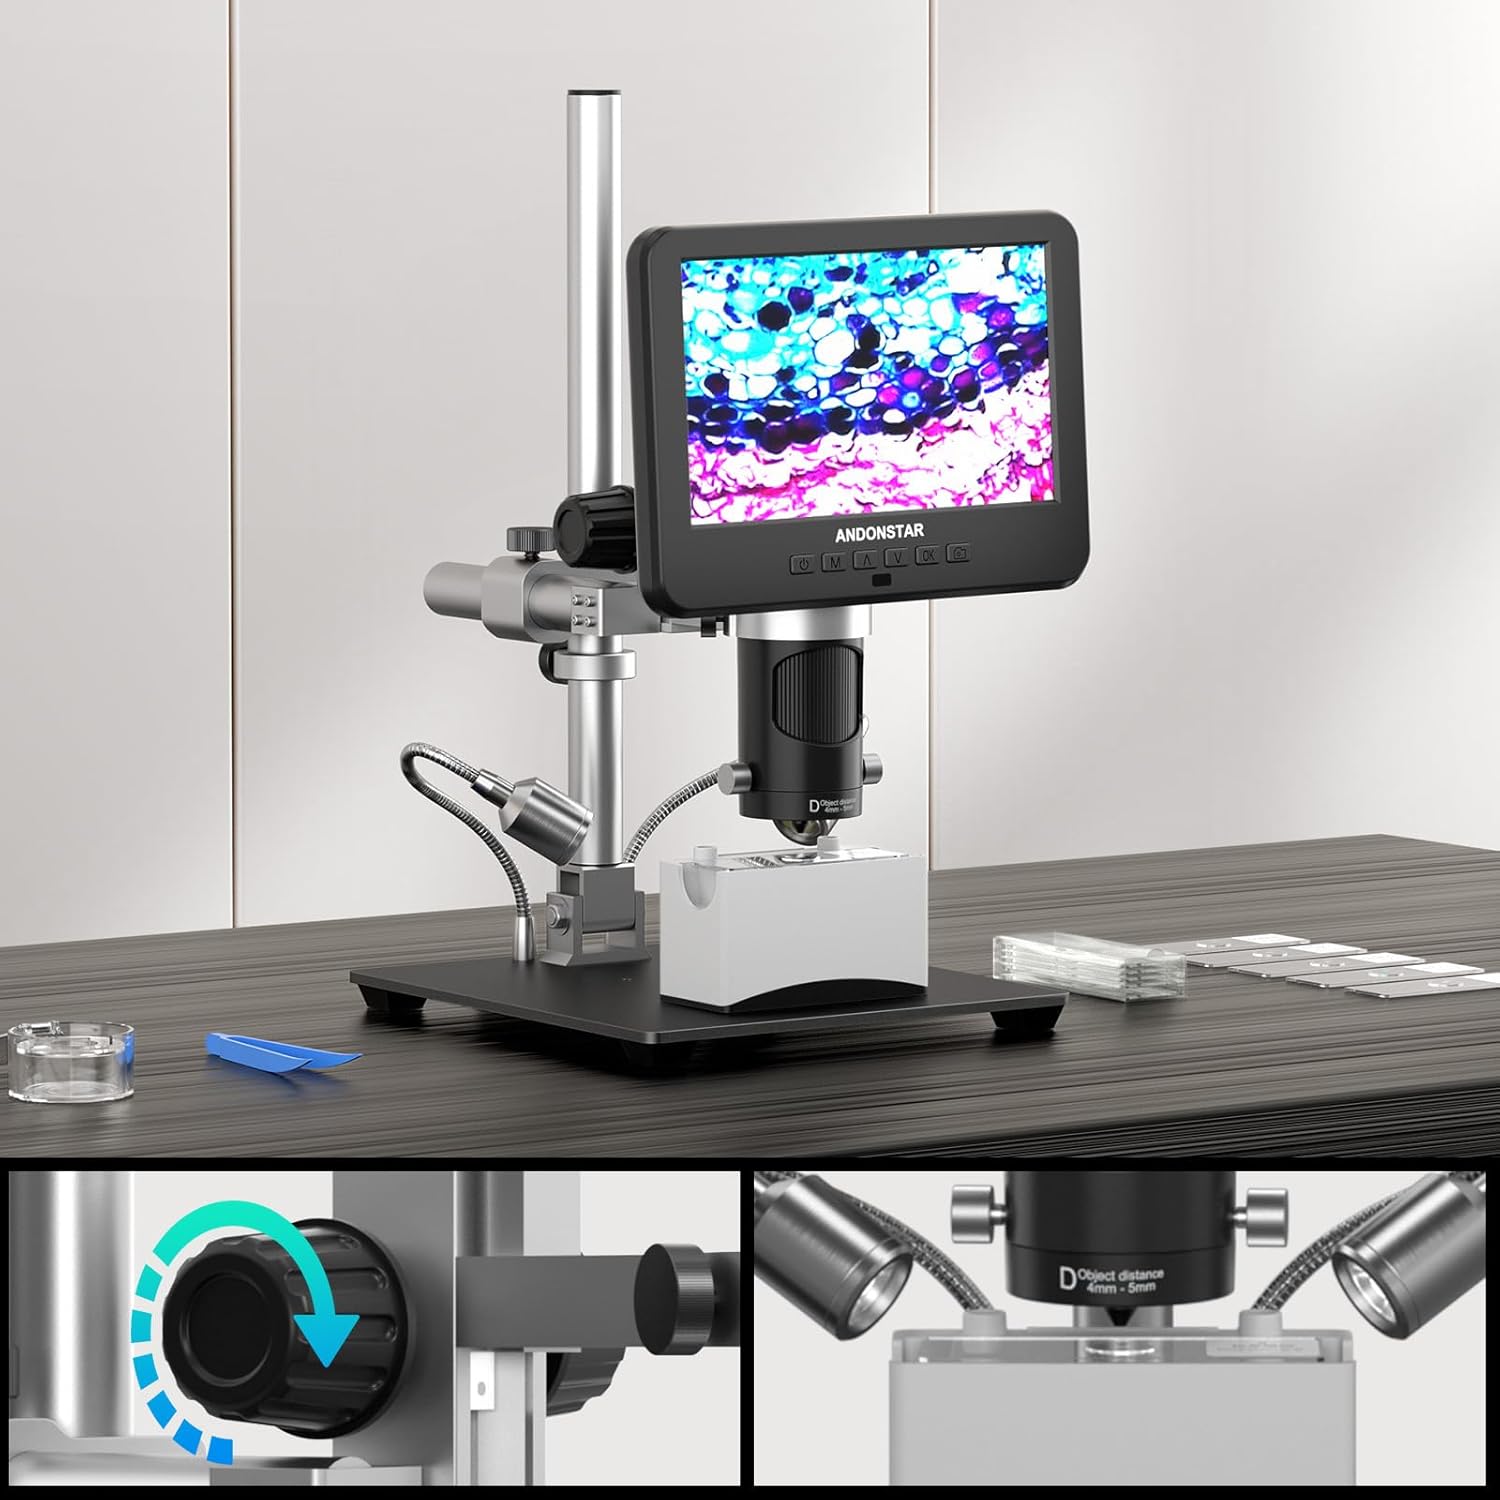
이미지: 클로즈업 view of the microscope's focus knob and the mechanism for adjusting the object distance, crucial for clear magnification.
4.3 LED Lighting and Remote Control
The built-in 8 LED lights provide adjustable brightness and lighting angles. Use the remote control to capture images and record videos without disturbing the microscope, ensuring stable and clear results.
5. 유지관리
- 렌즈 세척: Use a soft, lint-free cloth and lens cleaning solution to clean the lenses. Avoid abrasive materials.
- 일반 청소: 현미경 본체를 닦고 마른 천이나 약간 젖은 천으로 받쳐 놓으십시오.amp 천. 독한 화학 물질을 사용하지 마십시오.
- 저장: 현미경을 사용하지 않을 때는 건조하고 먼지가 없는 곳에 보관하십시오.
- Soldering Mat: The silicone soldering mat is resistant to heat, dirt, and oil. Clean it regularly to maintain its protective properties.
6. 문제 해결
| 문제 | 가능한 원인 | 해결책 |
|---|---|---|
| 화면에 이미지가 없습니다. | Power not connected; Microscope not turned on; HDMI/USB cable loose or faulty. | Check power connection; Press power button; Reconnect or replace cables. |
| 흐릿한 이미지 | Incorrect focus; Wrong lens for object distance; Object too far/close. | Adjust focus knob; Select appropriate lens (A, L, or D); Adjust microscope height. |
| 화면 깜빡임 또는 불안정한 이미지 | Loose cable connection; Power supply issue; Interference. | Ensure all cables are securely connected; Try a different power outlet; Minimize electronic interference. |
| 리모컨이 작동하지 않습니다 | Batteries depleted; Obstruction between remote and microscope. | Replace remote control batteries; Ensure clear line of sight to the microscope's IR receiver. |
7. 사양
- 모델: AD246SM-Plus (SXWL-246S-M-Plus)
- 비디오 해상도: Ultra HD 2880x2160 24fps; Full HD 1920x1080 60fps/30fps; HD 1280x720 120fps
- 확대: Up to 2000X (with Lens D)
- Lenses Included:
- Lens A: 18X-720X (Object distance: 12mm-320mm)
- Lens L: 60X-240X (Object distance: 90mm-300mm)
- Lens D: 1800X-2040X (Object distance: 4mm-5mm)
- 표시하다: Integrated screen, supports HDMI output for larger field of view, USB output for PC connection.
- 조명: 8 조정 가능한 LED 조명
- 서다: Upgraded Plus Stand with Extension Base (30cm x 40cm x 33cm)
- 추가 기능: Soldering helping hands, tool holder, 100 grids compartment screw box, silicone soldering mat, IR remote control, 32G Micro SD card.
- 품목 무게: 7.39파운드
- 패키지 크기: 17.5 x 10.8 x 6 인치
- 제조업체: 안돈스타
- 색상: 검은색
- 재료: 금속
8. 보증 및 지원
For warranty information and technical support, please refer to the official Andonstar web사이트를 방문하거나 고객 서비스에 직접 문의하세요. 보증 청구를 위해 구매 영수증을 보관하세요.
방문할 수 있습니다 아마존에서 Andonstar 스토어를 만나보세요 자세한 제품 정보와 지원 리소스를 확인하세요.