
1. 서론
The Vivolink USB-C 4K KVM Extender (Model W126974534) is designed to extend USB-C signals, including 4K video, USB data (for keyboard, mouse, and other peripherals), and control signals, over long distances using HDBaseT 3.0 technology. This system consists of a Transmitter (TX) unit and a Receiver (RX) unit, connected by a single Cat6a/7 Ethernet cable. It enables users to operate a computer or other USB-C source device from a remote location with a display, keyboard, and mouse, maintaining high-quality 4K resolution.
2. 안전 정보
- 기기를 작동하기 전에 모든 지침을 주의 깊게 읽으세요.
- 본 제품을 비, 습기 또는 과도한 습도에 노출시키지 마십시오.
- 과열을 방지하기 위해 적절한 환기를 유지하세요. 환기구를 막지 마세요.
- 제품에 포함된 전원 어댑터만 사용하십시오.
- 제품을 열거나 개조하지 마십시오. 모든 서비스는 자격을 갖춘 전문가에게 맡기십시오.
- 장치를 강한 전자기장에서 멀리 두십시오.
- 천둥번개가 칠 때나 장기간 사용하지 않을 때는 전원을 차단하십시오.
3. 패키지 내용
포장 내용물을 꼼꼼히 확인해 주십시오. 누락되거나 손상된 품목이 있을 경우 즉시 판매점에 연락하십시오.
- 1x Vivolink USB-C 4K KVM Extender Transmitter (TX) Unit
- 1x Vivolink USB-C 4K KVM Extender Receiver (RX) Unit
- 2x Power Adapters (DC 12V)
- 1x USB-C to USB-C 케이블
- 1x 사용자 설명서
- Mounting accessories (if included)
4. 제품 오버view
The Vivolink USB-C 4K KVM Extender leverages HDBaseT 3.0 technology to provide uncompressed 4K video, audio, USB 2.0, and control signals over a single Cat6a/7 cable up to 100 meters. This solution is ideal for applications requiring remote access to a USB-C enabled computer, such as control rooms, medical imaging, digital signage, and educational facilities.
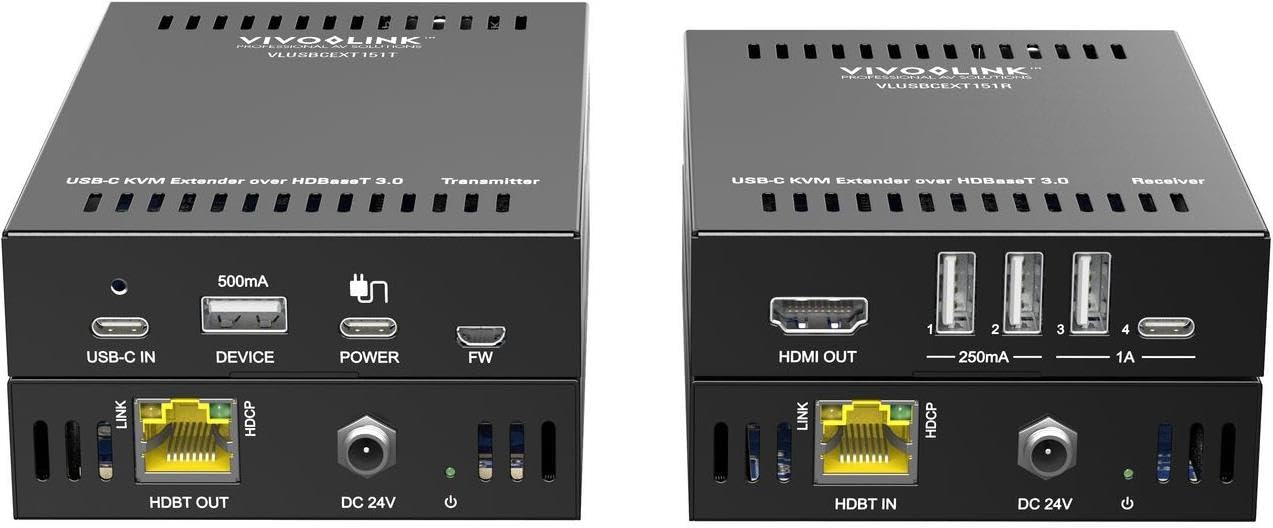
이미지 1: Vivolink USB-C 4K KVM Extender units. This image displays the compact design of both the transmitter and receiver units, highlighting their various ports for connectivity.
The Transmitter unit connects to your USB-C source device (e.g., laptop, PC), while the Receiver unit connects to your display, keyboard, mouse, and other USB peripherals at the remote location. The HDBaseT 3.0 link ensures reliable and high-bandwidth transmission.
5. 설정 지침
Follow these steps to set up your Vivolink USB-C 4K KVM Extender:
- 전원 끄기 장치: Ensure all devices, including your source computer, display, and the KVM extender units, are powered off before making any connections.
- Connect Source to Transmitter: Connect your USB-C source device (e.g., PC, laptop) to the USB-C input port on the Transmitter (TX) unit using the provided USB-C cable.
- Connect Display to Receiver: Connect your display (monitor) to the HDMI output port on the Receiver (RX) unit using an HDMI cable.
- Connect Peripherals to Receiver: Connect your USB keyboard, mouse, and any other USB peripherals to the USB ports on the Receiver (RX) unit.
- Connect TX and RX Units: Connect the HDBaseT OUT port on the Transmitter (TX) unit to the HDBaseT IN port on the Receiver (RX) unit using a single, high-quality Cat6a or Cat7 Ethernet cable. Ensure the cable length does not exceed 100 meters for optimal performance.
- 전원 적용: Connect the provided 12V DC power adapters to both the Transmitter (TX) and Receiver (RX) units, then plug them into power outlets.
- 전원 켜기 장치: Power on your display, then your source computer. The extender units will typically power on automatically when connected to power.
- 연결 확인: Check for signal on your remote display and test the functionality of your keyboard and mouse.
6. 사용 설명서
Once the Vivolink USB-C 4K KVM Extender is set up correctly, operation is straightforward:
- 자동 신호 감지: The extender units are designed to automatically detect and transmit the video, audio, and USB signals from your source device to the remote display and peripherals.
- 해결: The system supports resolutions up to 4K (3840x2160) at 60Hz, depending on the capabilities of your source and display devices.
- USB 기능: All connected USB devices (keyboard, mouse, USB drives, etc.) should function as if directly connected to the source computer.
- 전원 순환: If you encounter any issues, try power cycling both the Transmitter and Receiver units, as well as your source computer and display.
7. 유지관리
To ensure the longevity and optimal performance of your Vivolink USB-C 4K KVM Extender, follow these maintenance guidelines:
- 청소: 제품 외부를 닦을 때는 부드럽고 마른 천을 사용하십시오. 액체 또는 에어로졸 세척제는 사용하지 마십시오.
- 통풍: 과열을 방지하기 위해 두 장치의 통풍구가 막히지 않도록 하십시오.
- 케이블 관리 : Keep cables neatly organized and avoid sharp bends or excessive tension on connectors.
- 환경: Store and operate the device in a cool, dry environment, away from direct sunlight, heat sources, and extreme temperatures.
8. 문제 해결
If you experience issues with your KVM extender, refer to the following troubleshooting steps:
| 문제 | 가능한 해결책 |
|---|---|
| No video on remote display |
|
| 키보드/마우스가 응답하지 않습니다 |
|
| Intermittent signal or flickering video |
|
9. 사양
- 상표: 비볼링크
- 모델: W126974534 (VLUSBCEXT150)
- 기술: HDBaseT 3.0
- 비디오 해상도: 최대 4K(3840x2160) @ 60Hz
- 입력: USB-C (on TX unit)
- 산출: HDMI (on RX unit)
- USB: USB 2.0 (on RX unit for peripherals)
- 연장 거리: Up to 100 meters (328 feet) over Cat6a/7 cable
- 전원 공급 장치: DC 12V (via included power adapters)
- 제조업체: 비볼링크
- ASIN: B0CPWLBPGF
10. 보증 및 지원
Vivolink products are designed for reliability and performance. For information regarding warranty coverage, technical support, or service, please refer to the warranty card included with your product or visit the official Vivolink website. Please have your product model number (W126974534) and purchase details ready when contacting support.
온라인 리소스: For the latest drivers, firmware updates, and additional support documentation, please visit the Vivolink support page.