1. 서론
Thank you for choosing the Conentool 21V Cordless Impact Drill/Driver Kit. This tool is designed for various drilling and screwdriving tasks in wood, metal, plastics, and masonry. Please read this manual carefully before operating the tool to ensure safe and efficient use. Keep this manual for future reference.

Image 1.1: The Conentool 21V Cordless Impact Drill/Driver Kit, including the drill, two 2500mAh batteries, charger, and a variety of drill bits and accessories in a carrying case.
2. 일반 안전 지침
경고: 이 전동 공구와 함께 제공된 모든 안전 경고, 지침, 그림 및 사양을 읽으십시오. 아래 나열된 모든 지침을 따르지 않으면 감전, 화재 및/또는 심각한 부상을 입을 수 있습니다.
2.1 작업장 안전
- 작업 구역을 깨끗하고 밝게 유지하세요. 어수선하거나 어두운 구역은 사고를 초래합니다.
- 가연성 액체, 가스 또는 먼지가 있는 폭발성 분위기에서 전동 공구를 작동하지 마십시오. 전동 공구는 먼지나 연기를 점화할 수 있는 불꽃을 생성합니다.
- 전동 공구를 작동하는 동안 어린이와 주변 사람을 멀리하십시오. 주의가 산만해지면 제어력을 잃을 수 있습니다.
2.2 전기 안전
- 전동 공구 플러그는 콘센트와 일치해야 합니다. 플러그를 어떤 식으로든 변경하지 마십시오.
- 파이프, 라디에이터, 레인지, 냉장고와 같은 접지된 표면과의 신체 접촉을 피하십시오. 신체가 접지되거나 접지된 경우 감전 위험이 증가합니다.
- 전동 공구를 비나 습한 환경에 노출시키지 마십시오. 전동 공구에 물이 들어가면 감전 위험이 커집니다.
2.3 개인 안전
- 항상 눈 보호 장비를 착용하세요. 보안경, 고글 또는 안면 보호대를 사용하세요.
- 장시간 도구를 작동할 때는 청력 보호 장비를 착용하세요.
- 적절한 복장을 하십시오. 느슨한 옷이나 장신구를 착용하지 마십시오. 머리카락과 옷을 움직이는 부분에서 멀리 두십시오.
- 전동 공구를 작동할 때는 항상 주의를 기울이고, 작업 시 주의하고, 상식에 따라 행동하세요.
3. 패키지 내용
아래 나열된 모든 품목이 패키지에 포함되어 있는지 확인하세요. 품목이 누락되었거나 손상된 경우 고객 지원팀에 문의하세요.
- 1 x Conentool 21V Cordless Impact Drill/Driver
- 2500mAh 리튬 이온 배터리 2개
- 1 x 배터리 충전기
- 1 x 플렉시블 샤프트 연장대
- Various Drill Bits (for wood, metal, masonry)
- Various Screwdriver Bits
- 소켓 어댑터
- 운반 케이스
- 사용자 설명서

Image 3.1: A complete overview of the kit contents, including the drill, two batteries, charger, flexible shaft, various drill bits, screwdriver bits, and socket adapters, all neatly arranged.
4. 제품 오버view
Familiarize yourself with the main components of your drill/driver:
- 척: 드릴 비트와 드라이버 비트를 보관합니다.
- 토크 조정 링: Selects the desired torque setting.
- 모드 선택 링: 스크류 드라이빙, 드릴링, 임팩트 드릴링 모드 간 전환이 가능합니다.
- 속도 선택 스위치: Changes between high and low-speed gears.
- 트리거 스위치: 도구를 활성화하고 속도를 제어합니다(가변 속도).
- 정방향/역방향 선택기: 회전 방향을 변경합니다.
- LED 작업등: 작업 영역을 밝게 합니다.
- 배터리 팩: 도구에 전원을 공급합니다.
- 배터리 분리 버튼: 배터리 제거용.
- 핸들: 편안한 사용을 위한 인체공학적 그립.

이미지 4.1: 내부 view highlighting the brushless motor, which provides increased power, efficiency, and a quieter operation with no sparks.
5. 설정
5.1 배터리 충전
The battery pack is not fully charged at the time of purchase. It is recommended to fully charge the battery before first use.
- 충전기를 표준 전원 콘센트에 연결하세요.
- Slide the battery pack onto the charger base. Ensure it clicks into place.
- The charger indicator light will show the charging status. A red light typically indicates charging, and a green light indicates a full charge.
- 완전히 충전되면 충전기를 전원 콘센트에서 분리하고 배터리를 제거하세요.

Image 5.1: The battery charger connected to a wall outlet, with a battery pack inserted for charging. The red light indicates charging, and the green light indicates a completed charge.
5.2 배터리 설치 및 제거
- 설치하려면: 배터리 팩을 공구 손잡이 밑부분에 맞춰 끼운 후 딸깍 소리가 나면서 제자리에 단단히 고정될 때까지 밀어 넣으십시오.
- 제거하려면: Press the battery release button (usually located at the front of the battery) and slide the battery pack out of the tool.

이미지 5.2: 단면도 view of the 2500mAh battery pack, illustrating its internal lithium-ion cells and power management system, designed for up to 90 minutes of use per battery.
5.3 Installing and Removing Drill/Screwdriver Bits
- 설치하려면: Rotate the chuck counter-clockwise to open the jaws. Insert the desired bit into the chuck as far as it will go. Rotate the chuck clockwise to tighten the jaws firmly around the bit.
- 제거하려면: 척을 시계 반대 방향으로 돌려 턱을 풀고 비트를 빼냅니다.
Ensure the bit is securely fastened to prevent it from slipping during operation.
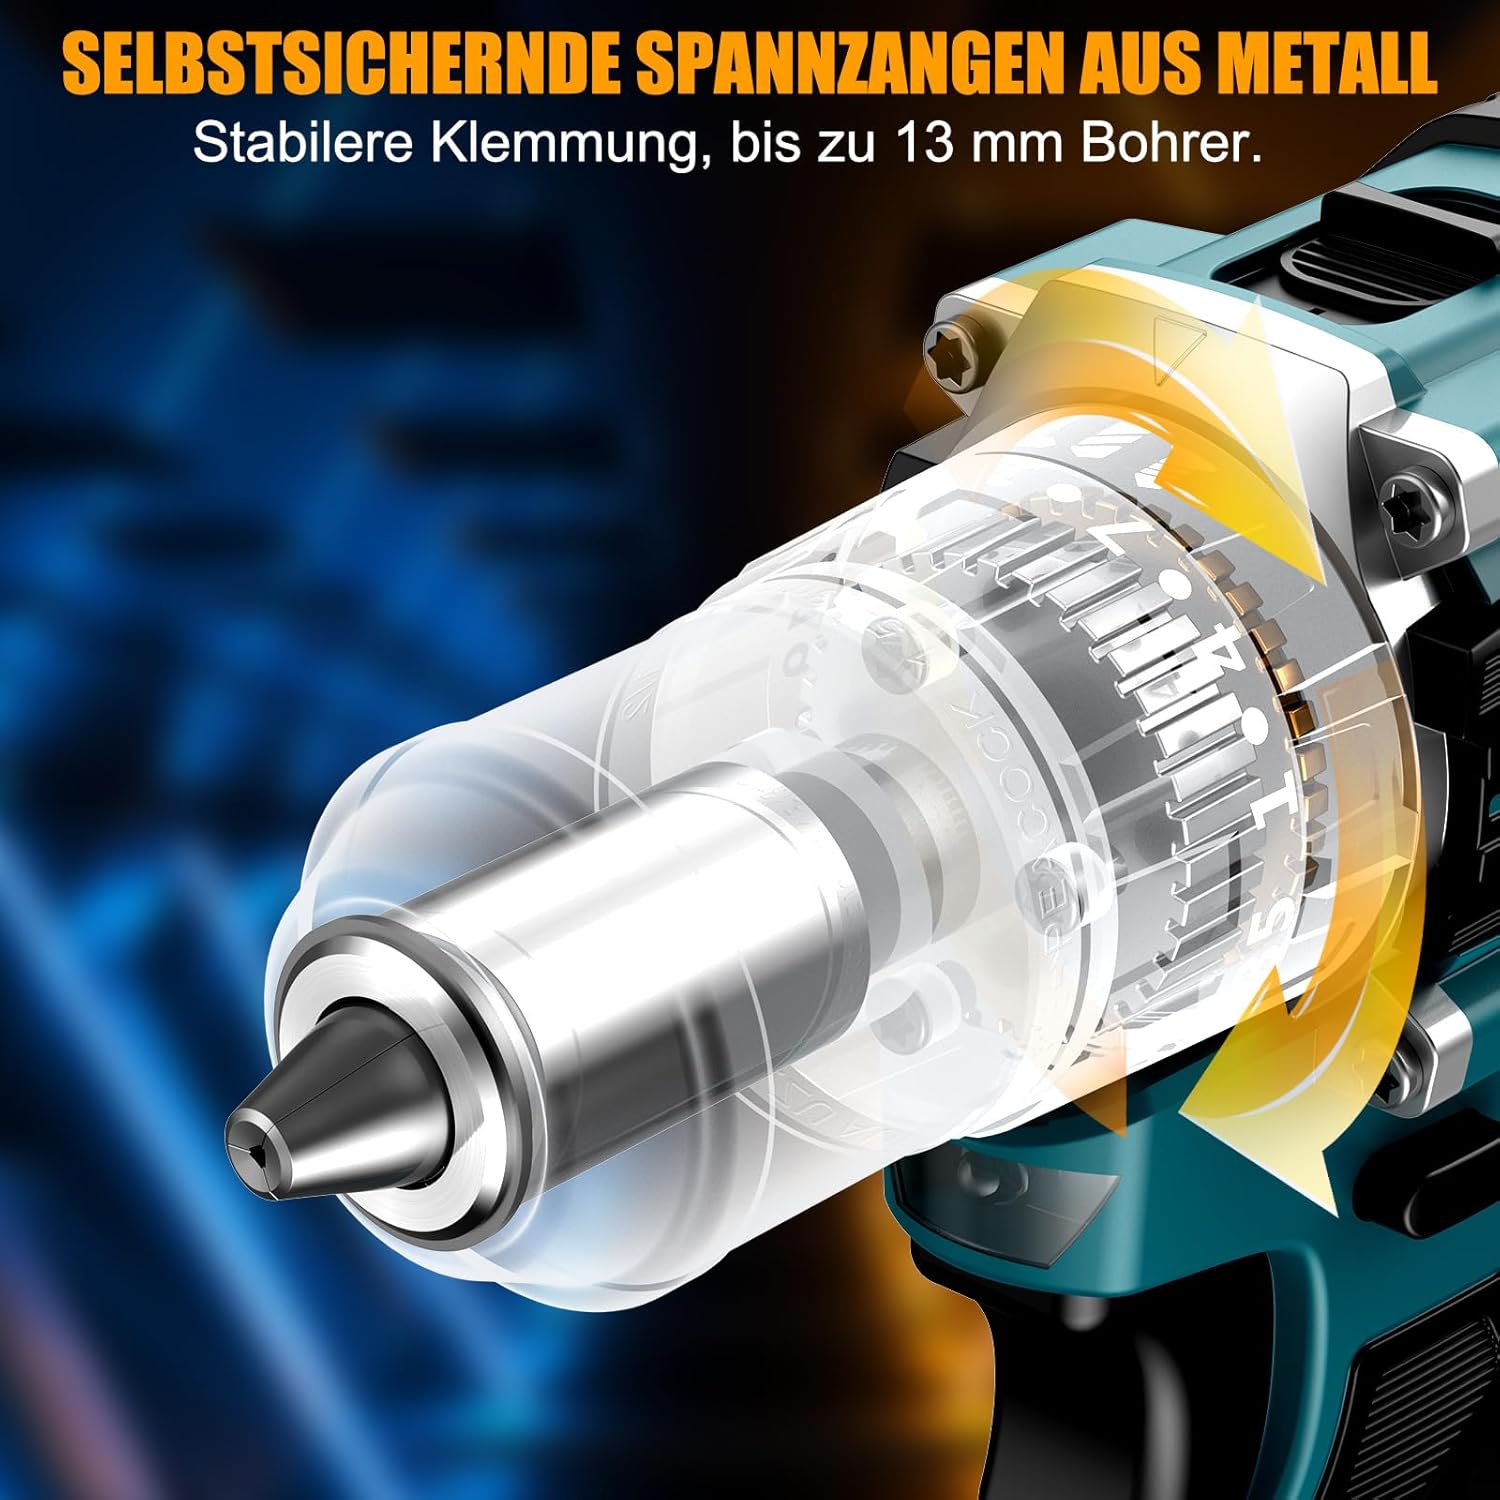
이미지 5.3: 자세한 view of the self-locking metal chuck, demonstrating its stable clamping mechanism capable of holding drill bits up to 13mm securely.
6. 사용 설명서
6.1 전원 켜기/끄기 및 속도 제어
- To turn the tool ON, press the trigger switch. The speed is variable; press the trigger further for higher speed.
- 공구를 끄려면 트리거 스위치를 놓으세요.
- 내장된 LED 작업등은 방아쇠를 당기면 켜져 어두운 곳에서도 시야를 확보해 줍니다.
6.2 정방향/역방향 회전
The forward/reverse selector switch is located above the trigger. Push it to the left for forward rotation (for screwdriving and drilling) and to the right for reverse rotation (for removing screws or freeing jammed bits). Ensure the tool is stopped before changing direction.
6.3 Speed Gear Selection
The drill features a 2-speed gear selector switch on top of the tool:
- Gear 1 (Low Speed, 0-650 RPM): 큰 나사를 조이거나 큰 구멍을 뚫는 등 높은 토크가 필요한 작업에 이상적입니다.
- Gear 2 (High Speed, 0-1850 RPM): Suitable for fast drilling in softer materials and smaller diameter holes.
Always select the appropriate gear for the task. Change gears only when the tool is completely stopped.
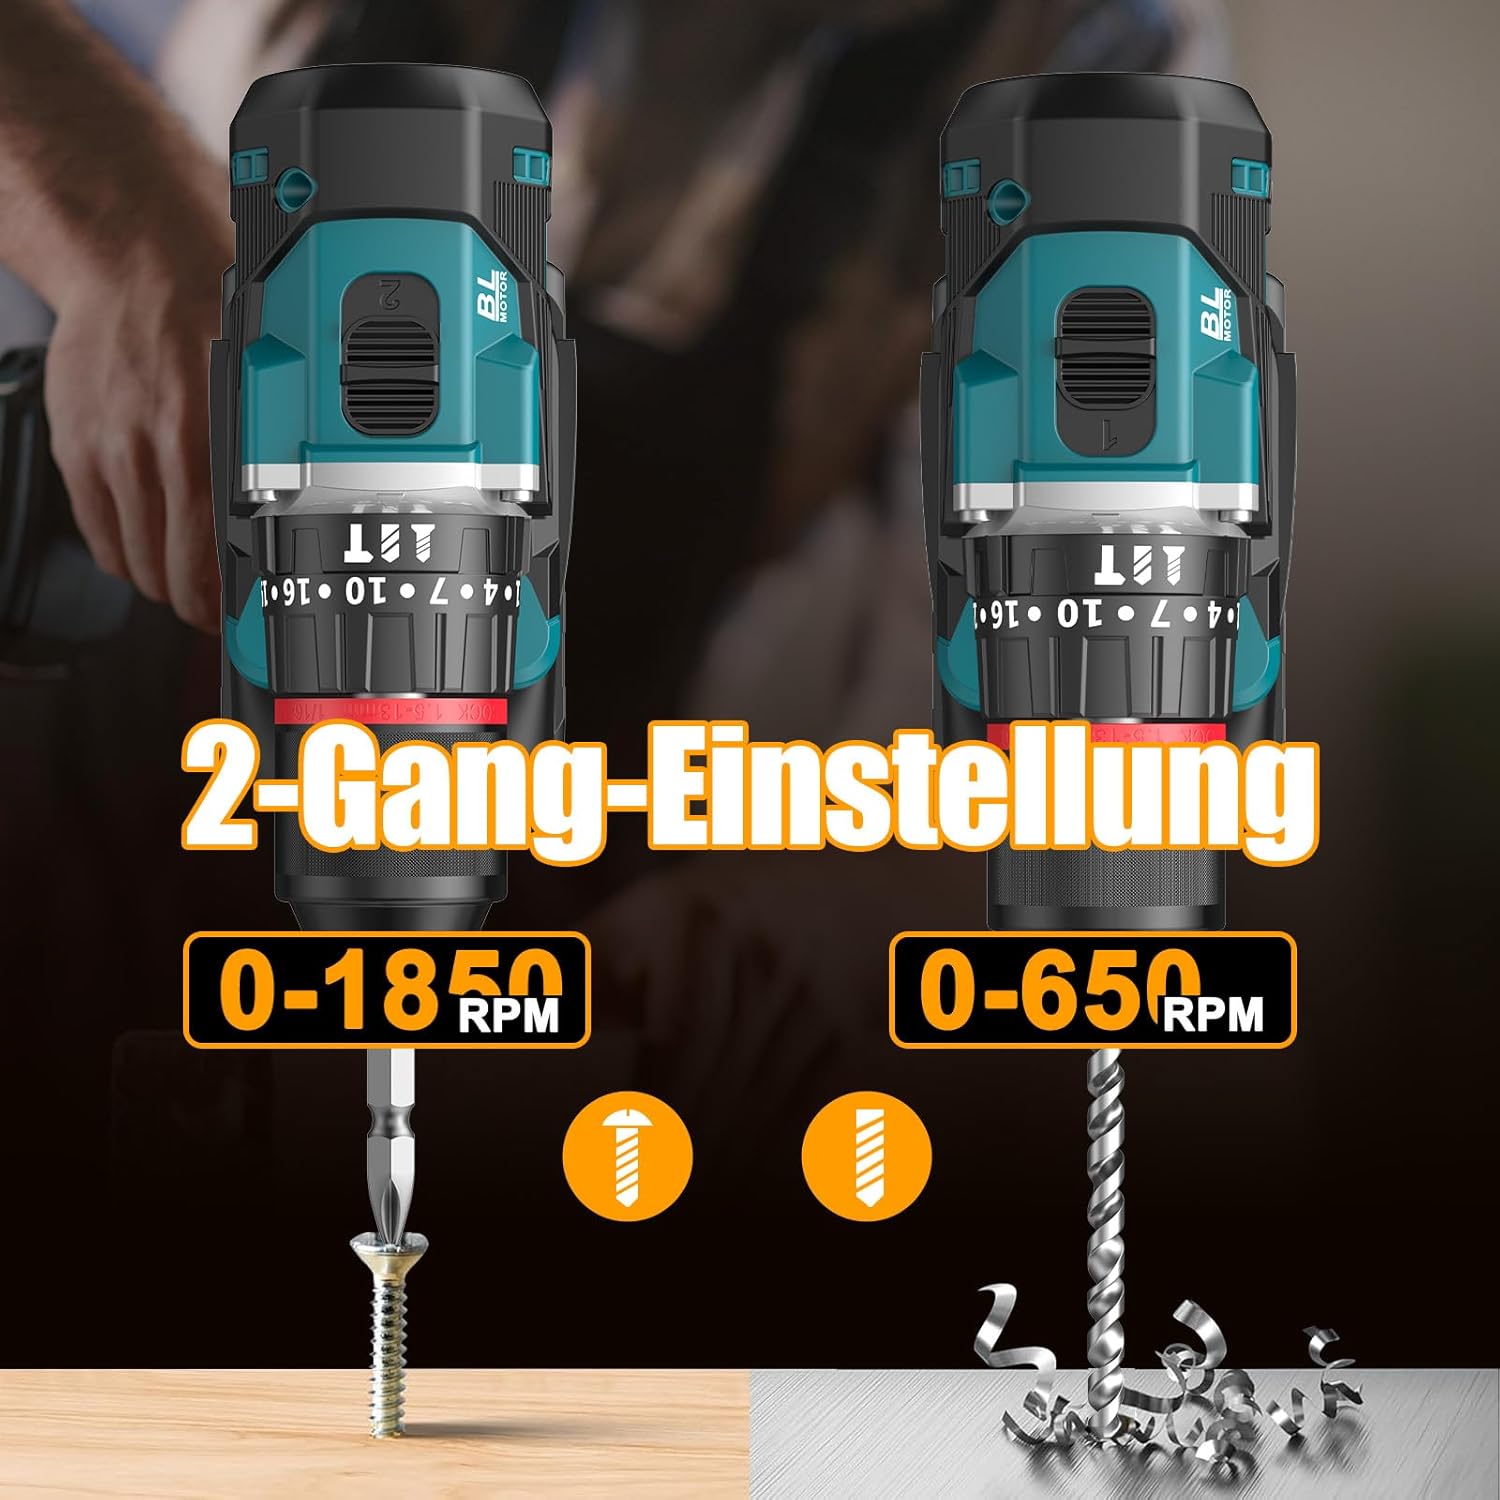
Image 6.1: An illustration demonstrating the two-speed gear settings: Gear 1 (0-650 RPM) for screwdriving and Gear 2 (0-1850 RPM) for drilling, allowing for optimal performance based on the application.
6.4 Torque Adjustment and Mode Selection
The torque adjustment ring allows you to set the desired torque for screwdriving applications, preventing overtightening or stripping screws. The mode selector ring allows you to switch between different operating modes.
- Screwdriving Mode (Torque Settings 1-35): Use these settings to match the torque to the screw size and material. Lower numbers for smaller screws/softer materials, higher numbers for larger screws/harder materials.
- 드릴링 모드(드릴 비트 아이콘): For general drilling without impact. The clutch is disengaged, providing maximum torque.
- Impact Drilling Mode (망치 아이콘): For drilling into masonry or concrete, providing a hammering action in addition to rotation.
The drill offers 35+3 settings, including 35 torque settings for screwdriving and 3 modes (screwdriving, drilling, impact drilling).

Image 6.2: A visual representation of the 35+3 torque and mode settings, indicating precise power control and a maximum torque of 55 N.m, suitable for various materials like wood, brick, plastic, and metal.
7. 유지관리
7.1 청소
- 청소나 유지관리를 하기 전에는 항상 배터리 팩을 분리하세요.
- 과열을 방지하려면 도구의 통풍구를 깨끗하게 유지하세요.
- 부드러운 d를 사용하세요amp 도구를 닦는 천 casing. 독한 화학 물질이나 연마성 세척제를 사용하지 마십시오.
7.2 보관
- 공구와 배터리는 직사광선과 습기를 피해 서늘하고 건조한 곳에 보관하십시오.
- Store the tool in its carrying case to protect it from dust and damage.
- 어린이의 손이 닿지 않는 곳에 보관하세요.

Image 7.1: A person carrying the Conentool drill kit in its durable black carrying case, designed for convenient storage and transport of the tool and its accessories.
7.3 배터리 관리
- 방전된 상태로 배터리를 보관하지 마십시오. 특히 장기간 사용하지 않을 경우 정기적으로 충전하십시오.
- 배터리를 극한 온도에 노출시키지 마세요.
- 배터리 팩을 분해하거나 개조하지 마십시오.
8. 문제 해결
| 문제 | 가능한 원인 | 해결책 |
|---|---|---|
| 도구가 시작되지 않음 | 배터리가 충전되지 않았거나 제대로 설치되지 않았습니다. | 배터리가 완전히 충전되었고 올바르게 삽입되었는지 확인하세요. |
| 전력 또는 속도 감소 | 배터리 충전량이 부족합니다. | 배터리를 충전하세요. |
| 척에서 비트가 미끄러짐 | 척이 충분히 조여지지 않았습니다. | Tighten the chuck firmly around the bit. Ensure the bit shank is clean. |
| 과열 | 환기구가 막혔습니다. 지속적으로 많이 사용했습니다. | 환기구를 청소하세요. 장시간 사용 시에는 공구를 식히세요. |
9. 사양
| 특징 | 사양 |
|---|---|
| 모델 번호 | ebvc-sd-de |
| 권tage | 21 볼트 |
| 배터리 유형 | 리튬이온 |
| 배터리 용량 | 2500mAh(각) |
| 최대 토크 | 55나노미터 |
| 토크 설정 | 35 + 3 Modes (Screwdriving, Drilling, Impact Drilling) |
| 무부하 속도(1단 기어) | 0-650 RPM |
| 무부하 속도(2단 기어) | 0-1850 RPM |
| 척 사이즈 | 13 mm (3/8 inch) Keyless |
| 제품 치수 | 35 x 31 x 10cm |
| 무게(배터리 포함) | 1.5 킬로그램 |
10. 보증 및 지원
Conentool products are manufactured to high-quality standards. In the unlikely event of a defect due to material or manufacturing fault, please contact your retailer or Conentool customer service. Please retain your proof of purchase for warranty claims.
For further assistance, technical support, or to inquire about spare parts, please refer to the contact information provided with your purchase or visit the official Conentool web대지.