
1. 중요한 안전 정보
Please read all instructions carefully before using the EVTSCAN Projection Clock. Keep this manual for future reference.
- 기기를 극한의 온도, 직사광선 또는 높은 습도에 노출시키지 마세요.
- 시계를 떨어뜨리거나 강한 충격을 가하지 마십시오.
- 직접 기기를 분해하거나 수리하지 마십시오. 자격을 갖춘 서비스 담당자에게 문의하세요.
- Use only the specified power adapter (DC 5.0V, 1.2A) or appropriate batteries (2xAAA, not included).
- 어린이의 손이 닿지 않는 곳에 보관하세요.
2. 제품 오버view
The EVTSCAN Projection Clock is a versatile digital alarm clock featuring a 3-inch backlit LCD screen that displays time, date, day of the week, temperature, and humidity. It includes a projection function to display time and temperature on a wall or ceiling, dual alarms with snooze, and a USB port for charging mobile phones.
주요 특징:
- 12/24-hour time format display.
- Date and day of the week display (7 languages for week).
- Temperature detection (-9℃ to +50℃) and humidity detection (20% to 95%).
- Projection function with 180-degree rotation for time and temperature.
- Dual alarm clocks with slowly increasing 볼륨.
- 5분간 다시 알림 기능 제공.
- 모바일 기기용 USB 충전 포트.
- Adjustable backlight with 4 levels (high, medium, low, off).

그림 2.1: 앞쪽 view of the EVTSCAN Projection Clock, showing the LCD display and projection lens.
3. 패키지 내용
포장을 풀 때 아래 나열된 모든 품목이 모두 들어 있고 상태가 양호한지 확인하세요.
- 1 x EVTSCAN Projection Clock
- 1 x USB 케이블
- 1 x 영어 사용자 설명서
Note: 2xAAA batteries are required for battery power and are not included in the package.
4. 설정
4.1 장치 전원 공급
The EVTSCAN Projection Clock can be powered by either AAA batteries or via the included USB cable.
4.1.1 배터리 설치
- 시계 뒷면에서 배터리 덮개를 찾으세요.
- Slide open the cover.
- 올바른 극성(+/-)을 확인하여 AAA 배터리 2개(2)를 삽입합니다.
- 배터리 덮개를 단단히 닫으세요.
Note: When powered by batteries, the backlight will only light up for 8 seconds when activated to conserve power. The projection lamp will also light up for 8 seconds.
4.1.2 USB Power Connection
- Connect the small end of the provided USB cable to the DC 5.0V 1.2A input port on the back of the clock.
- Connect the larger end of the USB cable to a compatible USB power adapter (not included) or a powered USB port.
Note: When powered by USB, the backlight and projection lamp can remain continuously on, with adjustable brightness for the backlight.
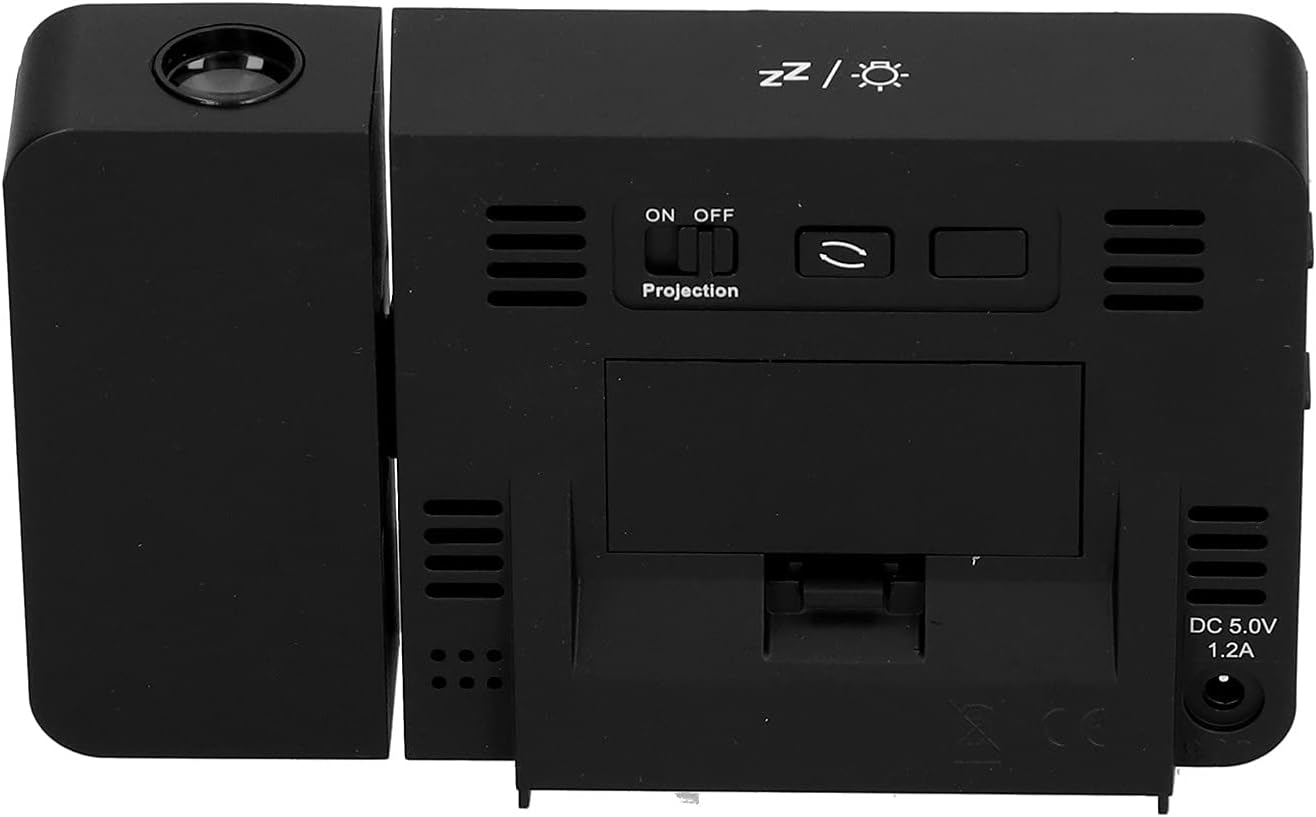
그림 4.1: 뒤쪽 view of the clock, indicating the battery compartment and DC 5.0V 1.2A power input.
5. 사용 설명서
5.1 버튼 기능
Familiarize yourself with the control buttons located on the front and sides of the clock:
- 시간: 시간 설정 모드로 들어갑니다.
- 경보: 알람 설정 모드로 들어갑니다.
- +: Increases values, switches 12/24HR format, adjusts backlight.
- -: Decreases values, switches temperature units (℃/℉).
- Projection ON/OFF Switch: Activates or deactivates the projection. (Located on the back/side)
- Alarm 1 ON/OFF Switch: Activates or deactivates Alarm 1. (Located on the side)
- Alarm 2 ON/OFF Switch: Activates or deactivates Alarm 2. (Located on the side)
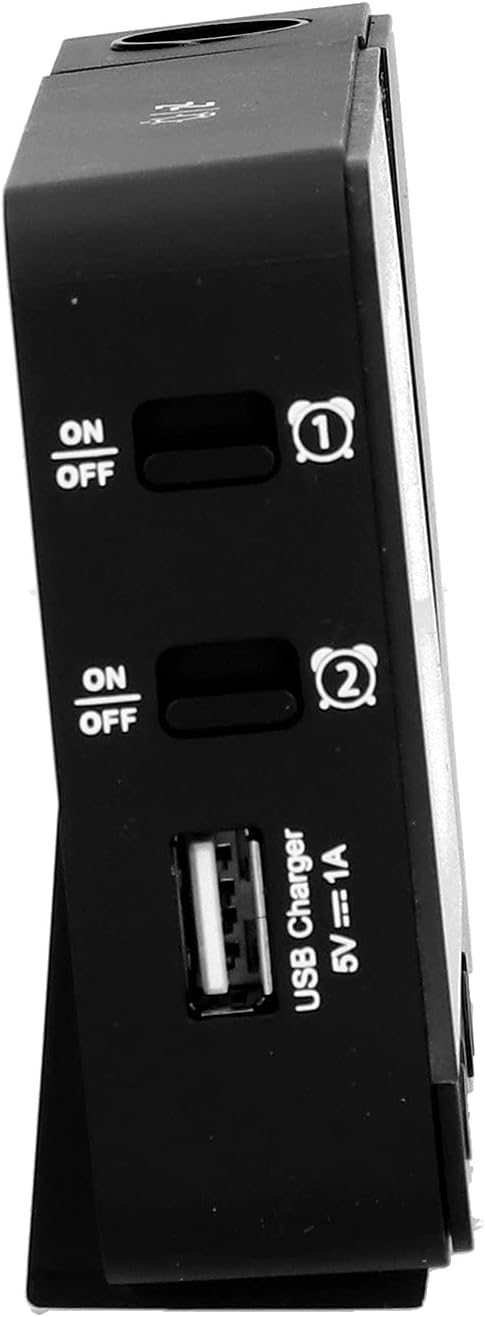
그림 5.1: 옆 view showing Alarm 1 and Alarm 2 ON/OFF switches, and the USB charging port.
5.2 시간 및 날짜 설정
- 를 누르고 계세요 시간 버튼을 눌러 시간 설정 모드로 들어갑니다. 시 표시가 깜빡입니다.
- 사용하세요 + or - 버튼으로 시간을 조정합니다.
- 누르다 시간 again to confirm the hour and move to minute setting. Adjust with + or -.
- 계속 누르기 시간 to cycle through setting year, month, and day. Adjust each with + or -.
- 날짜를 설정한 후 누르세요. 시간 설정 모드를 종료하려면 마지막으로 한 번 더 누르세요.
- 12시간 형식과 24시간 형식을 전환하려면 다음을 누릅니다. + 정상 시간 표시 중 버튼.
- 온도 단위를 섭씨(℃)와 화씨(℉)로 전환하려면 버튼을 누르세요. - 정상 시간 표시 중 버튼.
5.3 알람 설정
이 시계는 두 개의 독립적인 알람 기능(알람 1과 알람 2)을 갖추고 있습니다.
- 를 누르고 계세요 경보 button to enter Alarm 1 setting mode. The Alarm 1 hour display will flash.
- 사용하세요 + or - 알람 시간을 조정하는 버튼입니다.
- 누르다 경보 again to confirm the hour and move to Alarm 1 minute setting. Adjust with + or -.
- 누르다 경보 again to move to Alarm 2 hour setting, and repeat the process for Alarm 2.
- After setting Alarm 2 minutes, press 경보 설정 모드를 종료하려면 마지막으로 한 번 더 누르세요.
- To activate or deactivate an alarm, use the corresponding 알람 1 ON/OFF or 알람 2 ON/OFF switch on the side of the clock. An alarm icon will appear on the display when active.
5.3.1 스누즈 기능
When an alarm sounds, press any button (except the alarm ON/OFF switch) to activate the 5-minute snooze function. The alarm will sound again after 5 minutes. To turn off the alarm completely, slide the corresponding alarm ON/OFF switch to OFF.
5.4 투영 함수
The clock can project the time and temperature onto a wall or ceiling.
- 위치 프로젝션 켜기/끄기 switch on the back of the clock. Slide it to ON to activate the projection.
- Adjust the angle of the projection arm (the part with the lens) to direct the projection as desired. The arm can rotate nearly 180 degrees.
- The projection will display the current time and temperature in a soft red color.

그림 5.2: 옆 view showing the projection arm extended and ready for use.

그림 5.3: The clock projecting time and temperature onto a wall in a bedroom setting.
5.5 백라이트 조정
When the clock is powered by USB, the backlight can be adjusted to four levels: high, medium, low, or off. Repeatedly press the + button during normal time display to cycle through the brightness levels.
When powered by batteries, the backlight will illuminate for 8 seconds when any button is pressed, then turn off to conserve power.
5.6 USB 충전 포트
The clock features a USB charging port (5V=1A) on its side. You can use this port to charge your mobile phone or other small electronic devices while the clock is connected to USB power.
Note: The USB charging port only functions when the clock is powered via the USB cable. It does not work when the clock is running on battery power.
6. 유지관리
6.1 청소
- 부드럽고 마른 천으로 시계 표면을 닦으세요.
- 연마성 세척제, 용제 또는 화학 스프레이는 마감재나 전자 부품을 손상시킬 수 있으므로 사용하지 마십시오.
- Keep the projection lens clean for clear projection. Use a soft, lint-free cloth.
6.2 배터리 교체
When the display becomes dim or the clock functions erratically while on battery power, it's time to replace the AAA batteries. Refer to Section 4.1.1 for battery installation instructions. Always replace both batteries at the same time with new ones.
7. 문제 해결
| 문제 | 가능한 원인 | 해결책 |
|---|---|---|
| 시계 디스플레이가 비어 있거나 어둡습니다. | No power, low batteries, or USB cable not connected. | Check battery installation and replace if necessary. Ensure USB cable is securely connected to a power source. |
| Projection is unclear or not visible. | Projection switch is OFF, lens is dirty, or projection distance is too far/close. | Ensure Projection switch is ON. Clean the projection lens. Adjust the clock's distance from the projection surface. |
| 알람이 울리지 않습니다. | 경보가 설정되어 있지 않거나 비활성화되어 있습니다. | Verify alarm time is set correctly. Ensure the corresponding Alarm ON/OFF switch is in the ON position. |
| USB 충전 포트가 작동하지 않습니다. | Clock is running on battery power, or USB cable is not connected to a power source. | Ensure the clock is powered via the USB cable and connected to a functional power adapter. |
| 시간/날짜가 잘못되었습니다. | 시간/날짜가 올바르게 설정되지 않았습니다. | 시간과 날짜를 재설정하려면 5.2절을 참조하십시오. |
8. 사양
| 모델: | B0CLGDFCGX |
| 상표: | EVTSCAN |
| 재료: | ABS(아크릴로니트릴부타디엔스티렌) |
| 제품 크기: | 약 13.5 x 8 x 2.5cm(5.3 x 3.1 x 1.0인치) |
| 무게: | 약 242g(8.5온스) |
| 디스플레이 유형: | 백라이트가 있는 디지털 LCD |
| 전원: | 2xAAA batteries (not included) or DC 5.0V 1.2A via USB cable |
| USB 충전 출력: | 5V=1A |
| 온도 감지 범위: | -9℃ to +50℃ (1℃ resolution) |
| 습도 감지 범위: | 20% to 95% (1% resolution) |
| Temperature/Humidity Calibration Time: | 30초 |
| 백라이트 레벨: | 4 levels (High, Medium, Low, Off) when USB powered; 8s illumination when battery powered. |
| 프로젝션 Lamp: | Always on when USB powered; 8s illumination when battery powered. |

그림 8.1: Product dimensions: 5.3 inches wide by 3.1 inches high.
9. 보증 및 지원
EVTSCAN products are manufactured to high quality standards. For specific warranty information, please refer to the warranty card included with your purchase or contact your retailer.
If you encounter any issues or have questions regarding your EVTSCAN Projection Clock, please contact the seller or EVTSCAN customer support for assistance. Please have your model number (B0CLGDFCGX) ready when contacting support.
추가 지원이 필요하면 다음을 방문하세요. EVTSCAN Store on Amazon.