
1. 서론
구매해주셔서 감사합니다asing the SKKTKT TV Stand. This entertainment center is designed to accommodate TVs up to 75 inches and features integrated LED lighting with body sensor activation, a 3-mode charging station (wireless, USB, Type-C), and ample storage. This manual provides detailed instructions for assembly, operation, maintenance, and troubleshooting to ensure optimal use and longevity of your product.

그림 1: 전면 view of the SKKTKT TV Stand with LED lights activated.
2. 안전 지침
- 조립 및 사용 전에 모든 지침을 주의 깊게 읽으십시오.
- 어린이와 애완동물이 조립 구역에 접근하지 못하도록 하세요. 작은 부품은 질식 위험을 초래할 수 있습니다.
- Ensure all connections are secure before placing a TV or other items on the stand.
- 최대 중량 용량인 110파운드(50kg)를 초과하지 마십시오.
- TV 스탠드가 넘어지지 않도록 평평하고 안정적인 표면에 놓으십시오.
- LED 조명과 충전 스테이션을 물이나 과도한 습기에 노출시키지 마십시오.
- 청소 또는 유지 보수를 하기 전에 전원 코드를 뽑으십시오.
- 제품을 개조하지 마십시오. 개조는 보증을 무효화하고 안전상의 위험을 초래할 수 있습니다.
3. 패키지 내용
조립을 시작하기 전에 모든 구성품이 있는지 확인하세요. 부품이 누락되었거나 손상된 경우 고객 서비스 센터에 문의하세요.
- 상단 패널 (1)
- 중간 선반 (1)
- 하단 선반 (1)
- Side Frames (2, X-shape reinforced)
- Support Legs (5, with floor protectors)
- Dividing Panels (4)
- LED Light Strip (1)
- Charging Station Unit (1, with wireless, USB, Type-C)
- 조립 하드웨어(나사, 다웰, 캠 잠금 장치 등)
- 조립 설명서

그림 2: TV 스탠드의 주요 구성 요소 및 특징.
4. 조립 설명서
Assembly typically requires two people. Follow the numbered steps in the included assembly instructions. Ensure all parts are correctly oriented before tightening screws.
- 짐을 풀고 식별하세요: Carefully unpack all components and hardware. Refer to the parts list to identify each piece.
- 측면 프레임 조립: Attach the X-shape reinforced side frames to the main support legs using the provided hardware.
- 하단 선반을 부착하세요: Secure the bottom shelf to the assembled side frames. Ensure it is level and stable.
- Install Dividing Panels: Insert the four dividing panels into the designated slots on the bottom shelf and secure them.
- Attach Middle Shelf: Place and secure the middle shelf onto the dividing panels and side frames.
- 상단 패널 설치: Carefully place the top panel onto the assembled structure and secure it with the remaining hardware.
- LED 조명 스트립 설치: Adhere the LED light strip to the designated area, typically along the underside of the top panel or middle shelf, following the clear installation stickers.
- 충전소 통합: Install the charging station unit into its designated cutout on the top surface. Connect its power cable to the main power supply.
- 최종 확인: Ensure all screws are tightened, and the stand is stable.
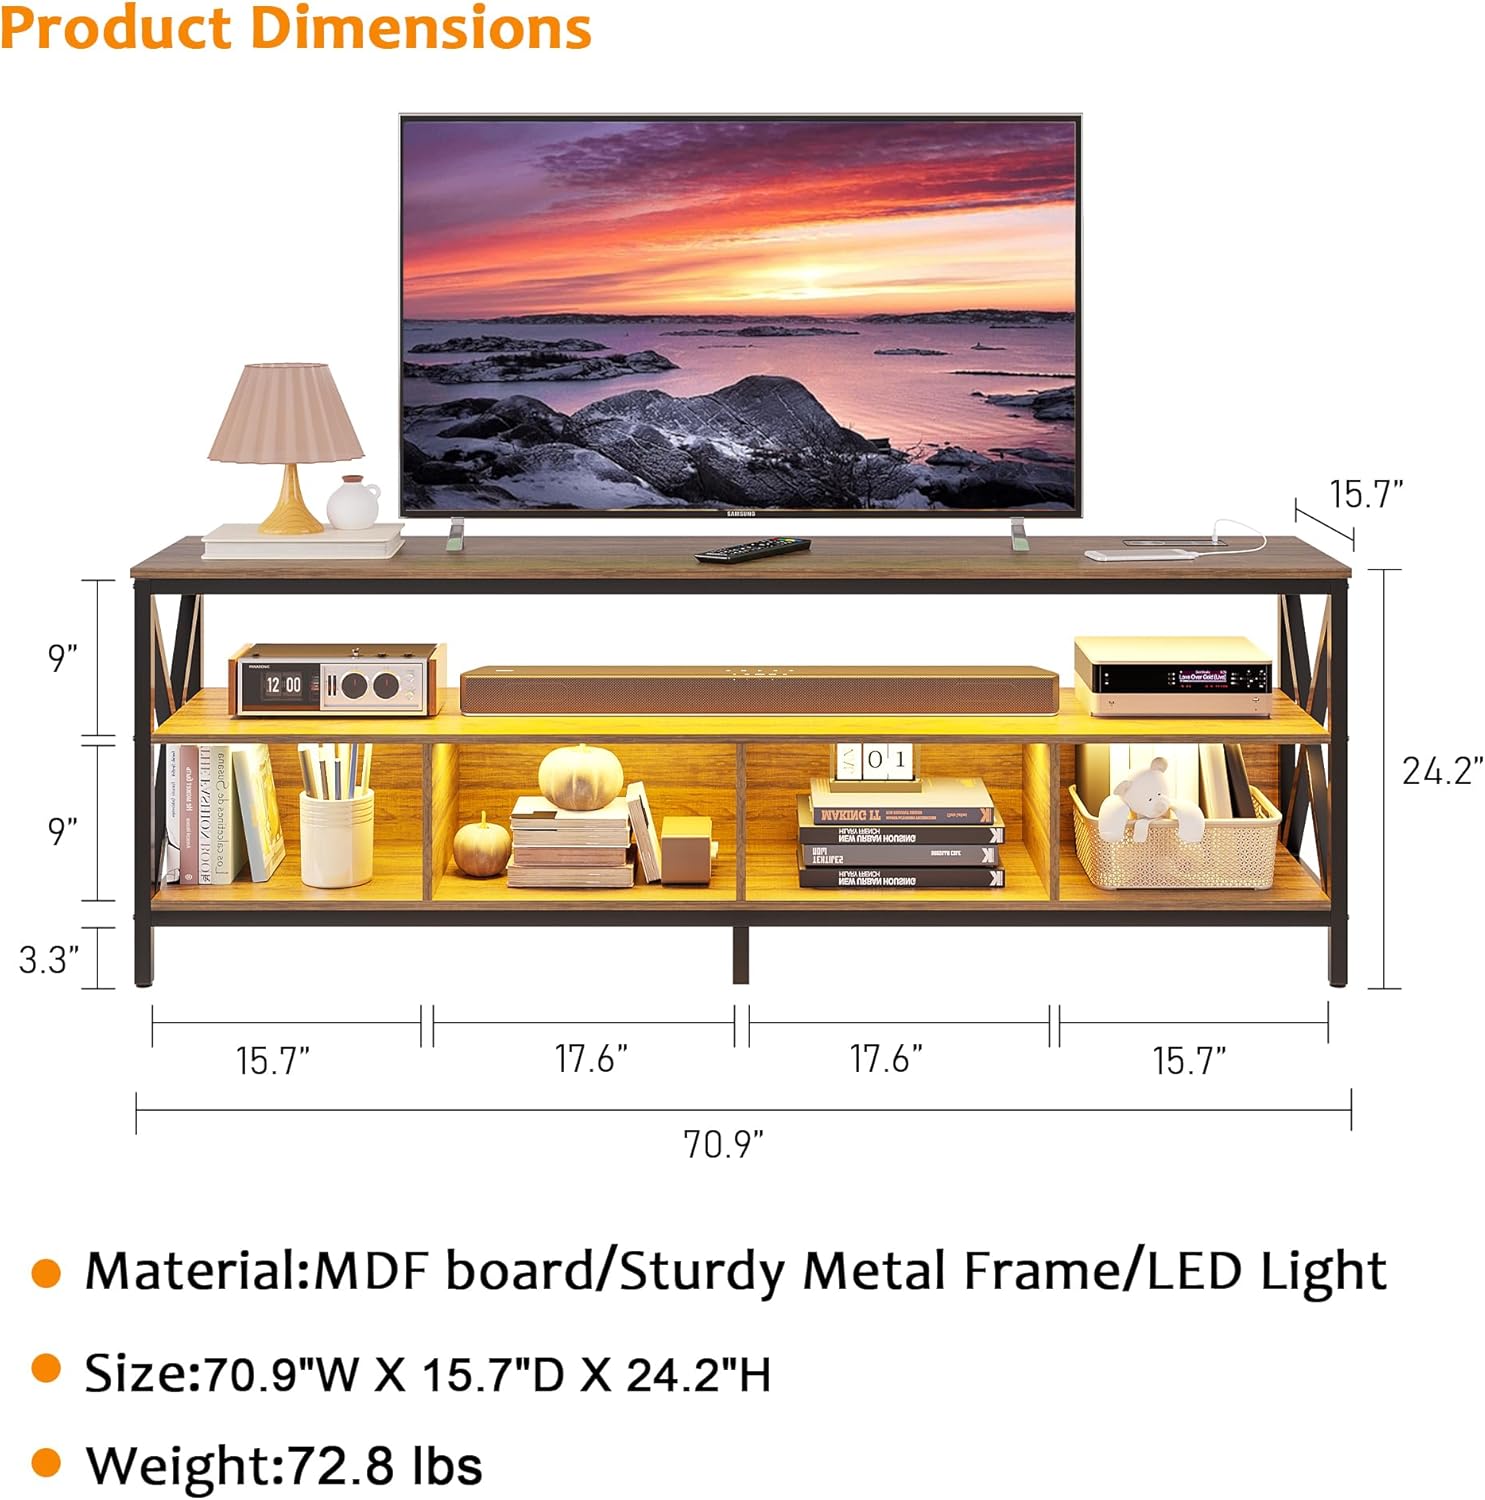
그림 3: 배치 계획을 위한 제품 치수.
5. 사용 설명서
5.1개의 LED 조명
The integrated LED lights offer three color options and adjustable brightness, along with a body sensor mode.
- Body Sensor Mode: Activate the body sensor mode using the 'Body' button on the control panel. The lights will automatically turn on when motion is detected nearby and turn off when no motion is detected for a period.
- 색상 변경 : Short press the 'Light' button on the control panel to cycle through the three available colors: white, yellow, and blue.
- 밝기 조정: Long press the 'Light' button to adjust the brightness level. Release the button when the desired brightness is reached.

Figure 4: Smart control panel for LED lights and charging.
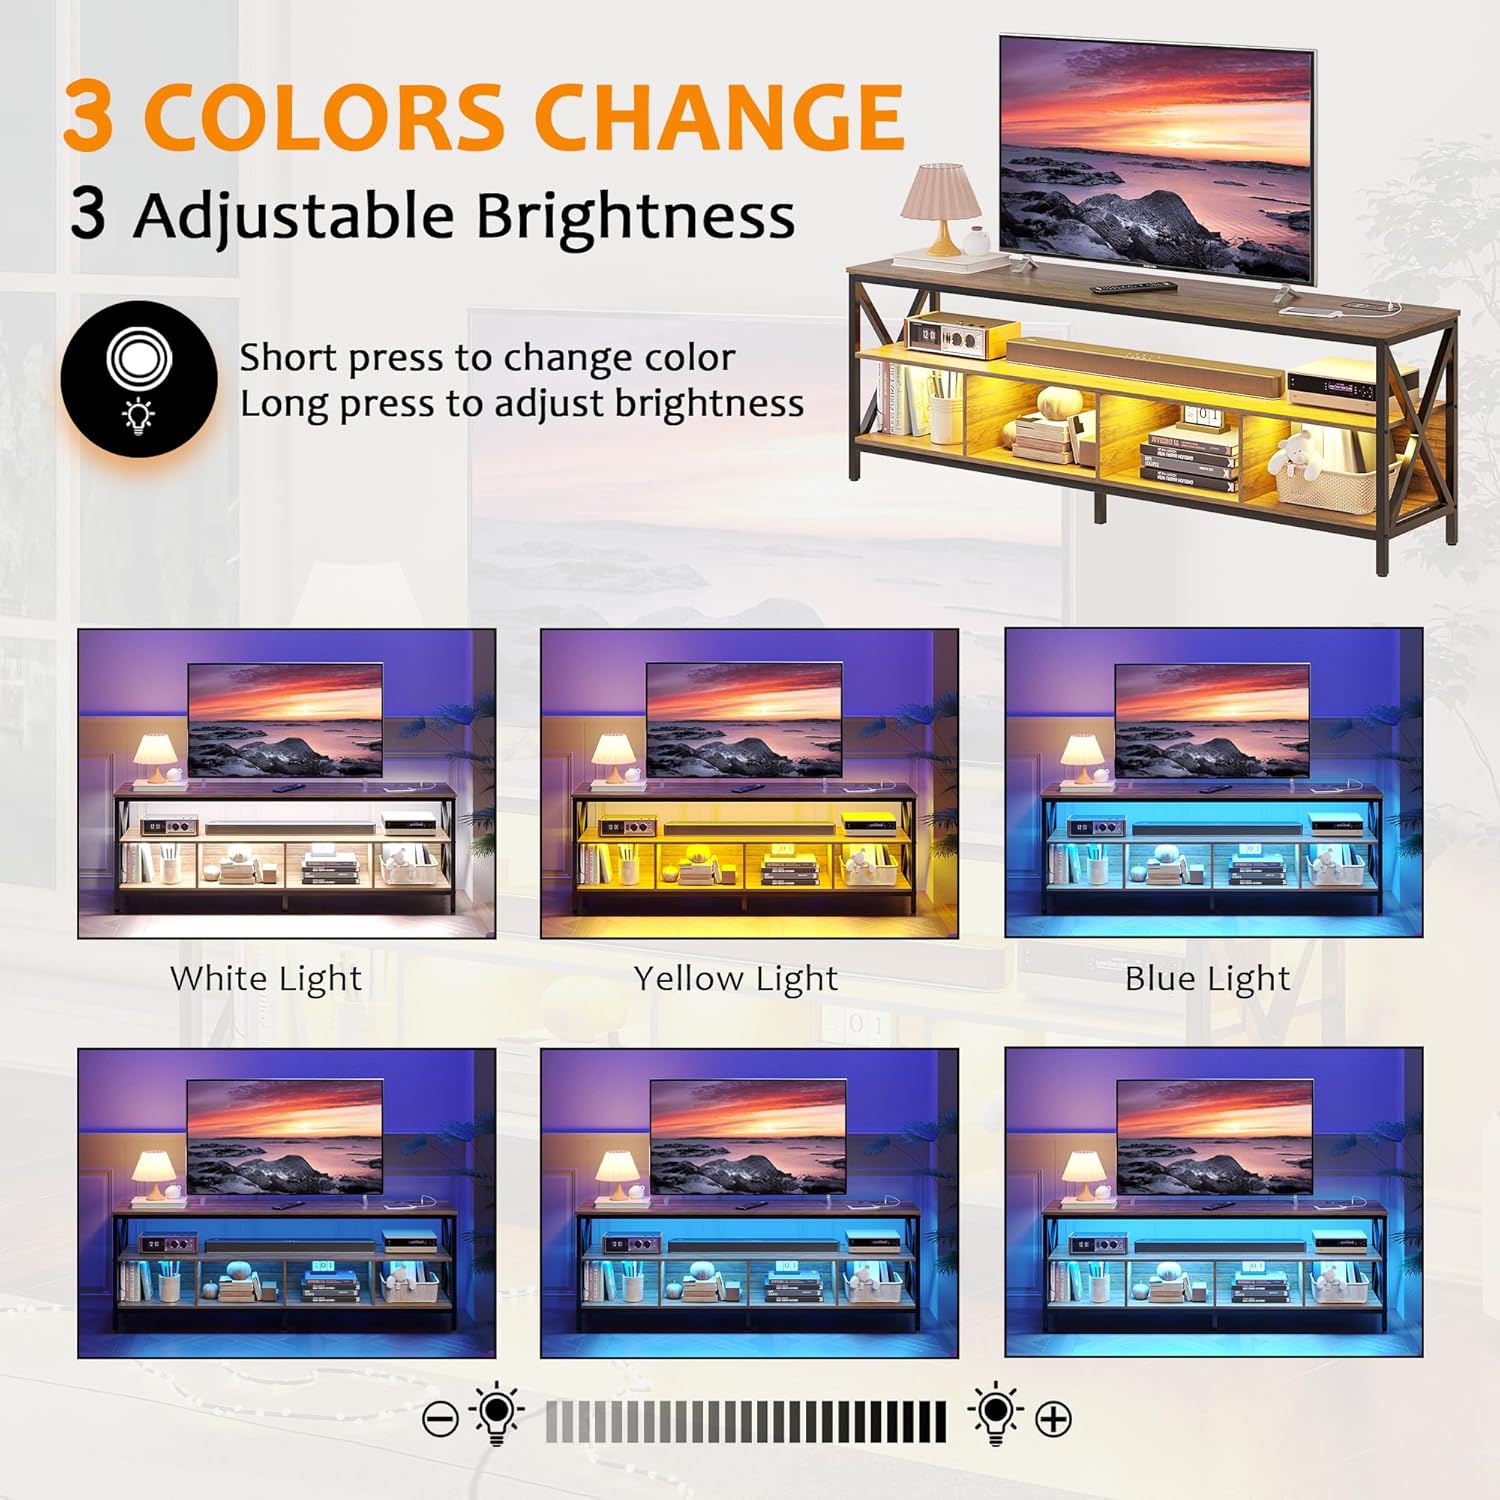
Figure 5: LED light color and brightness options.
5.2 충전소
The TV stand includes a versatile charging station with wireless, USB, and Type-C charging options.
- 무선 충전: Place your compatible device on the wireless charging pad. Ensure the device is centered for optimal charging.
- USB 충전: Connect your device's USB cable to the USB port on the charging station.
- C형 충전: Connect your device's Type-C cable to the Type-C port on the charging station.
6. 유지관리
To maintain the appearance and functionality of your TV stand, follow these simple care instructions:
- 청소: 표면을 마른 부드러운 천으로 닦으십시오. 마감재를 손상시킬 수 있는 독한 화학 약품이나 연마성 세척제 사용은 피하십시오.
- 유출: Immediately wipe up any spills with a dry cloth to prevent staining or damage to the wood and electronic components.
- 점검: 모든 하드웨어 연결부가 단단히 고정되어 있는지 주기적으로 점검하십시오. 필요한 경우 다시 조이십시오.
- 바닥 보호 장치: Ensure the floor protectors on the legs are intact to prevent scratches on your flooring.
7. 문제 해결
7.1 LED 조명이 작동하지 않음
- 전원 확인: Ensure the TV stand is properly plugged into a working power outlet.
- LED 스트립 연결: Verify that the LED light strip is securely connected to the power source and control unit.
- 제어판: Ensure the 'Light' button on the control panel is pressed to turn on the lights.
7.2 충전소가 작동하지 않음
- 전원 연결: Confirm the TV stand is plugged in and receiving power.
- 장치 호환성: For wireless charging, ensure your device is wireless charging compatible and properly aligned on the pad.
- 케이블 점검: For USB/Type-C, ensure your charging cable is functional and securely connected to both the device and the port.
- 초과 적재: Avoid charging too many high-power devices simultaneously, which might exceed the station's capacity.
7.3 안정성 문제
- 수평 표면: TV 스탠드가 평평하고 수평인 표면에 놓여 있는지 확인하십시오.
- 하드웨어를 조이세요: Recheck and tighten all assembly screws and bolts.
- 무게 분포 : Distribute items evenly across the shelves and top surface.
8. 사양
| 특징 | 세부 사항 |
|---|---|
| 상표 | SKKTKT |
| 모델 | B0CGJ4MCZF |
| 재료 | MDF Board, Sturdy Metal Frame |
| 색상 | 갈색 |
| 제품 치수(W x D x H) | 70.9" x 15.7" x 24.2"(180cm x 40cm x 61.5cm) |
| 품목 무게 | 72.8파운드(33kg) |
| Weight Capacity (Maximum) | 110파운드(50kg) |
| TV 크기 호환성 | 최대 75인치 |
| LED 조명 | Auto Sensor, 3 Colors (White/Blue/Yellow), 3 Level Brightness |
| 충전 스테이션 | Wireless Charging, USB Port, Type-C Port |
| 프레임 유형 | Metal (X-shape reinforced) |
| 바닥 보호 | Included on legs |
9. 고객 지원
If you have any questions, concerns, or require assistance with your SKKTKT TV Stand, please contact us directly via Amazon. We are committed to providing the best solution for you within 24 hours.
더 자세한 정보를 원하시거나 다른 제품을 살펴보시려면 다음 웹사이트를 방문하세요. SKKTKT Store on Amazon.