소개
The IHSENO Mini WiFi Relay Smart Switch is an intelligent device designed to integrate your lighting and other electrical appliances into a smart home system. It operates on 2.4GHz WiFi and is controlled via the Tuya Smart Life App, allowing for remote management, scene customization, and voice control through platforms like Alexa and Google Home. Its compact design enables installation in various electrical boxes, facilitating the automation of your home environment.
안전 정보
Before installation or operation, please read and understand all safety instructions. Improper installation can lead to electric shock or fire. This device is designed for indoor use only. Ensure the power supply is disconnected before any wiring work. Installation should be performed by a qualified electrician or in accordance with local electrical codes. The device is certified for safety (FCC, CE, RoHS) and features fireproof material.

Image: Safety and Certification details for the IHSENO Mini WiFi Smart Switch, highlighting compliance with FCC, CE, and RoHS standards, and indicating fireproof material construction.
제품 특징
- Mini WiFi Smart Switch: Compact design for easy installation in standard electrical boxes.
- Tuya Smart Life App Control: Manage devices remotely, create intelligent scene linkages with other Tuya devices.
- Customizable Scene Modes: Set specific lighting or appliance configurations for various activities (e.g., Reading, Movie).
- 음성 제어: Alexa 및 Google Assistant와 호환되어 핸즈프리로 작동할 수 있습니다.
- 지능형 타이밍: Schedule automatic on/off times for energy saving and convenience.
- 2방향 제어 지원: Designed to work with existing 2-way switch setups.
- 가족 공유 기능: Share control permissions with family members through the app.
명세서

Image: Detailed product specifications for the IHSENO Mini WiFi Smart Switch, including electrical ratings, dimensions, and supported application.
| 제조업체 | IHSENO |
| 크기 | 1.6*1.6*0.8 inches (approx. 41x20x41mm) |
| 색상 | 하얀색 |
| 재료 | Copper (internal components), PC V0 (housing) |
| 품목 패키지 수량 | 2 |
| 스위치 유형 | 1방향 |
| 장착 유형 | 벽걸이형 |
| 스위치 스타일 | 푸시 버튼 |
| 무선형 | 2.4G WiFi |
| 입력 | AC 100-240V 50 / 60Hz 16A Max |
| 산출 | AC 100-240V 50 / 60Hz 16A Max |
| 앱 호환성 | Smart Life (Support iOS & Android) |
설정 및 설치
상자 안에 무엇이 들어있나요?
Your package includes two (2) IHSENO Mini WiFi Relay Smart Switches and this instruction manual.
배선 다이어그램
중요한: Ensure the power supply is completely disconnected at the circuit breaker before attempting any wiring. Input and output connections cannot be reversed. Consult a qualified electrician if you are unsure about any wiring procedures.

Image: Wiring Method 1 - Direct connection. This diagram illustrates connecting the smart switch directly between the mains power supply and a lamp. L-out and N-out connect to the lamp, while L-in and N-in connect to the mains. Input and output cannot be reversed.

Image: Wiring Method 2 - With a 1-way switch. This diagram shows how to integrate the smart switch with a traditional 1-way wall switch. The lamp connects to L-out/N-out, mains to L-in/N-in, and the 1-way switch connects to the S1 and S2 terminals on the smart switch. Input and output cannot be reversed.

Image: Wiring Method 3 - With a 2-way switch. This diagram details connecting the smart switch in a 2-way control setup. The lamp connects to L-out/N-out, mains to L-in/N-in, and the 2-way switch connects to the S1, S2, and L-in terminals of the smart switch. Input and output cannot be reversed.
앱 설치 및 기기 페어링
- 앱 다운로드: 검색 "Tuya Smart" or "Smart Life" in your smartphone's app store (iOS or Android) and install the application.
- 등록/로그인: 앱을 열고 새 계정을 등록하거나 기존 계정으로 로그인하세요.
- 장치 추가:
- Ensure your smart switch is powered on and in pairing mode (usually indicated by a rapidly blinking light). If not, refer to the device's reset instructions (typically pressing a button for 5 seconds).
- 앱에서 (일반적으로 오른쪽 상단에 있는) "+" 아이콘을 탭하여 새 기기를 추가하세요.
- 장치 목록에서 "전기" 또는 "스위치(Wi-Fi)"를 선택하십시오.
- Follow the on-screen prompts to connect the device to your 2.4GHz WiFi network.
- 연결되면 기기 이름을 변경하여 쉽게 식별할 수 있습니다.
작동 지침
Remote Control via Tuya Smart Life App
Once paired, you can control your smart switch from anywhere with an internet connection using the Tuya Smart Life App. This includes turning devices on/off, checking status, and managing settings.
Image: Illustration of WiFi remote control, demonstrating how a smartphone connected to the internet can control the smart switch and connected devices from any location.

Image: App Remote Control in action, showing a user controlling a floor lamp via the Smart Life application on their smartphone.
Alexa 및 Google Home을 통한 음성 제어
Integrate your smart switch with Amazon Alexa or Google Assistant for convenient voice control. Follow the instructions in your Alexa or Google Home app to link your Tuya Smart Life account.
- 알렉사의 경우: Open the Alexa app, go to "Skills & Games," search for "Smart Life," enable the skill, and link your account. Discover devices.
- 구글 홈의 경우: Open the Google Home app, tap "+", select "Set up device" > "Works with Google," search for "Smart Life," link your account.
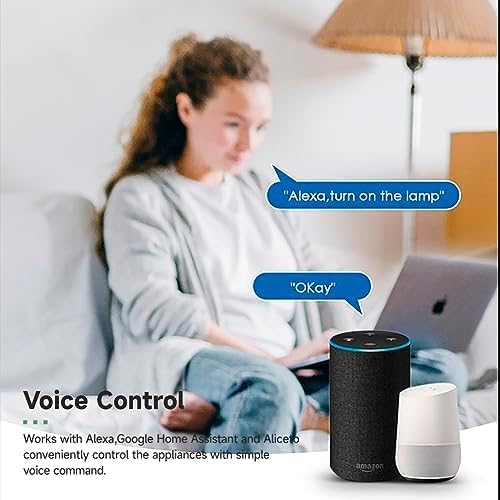
Image: Voice Control demonstration, showing a user interacting with an Amazon Echo and Google Home Mini to turn on a lamp using voice commands.
Customizing Scene Modes
The Tuya Smart Life App allows you to create custom scenes that activate multiple devices with a single command or condition. For example, a "Movie Night" scene could dim lights and turn on entertainment systems.
- In the Tuya Smart Life App, navigate to the "Smart" or "Scenes" section.
- 탭하여 새로운 장면을 만드세요.
- Define the conditions (e.g., manual tap, time, device status) and the actions (e.g., turn on/off switch, set brightness).
- 장면을 저장하세요.
Intelligent Timing and Scheduling
Set schedules for your devices to operate automatically, enhancing convenience and energy efficiency.
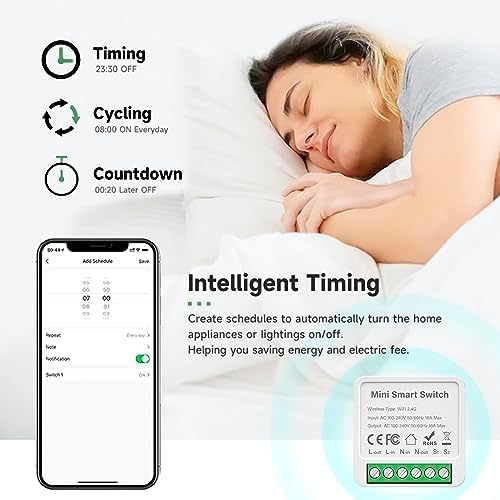
Image: Intelligent Timing features, illustrating the app's capabilities for setting schedules, cycling, and countdown timers to automate home appliances and lighting.
- From the device control interface in the app, look for "Schedule," "Timer," or "Countdown" options.
- Set desired on/off times, repeat cycles, or countdown durations.
- 설정을 확인하고 저장합니다.
2-Way Control Functionality
The smart switch supports 2-way control, allowing you to maintain functionality with existing multi-location switch setups. Refer to the wiring diagrams in the Setup section for proper installation.

Image: Support for 2-way control, showing a wiring schematic for connecting the smart switch with two parallel switches to control a single light fixture.
공유 기능
Share control of your smart devices with family members. This allows multiple users to manage the smart switch from their own Tuya Smart Life accounts.

Image: Sharing function overview, demonstrating how control permissions for smart devices can be shared among family members via the app.
- In the app, select the device you wish to share.
- Go to the device settings (usually an icon in the top right corner).
- Look for "Share Device" or "Device Sharing" and follow the prompts to add family members.
유지
The IHSENO Mini WiFi Relay Smart Switch requires minimal maintenance. Keep the device clean and free from dust. Do not attempt to open or repair the device yourself, as this will void the warranty and could pose a safety risk. Ensure the device is kept in a dry environment and away from extreme temperatures.
문제 해결
- 장치가 WiFi에 연결되지 않음:
- 와이파이 네트워크가 2.4GHz 대역인지 확인하십시오. 이 기기는 5GHz 와이파이를 지원하지 않습니다.
- Check that your WiFi password is correct.
- 기기를 WiFi 라우터에 더 가까이 옮기세요.
- Reset the smart switch (refer to app instructions for specific reset procedure, usually holding a button for 5 seconds) and try pairing again.
- 기기가 앱에서 응답하지 않습니다.
- 스마트폰이 인터넷에 연결되어 있는지 확인하세요.
- Check if the smart switch has power and its indicator light is on.
- Tuya Smart Life 앱을 다시 시작하세요.
- If the issue persists, try restarting your WiFi router.
- 음성 제어가 작동하지 않습니다:
- Ensure your Tuya Smart Life account is correctly linked to Alexa or Google Home.
- Check the device name in the Alexa/Google Home app; it should match what you are saying.
- Verify your voice assistant device is online and functioning correctly.
- 설치 후 물리적 스위치가 작동하지 않습니다.
- Double-check all wiring connections against the provided diagrams. Ensure L-in, N-in, L-out, N-out, S1, and S2 are correctly connected.
- 전원공급장치가 켜져 있는지 확인하세요.
보증 및 지원
IHSENO is committed to providing quality products and customer satisfaction. If you encounter any issues or have questions regarding your Mini WiFi Relay Smart Switch, please contact our customer service team. We aim to respond to all inquiries within 24 hours.
For support, please refer to the contact information provided with your purchase or visit the official IHSENO web대지.