1. 소개 및 안전 정보
Thank you for choosing the Assark Mini Hot Glue Gun. This manual provides essential instructions for safe and effective use of your new tool. Please read all instructions carefully before operation and retain this manual for future reference.
중요 안전 경고:
- 작동 중에는 노즐과 녹은 접착제가 매우 뜨거워집니다. 화상을 방지하기 위해 피부에 직접 닿지 않도록 하십시오.
- Do not touch the nozzle or surrounding areas immediately after use. Allow the tool to cool completely.
- Keep out of reach of children. This is not a toy. Adult supervision is required when children are present.
- Do not pull out a partially used glue stick from the back of the gun while it is hot. This can damage the feeding mechanism.
- 작업 공간은 환기가 잘 되고 가연성 물질이 없는지 확인하십시오.
- Always place the glue gun on its integrated stand when not in use to prevent hot glue from dripping onto surfaces.
- Do not operate the glue gun if the power cord or plug is damaged.
- Use only 7mm diameter glue sticks with this device.
2. 패키지 내용
패키지에 모든 품목이 들어 있는지 확인하세요.
- 1 x Assark Mini Hot Glue Gun (HL-E 20W)
- 30 x Hot Glue Sticks (130 x 7 mm)

Image: Assark Mini Hot Glue Gun and included glue sticks.
3. 제품 오버view
글루건의 구성 요소를 숙지하세요:

이미지: 상세 view of the hot glue gun, highlighting the nozzle, glue stick entry, power switch, indicator light, and stable stand.
- 대통 주둥이: The metal tip where melted glue is dispensed. Features a heat-resistant silicone cap.
- 풀 스틱 참가작: Slot at the rear for inserting glue sticks.
- 방아쇠: 접착제 공급 메커니즘을 활성화합니다.
- 전원 스위치: 기기의 켜짐/꺼짐 제어 기능입니다.
- 표시등: Illuminates when the glue gun is powered on and heating.
- 통합 스탠드: A metal wire stand to support the glue gun safely when not in active use.
- 전원 코드: Connects the glue gun to an electrical outlet.
4. 설정
- 접착제 스틱 삽입: Insert a 7mm diameter glue stick into the round opening at the back of the glue gun. Push it in until it stops.
- 스탠드 위치: Flip down the metal stand so the glue gun can rest securely on a flat, heat-resistant surface.
- 전원에 연결: 전원 코드를 일반 전기 콘센트(222V)에 꽂으세요.
- 전원 켜기: Flip the power switch to the 'ON' position. The indicator light will illuminate, signaling that the glue gun is heating up.

Image: A hand inserting a glue stick into the rear opening of the glue gun.

Image: The glue gun resting on its integrated metal stand.

Image: A close-up of the red power switch in the 'ON' position.
5. 사용 설명서
- 예열: Allow the glue gun to preheat for approximately 2-2.5 minutes. The indicator light will remain on during this time. The operating temperature ranges from 180-200°C.
- 접착제 바르기: Once preheated, gently squeeze the trigger to dispense melted glue from the nozzle. Apply glue to the desired surface. The leak-proof nozzle ensures precise and drip-free application.
- Joining Surfaces: Press the surfaces together immediately after applying glue, as hot glue sets quickly. Hold firmly for a few seconds.
- 풀 스틱 교체하기: When a glue stick is nearly depleted, insert a new one into the rear opening and push it forward to continue feeding.
- 마무리 손질: When finished, turn off the power switch and unplug the glue gun from the electrical outlet. Allow it to cool completely before storing.
Image: A close-up of the green indicator light, showing the gun is powered on.
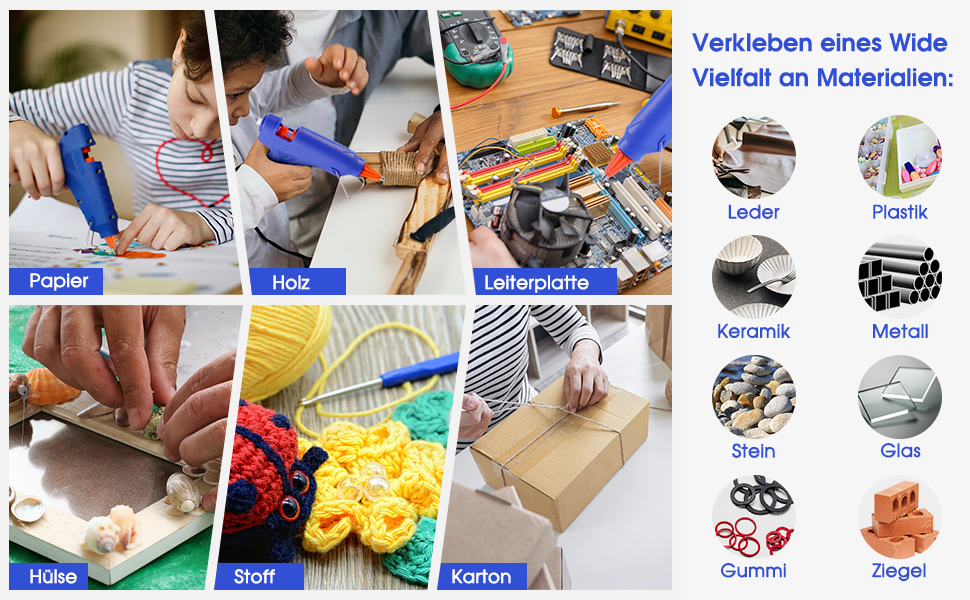
Image: A visual guide showing the steps: 1. Insert glue stick, 2. Plug in and switch on, 3. Preheat for 3-5 minutes, 4. Press the trigger to apply glue.
응용 프로그램 예amp레:
The Assark Mini Hot Glue Gun is suitable for various materials including paper, plastic, wood, leather, ceramic, and circuits. It is ideal for school crafts, DIY projects, and quick home repairs.

이미지: 전amples of the glue gun being used for crafts like decorating eggs, making fabric flowers, assembling popsicle stick structures, and attaching decorative elements.
6. 유지관리
- 청소: 청소하기 전에 글루건의 플러그를 뽑고 완전히 식혔는지 확인하십시오. 외부를 부드럽게 닦아주세요.amp 옷감. 연마성 세제를 사용하거나 장치를 물에 담그지 마십시오.
- 노즐 청소: If the nozzle becomes clogged, allow the gun to heat up slightly, then carefully wipe away any excess glue with a heat-resistant cloth. Never attempt to clear a hot nozzle with bare hands or metal objects.
- 저장: Store the glue gun in a dry, cool place, away from direct sunlight and moisture. Ensure it is completely cool before storing.
7. 문제 해결
| 문제 | 가능한 원인 | 해결책 |
|---|---|---|
| 글루건이 가열되지 않습니다. | 플러그가 꽂혀 있지 않음; 전원 스위치가 꺼짐; 콘센트에 결함이 있음. | Check power connection; ensure switch is ON; try a different outlet. |
| Glue does not flow when trigger is pressed. | Insufficient preheating time; glue stick not fully inserted; wrong size glue stick. | Allow full preheating time (2-2.5 min); push glue stick firmly into the entry; ensure 7mm glue sticks are used. |
| Excessive dripping from nozzle. | Normal during initial heating; gun too hot. | Place gun on its stand; ensure not left on for excessively long periods without use. |
8. 사양
| 특징 | 세부 사항 |
|---|---|
| 상표 | 아사크 |
| 모델 번호 | HL-E |
| 왓tage | 20와트 |
| 권tage | 222 볼트 |
| 전원 | 코드식 전기 |
| 예열 시간 | 2-2.5분 |
| 작동 온도 | 180~200도 |
| 호환되는 접착제 스틱 직경 | 7의 mm (0.28 인치) |
| 케이블 길이 | 1.5 미터 |
| 품목 무게 | 330그램 |
| 치수(패키지) | 16.9 x 13.6 x 3.3cm |
| 색상 | 블루 N |
9. 보증 및 지원
For information regarding warranty coverage or technical support, please refer to the documentation provided with your purchase or contact Assark customer service through your retailer.