
1. 서론
This manual provides essential information for the proper installation, operation, and maintenance of your ENDORFY Arx 500 ARGB ATX Computer Case. Please read this manual thoroughly before beginning installation to ensure optimal performance and safety.
The ENDORFY Arx 500 ARGB is a high-performance ATX computer case designed for efficient cooling and spacious component compatibility. Key features include:
- Tempered glass side panel for showcasing 내부 구성 요소.
- Spacious interior for easy component installation and cable management.
- Compatibility with various radiator sizes for advanced cooling solutions.
- Airy and easily accessible front panel for optimal airflow.
- Efficient cooling design to maintain low component temperatures.
- Convenient cable management features for a clean build.
2. 안전 정보
제품 손상이나 부상을 방지하기 위해 다음 안전 수칙을 준수해 주십시오.
- 전원 차단: 컴퓨터 케이스 내부의 부품을 설치하거나 제거하기 전에 항상 전원 공급 장치의 케이블을 벽면 콘센트에서 분리하십시오.
- 정전기 : 내부 부품을 다루기 전에 정전기 방지 손목 스트랩을 착용하거나 접지된 금속 물체를 자주 만져 정전기를 방전시키십시오.
- 날카로운 모서리: 설치 중 케이스 내부의 날카로운 모서리에 주의하십시오.
- 강화 유리: Handle the tempered glass side panel with care. It is fragile and can break if dropped or subjected to impact. Place it on a soft, flat surface when removed.
- 통풍: Ensure adequate ventilation around the case to prevent overheating. Do not block air vents.
- 액체 접촉: Keep the computer case away from liquids and moisture.
3. 패키지 내용
패키지에 모든 구성품이 들어 있는지 확인하십시오. 누락되거나 손상된 구성품이 있는 경우 판매점에 문의하십시오.
- ENDORFY Arx 500 ARGB ATX Computer Case
- 4 x 140 mm ARGB Fans (pre-installed)
- Accessory Box (containing screws, cable ties, and other mounting hardware)
- 사용 설명서 (본 문서)

그림 3.1: 폭발 view showing the computer case, fans, and various panels.
4. 설정 및 설치
Follow these steps to install your components into the ENDORFY Arx 500 ARGB case.
4.1 사건 준비
- 사이드 패널 제거: Carefully remove the tempered glass side panel and the solid metal side panel. Place them on a soft, non-abrasive surface to prevent scratches.
- 액세서리 상자: 케이스 안쪽에 있는 액세서리 상자를 찾으십시오. 그 안에 필요한 나사와 장착 하드웨어가 모두 들어 있습니다.
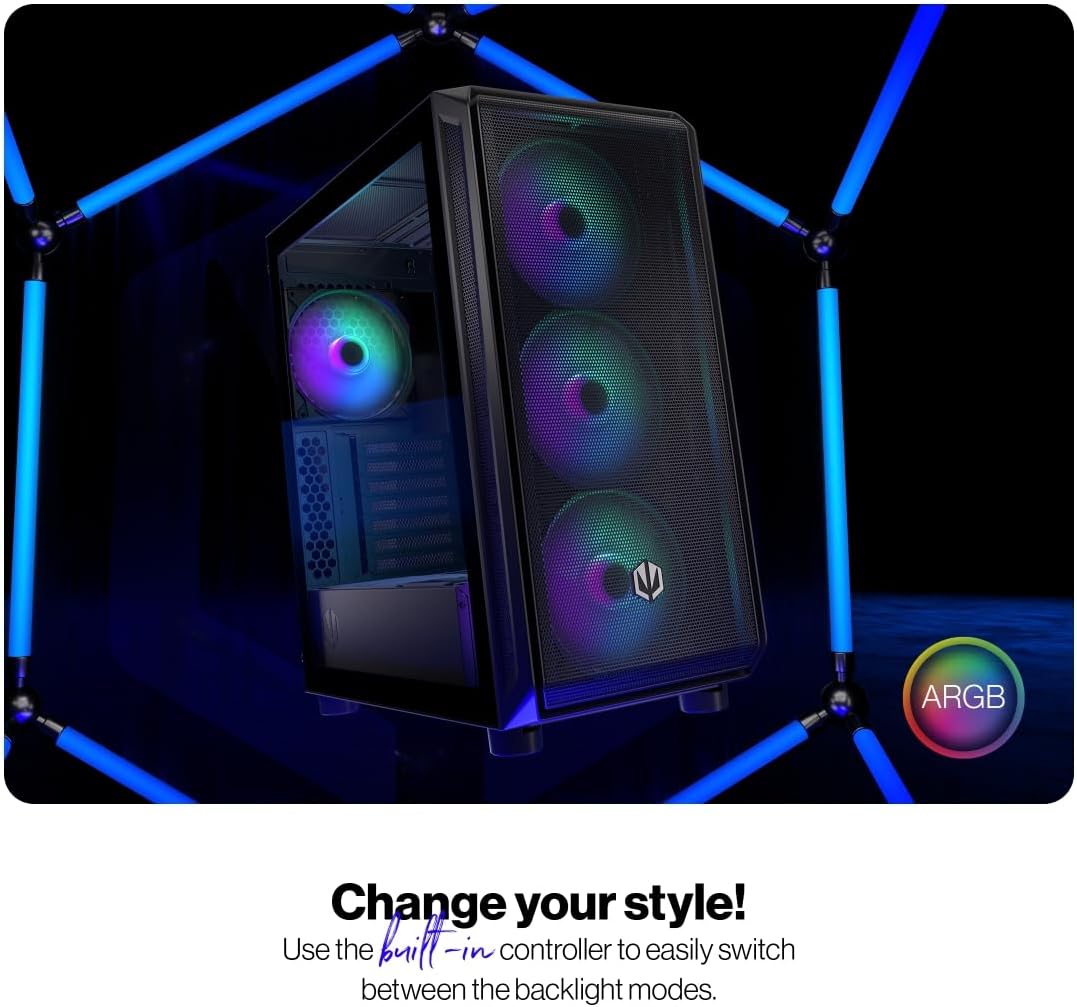
Figure 4.1: The tempered glass side panel allows for a clear view 내부 구성 요소.
4.2 마더 보드 설치
- 스탠드오프 설치: Ensure the correct standoffs are installed for your ATX motherboard. The case supports ATX motherboards.
- 마더보드 장착: 마더보드를 스탠드오프 위에 조심스럽게 올려놓고 제공된 나사로 고정하십시오.

그림 4.2: 넓은 실내 공간 제공 ample room for motherboard and other component installation.
4.3 전원 공급 및 저장 설치
- 전원 공급 장치: Install your power supply unit (PSU) into the dedicated bottom mount area. Secure it with screws from the rear of the case.
- 저장 드라이브: Install your 2.5" SSDs or 3.5" HDDs into the designated drive bays. Refer to the case's internal structure for specific mounting points.
4.4 그래픽 카드 및 확장 카드
- 슬롯 커버를 제거하세요: 케이스 뒷면에서 필요한 PCI-E 슬롯 커버를 제거합니다.
- 카드 설치: Insert your graphics card and other expansion cards into the motherboard's PCI-E slots and secure them with screws.
4.5 Cooling System (Fans and Radiators)
The case comes with 4 pre-installed 140mm ARGB fans. Additional fans or radiators can be installed for enhanced cooling.
- 팬 용량: The case accommodates up to 7 fans.
- 라디에이터 호환성: The design supports various radiator sizes for liquid cooling solutions.

Figure 4.3: The case features pre-installed 140mm ARGB fans for optimal airflow.

Figure 4.4: Perforated front and top panels ensure maximum airflow and dust protection.
4.6 케이블 관리
Utilize the dedicated cable management space and tie-down points behind the motherboard tray to route and secure cables for a clean build and improved airflow.
4.7 Front I/O Panel Connections
Connect the front panel cables (USB, audio, power, reset, LEDs) to the corresponding headers on your motherboard. Refer to your motherboard manual for header locations.

Figure 4.5: Front I/O panel with USB-C, USB-A, headphone, microphone, reset, and power buttons/LEDs.
- USB-C 포트: Connects to a USB 3.x Type-C header on your motherboard.
- USB-A 포트: Connects to USB 3.x and USB 2.0 headers on your motherboard.
- Headphones Port: Connects to the audio header on your motherboard.
- 마이크 포트: Connects to the audio header on your motherboard.
- 재설정 버튼: Connects to the reset header on your motherboard.
- 전원 LED: Connects to the power LED header on your motherboard.
- Storage Activity LED: Connects to the HDD LED header on your motherboard.
- 전원 버튼: Connects to the power switch header on your motherboard.
5. 사용 설명서
모든 구성 요소를 설치하고 연결하면 시스템의 전원을 켤 수 있습니다.
- 전원 켜기: Press the Power Button on the front I/O panel to turn on your computer. The Power LED will illuminate.
- ARGB 팬 제어: The pre-installed ARGB fans can be controlled via a built-in controller or synchronized with compatible motherboard software. Use the built-in controller to switch between various backlight modes.

Figure 5.1: The ARGB fans offer customizable lighting effects, controlled via the built-in controller.
6. 유지관리
정기적인 유지 관리는 컴퓨터 케이스와 구성 요소의 최적 성능과 수명 연장에 도움이 됩니다.
- 먼지 필터: 케이스 앞면, 윗면, 아랫면에 있는 먼지 필터를 주기적으로 분리하여 청소하십시오. 압축 공기나 부드러운 브러시를 사용하여 쌓인 먼지를 제거하세요.
- 외부 청소: 케이스 외부 표면을 부드러운 천으로 닦으십시오.amp 천으로 닦으세요. 연마성 세제나 용제는 사용하지 마세요.
- 내부 청소 : With the system powered off and unplugged, use compressed air to gently remove dust from internal components and fan blades.
- 강화 유리: 강화유리 패널은 극세사 천과 전자제품 전용 유리 세정제를 사용하여 닦으십시오.
7. 문제 해결
If you encounter issues with your computer case, refer to the following common troubleshooting steps.
- 시스템 전원이 켜지지 않음:
- 전원 공급 장치가 벽면 콘센트에 제대로 연결되어 있고 스위치가 켜져 있는지 확인하십시오.
- 파워서플라이의 모든 전원 케이블이 마더보드 및 구성 요소에 올바르게 연결되어 있는지 확인하십시오.
- Check that the front panel power button cable is correctly connected to the motherboard's power header.
- 팬이 회전하지 않거나 ARGB 조명이 켜지지 않음:
- Ensure fan power cables are securely connected to the fan hub or motherboard headers.
- Verify ARGB cables are connected to the built-in controller or motherboard ARGB header.
- Check the built-in controller or motherboard software for fan speed and lighting settings.
- Front USB/Audio Ports Not Working:
- Confirm that the front panel USB and audio cables are correctly connected to the corresponding headers on your motherboard.
- Ensure motherboard drivers for USB and audio are installed.
If problems persist, consult your motherboard manual or contact ENDORFY customer support.
8. 사양
| 특징 | 세부 사항 |
|---|---|
| 상표 | 엔도르피 |
| 시리즈 | Arx 500 ARGB |
| 모델 번호 | EY2A011 |
| 케이스 유형 | 미디 타워 |
| 마더보드 호환성 | 에이티엑스 |
| 치수(길이x너비x높이) | 16.89 x 8.98 x 19.13인치(429 x 228 x 486mm) |
| 품목 무게 | 16.5파운드 |
| 재료 | 강화유리(측면 패널) |
| 냉각 방식 | 공기 |
| 포함된 팬 | 4 x 140 mm ARGB fans |
| 팬 크기 | 140 밀리미터 |
| 전원 공급 장치 장착 유형 | 바텀 마운트 |
| 전면 I / O 포트 | 2x USB 2.0, 1x USB-C, 1x Headphone, 1x Microphone, Reset Button, Power Button |

Figure 8.1: Front dimensions (228 mm width).

Figure 8.2: Side dimensions (429 mm depth, 486 mm height).
9. 보증 및 지원
For warranty information, technical support, or further assistance, please visit the official ENDORFY web사이트를 방문하거나 가까운 판매점에 문의하세요.


