
1. 서론
Thank you for choosing the Aigo AC SE 360 Rainbow 360mm Water Cooler. This all-in-one liquid cooling solution is designed to provide efficient thermal management for your high-performance CPU, featuring a 360mm triple radiator and vibrant ARGB lighting. This manual provides essential information for proper installation, operation, and maintenance to ensure optimal performance and longevity of your product.

Image 1.1: Aigo AC SE 360 Rainbow 360mm Water Cooler assembled view.
2. 안전 정보
- 설치나 유지관리를 하기 전에는 항상 컴퓨터의 전원을 분리하세요.
- 손상을 방지하기 위해 구성품을 조심스럽게 다루십시오.
- 전기 위험을 방지하기 위해 적절한 접지를 확인하십시오.
- 제품을 습기와 극한의 온도에 노출시키지 마십시오.
- Do not attempt to open the pump or radiator, as this may void the warranty and cause leaks.
- 어린이의 손이 닿지 않는 곳에 보관하세요.
3. 패키지 내용
아래 나열된 모든 구성 요소가 패키지에 들어 있는지 확인하세요.
- 1x Aigo AC SE 360 Water Cooler Unit (Radiator, Pump/CPU Block, Tubing)
- 3개의 120mm ARGB 팬
- Mounting Hardware for Intel Sockets (LGA 115X, 1200, 1700, 2011, 2066)
- Mounting Hardware for AMD Sockets (AM2, AM3, AM4, AM5)
- 열전도 페이스트
- 팬 나사 및 라디에이터 나사
- ARGB Controller (if included with your specific model)
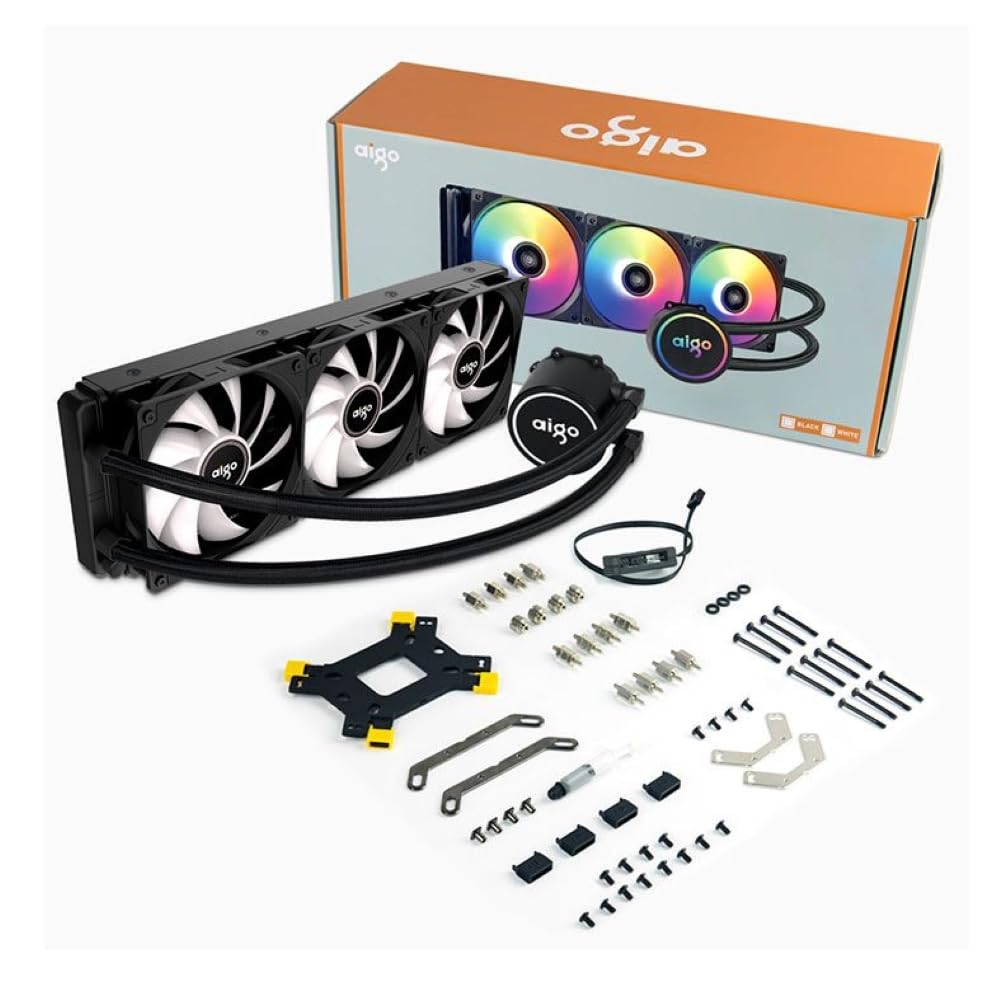
Image 3.1: All components included in the Aigo AC SE 360 package.
4. 설정 및 설치
Follow these steps for proper installation of your Aigo AC SE 360 Water Cooler:
- 마더보드 준비: Install the appropriate backplate and standoffs for your CPU socket (Intel: 115X, 1200, 1700, 2011, 2066; AMD: AM2, AM3, AM4, AM5). Refer to your motherboard manual for specific instructions.
- 열 페이스트 적용: Clean the CPU surface. Apply a small amount of thermal paste to the center of the CPU IHS (Integrated Heat Spreader).
- Mount the CPU Block/Pump: Carefully place the CPU block onto the CPU, aligning it with the standoffs. Secure it with the provided screws, tightening them in a diagonal pattern until snug. The magnetic block design allows for easy rotation to align the logo or tubing as desired.
- 라디에이터에 팬 설치: Attach the three 120mm ARGB fans to the radiator using the longer screws provided. Ensure the fan airflow direction is correct for your case configuration (typically blowing air through the radiator).
- 라디에이터 장착: Install the radiator assembly into your PC case. The 360mm radiator is compatible with most ATX cases that support this size. Secure it with the appropriate screws.
- Connect Fans (Daisy Chain): The fans feature a daisy chain connection system. Connect the fans to each other in series, then connect the final fan's cable to the motherboard's fan header or an ARGB controller. This simplifies cable management by reducing the number of cables.
- ARGB 조명 연결: Connect the ARGB cables from the fans and pump to a 3-pin, 5V ARGB header on your motherboard or a dedicated ARGB controller. Ensure the voltag손상을 방지하려면 전압(e)이 5V로 적절합니다.
- 펌프 전원 연결: Connect the pump's 4-pin power connector to a dedicated AIO_PUMP or CPU_FAN header on your motherboard.
- 케이블 관리 : Organize all cables neatly to ensure proper airflow and a clean build.
5. 사용 설명서
Once installed, the Aigo AC SE 360 Water Cooler operates automatically to maintain optimal CPU temperatures. Here are key operational aspects:
- 자동 냉각: The pump and fans will adjust their speed based on CPU temperature, ensuring efficient cooling. The pump operates at 12V with 3200 RPM, and fans operate between 800-1800 RPM.
- ARGB 조명 제어: The Rainbow ARGB lighting can be controlled via your motherboard's ARGB software (if connected to a compatible header) or through an included ARGB controller. This allows for various lighting effects and synchronization with other ARGB components.
- 소음 수준: The cooler is designed for quiet operation, with a noise level of approximately 30 dB.
6. 유지관리
Regular maintenance helps ensure the longevity and performance of your water cooler:
- 먼지 청소: 라디에이터 핀과 팬 블레이드에 먼지가 쌓이는 것을 방지하기 위해 주기적으로 청소하십시오. 먼지가 쌓이면 공기 흐름과 냉각 성능이 저하될 수 있습니다. 압축 공기나 부드러운 브러시를 사용하십시오.
- 튜빙 검사: 튜브에 꼬임, 누수 또는 손상의 흔적이 있는지 확인하세요.
- 모니터 온도: CPU 온도를 모니터링하려면 모니터링 소프트웨어를 사용하십시오. 온도가 크게 상승하면 추가 점검이나 청소가 필요할 수 있습니다.
- 열전도 페이스트: While not frequently required, reapplying thermal paste every few years can help maintain optimal thermal transfer.
7. 문제 해결
If you encounter issues with your Aigo AC SE 360 Water Cooler, refer to the following common problems and solutions:
| 문제 | 가능한 원인 | 해결책 |
|---|---|---|
| 높은 CPU 온도 | Insufficient thermal paste, poor contact, dust buildup, pump failure, fan failure. | Reapply thermal paste, ensure CPU block is securely mounted, clean radiator and fans, check pump/fan connections. |
| 팬이 회전하지 않음 | Loose fan connection, incorrect fan header, faulty fan. | Check fan cables and connections, ensure connected to appropriate motherboard header, test fans individually if possible. |
| No ARGB Lighting | Loose ARGB connection, incorrect ARGB header (e.g., 12V instead of 5V), faulty ARGB component. | Verify ARGB cables are securely connected to a 3-pin, 5V ARGB header. Check motherboard manual for correct header. |
| 특이한 소음 | Air bubbles in loop, fan rubbing, pump issue. | Gently tilt the PC case to help dislodge air bubbles. Check for obstructions around fans. If pump noise persists, contact support. |
8. 사양
| 특징 | 세부 사항 |
|---|---|
| 모델 | AC SE 360 |
| 라디에이터 크기 | 360mm (394 x 120 x 27mm) |
| 팬 크기 | 120mm (XNUMXmm) |
| 팬 속도 | 800-1800 RPM |
| 공기 흐름 | 64.05 퀴놀론 |
| 정압 | 1.85mmHXNUMXO |
| 소음 수준 | 30데시벨 |
| 펌프 볼륨tage | 12 볼트 |
| 펌프 속도 | 3200 RPM |
| 전력 소비 | 3.24 와트 |
| 베어링 유형 | 세라믹 베어링 |
| TDP Supported | 280와트 |
| 호환 소켓 | Intel (LGA 115X, 1200, 1700, 2011, 2066), AMD (AM2, AM3, AM4, AM5) |
| 전원 커넥터 | 4핀 |
| ARGB 커넥터 | 3핀, 5V |
9. 보증 및 지원
The Aigo AC SE 360 Water Cooler comes with a 12개월 보증 구매일로부터. 본 보증은 정상적인 사용 조건에서 발생한 제조상의 결함에 적용됩니다.
For technical support, warranty claims, or any questions not covered in this manual, please contact your retailer or the Aigo customer support team. Please have your proof of purchase and product model number (ACSE360) ready when contacting support.