1. 서론
This user manual provides detailed instructions for the installation, operation, and maintenance of your Generic DZ41-CAN Electric Bikes LCD Display. This display is specifically designed for use with M500 and BBS0102 mid-drive motors, offering a high-contrast, large-size color display for essential riding data.
제품의 올바른 기능과 안전을 보장하기 위해 사용하기 전에 이 설명서를 자세히 읽어주세요.
2. 안전 정보
- 라이딩하기 전에 디스플레이가 안전하게 장착되었는지 항상 확인하세요.
- 디스플레이를 분해하거나 개조하지 마십시오. 이는 보증을 무효화하고 손상을 초래할 수 있습니다.
- The display features a waterproof design, but avoid submerging it in water or exposing it to high-pressure water jets.
- 부드러운 천으로 디스플레이를 닦으세요.amp 천. 연마성 세척제나 용매를 사용하지 마십시오.
- Pay attention to your surroundings while riding. Do not become overly focused on the display.
3. 패키지 내용
다음 품목이 패키지에 포함되어 있는지 확인하세요.
- 1 x Generic DZ41-CAN Electric Bike Display
4. 제품 오버view
4.1 디스플레이 구성 요소
The DZ41-CAN display features a clear LCD screen and intuitive control buttons for easy operation.

그림 1: 전면 view of the DZ41-CAN LCD Display.

그림 2: 제어 버튼의 확대 사진.
- LCD 화면: Displays real-time data such as speed, battery level, assistance level, trip distance, and error messages.
- '+' 버튼: Increases assistance level, navigates up in menus.
- '-' 버튼: Decreases assistance level, navigates down in menus.
- 'M'(모드) 버튼: Powers on/off, confirms selections, switches display modes.
4.2 치수
The compact design ensures it fits well on most handlebars.
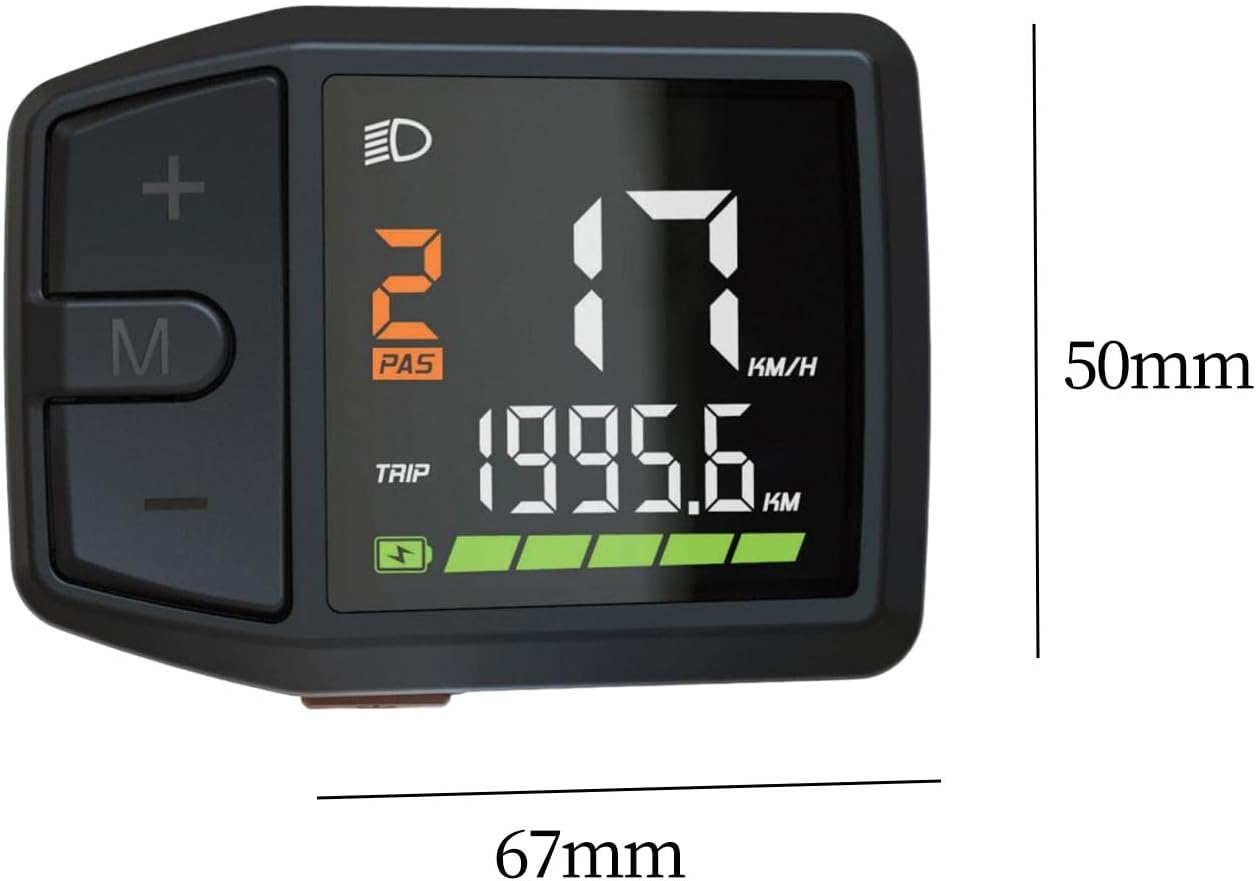
Figure 3: Display dimensions (approx. 67mm x 50mm).
5. 설정 및 설치
The DZ41-CAN display is designed for easy integration with M500 and BBS0102 mid-drive motors.
- 설치: Securely attach the display to your e-bike's handlebar using the provided mounting bracket. Ensure it is positioned for clear visibility and easy access to buttons.
- 케이블 연결: Connect the display's cable to the corresponding port on your e-bike's motor system (M500 or BBS0102). Ensure the connection is firm and secure.
- 케이블 관리 : Route the cable neatly along the bike frame, securing it with cable ties to prevent interference with moving parts.
- 초기 확인: After installation, perform a quick check to ensure all connections are secure and the display powers on correctly.
6. 사용 설명서
6.1 전원 켜기/끄기
- 전원을 켜려면: Press and hold the 'M' button for approximately 2 seconds until the display illuminates.
- 전원을 끄려면: Press and hold the 'M' button for approximately 2 seconds until the display turns off.
6.2 디스플레이 기능
The display provides comprehensive data for your ride:
- 속도: 현재 주행 속도(km/h 또는 MPH).
- 배터리 수준: Real-time battery charge indicator.
- Assistance Level (PAS): Current pedal assist level (e.g., 0-5 or 0-9).
- 여행 거리: 이번 라이딩 중 이동 거리.
- Total Odometer: Total distance covered by the bike.
- 헤드라이트 표시기: Icon illuminates when headlights are active.
- 오류 메시지: Displays codes or symbols for system malfunctions.
6.3 버튼 기능
- '+' 버튼: Short press to increase pedal assistance level. Long press may activate walk mode or enter settings.
- '-' 버튼: Short press to decrease pedal assistance level. Long press may activate walk mode or enter settings.
- 'M' 버튼: Short press to cycle through display modes (e.g., Trip, Odometer, Max Speed, Avg Speed). Long press to power on/off.
6.4 Settings Adjustment
Specific settings adjustments (e.g., unit conversion, wheel size) may be accessible through a combination of button presses. Refer to your e-bike's main controller manual for detailed instructions on advanced settings, as the display acts as an interface.
7. 유지관리
- 청소: Regularly wipe the display screen and body with a soft, lint-free, damp cloth. Avoid using harsh chemicals or abrasive materials that could scratch the screen.
- 저장: 장기간 사용하지 않을 경우, 전기 자전거와 디스플레이를 직사광선과 극한 온도 변화를 피해 서늘하고 건조한 곳에 보관하십시오.
- 케이블 검사: Periodically check the display cable and connectors for any signs of wear, damage, or corrosion. Ensure connections remain secure.
8. 문제 해결
If you encounter issues with your DZ41-CAN display, refer to the table below for common problems and solutions.
| 문제 | 가능한 원인 | 해결책 |
|---|---|---|
| 디스플레이의 전원이 켜지지 않습니다. | Loose cable connection; Low e-bike battery; Faulty display. | Check all cable connections; Charge e-bike battery; Contact support if issue persists. |
| 속독은 안 돼요. | Speed sensor issue; Loose motor connection. | Check speed sensor alignment and connection; Ensure motor connection is secure. |
| 잘못된 데이터가 표시되었습니다. | Incorrect settings (e.g., wheel size); Sensor malfunction. | Verify settings through the display or e-bike controller; Check sensor for damage. |
| 디스플레이에 오류 코드가 표시됩니다. | System malfunction; Specific component error. | Refer to your e-bike's main controller manual for error code definitions and solutions. |
9. 사양
| 특징 | 세부 사항 |
|---|---|
| 모델 | DZ41-CAN |
| 호환성 | Bafang M500, BBS0102 mid-drive motors |
| 디스플레이 유형 | LCD, High Contrast Color |
| 화면 크기 | 6.7 센티미터 |
| 재료 | PP and PC |
| 방수 설계 | 예 |
| 장착 유형 | 핸들바 마운트 |
| 휴먼 인터페이스 입력 | 버튼 |
| 색상 | 검은색 |
10. 보증 및 지원
For warranty information and technical support, please refer to the documentation provided with your e-bike or contact the seller directly. Keep your purchase receipt as proof of purchase.

