1. 서론
This manual provides detailed instructions for the installation, operation, and maintenance of your SANSCO 8-channel 2K Home Security Camera System. This system is designed to provide comprehensive surveillance for your home or business, featuring 2MP HD cameras, an 8-channel DVR with a pre-installed 3TB hard drive, and remote access capabilities. Please read this manual thoroughly before setup and use to ensure proper functionality and safety.
2. 패키지 내용
아래 나열된 모든 품목이 패키지에 포함되어 있는지 확인하세요. 품목이 누락되었거나 손상된 경우 고객 지원팀에 문의하세요.
- 1x DVR (Digital Video Recorder) with 3TB Hard Disk Drive preinstalled
- 8x HD Cameras (2MP)
- 8x 18.3m (60ft) Coaxial Cables for cameras
- 8x Screw sets for camera mounting
- 3x 전원 어댑터
- 2x 4-way power splitters
- 1x 1M Ethernet cable
- 1x USB 마우스
- 1x 빠른 설정 가이드

3. 설정
3.1 시스템 연결하기
Follow these steps to connect the main components of your security system:
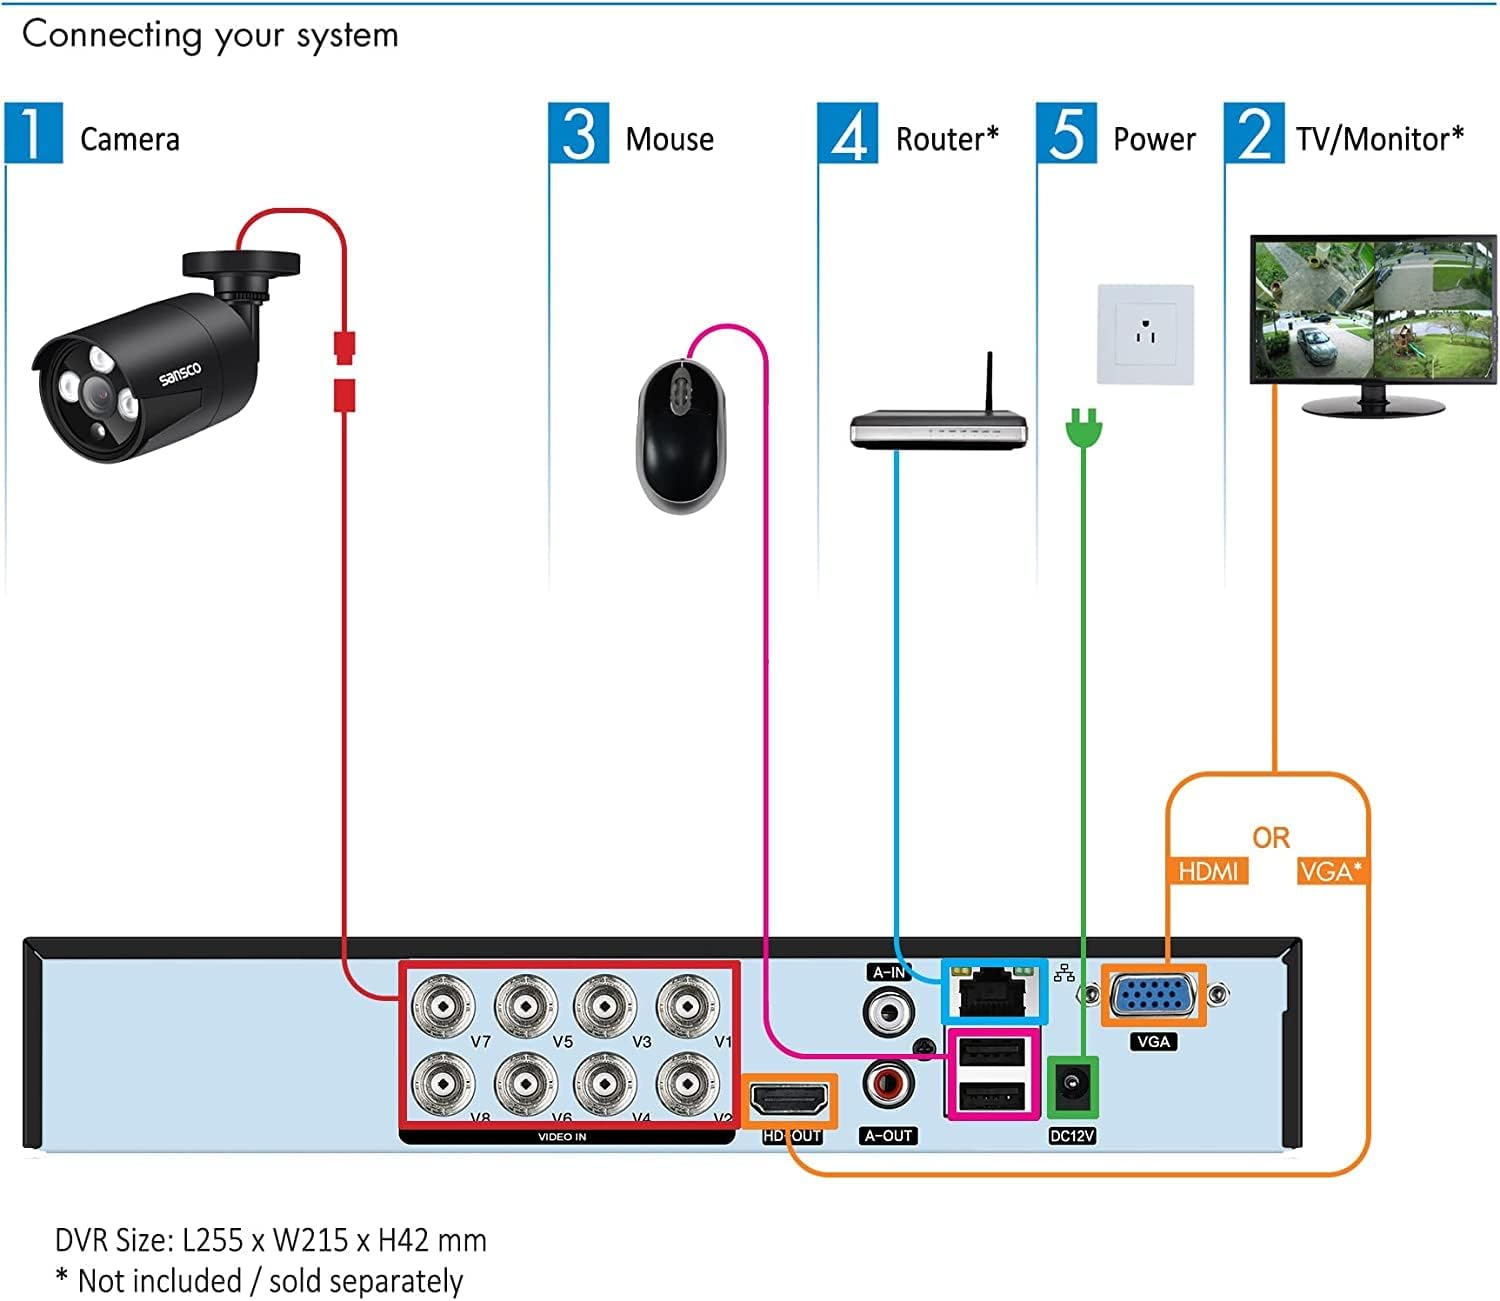
- 카메라 연결: Attach each camera to the DVR using the provided coaxial cables. Connect the BNC connector from the camera cable to the 'VIDEO IN' ports (V1-V8) on the back of the DVR.
- 파워 카메라: Use the 4-way power splitters and power adapters to supply power to the cameras. Connect the power cables from the cameras to the splitter, and then connect the splitter to a power adapter, which plugs into a wall outlet.
- 모니터/TV 연결: Connect the DVR to a monitor or TV using either an HDMI cable (for HD display) or a VGA cable. Ensure your display device supports at least 1080p resolution for optimal view주고받음.
- 마우스 연결: 탐색을 위해 USB 마우스를 DVR의 USB 포트 중 하나에 연결하세요.
- 네트워크에 연결(선택 사항): For remote access features, connect the DVR to your router using the provided Ethernet cable.
- 파워 DVR: Connect the DVR's power adapter to the DVR and then to a wall outlet.
3.2 초기 전원 켜기 및 구성
After connecting all components, power on the DVR. The system will boot up and display the live view from your cameras on the connected monitor. Follow the on-screen prompts for initial setup, which may include setting the date/time, creating a password, and configuring network settings.
4. 사용 설명서
4.1 라이브 View 그리고 녹음
Once the system is powered on, you will see the live video feeds from all connected cameras on your monitor. The DVR is pre-configured for 24/7 continuous recording to the 3TB hard drive. You can switch between single-camera view, 멀티 카메라 그리드 view, and other display modes using the DVR's interface and mouse.

4.2 Remote Access (Mobile App/PC Client)
To access your security system remotely via smartphone, tablet, or computer, ensure the DVR is connected to your network. Download the official mobile application (TSEye or XVRView) from your device's app store or the PC client software from the SANSCO website. Follow the in-app instructions to add your DVR using its unique ID or QR code. This allows you to view 인터넷 연결만 있으면 어디서든 실시간 영상 시청, 녹화 영상 재생, 알림 수신이 가능합니다.

4.3 동작 감지 및 알림
The system supports smart motion detection. You can configure specific areas within each camera's view to trigger alerts. When motion is detected, the system can send instant push notifications to your smartphone or tablet, and/or email alerts. This feature helps you stay informed of any activity on your property. Adjust sensitivity and define detection zones to minimize false alarms.

4.4 재생 및 백업
다시view 기록된 footage, navigate to the playback menu on the DVR interface or through the remote access app. You can search for recordings by date, time, or event (e.g., motion detection). The 3TB hard drive provides approximately 2 weeks of continuous recording for all 8 cameras in FHD 1080p before overwriting the oldest footage. For long-term storage, you can back up important video clips to a USB drive connected to the DVR.

5. 유지관리
5.1 하드 드라이브 관리
The pre-installed 3TB hard drive is designed for 24/7 security recording. It automatically overwrites the oldest footage once full, ensuring continuous recording. Regularly check the hard drive status through the DVR's system settings to ensure it is functioning correctly.
5.2 카메라 관리
The outdoor cameras are weatherproof. Periodically clean the camera lenses with a soft, damp 먼지, 흙 또는 물 얼룩을 제거하기 위한 천으로 막힘을 방지합니다. view. Ensure that the camera mounts are secure and that cables are not damaged. For outdoor installations, it is recommended to seal the cable connections (BNC and power) with waterproof tape or sealant to prevent moisture ingress, as these connections are not inherently waterproof.

6. 문제 해결
If you encounter issues with your security system, refer to the following common problems and solutions:
- 모니터에 영상 신호가 없습니다:
Ensure the HDMI or VGA cable is securely connected between the DVR and the monitor. Verify that the monitor is powered on and set to the correct input source. Check if the DVR is powered on. Ensure your monitor has a resolution of at least 1080p; lower resolutions may not display the DVR interface correctly. - 카메라 영상이 표시되지 않음:
Check that each camera is properly connected to the DVR's 'VIDEO IN' port. Verify that all cameras are receiving power via the power adapters and splitters. Inspect coaxial cables for any damage or loose connections. - No Audio Recording/Playback:
The cameras in this system do not have built-in microphones or speakers. To enable audio, external microphones must be connected to the DVR's 'AUDIO IN' ports and an external speaker to the 'AUDIO OUT' port (Mic & Speaker are not provided). - 원격 액세스가 작동하지 않음:
Confirm that the DVR is connected to your router via the Ethernet cable and has a stable internet connection. Check your router's settings to ensure the DVR is assigned an IP address. Verify that the mobile app or PC client is correctly configured with the DVR's ID and network settings. - Frequent False Motion Alerts:
Adjust the motion detection sensitivity settings for each camera through the DVR interface. Utilize the motion detectionAsk a question about this manual
Ask about setup, troubleshooting, compatibility, parts, safety, or missing instructions. Manuals+ will review the question and use this page’s manual context to help answer it.