
1. 제품 오버view
The YEEHUNG 12.3-inch HD Car Radio Screen is designed to upgrade the infotainment system in compatible Mercedes-Benz vehicles. It integrates modern features such as CarPlay and Android Auto while retaining the original vehicle's functions.

Image 1.1: The 12.3-inch HD Car Radio Screen displaying the CarPlay interface.
주요 특징:
- 12.3-inch HD IPS Touch Screen (1920x720 resolution)
- 리눅스 운영체제
- Bluetooth 5.0 연결
- Supports Wired and Wireless CarPlay
- Supports Wired and Wireless Android Auto
- 미러 링크 기능
- Compatible with OEM and aftermarket CVBS/720P AHD cameras
- USB 미디어 재생

Image 1.2: Visual representation of the screen's core features.
2. 설정 및 설치
2.1 호환성 검사
This unit is specifically designed for Mercedes-Benz C Class W204 models manufactured between 2012 and 2015, equipped with the NTG4.5/4.7 system. Before installation, verify your vehicle's year, model, and existing OEM system to ensure compatibility.

Image 2.1: Confirming vehicle year and model for compatibility.
2.2 패키지 내용
패키지에 모든 구성 요소가 들어 있는지 확인하세요.
- 1 x 12.3 inch HD Car Radio Screen
- ISO 배선 하네스 1개
- 1 x USB 케이블
- 1 x BC AMI Cable
- 1 x W204 Base
- 1 x 설치 설명서 (본 문서)

이미지 2.2: 제품 포장 내용물.
2.3 설치 단계
Professional installation is recommended. Refer to vehicle-specific guides for dashboard disassembly. The following points are critical during installation:
- Fiber Optic Cable Adaptation: Properly adapt the 2-pin fiber optic cable to the original ISO plug. This is crucial for sound transmission.
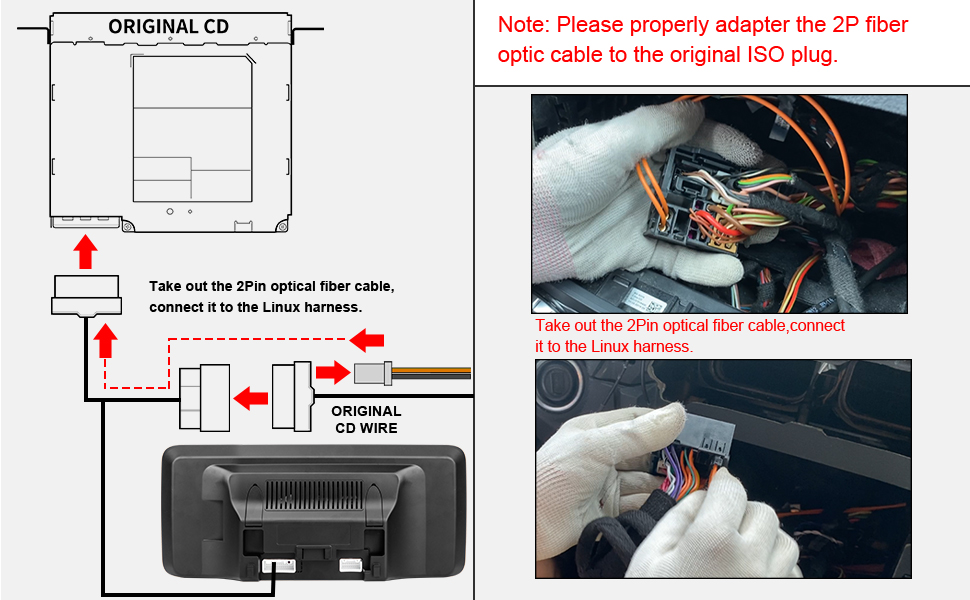
Image 2.3: Fiber optic cable connection diagram.
- 배선 관리: The new harness may create a tight fit. Tape wires together and carefully route them to ensure the original radio unit can be reinstalled without obstruction.
- AUX 오디오 연결: If your NTG4.5 system does not have an AUX menu, it must be activated. You will need to connect the audio output from the new screen to your car's AUX jack using either the provided AMI cable or the Audio out on the ISO cable, depending on your car's interface type.

Image 2.4: Connecting 'Audio out' to AMI.

Image 2.5: Connecting 'Audio out' to AUX IN.
- AUX 활성화: Navigate to the system settings to activate the AUX input if it's not already enabled.
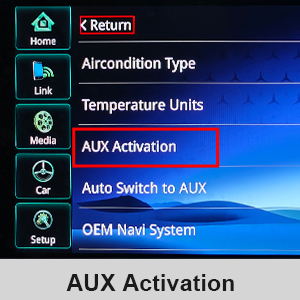
Image 2.6: AUX Activation menu in settings.
- Old Apple 30-pin Cable: If your car has an older 30-pin Apple cable in the glovebox or center console, unplug it from the OEM wiring harness. This cable can impede AUX sound through the new unit.
- USB Connection for Wired CarPlay/Android Auto: For wired CarPlay and Android Auto functionality, ensure you use the USB IN 1 port.
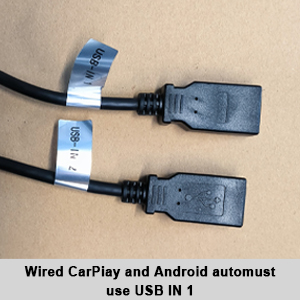
Image 2.7: USB IN 1 for wired CarPlay/Android Auto.
- OEM Resolution Setting: Adjust the OEM resolution setting within the unit's menu to match your vehicle's original display resolution for optimal clarity.

Image 2.8: Setting the OEM Resolution.
- 카메라 유형 설정: If installing a backup camera, configure the camera type (Original Camera or Aftermarket Camera) in the settings. The unit supports CVBS/720P AHD cameras.
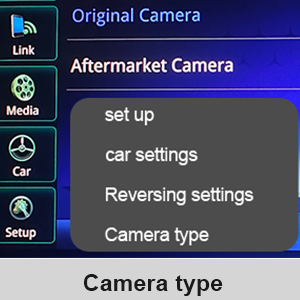
Image 2.9: Camera type selection in settings.

이미지 2.10: 설치 전후 view.
3. 사용 설명서
3.1 시스템 간 전환
The unit supports a dual system, allowing you to switch between the original OEM vehicle information display and the new CarPlay/Android Auto interface. This can typically be done via a dedicated button or a menu option on the screen.

Image 3.1: Switching between OEM and new system interfaces.
3.2 CarPlay 및 Android Auto
The screen supports both wired and wireless CarPlay and Android Auto. Connect your smartphone to access navigation, music, calls, and other compatible applications directly on the car's display. Control can be done via the touchscreen or the car's original knob.

Image 3.2: CarPlay and Android Auto in operation.
3.3 블루투스 통화 및 음악
The unit supports OEM Bluetooth calls and music playback. For optimal call quality, ensure your car has both factory Bluetooth and Bluetooth audio. After setup, you may need to switch the call mode on your phone to utilize the OEM Bluetooth sound when using CarPlay or Android Auto.

Image 3.3: OEM Bluetooth support for audio and calls.
3.4인치 후방 카메라 디스플레이
The screen integrates with OEM and aftermarket backup cameras (up to 720P AHD format), displaying the camera feed and radar information when reversing.

Image 3.4: Backup camera display with radar information.
3.5 Manual AUX Switching
If you experience unstable sound when using the automatic AUX switching function, you can manually select the AUX input to achieve a more stable audio connection.
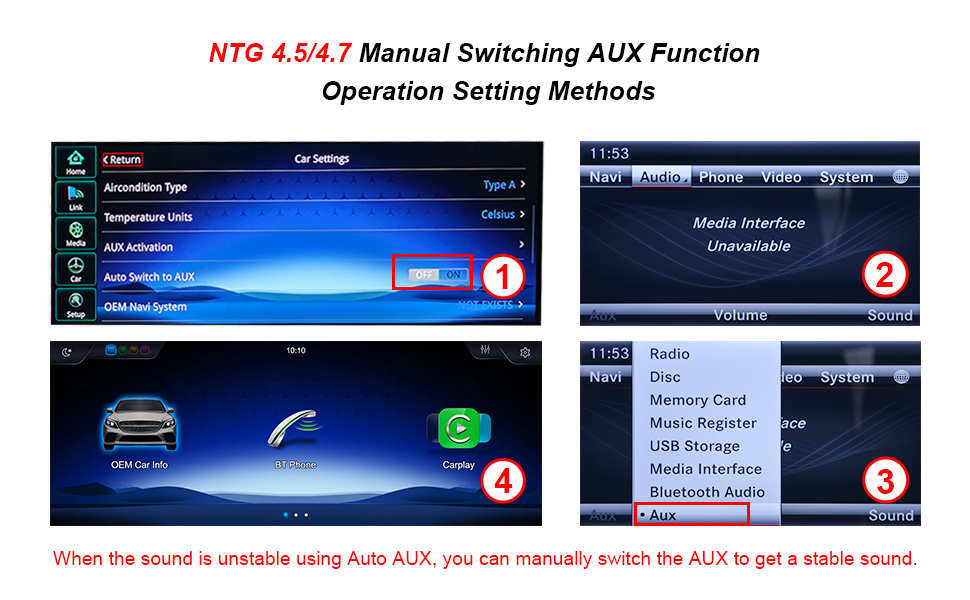
Image 3.5: Manual AUX function operation settings.
4. 유지관리
To ensure the longevity and optimal performance of your YEEHUNG car radio screen, follow these maintenance guidelines:
- 화면 청소: Use a soft, lint-free cloth specifically designed for electronics to clean the screen. Dampen the cloth lightly with water or a screen-safe cleaner if necessary. Avoid harsh chemicals, abrasive materials, or excessive moisture.
- 먼지 제거: Regularly wipe down the unit and surrounding areas to prevent dust buildup, which can affect performance and aesthetics.
- 소프트웨어 업데이트: 제조업체에서 제공하는 소프트웨어 업데이트가 있는지 확인하여 최신 기능과 버그 수정 사항을 활용하십시오.
- 극한의 온도를 피하세요: Do not expose the unit to extreme heat or cold for extended periods, as this can damage internal components.
5. 문제 해결
If you encounter issues with your YEEHUNG car radio screen, refer to the following common problems and solutions:
- No Sound or Unstable Audio:
- Ensure the AUX menu is activated in your NTG4.5 system settings.
- Verify the audio output cable is correctly connected to your car's AUX or AMI jack.
- If using Auto AUX, try manually switching to the AUX input.
- If an old 30-pin Apple cable is present in your car, ensure it is unplugged from the OEM wiring harness.
- 후방 카메라 영상이 표시되지 않음:
- Check the camera type setting in the unit's menu to ensure it matches your installed camera (OEM or Aftermarket).
- 모든 카메라 연결이 안전한지 확인하십시오.
- Ensure the camera format does not exceed 720P AHD, as higher resolutions are not supported.
- Unit is Slow or Takes Long to Start:
- This can sometimes occur. Ensure all background applications are closed if applicable.
- 문제가 지속되면 추가 지원을 위해 고객 지원팀에 문의하세요.
- Screen Not Lighting Up / No Power:
- Double-check all power connections and the ISO wiring harness.
- 차량의 점화가 켜져 있는지 확인하세요.
- If the unit remains unresponsive, it may indicate a hardware issue. Contact customer support.
For issues not covered here, or if troubleshooting steps do not resolve the problem, please refer to the Support section for contact information.
6. 사양
| 특징 | 사양 |
|---|---|
| 모델 번호 | FY-7L12 |
| 디스플레이 크기 | 12.3 인치 |
| 디스플레이 해상도 | 1920x720 |
| 운영 체제 | 리눅스 |
| 연결 기술 | 블루투스, USB, Wi-Fi |
| 블루투스 버전 | 5.0 |
| 특별 기능 | Built-In Bluetooth, Touchscreen, CarPlay, Android Auto, Mirror Link |
| 호환 장치 | 스마트폰 |
| 오디오 출력 모드 | 스테레오 재생 |
| 서라운드 사운드 채널 구성 | 5.0 |
| 비디오 인코딩 | H.264, H.265/HEVC |
| 채널 수 | 5 |
| 품목 무게 | 6.23파운드 |
| 제품 치수 | 12.83 x 0.98 x 5.67 인치 |
| 지원되지 않는 기능 | Aftermarket cameras exceeding 720P AHD format, 4G network |
7. 보증 정보
YEEHUNG provides the following warranty coverage for this product:
- Within 1 Month of Purchase: Free returns are available according to Amazon's return policy. Contact Amazon Buyer Services before initiating a return.
- 1 to 12 Months After Purchase: Free warranty service is provided for non-human damage. The customer is responsible for the cost of shipping the product back and forth within the U.S.
- After 1 Year of Purchase: Repair service is available. In addition to paying for postage within the U.S., customers will be responsible for additional parts replacement and labor costs.
8. 지원
For any questions, concerns, or technical assistance, please contact YEEHUNG customer support. To expedite assistance, clearly describe your issue and provide relevant details such as your vehicle model, year, and OEM system.
- Compatibility Inquiries: If you are unsure about product fitment, send a photo of your car's dashboard and the model year to customer support for verification.
- 응답 시간: Customer support aims to reply within 24 hours.