
1. 서론
This manual provides essential instructions for the setup, operation, maintenance, and troubleshooting of your Shuttle XPC Slim DH610 Barebone PC. The DH610 is a compact and versatile barebone system designed to support Intel 12th and 13th Generation LGA1700 processors, offering robust performance for various applications including office, digital signage, and kiosks.
2. 안전 정보
기기 손상이나 본인 부상을 예방하려면 다음 안전 지침을 읽고 따르세요.
- Always disconnect the power cord before performing any installation or maintenance.
- Ensure the system is placed on a stable, flat surface with adequate ventilation.
- 기기를 습기, 극한의 온도 또는 직사광선에 노출시키지 마세요.
- Only use the power adapter provided or an approved equivalent.
- Refer to qualified service personnel for any repairs not covered in this manual.
3. 패키지 내용
패키지에 모든 품목이 들어 있는지 확인하세요.
- Shuttle XPC Slim DH610 Barebone PC Unit
- VESA 마운트 키트
- 전원 어댑터 및 코드
- Accessory Pack (screws, cables, etc.)
- 빠른 시작 가이드(포함된 경우)
4. 설정 및 설치
The Shuttle DH610 is a barebone system, requiring the installation of a CPU, RAM, and storage devices before operation.
4.1. Opening the Chassis
Carefully remove the chassis cover to access the internal components. Typically, this involves unscrewing a few screws on the rear or sides of the unit and sliding the cover off.

Image: The Shuttle XPC Slim DH610 with its top cover removed, showing the internal layout including cooling fans and the motherboard.
4.2. CPU 설치
The DH610 supports Intel 12th/13th Generation Alder Lake-S LGA1700 processors with a maximum TDP of 65W. Ensure your chosen CPU has integrated graphics, as the system does not support F-series processors without integrated graphics or K-series processors.
- CPU 소켓 레버를 열고 보호 덮개를 제거하십시오.
- Carefully align the CPU with the socket, matching the triangular markers.
- CPU를 억지로 끼우지 말고 조심스럽게 소켓에 넣으세요.
- 소켓 레버를 닫아 CPU를 고정합니다.
- 제조업체의 지침에 따라 CPU 쿨러를 설치하세요.
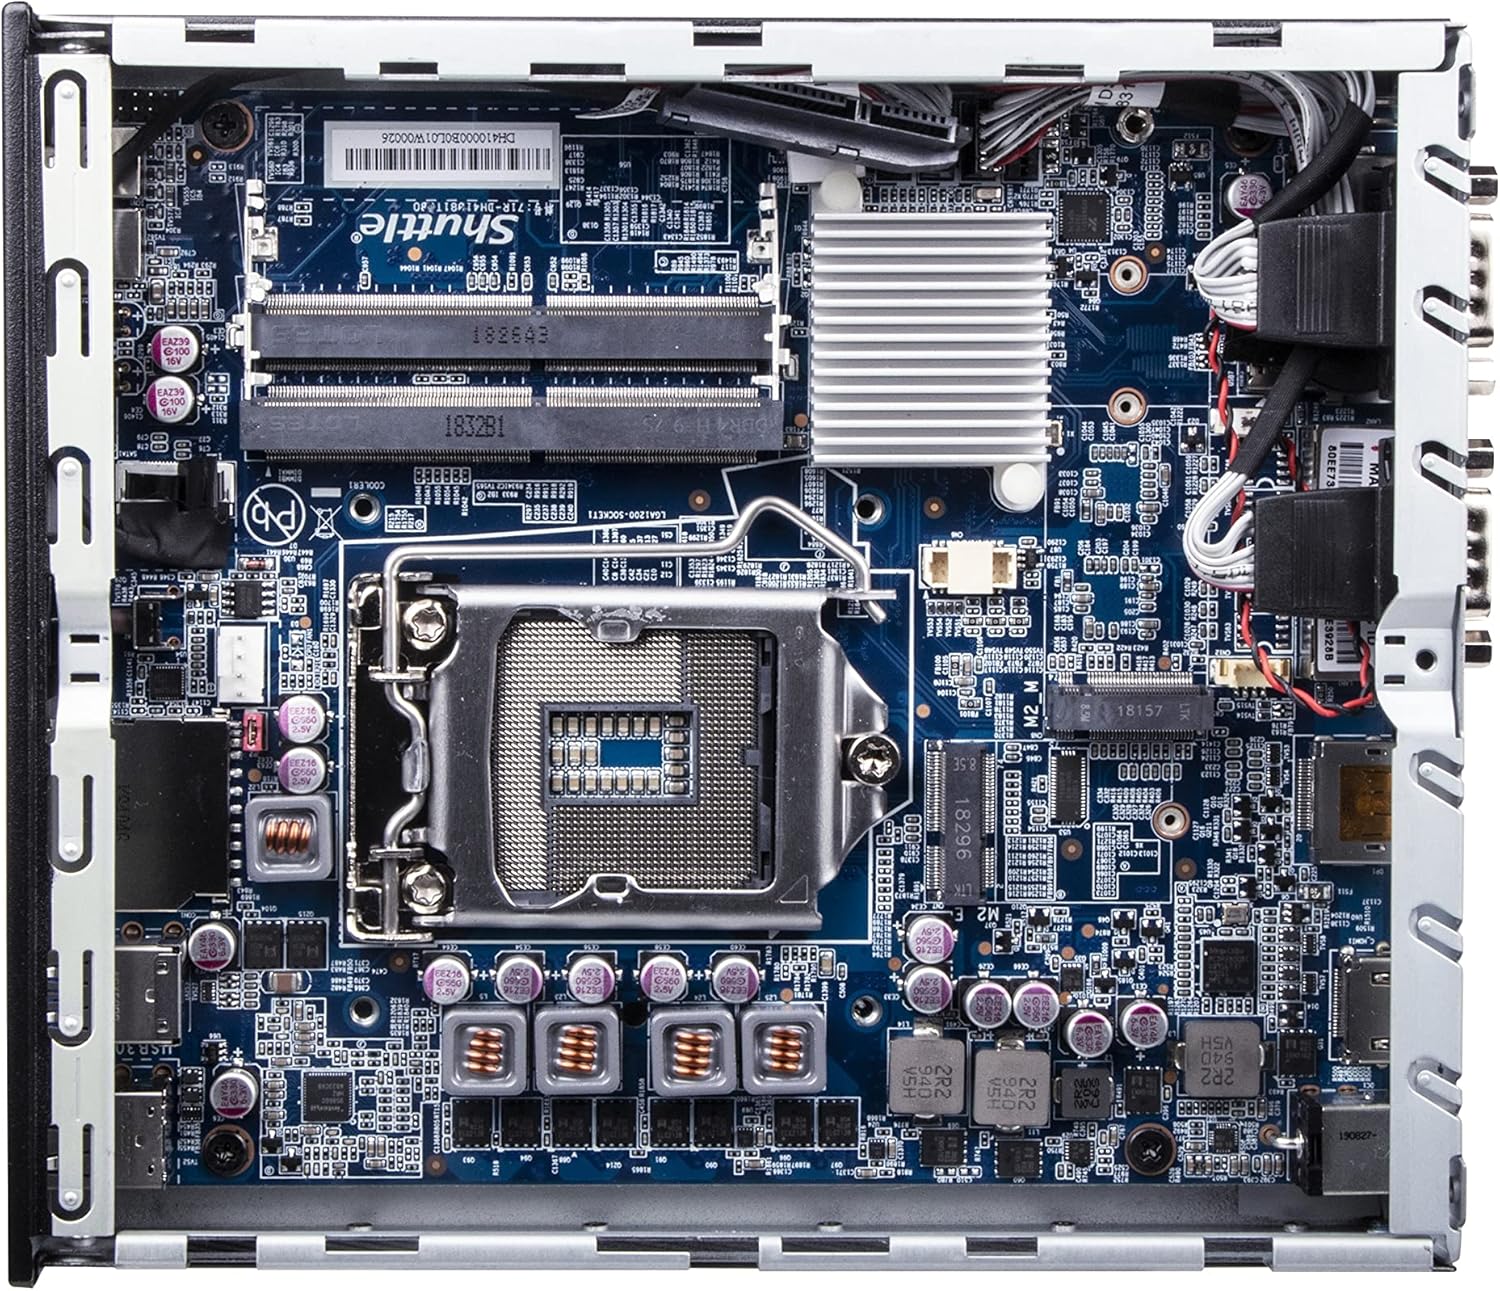
이미지: 자세한 view of the Shuttle DH610 motherboard, highlighting the LGA1700 CPU socket, RAM slots, and other integrated circuits.
Note: For 13th Gen Intel Processors, BIOS Version DH610000.202 or newer is required. Update BIOS if necessary after initial setup with a 12th Gen CPU or via a compatible method.
4.3. RAM 설치
The system features two 260-pin dual-channel DDR4 SODIMM slots, supporting up to 64GB (2x 32GB) at 3200MHz. Dual-channel memory is recommended for optimal performance.
- Locate the SODIMM slots on the motherboard.
- Align the notch on the RAM module with the key in the slot.
- Insert the module at a 45-degree angle and push down until the clips on both sides snap into place.
4.4. 스토리지 설치
The DH610 supports one 2.5-inch HDD/SSD and one M.2 2280 SSD.
- 2.5" Drive: Mount the 2.5" HDD/SSD into the designated bay using the provided screws and connect the SATA data and power cables.
- M.2 SSD: Insert the M.2 2280 SSD into its slot, securing it with the provided screw.
4.5. 주변기기 연결하기
After installing internal components, reattach the chassis cover. Connect your peripherals to the available ports:
- 표시하다: Connect your monitor(s) to the HDMI 2.0b port or one of the two DisplayPort outputs. The system supports up to three 4K UHD displays.
- USB 장치: Use the four USB 3.2 Gen1 ports (including one Type-C) and four USB 2.0 ports for keyboard, mouse, and other USB devices.
- 회로망: Connect to your network using either of the two Gigabit Ethernet LAN ports (Intel 2.5GbE + Intel 1GbE).
- Serial Devices: Utilize the two RS232 COM ports for compatible devices.
- 오디오: Connect headphones or a microphone to the front audio jacks.

Image: The front panel of the Shuttle DH610, featuring the power button, USB 3.2 Gen1 ports (one Type-C), and audio input/output jacks.

Image: The rear panel of the Shuttle DH610, displaying the DC-IN power input, HDMI, two DisplayPort outputs, two LAN ports, USB ports, and two COM ports.
4.6. 전원 연결
Connect the power adapter to the DC-IN port on the rear of the unit, then plug the power cord into an electrical outlet.
5. 사용 설명서
5.1. 전원 켜기 / 끄기
- 전원 켜기: 전면 패널에 있는 전원 버튼을 누릅니다.
- 전원 끄기 : Perform a graceful shutdown through your operating system. Alternatively, press and hold the power button for 4-5 seconds for a forced shutdown (use only when necessary).
5.2. 운영체제 설치
The DH610 is compatible with Windows 11/10 (64-bit) and Linux (64-bit) operating systems. Follow the standard installation procedures for your chosen OS. Ensure all necessary drivers are installed for optimal performance, which can typically be found on the Shuttle support web대지.
5.3. BIOS/UEFI 액세스
BIOS/UEFI 설정 유틸리티에 액세스하려면 다음을 누르십시오. 삭제 or F2 key repeatedly during system startup. This allows configuration of boot options, system settings, and hardware parameters.
6. 유지관리
6.1. 청소
Regularly clean the exterior of the unit with a soft, dry cloth. Use compressed air to clear dust from ventilation openings to ensure proper airflow and prevent overheating. Do not use liquid cleaners directly on the device.
6.2. BIOS 업데이트
Periodically check the Shuttle website for BIOS updates. BIOS updates can improve system stability, add support for new hardware (like 13th Gen Intel CPUs), and fix bugs. Follow the instructions provided with the BIOS update package carefully.
7. 문제 해결
If you encounter issues with your DH610, refer to the following common problems and solutions:
- 디스플레이 출력 없음:
- Ensure the monitor is powered on and correctly connected to the HDMI or DisplayPort.
- Verify that the CPU has integrated graphics and that the display cable is connected to the motherboard's video output, not a discrete graphics card (if applicable).
- 다른 디스플레이 케이블이나 모니터를 사용해 보세요.
- 시스템 전원이 켜지지 않음:
- Check that the power adapter is securely connected to both the unit and the electrical outlet.
- Ensure the CPU and RAM are correctly installed and seated.
- 다른 장치로 전원 콘센트를 테스트하세요.
- 13th Gen CPU Not Recognized:
- The system requires BIOS Version DH610000.202 or newer for 13th Gen Intel processors. If you have an older BIOS, you may need to install a 12th Gen CPU first to update the BIOS.
- 시스템 과열:
- Ensure the chassis ventilation holes are not obstructed.
- Clean any dust accumulation from the internal fans and heatsinks.
- Verify the CPU cooler is properly installed and making good contact with the CPU.
8. 사양
| 특징 | 사양 |
|---|---|
| 상표 | 우주선 |
| 모델명 | DH610 |
| CPU 소켓 | LGA 1700 |
| 지원되는 프로세서 | Intel 12th/13th Gen Alder Lake-S (65W max, with integrated graphics) |
| 칩셋 | 인텔 H610 |
| 램 종류 | DDR4 SODIMM (2x slots) |
| 최대 RAM 용량 | 64 GB (2x 32GB) |
| 메모리 속도 | 최대 3200MHz |
| 제도법 | Integrated Intel UHD Graphics (CPU dependent) |
| 비디오 출력 | 1x HDMI 2.0b, 2x DisplayPort (Supports triple 4K UHD displays) |
| 저장 | 1x 2.5" HDD/SSD bay, 1x M.2 2280 slot |
| USB 포트 | 4x USB 3.2 Gen1 (1x Type-C), 4x USB 2.0 (Total 8) |
| 랜 | 1x Intel 2.5GbE, 1x Intel 1GbE |
| 직렬 포트 | 2x RS232 (COM) |
| 운영 체제 호환성 | Windows 11/10 (64-bit), Linux (64-bit) |
| 전력 소비 | 65 Watts (CPU) |
| 포함된 구성 요소 | VESA 마운트 |
9. 보증 및 지원
9.1. 제조업체 보증
The Shuttle XPC Slim DH610 Barebone PC comes with a 3-Year Manufacturer's Warranty. This warranty covers defects in materials and workmanship under normal use. Please retain your proof of purchase for warranty claims.
9.2. 기술 지원
For technical assistance, driver downloads, BIOS updates, or further troubleshooting not covered in this manual, please visit the official Shuttle website or contact Shuttle customer support. Free lifetime technical support is typically provided by the manufacturer.
자세한 내용은 다음을 방문하세요. www.shuttle.com