1. 서론
This manual provides detailed instructions for the installation, operation, and maintenance of your ASUS Prime B650M-A AX Micro-ATX Motherboard. Designed to support AMD Ryzen 7000 series processors, this motherboard offers robust performance, comprehensive cooling, and extensive connectivity options for daily users and PC builders.
설치를 시작하기 전에 이 설명서를 꼼꼼히 읽어 올바른 설정을 완료하고 시스템의 성능과 수명을 극대화하십시오.
2. 패키지 내용
아래 나열된 모든 품목이 마더보드 패키지에 들어 있는지 확인하세요. 품목이 누락되었거나 손상된 경우 판매점에 문의하세요.
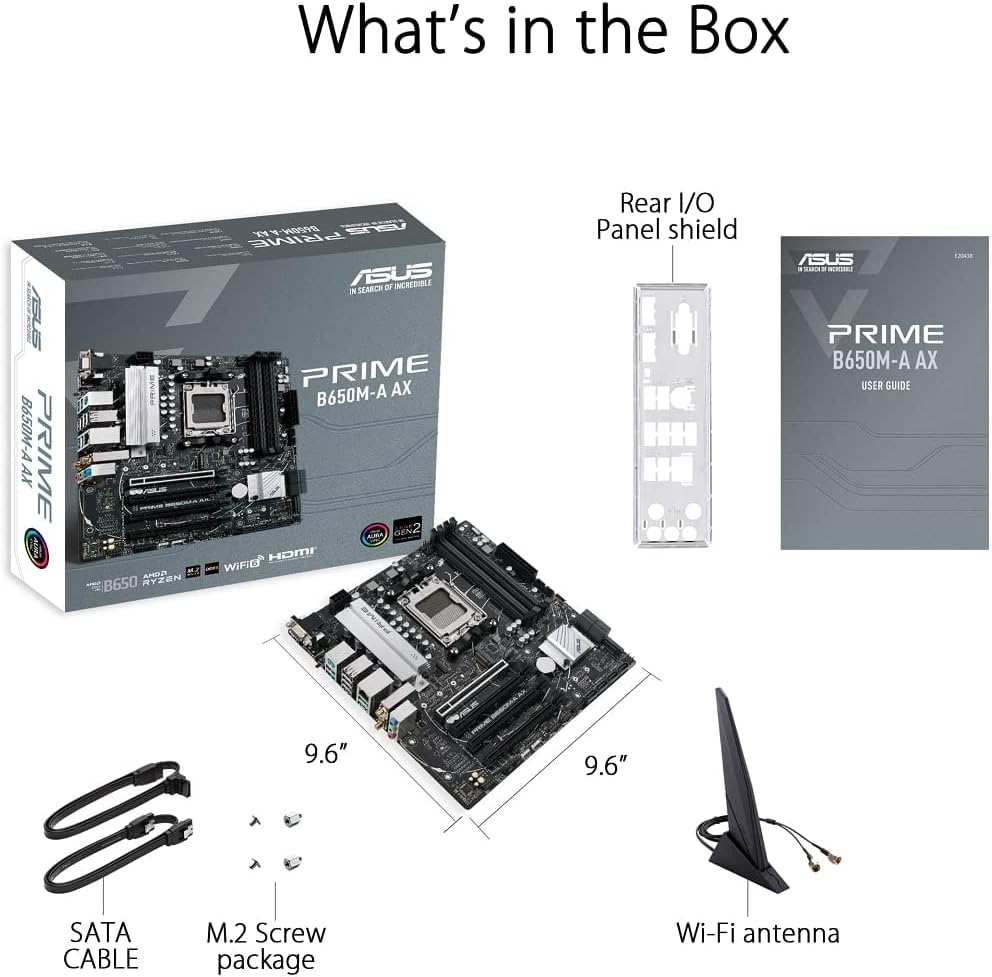
Figure 2.1: Contents of the ASUS Prime B650M-A AX Motherboard package.
- ASUS Prime B650M-A AX Motherboard
- 후면 I/O 패널 실드
- User Guide (Printed Manual)
- SATA 케이블 (2개)
- M.2 나사 패키지
- 와이파이 안테나
3. 제품 오버view 및 기능
The ASUS Prime B650M-A AX motherboard is designed to provide a stable and high-performance foundation for your PC build. Key features include:
3.1. Component Layout and Power Delivery

Figure 3.1: Motherboard layout highlighting power delivery and cooling components.
- AMD AM5 소켓: AMD 라이젠 7000 시리즈 데스크톱 프로세서에 최적화되어 있습니다.
- 강력한 전력 공급: Features a comprehensive VRM heatsink and thermal pads for stable power delivery to the CPU.
- 종합 냉각 시스템: Includes VRM heatsink, PCH heatsink, hybrid fan headers, and Fan Xpert 2+ for efficient thermal management.
3.2. 메모리 및 스토리지
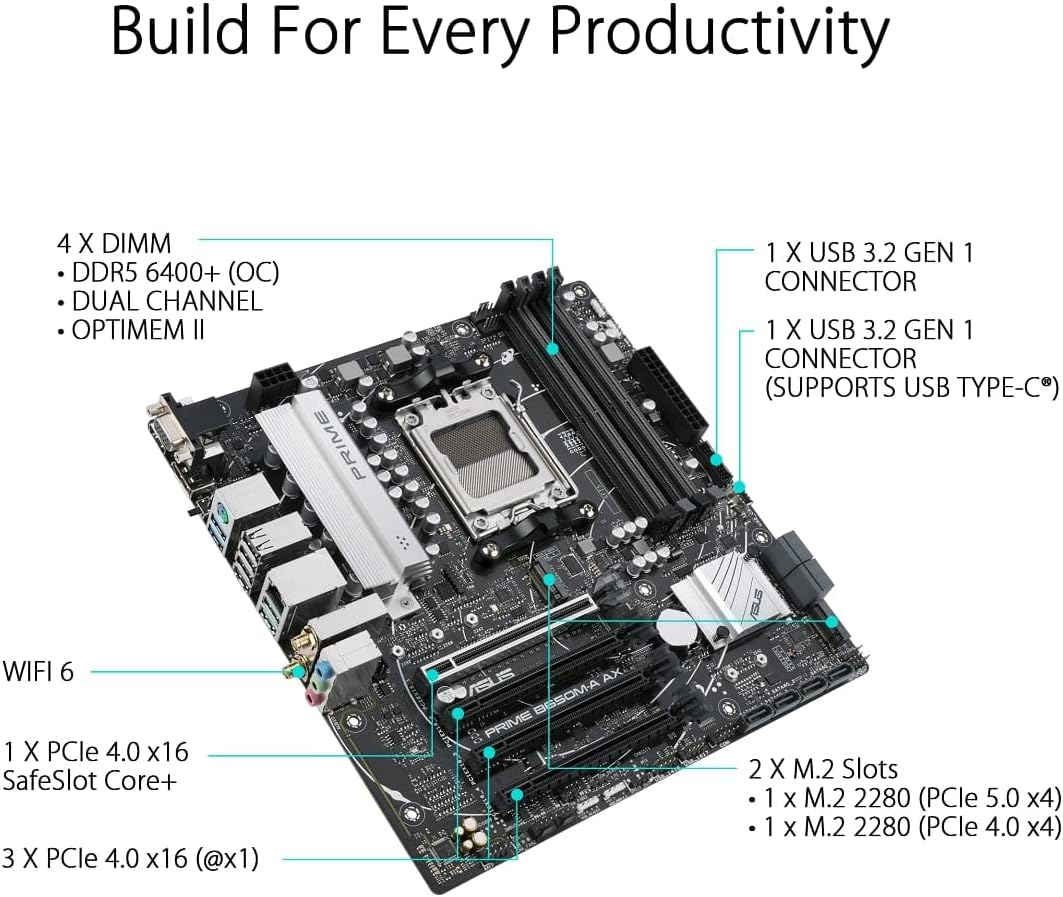
Figure 3.2: Motherboard layout highlighting memory and storage options.
- DDR5 지원: Four DIMM slots supporting DDR5 memory with ASUS OptiMem II for improved memory overclocking and signal integrity.
- PCIe 5.0 M.2: One PCIe 5.0 M.2 slot for ultra-fast storage, alongside another PCIe 4.0 M.2 slot.
- PCIe 확장: One PCIe 4.0 x16 SafeSlot Core+ and three PCIe 4.0 x1 slots for expansion cards.
3.3. 연결성

Figure 3.3: Rear I/O Panel connectivity options.
- 와이파이 6: Integrated Wi-Fi 6 for high-speed wireless networking.
- 2.5Gb LAN: Realtek 2.5Gb Ethernet for fast wired network connections.
- USB 포트: Multiple USB 3.2 Gen 2 ports, USB 3.2 Gen 1 ports (including front USB 3.2 Gen 1 Type-C®), and USB 2.0 ports.
- 비디오 출력: DisplayPort, HDMI, and VGA for display connectivity.
- BIOS FlashBack™: Dedicated button for easy BIOS updates without a CPU or memory installed.
3.4. Personalization and Audio
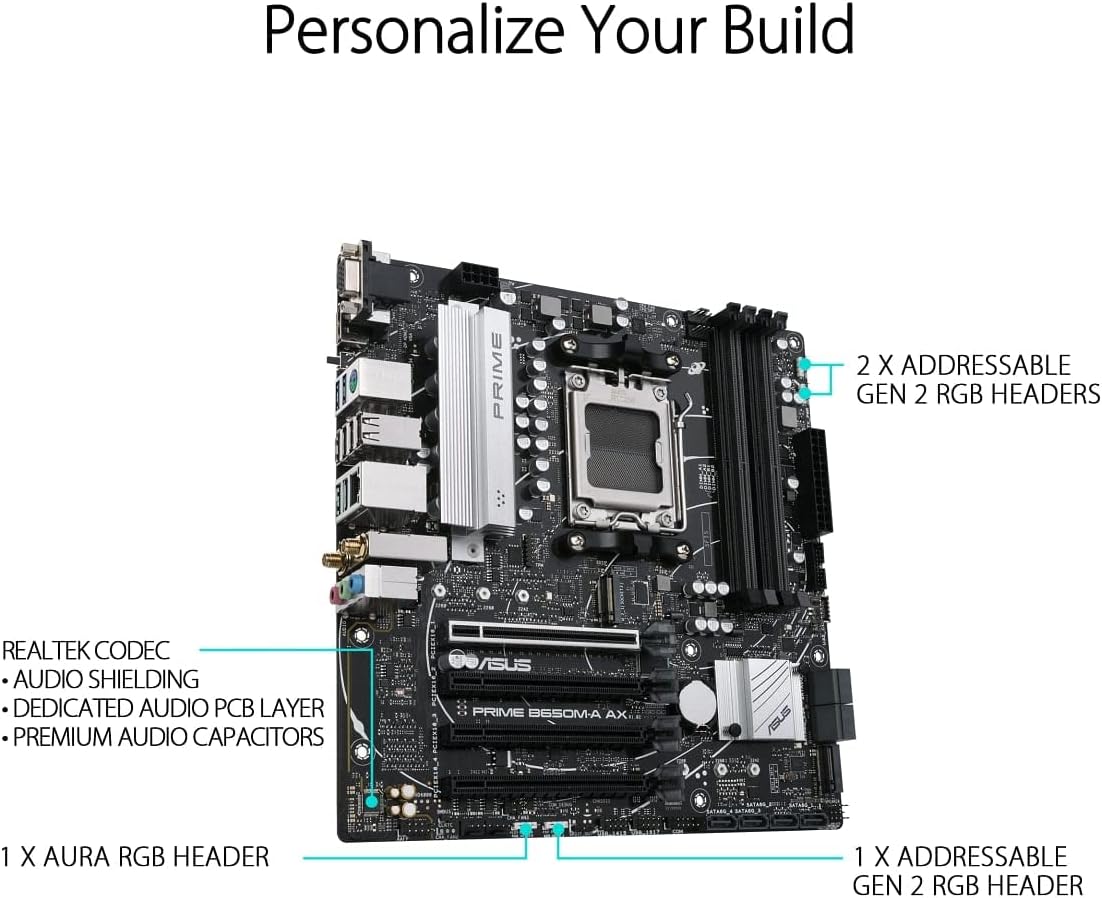
Figure 3.4: Motherboard layout highlighting audio and RGB features.
- 오라 싱크 RGB 조명: Onboard Addressable Gen 2 headers and an Aura RGB header for RGB LED strips, easily synced with Aura Sync-capable hardware.
- 향상된 오디오: Features Realtek Codec, audio shielding, a dedicated audio PCB layer, and premium audio capacitors for high-quality sound.
4. 설정 및 설치
Before you begin, ensure your system is powered off and unplugged from the wall outlet. Always handle the motherboard by its edges to prevent damage from static electricity.
- 섀시 준비: Install the I/O shield into your PC case. Ensure proper standoffs are installed in the chassis for the Micro-ATX form factor.
- 메인보드를 설치하세요: 마더보드를 케이스에 조심스럽게 넣고 나사 구멍과 스탠드오프를 맞춰주세요. 나사를 사용하여 마더보드를 고정합니다.
- CPU 설치: Open the CPU socket lever, align the CPU with the socket (triangle mark on CPU to triangle mark on socket), gently place the CPU, and close the lever to secure it.
- CPU 쿨러 설치: Mount your CPU cooler according to its manufacturer's instructions. Ensure thermal paste is applied.
- 메모리(RAM) 설치: Open the clips on the DIMM slots. Align the memory module's notch with the slot's key. Press down firmly on both ends until the clips snap into place. For dual-channel operation, refer to your motherboard's specific manual for recommended slot configurations.
- M.2 SSD 설치: Insert the M.2 SSD into the M.2 slot at an angle, then gently push it down and secure it with the provided M.2 screw.
- 그래픽 카드 설치(선택 사항): Insert your graphics card into the PCIe 4.0 x16 slot (SafeSlot Core+). Ensure it clicks into place and secure it with a screw to the chassis.
- 전원 케이블 연결: 전원 공급 장치의 24핀 ATX 전원 커넥터와 8핀 CPU 전원 커넥터를 마더보드에 연결합니다.
- 전면 패널 케이블 연결: Connect the power button, reset button, HDD LED, power LED, and front panel USB/audio cables to their respective headers on the motherboard. Refer to the motherboard manual for exact pin layouts.
- 저장 장치 연결: Connect SATA data cables from your SATA SSDs/HDDs to the SATA ports on the motherboard, and connect power cables from your power supply to the drives.
- Wi-Fi 안테나를 연결하세요: Screw the included Wi-Fi antenna onto the rear I/O panel connectors.
5. 사용 설명서
모든 구성 요소를 설치하고 연결하면 시스템의 전원을 켤 수 있습니다.
- 첫 번째 부팅: After powering on, the system will typically enter the BIOS/UEFI setup utility.
- BIOS/UEFI 설정:
- 누르다 델 or F2 POST(전원 켜기 자체 테스트) 중에 BIOS/UEFI 설정으로 진입합니다.
- Configure boot order, enable XMP/EXPO for memory, and set other system parameters as needed.
- 변경 사항을 저장하고 BIOS를 종료한 후 운영 체제 설치를 진행하십시오.
- 운영 체제 설치: Insert your Windows or Linux installation media and follow the on-screen prompts to install your preferred operating system.
- 드라이버 설치: After OS installation, install the latest drivers for your motherboard (chipset, LAN, Wi-Fi, audio, etc.) from the ASUS support web최적의 성능과 안정성을 보장하기 위한 사이트입니다.
6. 유지관리
정기적인 유지관리는 마더보드의 수명과 최적의 성능을 보장하는 데 도움이 됩니다.
- 먼지 제거: 압축 공기를 사용하여 마더보드와 부품의 먼지를 주기적으로 청소하십시오. 청소하기 전에 시스템 전원이 꺼져 있고 플러그가 뽑혀 있는지 확인하십시오.
- BIOS 업데이트: ASUS 지원을 확인하세요 website for the latest BIOS updates. Updating the BIOS can improve compatibility, stability, and performance. Use the BIOS FlashBack™ feature for convenient updates.
- 드라이버 업데이트 : 새로운 소프트웨어 및 하드웨어와의 호환성을 보장하고 성능 향상과 버그 수정의 혜택을 누리려면 마더보드 드라이버를 최신 상태로 유지하세요.
- 물리적 검사: 마더보드의 연결부가 헐거워졌는지, 부품이 손상되었는지, 과열 징후가 있는지 주기적으로 점검하십시오.
7. 문제 해결
이 섹션에서는 일반적으로 발생할 수 있는 문제에 대해 설명합니다.
| 문제 | 가능한 원인 | 해결책 |
|---|---|---|
| 시스템 전원이 켜지지 않습니다. | 전원 케이블이 헐거워졌거나, 전원 공급 장치가 불량이거나, 전면 패널 연결이 잘못되었을 수 있습니다. | Check 24-pin ATX and 8-pin CPU power connections. Verify front panel power switch connection. Test power supply. |
| 모니터에 표시되지 않습니다. | Incorrect video cable connection, faulty graphics card/integrated graphics, loose RAM. | Ensure monitor cable is securely connected to the correct port. Reseat graphics card and RAM modules. Test with integrated graphics if available. |
| 시스템이 예기치 않게 재부팅됩니다. | 과열, 불안정한 전원, 불량 RAM, 드라이버 문제. | Check CPU/GPU temperatures. Ensure adequate cooling. Test RAM with diagnostic tools. Update drivers. |
| 와이파이/LAN이 작동하지 않습니다. | Missing drivers, antenna not connected (Wi-Fi), loose Ethernet cable (LAN). | Install/update Wi-Fi and LAN drivers from ASUS website. Ensure Wi-Fi antenna is securely attached. Check Ethernet cable connection. |
보다 자세한 문제 해결 방법은 ASUS 지원 웹사이트에서 제공되는 종합 사용자 설명서를 참조하십시오. web사이트 또는 참조 사용 설명서 (PDF).
8. 사양
Below are the key technical specifications for the ASUS Prime B650M-A AX Motherboard:
| 특징 | 세부 사항 |
|---|---|
| 상표 | 아수스 |
| 모델명 | 프라임 B650M-A AX |
| CPU 소켓 | 소켓 AM5 |
| 호환 프로세서 | AMD 라이젠 7000 시리즈 |
| 칩셋 유형 | AMD B650 |
| RAM 메모리 기술 | DDR5 |
| 메모리 속도 | 최대 6400MHz(OC) |
| 메모리 저장 용량(최대) | 128GB (XNUMX기가바이트) |
| 무선형 | 802.11ax(와이파이 6) |
| 랜 | 리얼텍 2.5Gb 이더넷 |
| 제품 치수 | 10.8 x 10.9 x 2.7 인치 |
| 품목 무게 | 2.9파운드 |
| 권tage | 12 볼트 |
| 첫 번째 가능한 날짜 | 12년 2022월 XNUMX일 |
9. 보증 및 지원
ASUS provides a limited warranty for its products. For specific warranty terms and conditions, please refer to the warranty card included with your product or visit the official ASUS support web대지.
For technical support, driver downloads, BIOS updates, and further documentation, please visit the official ASUS support web이 사이트를 참고하세요. 또한 종합적인 정보를 참조할 수도 있습니다. 사용 설명서 (PDF) 자세한 내용은
ASUS 지원 Web대지: https://www.asus.com/support/