1. 서론
구매해주셔서 감사합니다asing the Lanix LX240 V7 23.8-inch Full HD Monitor. This manual provides essential information for the safe and efficient use of your new monitor. Please read it thoroughly before installation and keep it for future reference.
2. 안전 정보
모니터 손상을 방지하고 사용자 안전을 확보하기 위해 다음 안전 수칙을 준수하십시오.
- 화재나 감전을 방지하기 위해 모니터를 비나 습기에 노출시키지 마십시오.
- 모니터를 열지 마세요asing. 내부에는 사용자가 수리할 수 있는 부품이 없습니다. 모든 수리는 자격을 갖춘 기술자에게 맡기십시오.
- 모니터가 떨어지지 않도록 안정적이고 평평한 표면에 놓으세요.
- 모니터 주변의 통풍이 잘 되도록 하십시오. 통풍구를 막지 마십시오.
- 모니터와 함께 제공된 전원 어댑터만 사용하세요.
- 장시간 모니터를 사용하지 않을 경우에는 콘센트에서 전원 플러그를 뽑아 두세요.
3. 패키지 내용
포장을 풀 때 모든 품목이 들어 있고 상태가 양호한지 확인하세요.
- Lanix LX240 V7 Monitor
- 전원 어댑터
- HDMI 케이블
- 사용 설명서 (본 문서)

Image: Lanix LX240 V7 Monitor packaging box, showing the monitor model and key features.
4. 설정
4.1 스탠드 조립
모니터에 스탠드를 부착하려면 다음 단계를 따르세요.
- 모니터를 포장에서 조심스럽게 꺼내 보호하세요.
- 스탠드 받침대를 스탠드 목 부분에 부착하십시오. 제공된 나사를 사용하여 고정하십시오.
- 조립된 스탠드를 모니터 뒷면의 장착 슬롯에 맞춰 정렬합니다.
- Gently push the stand into the slot until it clicks into place or secure with screws.

이미지: 후면 view of the Lanix LX240 V7 monitor, showing the stand attachment point and port area.
4.2 모니터 연결
적절한 케이블을 사용하여 모니터를 컴퓨터에 연결하십시오.
- 전원 연결: 전원 어댑터를 모니터의 전원 입력 단자에 연결한 다음, 어댑터를 전원 콘센트에 꽂으십시오.
- 비디오 연결:
- HDMI : HDMI 케이블의 한쪽 끝을 모니터의 HDMI 포트에 연결하고 다른 쪽 끝을 컴퓨터의 HDMI 포트에 연결합니다.
- VGA : VGA 케이블의 한쪽 끝을 모니터의 VGA 포트에 연결하고 다른 쪽 끝을 컴퓨터의 VGA 포트에 연결하십시오.
- 오디오 연결(해당되는 경우): The monitor has integrated speakers. If using HDMI, audio will transmit automatically. For VGA, ensure your computer's audio output is configured correctly.
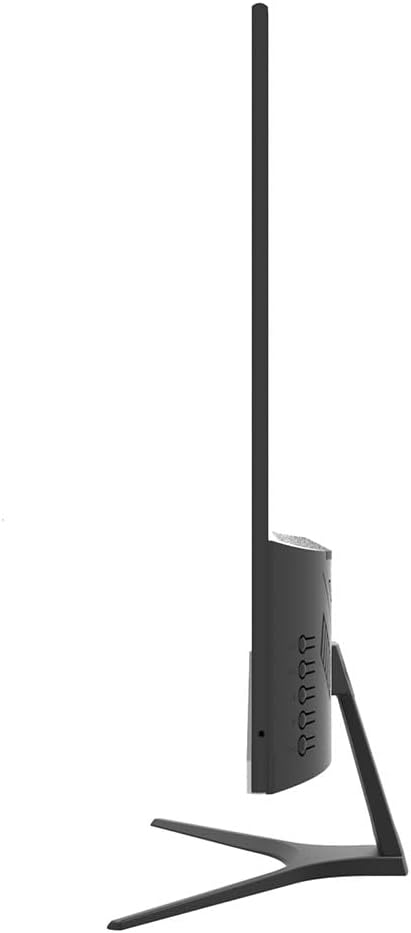
이미지: 측면 view of the Lanix LX240 V7 monitor, illustrating the location of input ports and control buttons.
5. 사용 설명서
5.1 전원 켜기/끄기
모니터에 있는 전원 버튼을 눌러 모니터를 켜거나 끄세요. 모니터가 켜지면 전원 표시등이 켜집니다.
5.2 입력 소스 선택
If you have multiple devices connected, you may need to manually select the input source:
- Press the "Input" or "Source" button on the monitor (refer to the side view image for button locations).
- Use the navigation buttons to select between HDMI and VGA inputs.
- Press the "Menu" or "OK" button to confirm your selection.
5.3 온스크린 디스플레이(OSD) 메뉴
OSD 메뉴를 사용하면 다양한 모니터 설정을 조정할 수 있습니다.
- "메뉴" 버튼을 눌러 OSD를 여세요.
- Use the navigation buttons (usually up/down or left/right arrows) to browse through menu options such as Brightness, Contrast, Color Settings, Aspect Ratio, etc.
- Press "Menu" or "OK" again to enter a sub-menu or confirm a setting.
- Press the "Exit" or "Menu" button repeatedly to close the OSD.

이미지: 앞면 view of the Lanix LX240 V7 monitor, showcasing its display area and slim bezels.
6. 유지관리
적절한 유지 관리는 모니터의 수명을 연장시켜 줍니다.
- 화면 청소: 부드럽고 보풀이 없는 천으로 화면을 부드럽게 닦으세요. 잘 지워지지 않는 얼룩의 경우,amp물이나 전용 화면 세척제를 천에 살짝 묻혀 닦아주세요. 절대로 액체를 화면에 직접 분사하지 마세요.
- C 청소asing: 부드럽고 마른 천을 사용하여 모니터를 닦으세요.asing. 연마성 세척제나 용제 사용을 피하세요.
- 저장: 장기간 모니터를 보관할 경우 모든 케이블을 분리하고 시원하고 건조한 곳에 보관하세요. 원래 포장 상태로 보관하는 것이 좋습니다.
7. 문제 해결
일반적인 문제와 해결 방법은 다음 표를 참조하세요.
| 문제 | 가능한 원인 | 해결책 |
|---|---|---|
| 화면에 이미지가 없습니다. | 모니터 전원이 켜져 있지 않음; 잘못된 입력 소스; 비디오 케이블이 헐거워짐. | Ensure power cable is connected and monitor is turned on. Select correct input source (HDMI/VGA). Check video cable connections. |
| 이미지가 너무 어둡거나 밝습니다 | 밝기/대비 설정이 올바르지 않습니다. | OSD 메뉴를 통해 밝기와 대비 설정을 조정하세요. |
| 스피커에서 소리가 나지 않습니다 | 오디오 설정이 잘못되었습니다. 볼륨이 너무 낮습니다. | Check monitor's volume settings in OSD. Ensure computer's audio output is set to the monitor (for HDMI) or external speakers (for VGA). |
| 이미지가 깜빡이거나 불안정함 | Loose video cable; Incorrect refresh rate. | Ensure video cable is securely connected. Check your computer's display settings for the correct refresh rate (60Hz). |
8. 사양
| 모델명 | LX240 V7 |
| 화면 크기 | 23.8 inches (23.6 inches actual) |
| 패널 유형 | 주도의 |
| 해결 | 1920 x 1080(풀HD) |
| 종횡비 | 1.78:1 (16:9) |
| 새로 고침 빈도 | 60Hz |
| 응답 시간 | 5밀리초 |
| 명도 | 250칸델라/제곱미터 |
| 대비율 | 3000시 1분 |
| View잉 각도 | 178도 |
| 연결성 | HDMI 1개, VGA 1개 |
| 내장 스피커 | 예 |
| 전력 소비 | 22 와트 |
| 치수(높이 x 너비 x 깊이) | Approx. 21cm x 25cm x 5cm (screen only, based on image) |
| 무게 | 2.71 킬로그램 |
이미지: 앞면 view of the Lanix LX240 V7 monitor with height, width, and depth measurements indicated.
9. 보증 및 지원
보증 정보: The Lanix LX240 V7 monitor comes with a 1-year manufacturer's warranty. This warranty covers defects in materials and workmanship under normal use. It does not cover damage caused by misuse, accidents, unauthorized modifications, or external causes.
고객 지원: For technical assistance, warranty claims, or service inquiries, please contact Lanix customer support. Refer to the official Lanix web자세한 연락처 정보는 해당 사이트나 구매 설명서를 참조하세요.