
소개
The Phanteks Eclipse G360A is a high-performance mid-tower gaming chassis designed for optimal airflow and component compatibility. It features an ultra-fine performance mesh front panel for superior cooling and dust filtration, integrated Digital-RGB lighting, and extensive support for modern gaming hardware including large GPUs and advanced liquid cooling solutions. This manual provides detailed instructions for setting up, operating, and maintaining your Eclipse G360A chassis.
설정 및 설치
1. 언박싱 및 구성품
Carefully remove the chassis from its packaging. Verify that all components and accessories are present. The package should include the Eclipse G360A chassis, pre-installed 120mm D-RGB fans, and an accessory box containing screws, zip ties, and the user manual.
2. 구성 요소 호환성
- 마더보드 지원: ATX, micro-ATX, mini-ITX, E-ATX (up to 280mm wide).
- GPU 길이: Up to 400 mm (15.7 in).
- CPU 쿨러 높이: Up to 162 mm (6.3 in).
- PSU 길이: Up to 220 mm (280 mm depending on HDD cage location).
- 저장: 2x 3.5" internal (included), 3x 2.5" internal (2 included).

그림 1: 내부 view highlighting 400mm GPU clearance, supporting high-end graphics cards.

Figure 2: Multiple storage options for 2.5" and 3.5" drives, with flexible mounting points.
3. 설치 단계
- 섀시 준비: Remove the tempered glass side panel by unscrewing the thumb screws. The front panel can be detached for easier fan/radiator installation.
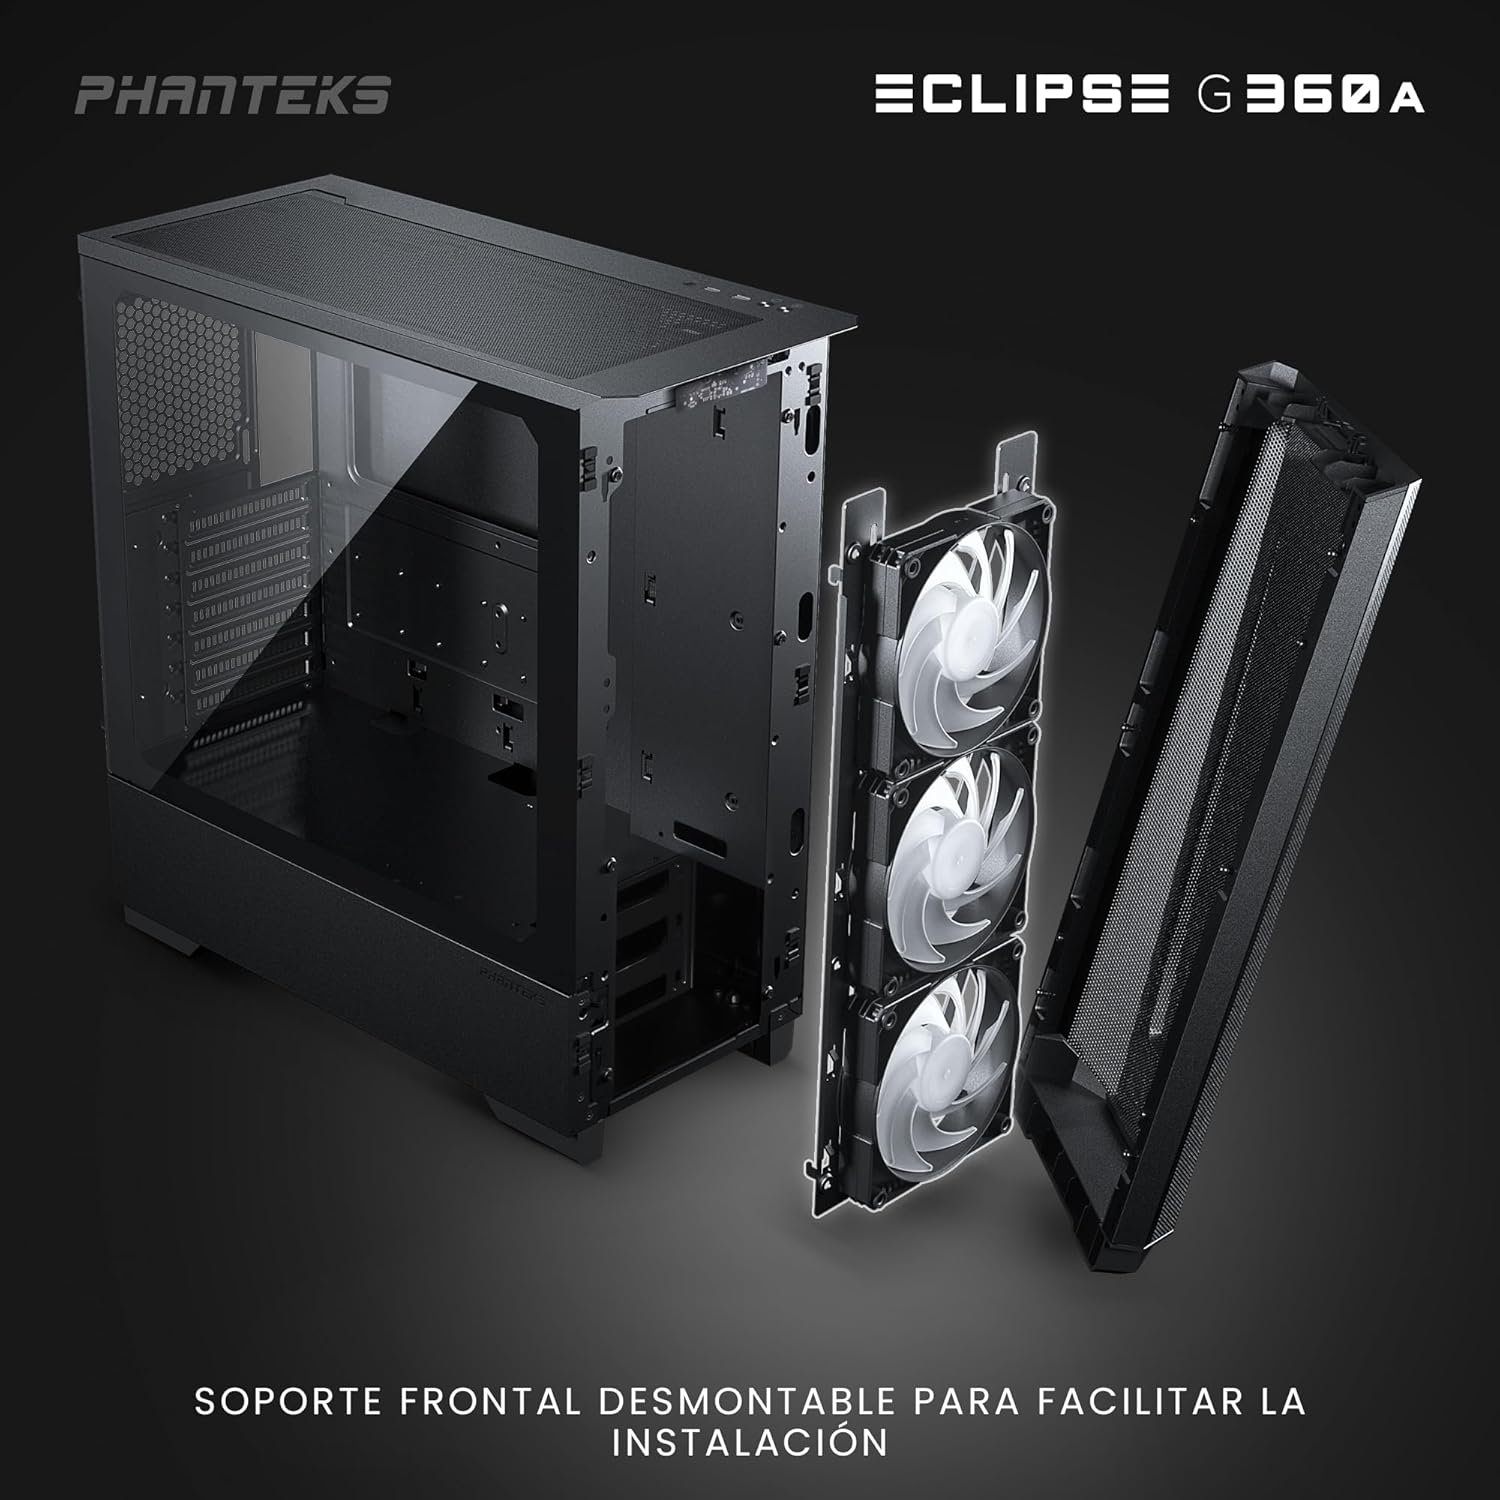
Figure 3: Detachable front panel and fan bracket for simplified installation.
- 마더보드 설치: Secure your motherboard to the standoffs using the provided screws.
- 저장 드라이브 설치: Mount 2.5" SSDs to the dedicated locations behind the motherboard tray or on the PSU shroud. Install 3.5" HDDs into the drive cages located under the PSU shroud.
- 전원 공급 장치(PSU) 설치: Slide the PSU into its designated compartment at the bottom rear of the chassis and secure it with screws.
- 그래픽 카드(GPU) 설치: Insert your graphics card into the PCIe slot on the motherboard. The chassis supports vertical GPU mounting with an optional bracket (PH-VGPUKT4.0_03).
- Install Cooling Components: The G360A supports various fan and radiator configurations.
- 팬 지원: Front: 3x 120mm (3 pre-installed) or 2x 140mm; Top: 3x 120mm or 2x 140mm; Rear: 1x 120mm.
- 라디에이터 지원 : Front: Up to 360mm or 280mm; Top: Up to 360mm; Rear: 120mm. Note: Front and top 360mm radiators cannot be installed simultaneously.

Figure 4: Detailed fan and radiator placement options for optimal cooling.
- 케이블 관리 : Utilize the 36mm (1.4 in) cable management space behind the motherboard tray to route and secure cables for a clean build and improved airflow.
작동 지침
1. 전면 입출력 패널 기능
전면 I/O 패널은 필수 제어 장치와 포트에 편리하게 접근할 수 있도록 해줍니다.
- 전원 버튼: 시스템을 켜거나 끕니다.
- USB 3.0 포트 2개: USB 장치를 연결하는 데 사용됩니다.
- 마이크/헤드폰 콤보 잭: 오디오 입력 및 출력용.
- D-RGB Mode Button: Cycles through pre-programmed lighting effects.
- D-RGB Color Button: Changes the color of the D-RGB lighting.

Figure 5: Front I/O panel with easy-access controls for power, USB, audio, and D-RGB lighting.
2. Digital-RGB Lighting Control
The Eclipse G360A features integrated D-RGB lighting with pre-installed 120mm D-RGB fans and an LED strip along the tempered glass panel. The lighting can be controlled in two ways:
- 수동 제어: Use the D-RGB Mode and Color buttons on the front I/O panel to cycle through various effects and colors without software.
- 메인보드 동기화: The D-RGB controller can be connected to a compatible motherboard's D-RGB header (e.g., ASUS Aura Sync, MSI Mystic Light Sync, GIGABYTE RGB Fusion, ASRock Polychrome Sync, Razer Chroma). This allows for software control and synchronization with other D-RGB components in your system. Refer to your motherboard manual for D-RGB header location and software instructions.
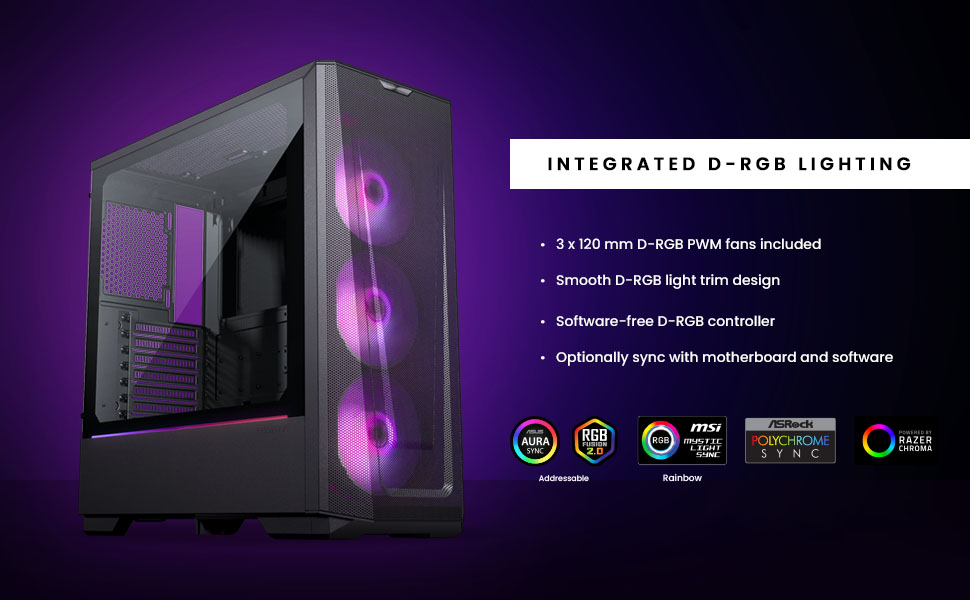
Figure 6: Integrated D-RGB lighting and compatibility with major motherboard synchronization software.
유지
1. Cleaning the Ultra-fine Performance Mesh
The front panel's ultra-fine mesh acts as a dust filter. To maintain optimal airflow and prevent dust buildup, regularly clean the mesh:
- Gently detach the front panel.
- Use a soft brush or compressed air to remove accumulated dust from the mesh.
- Wipe the mesh with a slightly damp 필요한 경우 천으로 덮고, 다시 부착하기 전에 완전히 말려야 합니다.

Figure 7: The ultra-fine performance mesh design, crucial for airflow and dust filtration.
2. General Chassis Cleaning
For general cleaning of the chassis exterior and interior:
- 시스템의 전원이 꺼져 있고 플러그가 뽑혀 있는지 확인하십시오.
- Use a microfiber cloth to wipe down exterior surfaces.
- For interior dust, use compressed air to blow dust out of components and the chassis.
- Clean the tempered glass panel with a glass cleaner and a soft cloth.
문제 해결
일반적인 문제 및 솔루션
| 문제 | 가능한 원인 | 해결책 |
|---|---|---|
| 시스템 전원이 켜지지 않습니다. | 전원 연결 불량, 파워서플라이 불량, 전면 패널 헤더 연결 오류. | Check all power cables (24-pin, 8-pin CPU, GPU). Verify front panel power switch connection to motherboard. Test PSU if possible. |
| D-RGB lighting not working or incorrect. | Loose D-RGB cable connection, incorrect D-RGB header, software conflict. | Ensure D-RGB cables are securely connected. If using motherboard sync, verify connection to a 3-pin 5V D-RGB header (not 4-pin 12V RGB). Try manual control via case buttons. Reinstall or update motherboard RGB software. |
| 공기 흐름이 좋지 않거나 온도가 높습니다. | Dust buildup, incorrect fan orientation, obstructed airflow. | Clean front mesh and other dust filters. Ensure fans are oriented correctly (intake/exhaust). Check for cable obstructions inside the case. |
| 전면 USB 포트가 작동하지 않습니다. | Loose USB 3.0 header cable connection to motherboard. | Verify the USB 3.0 cable from the front panel is securely connected to the motherboard's USB 3.0 header. |
명세서
| 특징 | 세부 사항 |
|---|---|
| 모델명 | 이클립스 G360A |
| 모델 번호 | PH-EC360ATG_DBK02 |
| 폼 팩터 | 미드 타워 |
| 치수(폭x깊이x높이) | 455 x 200 x 465mm / 17.9 x 7.87 x 18.3인치 |
| 기재) | Steel Chassis, Tempered Glass |
| 마더보드 지원 | ATX, micro-ATX, mini-ITX, E-ATX (최대 너비 280mm) |
| 전면 I/O | 2x USB 3.0, Microphone/Headphone Combo, Power Button, D-RGB Mode, D-RGB Color |
| 확장 슬롯 | 7 |
| 내부 3.5인치 드라이브 베이 | 2개 (2개 포함) |
| 내부 2.5인치 드라이브 베이 | 3개 (2개 포함) |
| 사전 설치된 팬 | 3x 120mm D-RGB (Front) |
| 팬 지원 (120mm) | Front: 3x; Top: 3x; Rear: 1x |
| 팬 지원 (140mm) | Front: 2x; Top: 2x |
| Radiator Support (120mm) | Front: Up to 360mm; Top: Up to 360mm; Rear: 120mm |
| Radiator Support (140mm) | Front: Up to 280mm; Top: Up to 360mm |
| 최대 GPU 길이 | 400mm / 15.7인치 |
| 최대 CPU 쿨러 높이 | 162mm / 6.3인치 |
| 케이블 관리 공간 | 36mm / 1.4인치 |
| 최대 PSU 길이 | 220 mm / 280 mm (depends on HDD Cage location) |
보증 및 지원
보증 정보
Phanteks products are manufactured to the highest quality standards. For detailed warranty terms and conditions, please refer to the warranty card included with your product or visit the official Phanteks web사이트. 보증은 일반적으로 정상적인 사용 중에 발생하는 재료 및 제조상의 결함을 보장합니다.
고객 지원
Should you encounter any issues or have questions regarding your Phanteks Eclipse G360A chassis, please contact Phanteks customer support. You can find contact information, FAQs, and additional resources on the official Phanteks web대지: