UPGRAVITY UPGRAVITY Dual Monitor Wall Mount
UPGRAVITY 듀얼 모니터 벽걸이 마운트 사용 설명서
Model: Dual Monitor Wall Mount (VESA 75/100)
1. 서론
This manual provides detailed instructions for the installation, operation, and maintenance of your UPGRAVITY Dual Monitor Wall Mount. Designed for two 17-32 inch flat or curved computer screens, this mount features height-adjustable gas spring arms capable of holding up to 17.6 lbs per arm, with VESA compatibility for 75x75mm and 100x100mm patterns. Please read this manual thoroughly before installation to ensure safe and proper use.
2. 안전 정보
설치 및 사용 시에는 항상 안전을 최우선으로 고려하십시오. 이 지침을 따르지 않을 경우 재산 피해 또는 인명 피해가 발생할 수 있습니다.
- Ensure the mounting surface can safely support the combined weight of the mount and your monitors.
- 건식벽체에만 설치하지 마십시오. This mount must be installed into a solid wood stud, concrete wall, or brick wall.
- Use appropriate tools and hardware as specified.
- 설치하는 동안 어린이와 애완동물이 작업 구역에 접근하지 못하도록 하세요.
- Adjust gas spring tension carefully to match monitor weight.
3. 패키지 내용
설치를 시작하기 전에 모든 구성 요소가 있는지 확인하세요.
- 벽판 조립체
- Dual Gas Spring Monitor Arms (2)
- VESA Monitor Plates (2)
- Mounting Hardware Kit (screws, washers, spacers, wall anchors)
- 공구 (육각 렌치)
- 사용 설명서
4. 설정 및 설치
4.1 벽면 플레이트 장착

Image: The wall mount is compatible with brick, cement, and wood walls. Do not install on drywall alone.
- Locate a suitable mounting position on a solid wood stud, concrete wall, or brick wall. Use a stud finder for wood studs.
- Hold the wall plate against the wall at the desired height and use a pencil to mark the drilling locations. Ensure the plate is level.
- Drill pilot holes at the marked locations. The size of the drill bit will depend on your wall type and the provided lag screws/anchors.
- Secure the wall plate to the wall using the provided lag screws. For concrete or brick, insert wall anchors before screwing.
4.2 Attaching Monitor Arms

Image: The dual monitor wall mount with its two articulated arms ready for monitor attachment.
- Slide the monitor arms onto the horizontal bar of the wall plate.
- Ensure the arms are securely seated and can move freely along the bar.
4.3 Mounting Monitors

Image: Universal compatibility details, showing VESA patterns and weight capacity.
- Attach the VESA monitor plates to the back of your monitors using the appropriate screws from the hardware kit. Ensure a secure fit.
- Carefully lift each monitor and slide its VESA plate onto the corresponding arm's mounting head.
- Secure the monitor to the arm by tightening the thumb screw or bolt on the top of the VESA plate.
5. 운영 및 조정
5.1 Dynamic Height Adjustment

Image: The monitor arm allows for dynamic height adjustment up to 11.02 inches and extends up to 20.5 inches from the wall.
The gas spring arms allow for smooth and effortless height adjustment up to 11.02 inches. Adjust the tension of the gas spring using the provided Allen wrench if the monitor does not hold its position or is too stiff to move. Turn clockwise to increase tension for heavier monitors, counter-clockwise for lighter monitors.
5.2 유연한 각도 조절
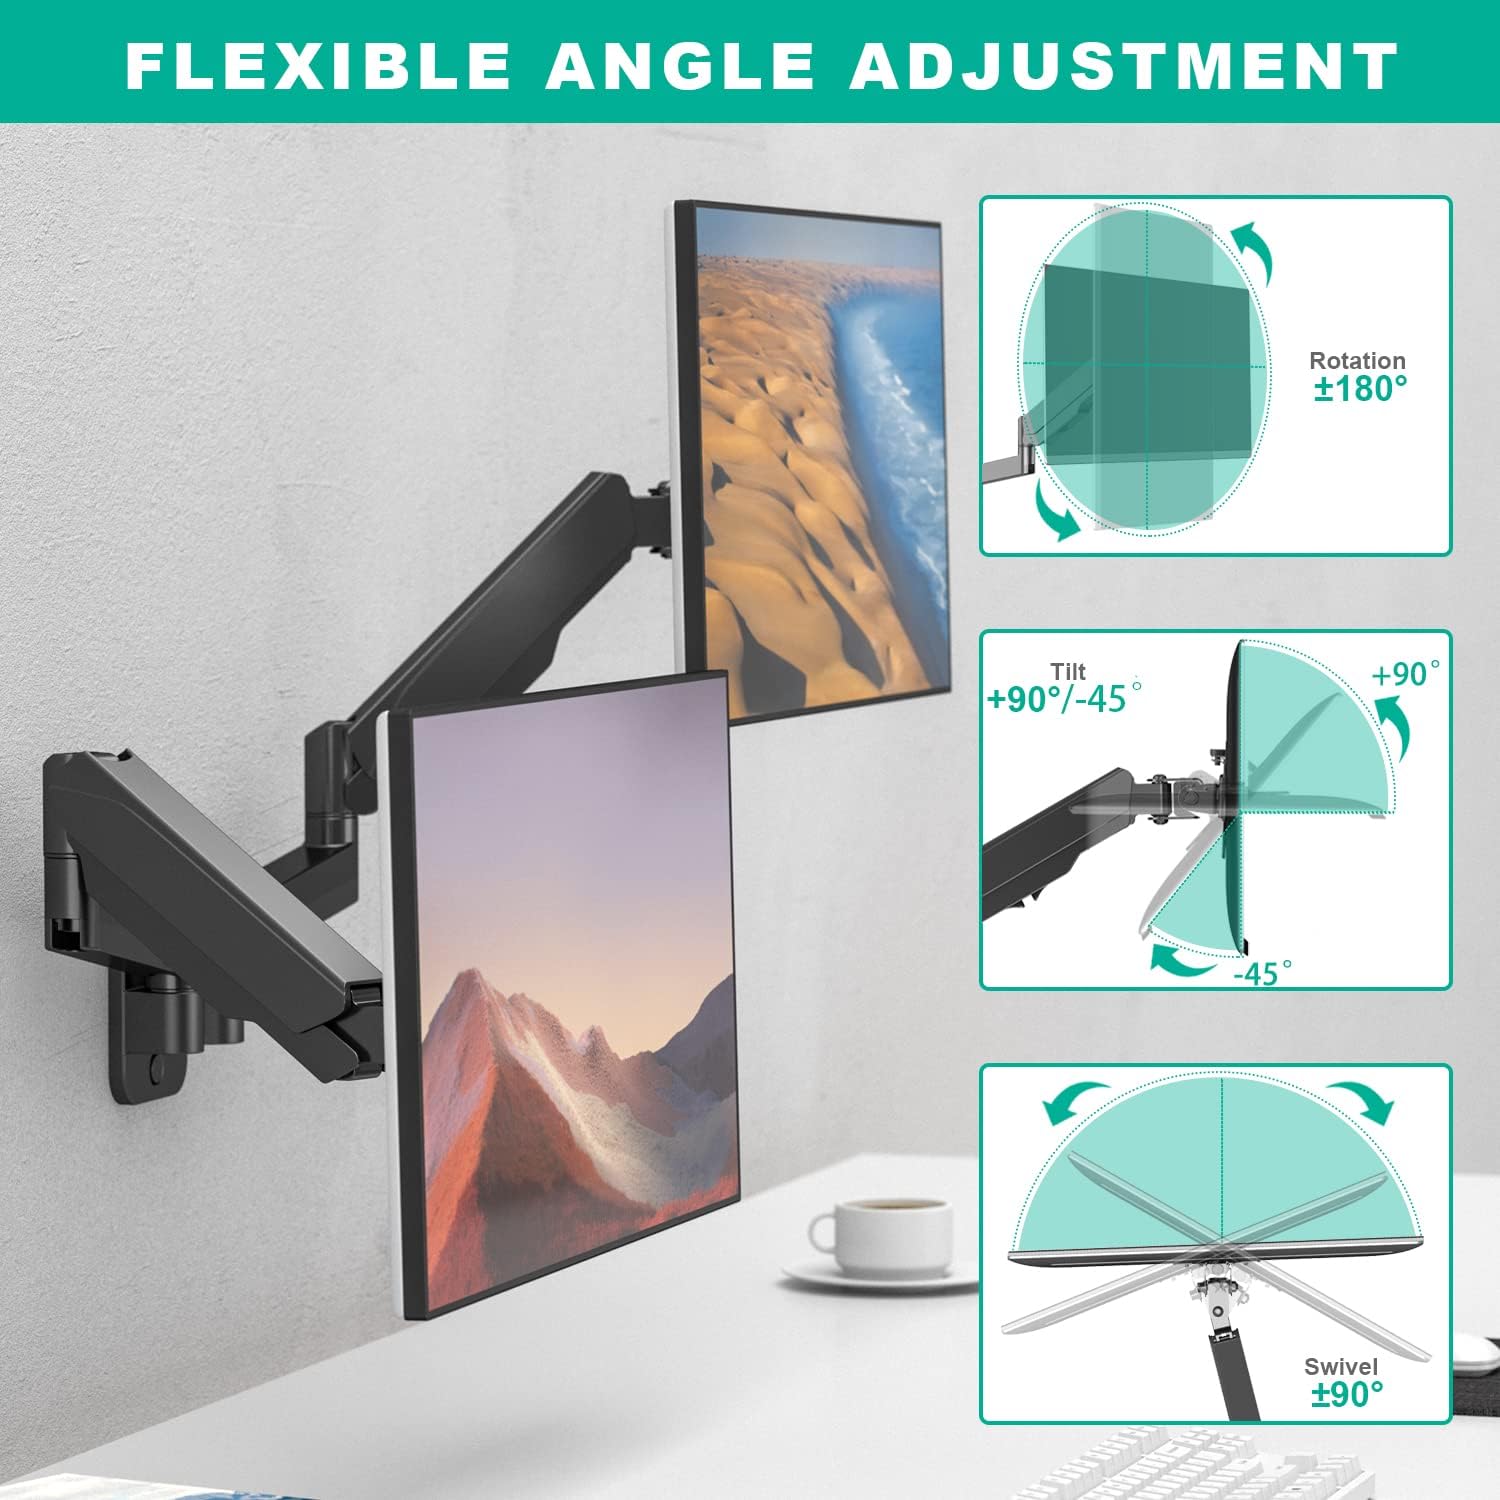
Image: The monitor mount offers flexible adjustments including ±180° rotation, +90°/-45° tilt, and ±90° swivel.
Achieve optimal viewing angles with the following adjustments:
- 경사: Adjust vertical tilt from +35° to -35° to reduce glare and optimize view주고받음.
- 받침: Rotate horizontally up to ±90° for collaborative work or view다양한 각도에서 중.
- 회전: Rotate the monitor ±180° to switch between landscape and portrait orientations.
5.3 Minimum Distance between Monitors and Wall

Image: A table detailing the minimum distance required between the screen and the wall for different monitor sizes, ranging from 17" to 32".
The mount allows for varying distances from the wall depending on monitor size and desired configuration. Refer to the provided diagram for specific minimum distances.
6. 케이블 관리

Image: The monitor arm features built-in cable management channels to keep wires organized and out of sight.
The UPGRAVITY monitor arm includes built-in cable control channels. Route your monitor cables through these channels to maintain a clean and organized workspace, preventing tangles and reducing clutter.
7. 유지관리
To ensure the longevity and optimal performance of your monitor mount:
- 모든 나사와 볼트가 단단하고 안전하게 고정되어 있는지 정기적으로 점검하세요.
- 부드럽고 마른 천으로 마운트를 닦으십시오. 연마성 세척제나 용제를 사용하지 마십시오.
- Periodically re-adjust gas spring tension if monitor weight changes or if the arm's movement feels too loose or too stiff.
8. 문제 해결
If you encounter any issues with your UPGRAVITY Dual Monitor Wall Mount, refer to the following common solutions:
- Monitor not holding position: The gas spring tension may be too low for your monitor's weight. Increase the tension using the provided Allen wrench (turn clockwise).
- Arm too stiff to move: The gas spring tension may be too high. Decrease the tension using the provided Allen wrench (turn counter-clockwise).
- Monitors not level: Check that the wall plate is installed level. Minor adjustments can often be made at the VESA plate connection point.
- 흔들림: Ensure all mounting screws and VESA plate screws are securely tightened. Verify the wall structure is adequate.
9. 사양
| 상표 | 업그레이드 |
| 모델 | 듀얼 모니터 월 마운트 |
| 화면 크기 호환성 | 17-32 인치 |
| 중량 용량 | Up to 17.6 lbs per arm |
| VESA 호환성 | 75x75mm, 100x100mm |
| 장착 유형 | 벽걸이형 |
| 이동 유형 | Tilt, Swivel, Rotation, Height Adjustment |
| 재료 | 알류미늄 |
| 색상 | 검은색 |
10. 보증 및 지원
The UPGRAVITY Dual Monitor Wall Mount is backed by a 5년 보증. For any issues, questions, or support needs, please contact UPGRAVITY customer service. We are committed to providing excellent after-sales service and support.
Ask a question about this manual
Ask about setup, troubleshooting, compatibility, parts, safety, or missing instructions. Manuals+ will review the question and use this page’s manual context to help answer it.